Depaepe Telecom Horizon User manual

Category
Telephones
Type
User manual

This manual is also suitable for

Introduction
There are 4 different models of HD2 Urgence
telephones:
-HD2000 Urgence 1: with direct dialling of 1
programmed number when lifting the handset.
- HD2000 Urgence 2: direct dialling of 2 programmed
numbers when depressing key M1 or M2.
-HD2000 Urgence 3: direct dialling of 3 programmed
numbers when depressing key M1, M2 or M3.
-HD2000 Urgence à clavier with automatic dialling of
1 pre-programmed number when lifting the handset.
The keypap allows PIN code access to automated
attendants or services.
EEPROM memory back-up avoids unfortunate erasure
of memories even when the phone is disconnected from
the line. No AC or battery required.
Programming memories requests to use the small
keypad keys. (see drawing page 7).
Designed for wall mount and desk use (Optional), the
HD 2000 Urgence telephone can be connected to CO
line or behind PBXs.
18
Small keyboard location
Dialling mode
Dialling mode can be selected. See “SETTINGS
PROGRAMMING” section, page 22
NOTE: When dialling in the pulse mode, depressing
key # or * automatically switches to tone dialling,
giving access from a pulse PABX to tone systems. When
returning to on-hook, the telephone automatically turns
back to pulse mode.
Memory programming/erasing
There are 2 different memory programming modes:
- Mode 1 is intended for the HD2000 Urgence1
and Urgence à clavier model with automatic dialling of
a programmed number when picking up the handset.
- Mode 2 is intended for the HD2 Urgence 2 or
3. Programmed numbers are dialled out when
depressing memory keys).
19
1
2
3
6
5
4
9
8
7
#
0
*
Bis
R
Pgr
Res
Mx
P
Programming
Keypad
Mode 1- HD2000 Urgence 1 programming and
Urgence à clavier (Automatic off-hook dialling):
1) Make sure HD2000 Urgence is connected to the line.
2) Lift the handset.
3) Depress "PGR" key located on the small keypad
(Located at the back of the unit).
A "beep" sound should be heard through the receiver.
4) Depress "P" (Pause) key located on the small
keypad.
A "beep" sound should be heard through the receiver.
5) Dial the telephone number to store including *, # or
"Pause" if needed (22 digits maxi).
6) Press “MX” key.
A double "beep" sound confirms the right storage.
7) Replace the handset on hook.
NOTE: In case of wrong operation, a long "beep"
sound is emitted. Replace the handset on hook and start
again from the beginning.
NOTE: To erase a number stored in memory, proceed
from 1 to 4, skip section 5 (Do not enter any digit) and
terminate as in 6 and 7.
NOTE: HD2000 Urgence 1 and Urgence à clavier
factory settings come with “Urgence“ mode. In case of
wrong operation, see « LIST OF SETTINGS » pages
24-25 and check that “Urgence” mode is selected.
Setting access code : 04
Setting choice Urgency:1
20
Mode 2 HD2000 Urgence 2 or 3
1) Make sure HD2000 Urgence is connected to the line.
2) Lift the handset.
3) Depress "PGR" key located on the small keypad.
A "beep" sound should be heard through the receiver.
4) Dial the telephone number to store including *, # or
"Pause" if needed (22 digits maxi).
5) Press the memory location“M1, M2, M3”.
A double "beep" sound confirms the right storage.
6) Replace the handset on hook.
Repeat operation 3 to 5 for the other memories.
NOTE: In case of wrong operation, a long "beep"
sound is emitted. Replace the handset on hook and start
again from the beginning.
NOTE: To erase a number stored in memory, proceed
from 1 to 3, skip section 4 (Do not enter any digit)
press the memory to erase as in 5 and terminate as in 6
and 7.
NOTE: HD2000 Urgence2 and 3 factory settings come
with “Normal“ mode. In case of wrong operation, see
« LIST OF SETTINGS » pages 24-25 and check that
Normal” mode is selected.
Setting access code : 04
Setting choice Normal:0
21
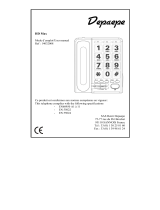
Settings programming
Note: HD2000 Urgence standard factory settings come
with:
- Programming access code = 0000
- Dialling = Tone
- Hook-Flash duration = 270 ms
- Pulse mark-break ratio = 66/33
- Access to memory programming =
unlocked
- Call barring = unlocked
To change settings, proceed as follows:
1) Make sure the telephone is connected to a powered
C.O. or PABX line.
2) Depress « PGR » key located on the small keypad
(Located at the back of the unit).
3) While keeping « PGR » key depressed, pick-up the
handset.
4) Release « PGR » key.
5) 2 sharp « beep » tones will confirm entering the
settings programming mode.
6) Enter the 4 digits programming access code with the
keypad (factory pre set code is: 0000)
This code can be modified (see « LIST OF
SETTINGS » section, pages 24-25).
7) If the right code is entered, 2 short « beep » tones
will be heard and the access to settings, changes will be
authorized.
If a wrong code is entered, a low « beep » tone will be
heard and the unit will return to talk mode.
8) Enter the 2 digits selected setting access code (see
« LIST OF SETTINGS » section pages 24-25)
9) 2 sharp « beep » tones confirming the selection will
be heard.
10) Enter your custom setting choice or the code or
number to store.
11) Terminate your setting by depressing « PGR » key.
22
12) 2 sharp « beep » tones will confirm the storage of
your new setting.
13) For other settings, proceed with operations 2 up to
11.
Total Reset
General reset operation erases memories, access code
and will return all settings to factory settings (see
« SETTINGS PROGRAMMING » section page 22).
1) Make sure the telephone is connected to a powered
C.O. or PABX line.
2) Depress « RESET » key (On the small keypad
located at the back of the unit).
3) While keeping « RESET » key depressed, pick-up the
handset.
4) 2 sharp « beep » tones will be heard.
5) Release « RESET » key.
6) Enter general reset code on the keypad: « 1-5-9 ».
7) If the right code is entered, 2 sharp « beep » tones
will be heard (Don’t hang up the handset).
8) Wait several seconds until 3 « beep » tones can be
heard, confirming the general reset operation.
9) Hang up the handset.
Partial reset
Partial reset operation will return almost all settings to
factory settings, but the 4 digits programming access
code as well as all numbers stored into memories will
be saved (see « LIST OF SETTINGS » section pages
24-25).
23
24
Factory settings are in GREY
Setting
Setting
access code
Access
confirmation
Setting choices
Press to
valid
Valid
confirmation
Dialling mode
00
2 «beep»
Pulse : 0 DTMF : 1
Pgr
2 «beep»
Pulse M/B ratio
01
2 «beep»
66/33 ms : 0 60/40 ms : 1
Pgr
2 «beep»
Hook-flash
02
2 «beep»
110 ms : 0 270 ms : 1 600ms : 2
Pgr
2 «beep»
Memories program
barring
03
2 «beep»
No : 0
Yes : 1
Pgr
2 «beep»
« Urgency » mode
04
2 «beep»
Regular : 0 Urgency : 1
Pgr
2 «beep»
Conversation timer
10
2 «beep»
1 up to 9 min, 0 no timer.
Pgr
2 «beep»
Call barring
20
2 «beep»
No : 0
Yes : 1
Pgr
2 «beep»
Barring of 1st digit
dialled
21
2 «beep»
Enter the digit to bar
# No digit barred
Pgr
2 «beep»
Barring another 1st
digit dialled
22
2 «beep»
Enter the digit to bar
# No digit barred
Pgr
2 «beep»
Barring 2 first
digits dialled
23
2 «beep»
Enter the 2 digits to bar
# No digits barred
Pgr
2 «beep»
25
Barring a second set of
2 first digits dialled
24
2 «beep»
Enter the 2 digits to bar
# No digits barred
Pgr
2 «beep»
Barring a third set of 2
first digits dialled
25
2 «beep»
Enter the 2 digits to bar
# No digits barred
Pgr
2 «beep»
Barring a fourth set of 2
first digits dialled
26
2 «beep»
Enter the 2 digits to bar
# No digits barred
Pgr
2 «beep»
Limitation of the
number of digits dialled
30
2 «beep»
01 up to 29 (Enter 01 up to 29), « ## »
no limitation « 00 » no dialling
« 99 » dialling possible after memory
Pgr
2 «beep»
Changing the
programming access
code
40
2 «beep»
Enter the new digits twice « 0 0 0 0 »
Pgr
2 «beep»
Reset to factory settings
(Memories and access
code don’t change)
50
2 «beep»
Enter the programming access code (4
digits)
Pgr
2 «beep»
Ringer
Ringer volume can be adjusted with the sliding switch
located on the right side of the telephone.
NOTE: Calls are indicated by the blinking LEDs.
Handset on hold position (Wall-mount position)
See page 4 and 5. This feature can be used to secure
the handset while waiting for someone to “come to the
phone” without going back to on-hook condition.
Wall mount installation
The HD2000 Urgence comes with a line cord and a
small plastic bag containing 1 thin screw and a foam
plug to be used for preventing theft or unauthorized
removal and 2 bigger screws for wall mount fixing.
1-Drill 2 holes as shown on the wall mounting layout.
Install the 2 bigger screws in those holes on the wall.
2- If the telephone must be secured against thefts or
unauthorized removal, drill a third hole as shown on
the wall mounting layout.
3- Align the 2 slots at the back of the HD 2000 in front
of the 2 screws and pull down.
4- If needed, install the third screw through the hole
located above the telephone (See pages 28 and 29) and
hide it with the foam plug.
26
Boucle sèche (Option)
Off-hook detection (Optional)
Boucle sèche (Option)
Off-hook detection (Optional)
Ligne/Line
Ligne/Line
Desk mount installation (Optional) see page 28
Use the optional desk-mount kit including one securing
screw, a loaded desk mount base, 2 desk-mount black
latches and the 4 non slip pads.
1- Take off the 2 screws located on the base of the unit.
2- Pull of the 2 wall-mount black latches and replace
them by 2 smaller desk-mount black latches.
3- Replace the 2 fixing screws.
4- Connect the handset cord.
5- Insert the desk-mount base.
6- Fix the base inserting the securing screw through the
top side of the telephone.
7-Connect the line cord to the line cord connector in
the bottom of the telephone (See page 26).
8-Place the non slip pads.
27
29
74mm
Percer 3 trous
Drill 3 holes
Antivol
Theftproof
32 mm
100 mm
75 mm
  • Page 1 1
  • Page 2 2
  • Page 3 3
  • Page 4 4
  • Page 5 5
  • Page 6 6
  • Page 7 7
  • Page 8 8
  • Page 9 9
  • Page 10 10
  • Page 11 11
  • Page 12 12
  • Page 13 13
  • Page 14 14
  • Page 15 15
  • Page 16 16
  • Page 17 17
  • Page 18 18
  • Page 19 19
  • Page 20 20
  • Page 21 21
  • Page 22 22
  • Page 23 23
  • Page 24 24
  • Page 25 25
  • Page 26 26
  • Page 27 27
  • Page 28 28
  • Page 29 29
  • Page 30 30

Depaepe Telecom Horizon User manual

Category
Telephones
Type
User manual
This manual is also suitable for

Ask a question and I''ll find the answer in the document

Finding information in a document is now easier with AI

in other languages