
1
Your air compressor has been engineered and manufactured to our high standard for dependability, ease of operation, and
operator safety. When properly cared for, it will give you years of rugged, trouble-free performance.
WARNING:
To reduce the risk of injury, the user must read and understand the operator’s manual before using this product.
Thank you for buying a RIDGID® product.
SAVE THIS MANUAL FOR FUTURE REFERENCE
OPERATOR’S MANUAL
2.5 GALLON PORTABLE
AIR COMPRESSOR
OF25135CW

2
Introduction.......................................................................................................................................................................2
General Safety Rules .....................................................................................................................................................3-4
Specific Safety Rules .....................................................................................................................................................4-5
Symbols .........................................................................................................................................................................6-7
Electrical ........................................................................................................................................................................... 8
Glossary of Terms ............................................................................................................................................................. 9
Features .....................................................................................................................................................................10-11
Assembly ........................................................................................................................................................................ 12
Operation ...................................................................................................................................................................13-18
Maintenance ................................................................................................................................................................... 19
Troubleshooting .............................................................................................................................................................. 20
Warranty .........................................................................................................................................................................21
Customer Service Information ...........................................................................................................................Back Page
TABLE OF CONTENTS
INTRODUCTION
This product has many features for making its use more pleasant and enjoyable. Safety, performance, and dependability
have been given top priority in the design of this product making it easy to maintain and operate.
DANGER:
This compressor/pump is not equipped and should not be used to supply breathing quality air. Additional equip-
ment would be necessary to properly filter and purify the air to meet minimal specifications for Grade D breathing
as described in Compressed Gas Association Commodity Specification G 7.1 - 1966, OSHA 29 CFR 1910.134.
Compressed Gas Association, 4221 Walney Road, Fifth Floor, Chantilly, VA 20151-2923, (703) 788-2700,
www.cganet.com. Any such additional equipment has not been examined and no implication of proper use for
breathing air is intended or implied.
If this compressor is altered in any way, existing warranties shall be voided. RIDGID® and One World Technologies,
Inc. disclaim any liabilities whatsoever for any loss, personal injury, or damage.
DISCLAIMER OF WARRANTIES
In the event the compressor is used for the purpose of breathing air application and proper in-line safety and alarm
equipment is not simultaneously used, existing warranties shall be voided, and RIDGID® disclaims any liabilities
whatsoever for any loss, personal injury, or damage.

3
GENERAL SAFETY RULES
WARNING:
Read and understand all instructions. Failure
to follow all instructions listed below may result
in electric shock, fire, and/or serious personal
injury.
SAVE THESE INSTRUCTIONS
WORK AREA
Keep your work area clean and well lit. Cluttered
benches and dark areas invite accidents. Floor must not
be slippery from wax or dust.
Do not operate power tools in explosive atmospheres,
such as in the presence of flammable liquids, gases,
or dust. Power tools create sparks which may ignite the
dust or fumes.
Keep bystanders, children, and visitors away while oper-
ating tools. Distractions can cause you to lose control.
Operate air compressor in an open area at least 18 in.
away from any wall or object that could restrict the
flow of fresh air to ventilation openings.
ELECTRICAL SAFETY
Avoid body contact with grounded surfaces such as
pipes, radiators, ranges, and refrigerators. There is an
increased risk of electric shock if your body is grounded.
Don’t expose power tools to rain or wet conditions.
Water entering a power tool will increase the risk of elec-
tric shock.
Do not abuse the cord. Never use the cord to carry the
tool or pull the plug from an outlet. Keep cord away
from heat, oil, sharp edges, or moving parts. Replace
damaged cords immediately. Damaged cords increase
the risk of electric shock.
When operating a power tool outside, use an outdoor
extension cord marked “W-A” or “W”. These cords are
rated for outdoor use and reduce the risk of electric shock.
PERSONAL SAFETY
Eye protection which conforms to ANSI specifications
and provides protection against flying particles both
from the FRONT and SIDE should ALWAYS be worn
by the operator and others in the work area when
loading, operating, or servicing this tool. Eye protection
is required to guard against flying fasteners and debris,
which could cause severe eye injury.
The employer and/or user must ensure that proper
eye protection is worn. We recommend a Wide Vision
Safety Mask for use over eyeglasses or standard safety
glasses that provide protection against flying particles
both from the front and side. Always use eye protection
which is marked to comply with ANSI Z87.1.
Additional safety protection will be required in some
environments. For example, the working area may
include exposure to a noise level which can lead to hear-
ing damage. The employer and user must ensure that any
necessary hearing protection is provided and used by the
operator and others in the work area. Some environments
will require the use of head protection equipment. When
required, the employer and user must ensure that head
protection marked to comply with ANSI Z89.1 is used.
Stay alert, watch what you are doing, and use common
sense when operating a power tool. Do not use tool
while tired or under the influence of drugs, alcohol,
or medication. A moment of inattention while operating
power tools may result in serious personal injury.
Dress properly. Do not wear loose clothing or jewelry.
Contain long hair. Keep your hair, clothing, and gloves
away from moving parts. Loose clothes, jewelry, or long
hair can be caught in moving parts.
Do not overreach. Keep proper footing and balance
at all times. Proper footing and balance enables better
control of the tool in unexpected situations.
Use safety equipment. Always wear eye protection.
Dust mask, nonskid safety shoes, hard hat, or hearing
protection must be used for appropriate conditions.
Do not use on a ladder or unstable support. Stable
footing on a solid surface enables better control of the
tool in unexpected situations.
TOOL USE AND CARE
Do not exceed the pressure rating of any component
in the system.
Protect material lines and air lines from damage or
puncture. Keep hose and power cord away from sharp
objects, chemical spills, oil, solvents, and wet floors.
Check hoses for weak or worn condition before each
use, making certain all connections are secure. Do not
use if defect is found. Purchase a new hose or notify an
authorized service center for examination or repair.
Release all pressures within the system slowly. Dust
and debris may be harmful.
Store idle tools out of the reach of children and other
untrained persons. Tools are dangerous in the hands of
untrained users.
Maintain tools with care. Follow maintenance instruc-
tions. Properly maintained tools are easier to control.
Check for misalignment or binding of moving parts,
breakage of parts, and any other condition that may
affect the tool’s operation. If damaged, have the tool
serviced before using. Many accidents are caused by
poorly maintained tools.
Never point any tool toward yourself or others.
Keep the exterior of the air compressor dry, clean, and
free from oil and grease. Always use a clean cloth when
cleaning. Never use brake fluids, gasoline, petroleum-
based products, or any strong solvents to clean the unit.
Following this rule will reduce the risk of deterioration of
the enclosure plastic.

4
GENERAL SAFETY RULES
SERVICE
Tool service must be performed only by qualified
repair personnel. Service or maintenance performed by
unqualified personnel may result in a risk of injury.
Disconnect power supply, open drain valve to decom-
press tank and allow water to drain, and allow air
compressor to become cool to the touch before
servicing. Turn pressure regulator knob fully clockwise
after shutting off compressor.
When servicing a tool, use only identical replacement
parts. Follow instructions in the Maintenance section
of this manual. Use of unauthorized parts or failure to
follow Maintenance instructions may create a risk of
injury.
SPECIFIC SAFETY RULES
Know your air compressor. Read operator’s manual
carefully. Learn its applications and limitations, as well
as the specific potential hazards related to this tool.
Following this rule will reduce the risk of electric shock,
fire, or serious injury.
Drain tank of moisture after each day’s use.
If unit will not be used for a while, it is best to leave drain
valve open until such time as it is to be used. This will
allow moisture to completely drain out and help prevent
corrosion on the inside of tank.
Risk of Fire or Explosion. Do not spray flammable liquid
in a confined area. Spray area must be well ventilated. Do
not smoke while spraying or spray where spark or flame
is present. Keep compressors as far from the spraying
area as possible, at least 15 feet from the spraying area
and all explosive vapors.
Risk of Bursting.
Do not adjust regulator to result in
output pressure greater than marked maximum pressure
of attachment and/or the item being inflated. Never use
at pressure greater than 135 psi.
Use an air pressure gauge periodically while inflating
an item to check the air pressure.
If connected to a circuit protected by fuses, use time-
delay fuses with this product.
To reduce the risk of electric shock, do not expose to
rain. Store indoors.
Inspect tank yearly for rust, pin holes, or other
imperfections that could cause it to become unsafe.
Never weld or drill holes in the air tank.
Make sure the hose is free of obstructions or snags.
Entangled or snarled hoses can cause loss of balance or
footing and may become damaged.
Use the air compressor only for its intended use. Do
not alter or modify the unit from the original design
or function.
Always be aware that misuse and improper handling
of this tool can cause injury to yourself and others.
Never leave a tool unattended with the air hose
attached.
Do not operate this tool if it does not contain a legible
warning label.
Do not continue to use a tool or hose that leaks air or
does not function properly.
Always disconnect the air supply and power supply
before making adjustments, servicing a tool, or when a
tool is not in use.
Do not attempt to pull or carry the air compressor by
the hose.
Your tool may require more air consumption than this
air compressor is capable of providing.
Always follow all safety rules recommended by the
manufacturer of your air tool, in addition to all safety
rules for the air compressor. Following this rule will
reduce the risk of serious personal injury.
Never direct a jet of compressed air toward people or
animals. Take care not to blow dust and dirt towards
yourself or others. Following this rule will reduce the risk
of serious injury.

5
SPECIFIC SAFETY RULES
Do not use this air compressor to spray chemicals.
Your lungs can be damaged by inhaling toxic fumes. A
respirator may be necessary in dusty environments or
when spraying paint. Do not carry while painting.
Inspect tool cords and hoses periodically and, if damaged,
have repaired at your nearest Authorized Service Center.
Constantly stay aware of cord location. Following this rule
will reduce the risk of electric shock or fire.
Never use an electrical adaptor with this grounded
plug.
Check damaged parts. Before further use of the air
compressor or air tool, a guard or other part that is
damaged should be carefully checked to determine
that it will operate properly and perform its intended
function. Check for alignment of moving parts, binding
of moving parts, breakage of parts, mounting, and
any other conditions that may affect its operation. A
guard or other part that is damaged should be properly
repaired or replaced by an authorized service center.
Following this rule will reduce the risk of shock, fire, or
serious injury.
Make sure your extension cord is in good condition.
When using an extension cord, be sure to use one
heavy enough to carry the current your product will
draw. A wire gauge size (A.W.G.) of at least 14 is
recommended for an extension cord 25 feet or less in
length. A cord exceeding 50 feet is not recommended.
If in doubt, use the next heavier gauge. The smaller
the gauge number, the heavier the cord. An undersized
cord will cause a drop in line voltage resulting in loss of
power and overheating.
This equipment incorporates parts, such as snap
switches, receptacles, and the like that tend to pro-
duce arcs or sparks and, therefore, when located in a
garage, it should be in a room or enclosure provided for
the purpose, or should be 18 in. (457 mm) or more above
the floor.
Never store tool with air connected. Storing the tool
with air connected can result in unexpected firing and
possible serious personal injury.
Protect your lungs. Wear a face or dust mask if the
operation is dusty. Following this rule will reduce the risk
of serious personal injury.
Never sit or stand on the toolbox. Following this rule
will reduce the risk of serious personal injury.
Only use hose reel handle to operate pneumatic hose.
Following this rule will reduce the risk of serious personal
injury.
Do not operate air hoses above the rated psi. Following
this rule will reduce the risk of serious personal injury.
If the power supply cord is damaged, it must be replaced
only by the manufacturer or by an authorized service
center to avoid risk.
Save these instructions. Refer to them frequently and use
them to instruct others who may use this tool. If you loan
someone this tool, loan them these instructions also.

6
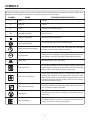
SYMBOLS
Some of the following symbols may be used on this product. Please study them and learn their meaning. Proper inter-
pretation of these symbols will allow you to operate the product better and safer.
Read The Operator’s Manual
Risk of Bursting
Risk of Fire or Explosion
SYMBOL NAME DESIGNATION/EXPLANATION
Voltage
Current
Frequency (cycles per second)
Type of current
Double-insulated construction
Do not expose to rain or use in damp locations.
To reduce the risk of injury, user must read and understand
operator’s manual before using this product.
Eye Protection
Always wear safety goggles or safety glasses with side shields and,
as necessary, a full face shield when operating this product.
Precautions that involve your safety.
Do not spray flammable liquid in a confined area. Spray area
must be well ventilated. Do not smoke while spraying or spray
where spark or flame is present. Keep compressors as far from
the spraying area as possible, at least 15 feet from the spraying
area and all explosive vapors.
Wet Conditions Alert
Class II Construction
Hz Hertz
A Amperes
V Volts
Hot Surface
To reduce the risk of injury or damage, avoid contact with any
hot surface.
Risk to Breathing
Air obtained directly from the air compressor should never be
used to supply air for human consumption.
Alternating Current
Safety Alert
Do not adjust regulator to result in output pressure greater than
marked maximum pressure of attachment and/or the item being
inflated. Never use at pressure greater than 135 psi.
Risk of Electrical Shock
Hazardous Voltage: Disconnect from power source before servic-
ing. Compressor must be grounded.

7
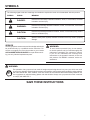
SYMBOLS
SERVICE
Servicing requires extreme care and knowledge and should
be performed only by a qualified service technician. For
service we suggest you return the product to your nearest
AUTHORIZED SERVICE CENTER for repair. When servic-
ing, use only identical replacement parts.
WARNING:
To avoid serious personal injury, do not attempt
to use this product until you read thoroughly and
understand completely the operator’s manual.
If you do not understand the warnings and
instructions in the operator’s manual, do not use
this product. Call RIDGID® customer service for
assistance.
The operation of any power tool can result in foreign objects being thrown into your eyes, which can result
in severe eye damage. Before beginning power tool operation, always wear safety goggles or safety glasses
with side shields and, when needed, a full face shield. We recommend Wide Vision Safety Mask for use
over eyeglasses or standard safety glasses with side shields. Always use eye protection which is marked
to comply with ANSI Z87.1.
WARNING:
SAVE THESE INSTRUCTIONS
The following signal words and meanings are intended to explain the levels of risk associated with this product.
SYMBOL SIGNAL MEANING
DANGER:
Indicates an imminently hazardous situation, which, if not avoided, will result
in death or serious injury.
WARNING:
Indicates a potentially hazardous situation, which, if not avoided, could result
in death or serious injury.
CAUTION:
Indicates a potentially hazardous situation, which, if not avoided, may result in
minor or moderate injury.
CAUTION:
(Without Safety Alert Symbol) Indicates a situation that may result in property
damage.

8
EXTENSION CORDS
Use only 3-wire extension cords that have 3-prong ground-
ing plugs and 3-pole receptacles that accept the product’s
plug. When using a power tool at a considerable distance
from the power source, use an extension cord heavy enough
to carry the current that the tool will draw. An undersized
extension cord will cause a drop in line voltage, resulting in
a loss of power and causing the motor to overheat. Use the
chart provided below to determine the minimum wire size
required in an extension cord. Only round jacketed cords
listed by Underwriter’s Laboratories (UL) should be used.
**Ampere rating (on product data plate)
0-2.0 2.1-3.4 3.5-5.0 5.1-7.0 7.1-12.0 12.1-16.0
Cord Length Wire Size (A.W.G.)
25' 16 16 16 16 14 14
50' 16 16 16 14 14 12
100' 16 16 14 12 10 —
**Used on 12 gauge - 20 amp circuit.
NOTE: AWG = American Wire Gauge
When working with the product outdoors, use an extension
cord that is designed for outside use. This is indicated by the
letters “W-A” or “W” on the cord’s jacket.
Before using an extension cord, inspect it for loose or
exposed wires and cut or worn insulation.
WARNING:
Keep the extension cord clear of the working area.
Position the cord so that it will not get caught on
lumber, tools, or other obstructions while you are
working with a power tool. Failure to do so can
result in serious personal injury.
WARNING:
Check extension cords before each use. If
damaged replace immediately. Never use the
product with a damaged cord since touching
the damaged area could cause electrical shock
resulting in serious injury.
ELECTRICAL CONNECTION
This product is powered by a precision-built electric motor.
It should be connected to a power supply that is 120 V, AC
only, (normal household current) 60 Hz. Do not operate
this product on direct current (DC). A substantial voltage
drop will cause a loss of power and the motor will overheat.
If the product does not operate when plugged into an outlet,
double check the power supply.
GROUNDING INSTRUCTIONS
This product must be grounded. In the event of a malfunction
or breakdown, grounding provides a path of least resistance
for electric current to reduce the risk of electric shock.
This product is equipped with an electric cord having an
equipment-grounding conductor and a grounding plug. The
plug must be plugged into a matching outlet that is properly
installed and grounded in accordance with all local codes
and ordinances.
Do not modify the plug provided. If it will not fit the outlet,
have the proper outlet installed by a qualified electrician.
WARNING:
Improper installation of the grounding plug is liable
to result in a risk of electric shock. When repair or
replacement of the cord is required, do not connect
the grounding wire to either flat blade terminal.
The wire with insulation having an outer surface
that is green with or without yellow stripes is the
grounding wire.
Check with a qualified electrician or service personnel if
the grounding instructions are not completely understood,
or if in doubt as to whether the product is properly
grounded.
Repair or replace a damaged or worn cord immediately.
This product is for use on a nominal 120 V circuit and has
a grounding plug similar to the plug illustrated in figure 1.
Only connect the product to an outlet having the same
configuration as the plug. Do not use an adapter with this
product.
Fig. 1
ELECTRICAL
GROUNDING
PIN
120 V GROUNDED OUTLET

9
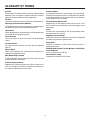
GLOSSARY OF TERMS
Pressure Switch
Automatically controls the on/off cycling of the compressor.
It stops the compressor when the cut-off pressure in the tank
is reached and starts the compressor when the air pressure
drops below the cut-in pressure.
PSI (Pounds Per Square Inch)
Measurement of the pressure exerted by the force of the
air. The actual psi is measured by a pressure gauge on the
compressor.
Pump
Produces the compressed air with a reciprocating piston
contained within the cylinder.
Regulator Pressure Gauge
Displays the current line pressure. Line pressure is adjusted
by rotating the pressure regulator knob.
Safety Valve
Prevents air pressure in the air tank from rising over a
predetermined limit.
SCFM (Standard Cubic Feet Per Minute) or CFM (Cubic
Feet Per Minute)
A unit of measure of air delivery.
Tank Pressure Gauge
Indicates the pressure in the air tank.
Air Filter
Porous element contained within a metal or plastic housing
attached to the compressor cylinder head which removes
impurities from the intake air of the compressor.
Air Tank
Cylindrical component which contains the compressed air.
Amperage Overload Switch (Manual)
Automatically shuts off the compressor if the amperage of
the electric motor exceeds a predetermined limit.
Check Valve
Device that prevents compressed air from flowing back from
the air tank to the compressor pump.
Cut-In Pressure
The low pressure at which the motor will automatically
restart.
Cut-Off Pressure
The high pressure at which the motor will automatically
shut off.
Electric Motor
Device which provides the rotational force necessary to
operate the compressor pump.
NPT (National Pipe Thread)
A seal thread tape must be used to provide a leak-free seal
on pipe threaded connections.
Pressure Regulator Knob
Regulates the outgoing pressure from the air outlet to the
tool. It is possible to increase or decrease the pressure at
the outlet by adjusting this control knob.

10
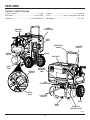
FEATURES
Fig. 2
PRODUCT SPECIFICATIONS
Air Tank Capacity ....................................................2.5 gal.
Air Pressure .................................................... 135 psi max.
Air Delivery ...........................................2.1 SCFM @ 90 psi
AUTO/OFF
SWITCH
PRESSURE
REGULATOR
KNOB
REGULATOR
PRESSURE GAUGE
HANDLE
RELEASE KNOB
SAFETY
VALVE
MOTOR
Gauges ..........................................................2 in. diameter
Input ................................120 V, AC only, 60 Hz, 9.6 Amps
Net Weight .............................................................58.1 lbs.
CORD
WRAP
TANK
PRESSURE GAUGE
1/4 IN.QUICK
COUPLER
DRAIN
VALVE
WHEEL
AUTO/OFF
SWITCH
SAFETY
VALVE
REMOVABLE
TOOL BOX
WHIP HOSE
RETRACTABLE
HANDLE
1/4 IN.QUICK
COUPLER

11
KNOW YOUR AIR COMPRESSOR
See Figure 2.
The safe use of this product requires an understanding of
the information on the product and in this operator’s manual
as well as a knowledge of the project you are attempting.
Before use of this product, familiarize yourself with all
operating features and safety rules.
25 FT. AIR HOSE AND HOSE REEL
The convenient hose reel will hold up to 100 feet of 1/4-in.
polyurethane air hose. A 25-ft. hose is included with your
air compressor.
CORD WRAP
The cord wrap keeps the cord neatly out of the way for
storage.
DRAIN VALVE
The drain valve on the tank is for draining condensation to
help prevent tank corrosion.
HEAVY-DUTY ROLL CAGE
The roll cage frames the air compressor to help protect the
gauges and controls from damage due to impact.
OIL-FREE PUMP
The oil-free pump reduces the need for maintenance.
PRESSURE REGULATOR KNOB
Use the pressure regulator knob to adjust the amount of
air being delivered through the hose. Pressing down on the
knob will lock it into place. This prevents movement of the
knob caused by vibration during use.
RETRACTABLE HANDLE
The air compressor is equipped with a retractable handle
that can be adjusted for storage and transportation.
REMOVABLE TOOL BOX
Your air compressor features a removable tool box for storing
tools and accessories.
REGULATOR PRESSURE GAUGE
The current line pressure is displayed on the regulator
pressure gauge. This pressure can be adjusted by rotating
the pressure regulator knob.
SAFETY VALVE
The safety valve is designed to automatically release air if
the air tank pressure exceeds the preset maximum.
TANK PRESSURE GAUGE
The tank pressure gauge indicates the pressure of the air
in the tank.
QUICK COUPLERS
Your air compressor has two 1/4-in. quick couplers located
on the control panel. There is a third quick coupler on the
hose reel.
FEATURES

12
UNPACKING
This product requires assembly.
Carefully remove the product and any accessories from
the box. Make sure that all items listed in the packing list
are included.
Inspect the product carefully to make sure no breakage
or damage occurred during shipping.
Do not discard the packing material until you have care-
fully inspected and satisfactorily operated the product.
If any parts are damaged or missing, please call
1-800-4-RIDGID for assistance.
PACKING LIST
Air Compressor with Hose Reel, 25 ft. Air Hose and
Removable Tool Box
Wheels (2)
Axles (2)
Hitch Pins (2)
Washers (2)
Operator’s Manual
WARNING:
If any parts are damaged or missing do not operate
this product until the parts are replaced. Failure to
heed this warning could result in serious personal
injury.
WARNING:
Do not attempt to modify this product or create
accessories not recommended for use with this
product. Any such alteration or modification is
misuse and could result in a hazardous condition
leading to possible serious personal injury.
WARNING:
Do not connect to power supply until assembly
is complete. Failure to comply could result in
accidental starting and possible serious personal
injury.
ASSEMBLY
INSTALLING THE WHEELS
See Figure 3.
NOTE: Do not connect the air compressor to a power supply
when installing the wheels. Make sure the pressure in the
tank is at 0 psi.
Remove the tool box and set it aside. See “Removing/
Replacing the Tool Box” in the Operation section of this
manual.
Position the compressor as shown, on the floor or a stable
surface, with the gauges face down.
Insert an axle through one of the tires. Add a washer as
shown. Slide a hitch pin through the hole in the bolt.
Install the second tire. Make sure both tires are securely
installed.
Set the air compressor upright.
Reinstall the tool box.
WHEELS
WASHER
Fig. 3
AXLE
HITCH PIN

13
DANGER:
Do not disassemble check valve, tank drain valves
or safety relief valve with air in tank — bleed
tank.
WARNING:
Do not allow familiarity with products to make you
careless. Remember that a careless fraction of a
second is sufficient to inflict severe injury.
WARNING:
Always wear safety goggles or safety glasses with
side shields when operating products. Failure to do
so could result in objects being thrown into your
eyes resulting in possible serious injury.
WARNING:
This equipment incorporates parts, such as snap
switches, receptacles, and the like that tend to
produce arcs or sparks and, therefore, when
located in a garage, it should be in a room or
enclosure provided for the purpose, or should be
18 in. (457 mm) or more above the floor.
WARNING:
Do not attach any tools to the open end of the hose
until start-up has been completed.
CAUTION:
Do not use in an environment that is dusty or
otherwise contaminated. Using the air compressor
in this type of environment may cause damage to
the unit.
APPLICATIONS
Air compressors are utilized in a variety of air system
applications. Match hoses, connectors, air tools, and
accessories to the capabilities of the air compressor.
You may use this product for the purposes listed below:
Operating some air-powered tools
Operating air accessories such as air nozzles and
inflators
OPERATION
Fig. 4
PULL OUT
KNOBS
ON EACH
SIDE TO
ADJUST
HANDLE
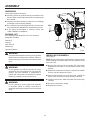
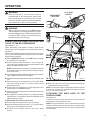
REMOVING/REPLACING THE TOOL BOX
See Figure 4.
The tool box included with the air compressor is removable.
It must be removed before the wheels can be installed.
To remove: Lift the tool box by the handle.
To replace the tool box: Lower the tool box onto the frame
until the bracket slides over the mounting plates and the tool
box sits securely on the frame.
The tool box is opened or closed using the latches on the
front of the tool box. Always make sure the latches are
secure before removing the tool box from the air compressor
frame.
ADJUSTING THE RETRACTABLE HANDLE
See Figure 4.
The retractable handle has two positions. To adjust the
handle up or down:
Pull the knobs outward and rotate them 90°.
Push the handle up or down to adjust to the desired
position.
Rotate the knobs 90° and release when they click into a
locked position.

14
OPERATION
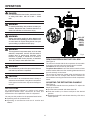
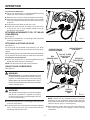
TWO-POSITION HOSE REEL HANDLE
See Figure 5.
The hose reel handle can be positioned at a 90° angle on
either side.
Fold the handle to the inside when storing or transporting the
air compressor, or when the air compressor is in use.
Fold the handle to the outside when unwinding or winding
hose.
WARNING:
Do not lift the unit without help. Hold it close to
your body. Keep your knees bent and lift with your
legs, not your back. Ignoring these precautions can
result in back injury.
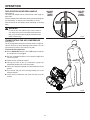
TRANSPORTING THE AIR COMPRESSOR
See Figure 6.
The air compressor should be moved as shown in figure 6.
This will help you to avoid damaging the wheels or the air
compressor by rolling it over items in its path.
To move the air compressor:
Ensure AUTO/OFF switch is in the OFF position and the
air compressor is unplugged.
Pull the retractable handle to its maximum height and
lock it into place.
Fold the hose reel handle inward.
Facing the back of the air compressor, grasp the
retractable handle firmly with both hands.
Tilt the air compressor toward you until it balances on the
wheels.
Turn around and pull the unit along behind you to the
desired location.
Lower the air compressor until it sits securely on a flat
surface.
Fig. 5
HOSE REEL
HANDLE
TURNED
OUTWARD
HOSE REEL
HANDLE
TURNED
INWARD
Fig. 6

15
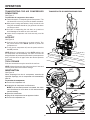
TRANSPORTING THE AIR COMPRESSOR
DOWN STAIRS
See Figure 7.
To wheel the air compressor down stairs:
Follow the steps in “Transporting the Air Compressor”. The
unit should be in front of you with the handle extended.
With proper footing and balance, firmly control the unit
using the retractable handle as you guide the unit down
one step at a time.
Use care in transporting the unit down or up stairs to
avoid damage to the stairs or to the unit itself.
Lower the air compressor until it sits securely on a flat
surface.
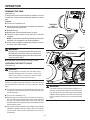
AUTO/OFF
See Figure 8.
Connect the air compressor to a power supply. Turn
the power switch to the AUTO position to power the
compressor on.
To turn the air compressor off, turn the power switch to
the OFF position.
NOTE: When the compressor is in the AUTO position, the
air compressor will automatically turn back on when the
designated tank air pressure drops below the preset pressure
limit. It will also shut off again when the desired pressure
is reached.
TOOL STORAGE
Tools and accessories may be stored in the tool box.
NOTE: Always disconnect the tools from the air hose and
securely close the tool box before storage.
RESET BUTTON
See Figure 8.
When amperage into the air compressor exceeds the
specified amperage, the air compressor will automatically
shut off.
To reset the air compressor:
Turn the air compressor off.
Unplug the air compressor for 30 minutes.
NOTE: If the overload protector is actuated, the motor
must be allowed to cool down for 30 minutes before
manual resetting.
Press the reset button.
Plug the air compressor into an approved outlet.
Turn the air compressor on.
Fig. 8
AUTO/OFF
SWITCH
AUTO
OFF
Fig. 7
OPERATION
TRANSPORTING THE AIR COMPRESSOR DOWN STAIRS
RESET
BUTTON

16
OPERATION
WARNING
Never exceed the air tool’s pressure rating as
recommended by the manufacturer. When using
this air compressor as an inflation device, always
follow the maximum inflation guidelines stated by
the manufacturer of the item being inflated.
WARNING
Always ensure the switch is in the OFF position
and the regulator pressure gauge reads zero (0) psi
before changing air tools or disconnecting the hose
from the air outlet. Failure to do so could result in
possible serious personal injury.
CONNECTING/DISCONNECTING HOSES AND
TOOLS TO THE AIR COMPRESSOR
See Figures 9 - 12.
When connecting a pneumatic air nailer or other air tool
always follow the manufacturer’s recommended start-up
procedure.
When connecting/disconnecting a hose to the air compres-
sor, or when connecting/disconnecting a tool to an air hose,
always do the following:
Ensure AUTO/OFF switch is in the OFF position and the
air compressor is unplugged.
Confirm that the outlet pressure is at zero (0) psi by
fully turning the regulator knob counterclockwise to fully
reduce air pressure at the outlet.
NOTE: Turning the knob clockwise increases air pressure
at the outlet. Turning counterclockwise reduces air pres-
sure at the outlet.
If not already installed, attach the whip hose. See “Attach-
ing the Whip Hose to the Control Panel”.
Unwind the desired length of hose from the attached hose
reel.
Attach the air tool or accessory with a 1/4 in. NPT quick-
connect air fitting to the 1/4 in. quick coupler on the
attached hose reel.
Connect the air compressor to a power supply and turn
power switch to the AUTO position.
Allow unit to reach max pressure as indicated on the tank
pressure gauge.
Set regulator to desired pressure by rotating pressure
regulator knob. The regulator pressure will appear on the
gauge marked as outlet.
To disconnect an air hose or an air tool:
Confirm that the outlet pressure is at zero (0) psi.
When disconnecting a hose from 1/4-in. quick coupler,
always firmly hold release end of hose.
Pull back on the release sleeve on the 1/4-in. quick
coupler.
QUICK-CONNECT
AIR FITTING
1/4 in. QUICK
COUPLER
Fig. 10
Fig. 9
With a firm grip, pull out the quick-connect air fitting that
is attached to the quick coupler.
NOTE: The whip hose that is connected to the hose reel has
a cover over the hose end, located on the inside of the tool
box. Do not remove this cover.
ATTACHING THE WHIP HOSE TO THE
CONTROL PANEL
See Figure 10.
A whip hose stored inside the tool box connects the air
compressor to the attached air hose.
NOTE: The air compressor may be used with the tool box
removed. Position the tool box on the floor or another stable
surface where the whip hose can be easily connected to the
air compressor.
WHIP
HOSE

17
0
2
4
6
40
80
120
160
0
2
4
6
40
80
120
160
Fig. 12
TANK
PRESSURE GAUGE
OPERATION
PRESSURE
REGULATOR
KNOB
PULL OUT TO OPEN;
PUSH TO CLOSE
AND LOCK
REGULATOR
PRESSURE GAUGE
To connect the whip hose:
Follow the instructions in “Connecting/Disconnecting
Hoses and Tools to the Air Compressor.”
Make sure the tool box is securely seated on the frame.
Open the tool box and pull the whip hose to the outside
of the box. Place the hose into the notch on the tool box
as shown.
Close and securely latch the tool box cover.
Attach the quick-connect air fitting on the whip hose
to one of the 1/4 in. quick coupler fittings on the air
compressor control panel.
ATTACHING A PNEUMATIC TOOL TO THE AIR
COMPRESSOR
See Figure 9.
Follow the instructions in “Connecting Hoses and Tools
to the Air Compressor.”
ATTACHING A SECOND AIR HOSE
See Figure 11.
An air hose can be connected to the second 1/4 in. quick
coupler while the whip hose is connected to the first quick
coupler.
When operating the air compressor with two hoses attached,
the air pressure will be the same for each hose connected.
To connect a second air hose:
Follow the instructions in “Connecting/Disconnecting
Hoses and Tools to the Air Compressor.”
NOTE: The first air hose will still contain pressure.
USING THE AIR COMPRESSOR
See Figure 12.
WARNING:
Risk of bursting. Do not adjust regulator to result
in output pressure greater than marked maximum
pressure of attachment and/or the item being
inflated. Never use at pressure greater than 135 psi.
Failure to heed this warning could result in possible
serious personal injury.
WARNING:
Air powered tools may require more air consumption
than this air compressor is capable of providing.
Check the tool manual to avoid damage to the tool
or risk of personal injury.
Follow the instructions in “Connecting Hoses and Tools
to the Air Compressor.”
Control the amount of air flow with the pressure regulator
knob. Turning the knob fully counterclockwise will
completely stop the flow of air.
DECREASE PRESSURE
(COUNTERCLOCKWISE)
INCREASE PRESSURE
(CLOCKWISE)
NOTE: Always use the minimum amount of pressure
necessary for your application. Using a higher pressure
than needed will drain air from the tank more rapidly and
cause the unit to cycle on more frequently.
When finished, always drain the tank and unplug the
unit. Never leave the unit plugged in and/or running
unattended.
Fig. 11
0
2
4
6
40
80
120
160
0
2
4
6
40
80
120
160

18
DRAINING THE TANK
See Figure 13.
To help prevent tank corrosion and keep moisture out of the
air used, the air tank of the compressor should be drained
daily.
To drain:
Turn the air compressor off.
Pull the ring on the safety valve to release until pressure
gauge reads less than 20 psi.
Release the ring.
Rotate drain valves counterclockwise to open.
Tilt tank to drain moisture from tank into a suitable
container.
NOTE: Condensate is a polluting material and should be
disposed of in compliance with local regulations.
If drain valve is clogged, release all air pressure, remove
and clean valve, then reinstall.
WARNING:
Unplug the air compressor and release all air from
the tank before servicing. Failure to depressurize
tank before attempting to remove valve may cause
serious personal injury.
Rotate drain valve clockwise until tightly closed.
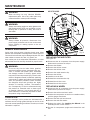
CHECKING THE SAFETY VALVE
See Figure 14.
DANGER:
Do not attempt to tamper with the safety valve.
Anything loosened from this device could fly up
and hit you. Failure to heed this warning could
result in death or serious personal injury.
The safety valve will automatically release air if the air tank
pressure exceeds the preset maximum. The valve should
be checked before each day of use by pulling the ring by
hand.
Turn the air compressor on and allow the tank to fill. The
compressor will shut off when the pressure reaches the
preset maximum.
Turn the air compressor off.
Pull the ring on the safety valve to release air for three to
five seconds to allow pressurized air to escape. Release
the ring. The safety release valve must reset and hold
pressure before all compressed air is exhausted from the
tank/pressure vessel.
Any continued loss of air after performing the above steps
indicates a problem with the safety valve. Discontinue
use and seek service before continued use of the air
compressor.
OPERATION
Fig. 14
RING
TO RELEASE AIR
OFF
ON
Fig. 13
TANK DRAIN
VALVE
(OFF POSITION)
WARNING:
If air leaks after the ring has been released, or if
the valve is stuck and cannot be actuated by the
ring. Do not use the air compressor until the safety
valve has been replaced. Use of the air compressor
in this condition could result in serious personal
injury.

19
MAINTENANCE
WARNING:
When servicing use only identical RIDGID®
replacement parts. Use of any other parts may
create a hazard or cause product damage.
WARNING:
Always wear safety goggles or safety glasses with
side shields during power tool operation or when
blowing dust. If operation is dusty, also wear a
dust mask.
WARNING:
Always release all pressure, disconnect from
power supply, and allow unit to cool to the touch
before cleaning or making repairs on the air
compressor.
GENERAL MAINTENANCE
Avoid using solvents when cleaning plastic parts. Most
plastics are susceptible to damage from various types of
commercial solvents and may be damaged by their use. Use
clean cloths to remove dirt, dust, oil, grease, etc.
As a routine part of air compressor maintenance, it is also
advised that the oil is routinely checked for proper levels.
WARNING:
Do not at any time let brake fluids, gasoline,
petroleum-based products, penetrating oils, etc.,
come in contact with plastic parts. Chemicals
can damage, weaken or destroy plastic which
may result in serious personal injury. Electric tools
used on fiberglass material, wallboard, spackling
compounds, or plaster are subject to accelerated
wear and possible premature failure because
the fiberglass chips and grindings are highly
abrasive to bearings, brushes, commutators,
etc. Consequently, we do not recommend using
this product for extended work on these types
of materials. However, if you do work with any of
these materials, it is extremely important to clean
the product using compressed air.
LUBRICATION
All of the bearings in this product are lubricated with a
sufficient amount of high grade lubricant for the life of the
unit under normal operating conditions. Therefore, no further
lubrication is required.
REPLACING THE AIR FILTER
See Figure 15.
Disconnect the air compressor from the power supply.
Make sure the pressure is at 0 psi.
Remove the toolbox.
Remove the air filter screws.
Remove the air filter cover.
Remove the metal retention clip.
Remove the air filter.
Install the new air filter.
Reinstall the metal retention clip.
Reinstall the air filter cover.
Reinstall the air filter screws.
REPLACING A WHEEL
Disconnect the air compressor from the power supply.
Make sure the pressure is at 0 psi.
Remove the tool box and set it aside.
Position the compressor on the floor or a stable surface,
with the gauges face down.
Remove the hitch pin from the axle.
Remove the axle and washer.
Replace the wheel. See Installing the Wheels in the
Assembly section of this manual.
Set the air compressor upright and reinstall the tool
box.
Fig. 15
AIR FILTER COVER
SCREWS
AIR
FILTER
CLIP

20
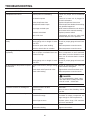
TROUBLESHOOTING
PROBLEM CAUSE SOLUTION
Compressor will not run Loss of power or overheating
No electrical power
Blown shop/house fuse
Shop/house breaker open
Amperage overload open
Pressure switch bad
Tank is full of air
Check for proper use of extension
cord
Check to be sure unit is plugged in
Check fuse/breaker
Replace shop/house blown fuse
Reset shop/house breaker, determining
why problem happened
Motor must be allowed to cool down for
30 minutes before manual resetting.
Replace pressure switch
Compressor will turn on when tank
pressure drops to cut-in pressure
Motor hums but cannot run or runs
slowly
Low voltage
Wrong gauge wire or length of exten-
sion cord
Shorted or open motor winding
Defective check valve or unloader
Check with voltmeter
Check for proper gauge wire and cord
length
Take compressor to service center
Take compressor to service center
Amperage overload protector cuts out
repeatedly
Low voltage
Lack of proper ventilation/room tem-
perature too high
Wrong gauge wire or length of exten-
sion cord
Check with voltmeter
Move compressor to well-ventilated
area. Motor must be allowed to cool
down for 30 minutes before manual
resetting.
Check for proper gauge wire and cord
length
Air tank pressure drops when compres-
sor shuts off
Loose connections (fittings, tubing,
etc.)
Loose drain valve/Open drain valve
Check valve leaking
Check all connections with soap and
water solution and tighten
Tighten drain valve/Close drain valve
Take compressor to service center
DANGER:
Do not disassemble check valve,
tank drain valves or safety relief valve
with air in tank — bleed tank.
Excessive moisture in discharge air Excessive water in air tank
High humidity
Drain tank
Move to area of less humidity; use air
line filter
Compressor runs continuously Defective pressure switch
Excessive air usage
Piston rings are worn
Take compressor to service center
Decrease air usage; compressor not
large enough for tool’s requirement
Replace piston rings; Call customer
service for assistance
Air output lower than normal Broken inlet valves
Connections leaking
Take compressor to service center
Tighten connections
Page is loading ...
Page is loading ...
-
 1
1
-
 2
2
-
 3
3
-
 4
4
-
 5
5
-
 6
6
-
 7
7
-
 8
8
-
 9
9
-
 10
10
-
 11
11
-
 12
12
-
 13
13
-
 14
14
-
 15
15
-
 16
16
-
 17
17
-
 18
18
-
 19
19
-
 20
20
-
 21
21
-
 22
22


Ask a question and I''ll find the answer in the document
Finding information in a document is now easier with AI
Related papers
-
RIDGID OL50135W User manual
-
-
-
-
-
-
-
-
-
Other documents
-
Husky 0232014 Operating instructions
-
-
NuMax S3GIUPCK User manual
-
-
SPEEDWAY 52619 User manual
-
Wachsmuth & Krogmann TAW-2030 User manual
-
Harbor Freight Tools 12v Quick start guide
-
Craftsman 107.16575 Owner's manual
-
-
 Badger Air-Brush 80-7 User And Maintenance Instructions
