LED RETROFIT KIT
INSTALLATION ENGLISH
PK-93843-10-00-0AAR2883
Zipline™
WARNINGS AND CAUTIONS:
• TO AVOID FIRE, SHOCK, OR DEATH: TURN OFF POWER AT CIRCUIT BREAKER OR FUSE AND TEST THAT THE POWER IS OFF BEFORE WIRING.
• Luminaire wiring and electrical parts may be damaged during installation of led retrofit kit. Check for enclosed wiring and components for damage.
• Led retrofit kit installation requires knowledge of luminaire electrical systems. If not qualified, do not attempt installation. Contact an electrician.
• Install this kit only in the luminaire that has the construction features and dimensions shown in this instruction sheet.
• Only those open holes indicated in these instructions may be made or altered as a result of kit installation. Do not leave any other open holes in an enclosure of wiring or
electrical components.
• To prevent wiring damage or abrasion, do not expose wiring to edges of sheet metal or other sharp objects.
• Retrofit kits must only be installed in the intended manner and location. NOTE: NOT suitable for vertical mounting.
• Fluorescent lamps contain mercury, a toxic substance. Dispose of lamps per local codes and regulations.
• Special handling of ballast may be required. Dispose of old ballast per local codes and regulations.
• This device is not intended for use with emergency exits.
• Leviton strongly recommends installing a trial fixture prior to ordering full project quantities.
• Ensure that non-connected low voltage wires are tied and separated 1/4 inch from the high voltage wires.
• Operating this fixture with only one lamp installed may result in decreased life to the LED lamp.
PARTS LIST
(1) LED lamps (2 EA)
(2) Disconnect #18 GA (1 EA)
(3) Liner label (1 EA)
(4) Liner assembly (1 EA) - Pre-assembled with two LED lampholders, driver(s),
two spring clips, disconnect, Ground bonding wire assembly and optional sensor.
(5) Trim panels (2 EA)
(6) #8-18 Self drilling screw (1 EA)
ENVIRONMENTAL REQUIREMENTS
• Suitable use for damp locations
• For service please call Leviton customer support: 1-800-824-3005
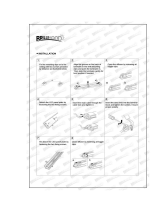
INSTALLATION
1. Lampholder LED retrofit kit fits 2' x 2' or 2' x 4' luminaire (see Figure 1).
2. Open diffuser door and remove diffuser door, lamps, ballast cover, lampholders, lampholder leads and ballast (see Figure 3).
3. Attach liner label to the empty fixture in a visible area (see Figure 5.0).
4. Install disconnect free end to luminaire power supply leads. Hot (+) lead to black port . White (-) neutral to other port
(See Figure 5.0).
5. Align liner assembly so that the lampholders are close to the wiring port side of the luminaire.
6. Using 8-18 self drilling screw (supplied) secure liner green grounding wire to luminaire (see Figure 5.1).
7. Connect the power supply disconnect from luminaire to the pre-assembled disconnect attached to the driver power
supply wires (see Figure 5.2).
8. Install liner side "A" into the luminaire first, and then install side "B". Install sides of liner between the grid (not shown) and luminaire.
(See Figure 5.2).
9. Install trim panel over side "A" of the liner between liner and grid. Angle trim panel and then rotate into place (see Figure 5.3).
10. Install both LED lamps to the lampholder. Important: Install the lamps with the blade contacts to the LED lampholder
first and then push the lamp into the spring clip side to lock in place (see Figure 5.5).
11. Install last trim panel to side "B" as per step 9 (see Figure 5.6).
1 - Diffuser door opened
and lamps removed
2 - Remove
ballast cover
4 - Remove ballast screw 5 - Remove ballast
and leads
3 - Cut leads to lampholders and remove
Figure 3
Figure 1 - Luminaire sizes
24" max.- 23-13/16" min. inside
2' x 2' LENGTH
14-11/16" min. inside
WIDTH
48" max.- 47-13/16" min. inside
2' x 4' LENGTH
LED Lamps
Luminaire
label
Trim Panel
LED Lampholder
Luminaire
Liner Assembly
Trim Panel
Spring Clip
Ground Wire
Figure 2
Parts list (2) Disconnect
1
3
4
6
6
Hot
Neutral