Page is loading ...

HAMMER
TAPE
MEASURER
MASONS
STRING
2” x 2”
WOOD
STAKES
SHOVEL
WHEEL
BARROW
DRILL
PHILLIPS
SCREWDRIVER
WOOD
BLOCKS
ADJUSTABLE
WRENCH
HANDHELD
SAW
POST HOLE
DIGGER
CONCRETE
Required Tools
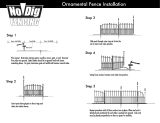
STEP 1: PLAN YOUR DESIGN
Decide on your layout and remember to consider where the gate will be installed. Regular posts should
be set 72-1/2” apart, measuring from center to center of each post, while gate posts should be set 1“
wider than the width of the gate itself to allow room for the hinges.
Layout the perimeter of determined fencing area with stakes and masons string to keep posts in line
when installing. Place the wood stakes where you intend to install the posts.
Most ForgeRight aluminum panels can be installed on an incline. The same method of installaon should
be followed, simply push the panel up or down to accommodate a hill or slope.
Post Post
72-1/2”
Center of Post
PLEASE NOTE: Addional accessories are required if installing on hard surface, such as a deck, or if mounng the
end panel to a wall.
TIP: All aluminum panels can be cut to
the size needed. When cung, use a
standard hand saw or reciprocang saw
and be sure to leave 2” of spacing at the
end of each horizontal rail.
RECIPROCATING
SAW
Aluminum Fence Installaon Instrucons

STEP 2: CHOOSE POSTS
Determine the correct post type for each post locaon - Line Post, End/Gate Post or Corner Post. It may be
helpful to drop each post at the appropriate stake to avoid confusion during installaon.
Wall mounts (sold separately) are required when mounng the panel to a wall or masonry.
LINE POST CORNER POST END/GATE POST
STEP 3: POST, GATE & PANEL INSTALLATION
For the easiest installaon, we suggest installing each post and panel in a sequenal manner.
Starng with the first post, remove the stake from the ground and dig a hole measuring approximately 8” in
diameter and around 22“ deep in the stakes place. Once the hole is dug, posion the post in the hole and check
to make sure the pre-cut holes are facing the direcon the panels will be installed. Using a hammer and a block of
wood (to protect the post) hammer the post into the ground approximately 2” so the post is 24“ below ground
level. This will provide stability when pouring concrete and aaching the panel to the post.
TIP: Measure 24” from the boom of
the post and mark with chalk or a
temporary marker to ensure proper
height placement. The 24” mark on the
post should align with ground level.

Once the first post is in the ground, pour concrete to fill the hole, filling just enough to provide a slight slant for
water runoff.
Assemble panels and posts by inserng the horizontal rails on the panels into the pre-cut holes on post.
Secure the posts with screws included. Place 2” wood blocks underneath the panel when aaching the panel
to the post for addional support.
Connue to the next in-ground stake, following the same acons as listed above. Connue this unl fencing
system is complete.
When you reach the area for the gate, remember to set the posts 1” wider than the width of the gate itself to
allow room for the hinges.
Installing the Gate:
Start by planning the swing of the gate. Align the opened hinge so that the L-bracket will fit on the gate and
the flat half of the bracket will aach to the end/gate post. Posion hinges so that they are approximately 8”
from the top and boom of the gate panel.
Start by installing the hinges to the end/gate post, opening the hinge and pushing fully against the top, keeping
flush and aach to the post using 3 self-tapping screws (included with the gate).
Next, hold the gate in posion so the top of the gate aligns evenly with the top rail of the
fence panel, then posion the gate into the L-bracket of the hinge and aach with 4 self-tapping screws.
WARNING: VERIFY LEGAL REQUIREMENTS FOR USE WITH POOLS, HOT TUBS, AND SPAS.
Note: See Warning on Forgerightfence.com
TIP: If installing the fence at an angle
greater or less than 90°, use one angle
connector (sold separately) per each
horizontal rail end.
Note: Gates do not rack
/