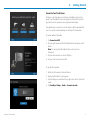
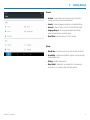
Rand McNally 0528017969 User manual
- Category
- Navigators
- Type
- User manual


OverDryve
™
Pro User Manual i
This device complies with Part 15 of the FCC Rules. Operation is subject to the
following two conditions:
(1) this device may not cause harmful interference, and
(2) this device must accept any interference received, including interference that
may cause undesired operation.
FCC Statement
This equipment has been tested and found to comply with the limits for a Class
B digital device, pursuant to part 15 of the FCC Rules. These limits are designed
to provide reasonable protection against harmful interference in a residential
installation. This equipment generates uses and can radiate radio frequency energy
and, if not installed and used in accordance with the instructions, may cause
harmful interference to radio communications. However, there is no guarantee that
interference will not occur in a particular installation. If this equipment does cause
harmful interference to radio or television reception, which can be determined
by turning the equipment o and on, the user is encouraged to try to correct the
interference by one or more of the following measures:
—Reorient or relocate the receiving antenna.
—Increase the separation between the equipment and receiver.
—Connect the equipment into an outlet on a circuit dierent from that to which the
receiver is connected.
—Consult the dealer or an experienced radio/TV technician for help.
FCC Radiation Exposure Statement
This device complies with FCC SAR exposure limits set forth for an uncontrolled
environment.
SAR compliance for using the equipment in close proximity to the human body has
been evaluated at 0mm.
This equipment must not be co-located or operating in conjunction with any other
antenna or transmitter.
End-users and installers must be provide with antenna installation instructions and
consider removing the no-collocation statement.
This device complies with Part 15 of the FCC Rules. Operation is subject to the
following two conditions:
(1) this device may not cause harmful interference, and
(2) this device must accept any interference received, including interference that
may cause undesired operation.
Caution!
Any changes or modications not expressly approved by the party responsible for
compliance could void the user's authority to operate the equipment.
Canada Statement
This device complies with Industry Canada’s licence-exempt RSSs. Operation is
subject to the following two conditions:
(1) This device may not cause interference; and
(2) This device must accept any interference, including interference that may cause
undesired operation of the device.
Le présent appareil est conforme aux CNR d’Industrie Canada applicables aux
appareils radio exempts de licence. L’exploitation est autorisée aux deux conditions
suivantes :
(1) l’appareil ne doit pas produire de brouillage;
(2) l’utilisateur de l’appareil doit accepter tout brouillage radioélectrique subi, même
si le brouillage est susceptible d’en compromettre le fonctionnement.
This equipment should be installed and operated with a minimum distance of 0mm
between the radiator and your body.
Cet équipement devrait être installé et actionné avec une distance minimum de
0mm entre le radiateur et votre corps.
This transmitter must not be co-located or operating in conjunction with any other
antenna or transmitter.
Cet émetteur ne doit pas être Co-placé ou ne fonctionnant en même temps
qu'aucune autre antenne ou émetteur.
The device for operation in the band 5150–5250 MHz is only for indoor use to
reduce the potential for harmful interference to co-channel mobile satellite systems.
Les dispositifs fonctionnant dans la bande 5150-5250 MHz sont réservés
uniquement pour une utilisation à l’intérieur an de réduire les risques de brouillage
préjudiciable aux systèmes de satellites mobiles utilisant les mêmes canaux.

OverDryve
™
Pro User Manual ii
About GPS
The Global Positioning System (GPS) is a constellation of satellites that
a GPS receiver uses to calculate geographical positions. To determine
a position, data from at least three satellites is required. To determine
elevation, the data from four or more satellites is required. Accuracy of
the positioning varies from 10 feet to several hundred feet, depending
on vehicle placement and the surrounding environment.
Geographical terrain (such as mountains), man-made structures (such as
highway overpasses, bridges, and tall buildings), as well as weather
can interfere with the GPS signal. For best GPS reception, position the
device and mount with a clear line of sight to the sky. Some vehicles
may have a limited view of the sky due to metal sun shields or a
metallized windshield coating.
Map data includes the geographical coordinates for address locations
and points of interest (POIs). With GPS reception, your device calculates
a route to your selected location.
VIP Customer Support
Questions about using OverDryve
™
? Our team is ready to help.
Call toll-free:
800-237-7270
E-mail:
support@randmcnally.com

OverDryve
™
Pro User Manual iii
Table of Contents
1. Your OverDryve
™ .........................................................................................................................................................................1
Caution: Important Safety Information.........................................................1
Box Contents ........................................................................................................... 2
Install the Mount ...................................................................................................2
Using the Android Home Screen ....................................................................4
2. Getting Started ....................................................................................................5
Setup ..........................................................................................................................5
Connect to the Internet ............................................................................... 6
Register Your Device .....................................................................................7
Connect to Bluetooth ...................................................................................8
Connect to Your Truck Stereo ................................................................... 9
Device Settings ..................................................................................................... 11
3. Messaging ........................................................................................................... 14
4. Phone ..................................................................................................................... 16
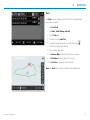
5. Navigation ............................................................................................................17
How the Truck GPS App Works ....................................................................17
Main Menu ............................................................................................................. 18
Preferences ............................................................................................................19
Search For an Address .......................................................................................23
Helpful Tips on Entering Addresses......................................................24
Route Map Window ...........................................................................................25
View Directions .............................................................................................26
Exits Quick View ...........................................................................................28
Virtual Dashboard ........................................................................................29
Trac ................................................................................................................31
Weather ...........................................................................................................33
Fuel Prices .......................................................................................................34
Route to Here, Set Origin, Add as Via .................................................35
6. Truck Tools ..................................................................................... 36
7. DriverConnect ............................................................................... 41
8. TripMaker ............................................................................................................. 42
9. Road Atlas ............................................................................................................ 43
10. Cameras ................................................................................................................44
Dash Cam ...............................................................................................................45
Video Files ......................................................................................................45
11. Entertainment .................................................................................................... 46
Bluetooth Player ...................................................................................................46
Phone Playback .............................................................................................46
FM Transmitter .....................................................................................................47
SiriusXM Radio .....................................................................................................48
SiriusXM Functions..............................................................................................49
12. Troubleshooting ................................................................................................51
Restarting the Device ........................................................................................51
13. More Information ............................................................................................ 52

OverDryve
™
Pro User Manual 1
1. Your OverDryve
™
Caution: Important Safety Information
Navigation
• Use this device at your own risk.
• Attend to this device only when it is safe to do so.
• Trac laws and regulations always have priority over any instructions
from the navigation system.
NOTE: If you do not understand the spoken instructions or are unsure of
what to do, refer to the navigation map on your device.
Installation
• Make sure that the mount is securely mounted and properly
adjusted before each trip.
• Make sure that the mount does not impair the driver’s visibility.
• Do not attach the mount within the airbag deployment zone.
• Install the mount in a manner that minimizes risk in the event of an
accident.
• After installation, check all safety-related equipment to ensure that it
operates without interference from the device, its cables, or
any other accessories.
• Connect the wall charger to a 120V or 240V outlet only.
• Connect the vehicle charger to a 12V outlet only.
Device
• Do not use sharp-edged objects on the device touch screen.
• The device is not waterproof and is not protected against
water damage.
• Protect the device from extreme temperatures. Operating
temperature for the device is between 32 degrees F and
120 degrees F.
• Do not open the device casing.
• Do not attempt to replace the battery. Contact Rand McNally
Customer Support with questions about the battery.
• Always follow local regulations when disposing of this device.
NOTE: Make sure that there are no kinks in the cable and that it will not be
damaged by any sharp objects.
NOTE: Use only a moist cloth to clean the device.
NOTE: Do not pull the cable to unplug the unit.

OverDryve
™
Pro User Manual 2
1. Your OverDryve
™
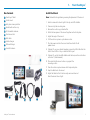
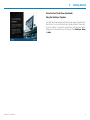
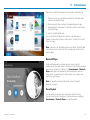
Box Contents
• OverDryve
™
tablet
• Smart mount
• Anti-glare screen protector
• Bracket with suction cup
• FM transmitter antenna
• Dash mount disc
• AUX cable
• Vehicle charger
• USB wall charger
• SiriusXM antenna
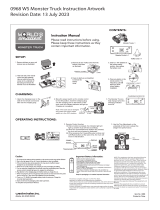
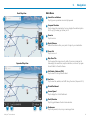
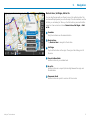
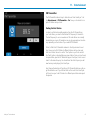
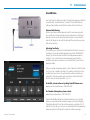
Install the Mount
Note: Follow all local regulations governing the placement of the mount.
1. Select an area with a line of sight to the sky and GPS satellites.
2. Clean and dry the mounting area.
3. Remove the suction cup protective lm.
4. Attach the two pieces of the mount together and lock into place.
5. Adjust the angle of the mount.
6. Pull the suction cup lever up to release suction.
7. Plug the power cord into the mount and the vehicle’s 12-volt
power source.
8. Optional: To use your vehicle’s speakers, connect an AUX cable from the
Smart Mount AUX out to your vehicle’s AUX in port.
9. Optional: To use the SiriusXM satellite radio features, see the instructions
in Section 11 (Entertainment).
10. Place and hold the mount suction cup against the
mounting surface.
11. Press the suction cup lever down until it snaps into place.
12. Snap the tablet onto the mount.
13. Adjust the tablet so that it can be easily seen and does not
block the driver’s line of sight.
4
5
7
8
9
3
2
6
4
5
78
9
3
2
6
1
1
10
10

OverDryve
™
Pro User Manual 3
1. Your OverDryve
™

OverDryve
™
Pro User Manual 4
1. Your OverDryve
™
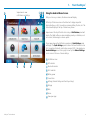
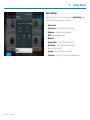
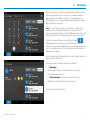
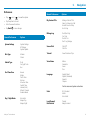
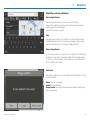
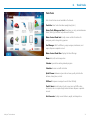
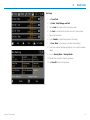
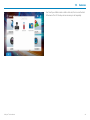
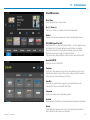
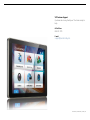
Using the Android Home Screen
After you turn on your device, the home screen will display.
At the top of the home screen is the status bar. It displays important
information like your Wi-Fi connection, remaining battery life, time, etc. The
status bar will display at the top of almost every screen.
Swipe down at the top of the status bar and your Notications panel will
display. The tablet noties you when something needs your attention, such
as an e-mail, text message, or device update.
Tap or swipe down in the Notications panel and a Quick Settings panel
will display. The Quick Settings panel contains often used features such as
Wi-Fi connection, Bluetooth, and location services (GPS). It also displays an
Android Settings icon in the top right corner. Tap the Android Settings
icon to access a full menu of device settings.
1
Notications icons
GPS indicator
Bluetooth indicator
Wi-Fi indicator
Battery power
Current time
Settings (Android Settings and OverDryve
™
Setup)
All apps
Back
Home
View open apps
2
9
10
2
4 6
Swipe down to view
notications and settings
3 5
8
109 11
1
7
3
4
5
6
7
8
11

OverDryve
™
Pro User Manual 5
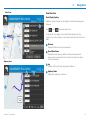
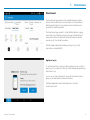
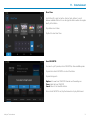
2. Getting Started
Setup
Connect to the Internet
Enable the Wi-Fi hotspot on your smartphone or other in-vehicle device
and then connect OverDryve
™
or connect to your home Wi-Fi to complete
setup.
Register your device
Register with Rand McNally for updates and support.
Connect to Bluetooth
Enable Bluetooth on your smartphone and pair OverDryve
™
to enable
hands-free calling and texting, music streaming, and voice assistance.
Connect to your truck stereo system
You can listen to audio through any of the following four methods:
1. Plug an AUX cable into the Smart Mount and the AUX port in your truck
Note: Do not plug the AUX cable into the audio out port on
OverDryve
™
.
2. Use the Smart Mount speaker.
3. Use the FM Transmitter. To use the FM transmitter, attach the antenna
to the Smart Mount. On OverDryve
™
, tap Entertainment > FM
Transmitter and follow the instructions
4. Add an AUX input to your existing truck. Visit randmcnally.com/aux-
install to learn more.
Note: If your device has not been able to detect your location, you may be
asked to set your time zone.

OverDryve
™
Pro User Manual 6
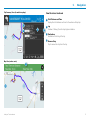
2. Getting Started
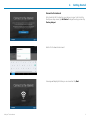
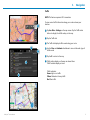
Connect to the Internet
First activate the Wi-Fi hotspot on your phone or in your truck. From the
OverDryve
™
setup screen, tap Get Started to begin the setup process. Tap
Find my hotspot.
Select a Wi-Fi network and connect.
A message will display that states you are connected. Tap Next.

OverDryve
™
Pro User Manual 7
2. Getting Started
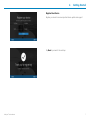
Register Your Device
Register your device to receive important device updates and support.
Tap Next to proceed to the next step.

OverDryve
™
Pro User Manual 8
2. Getting Started
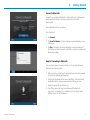
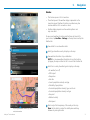
Connect to Bluetooth
Connect to your phone via Bluetooth to allow OverDryve
™
to call and text
hands-free and to stream music from your phone to your truck’s
stereo system.
First enable Bluetooth on your phone.
From OverDryve
™
:
1. Tap Connect.
2. Tap Scan For Devices. A Bluetooth pairing request will display on your
OverDryve
™
.
3. Tap Pair. If successful, the screen will display a connected message. If
the OverDryve
™
failed to connect, verify that your phone is in range and
Bluetooth is enabled.
Help for Connecting to Bluetooth
If you are having issues connecting OverDryve
™
to your smartphone via
Bluetooth, these steps can help:
1. Make sure that your OverDryve
™
and smartphone are in close proximity
to each other, preferably within ve feet.
2. Check that both devices do not have a low battery. Some devices will
disable Bluetooth to conserve power when the battery gets low.
3. Power the devices o and then back on.
4. Turn o any devices that may be interfering with the Bluetooth
connection. For example, if you usually pair your OverDryve
™
with a
dierent phone, turn o that phone.

OverDryve
™
Pro User Manual 9
2. Getting Started
Connect to Your Truck Stereo
To listen to audio through your truck stereo, the tablet must be in truck
mode. To put the tablet in truck mode, place it on the Smart Mount and
plug the mount into a power source using the vehicle charger.
The optimal way to connect to your truck stereo is with the provided AUX
cord. You can also connect wirelessly via OverDryve’s FM transmitter.
To connect with the AUX cable:
1. Tap Connect via AUX.
2. Plug the right-angle end of the AUX cable into the OverDryve
™
Smart
Mount.
Note: Do not plug the AUX cable into the audio out port on
OverDryve
™
.
3. Plug the other end into your truck’s AUX jack.
4. Set your truck’s audio source to AUX.
To use the FM transmitter:
1. Attach the FM antenna to the Smart Mount.
2. Unplug the AUX cable if it is plugged in.
3. Tap the settings icon located in the top right corner of the OverDryve
™
screen.
4. Tap OverDryve
™
Setup > Audio > Connect via radio.

OverDryve
™
Pro User Manual 10
2. Getting Started
Connect to Your Truck Stereo (Continued)
Using the OverDryve
™
Speakers
Your tablet has its own speaker, and there’s another powerful speaker in the
Smart Mount. You can use the OverDryve
™
speakers instead of connecting
to your truck stereo. If you want to connect to the truck stereo later, tap the
Settings icon in the top right corner of the screen, then OverDryve
™
Setup
> Audio.

OverDryve
™
Pro User Manual 11
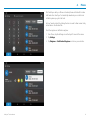
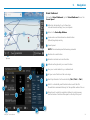
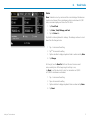
2. Getting Started
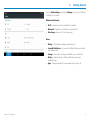
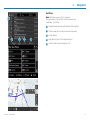
Device Settings
Swipe down from the top of the screen to view the Quick Settings panel
and adjust the following frequently used features:
• Battery Power
• Settings Icon – Access a full menu of all settings
• Brightness – Changes the screen brightness
• Wi-Fi – Shows available networks
• Bluetooth
• Airplane Mode – Turns o Wi-Fi and Bluetooth
• Auto Rotate – Controls whether the screen rotates
when you rotate the tablet
• Location – Turn on/o location services (GPS)
• Cast screen – Project your screen onto a compatible device.

OverDryve
™
Pro User Manual 12
2. Getting Started
From the Quick Settings panel, tap the Settings icon to access a full menu
of settings for your device.
Wireless and Networks
• Wi-Fi – View and connect to available Wi-Fi networks.
• Bluetooth – Pair with your smartphone using Bluetooth.
• Date Usage – View your Wi-Fi and app usage.
Device
• Display – Set brightness, wallpaper, appearance, etc.
• Sound & Notication – Set volumes for dierent features and enable
and disable sounds.
• Storage – View how much storage is available on your OverDryve
™
.
• Battery – View time spent on battery and battery power used
by dierent apps.
• Apps – View apps. Swipe left to view: downloaded, running, all.

OverDryve
™
Pro User Manual 13
2. Getting Started
Personal
• Location – View location mode, location requests, and location
services. High accuracy mode is recommended.
• Security – View lock,password,encryption, and credential settings.
• Accounts – View and add accounts for the Rand McNally market.
• Language & input – Set language and keyboard information,
as well as speech options and pointer speed.
• Reset Tablet – Reset the device to its factory settings.
System
• Date & time – Set date, time, time zone, and date and time format.
• Accessibility – Enable spoken feedback, captions, and large text help
visually impaired users.
• Printing – Enable printing services.
• About tablet – View battery and network status. Also view legal
information such as model numbers and build numbers.

OverDryve
™
Pro User Manual 14
3. Messaging
Pair OverDryve
™
with your iPhone or Android phone via Bluetooth to send
and receive texts hands-free. The OverDryve
™
Voice Assistant integrates
with your phone’s voice assistant. OverDryve
™
automatically syncs your
text messages so you can see new messages and browse through old ones
without reaching for your phone.
*
Note: If you have an iPhone, make sure your phone is not open to the
messaging screen. When the messaging screen is open, the iPhone
automatically marks the message as “read”. The iPhone won’t transmit “read”
messages over Bluetooth, so OverDryve
™
will not be able to access them.
To send and receive texts hands-free, tap the Voice Assistant
which will ask who you would like to text. Speak the name of any of your
contacts. The Voice Assistant will prompt you for your message and then ask
you if you would like to send it. The Voice Assistant can also read back text
messages that you receive.
Set your favorite contacts by clicking the star icon next to their names. Easily
access them in the favorites tab.
If you want to send a text without using the Voice Assistant
*
:
1. Tap Messaging.
2. Enter the phone number or select a name from your Contacts.
3. Tap the yellow messaging icon.
4. Tap Write a message in the lower left corner of the screen.
5. Write the message and tap the blue arrow to send it.
*
Supported on Android phones only.

OverDryve
™
Pro User Manual 15
3. Messaging
To enable text message notications:
1. From Messaging, tap the Settings icon in the top left corner of the
screen.
2. Tap Settings.
3. If Enable Messaging Notications is checked, notications are already
enabled. If not, tap to turn on the feature. The status will show “Enabled”.
To control what text message information displays on OverDryve
™
:
1. From Messaging, tap the Settings icon in the top left corner of the
screen.
2. Tap Settings.
3. If Show Message Content is checked, tap to uncheck. The status will
change to “Hide Content”.

OverDryve
™
Pro User Manual 16
4. Phone
Pair OverDryve
™
with your iPhone or Android phone via Bluetooth to make
calls hands-free. OverDryve
™
automatically downloads your contacts and
call history when you get in the truck.
Set your favorite contacts by clicking the star icon next to their names. Easily
access them in the favorites tab.
To set the ringtone or notication ringtone:
1. From Phone, tap the Settings icon in the top left corner of the screen.
2. Tap Settings.
3. Tap Ringtone or Notication Ringtone and choose your selection.
Page is loading ...
Page is loading ...
Page is loading ...
Page is loading ...
Page is loading ...
Page is loading ...
Page is loading ...
Page is loading ...
Page is loading ...
Page is loading ...
Page is loading ...
Page is loading ...
Page is loading ...
Page is loading ...
Page is loading ...
Page is loading ...
Page is loading ...
Page is loading ...
Page is loading ...
Page is loading ...
Page is loading ...
Page is loading ...
Page is loading ...
Page is loading ...
Page is loading ...
Page is loading ...
Page is loading ...
Page is loading ...
Page is loading ...
Page is loading ...
Page is loading ...
Page is loading ...
Page is loading ...
Page is loading ...
Page is loading ...
Page is loading ...
Page is loading ...
Page is loading ...
Page is loading ...
Page is loading ...
-
 1
1
-
 2
2
-
 3
3
-
 4
4
-
 5
5
-
 6
6
-
 7
7
-
 8
8
-
 9
9
-
 10
10
-
 11
11
-
 12
12
-
 13
13
-
 14
14
-
 15
15
-
 16
16
-
 17
17
-
 18
18
-
 19
19
-
 20
20
-
 21
21
-
 22
22
-
 23
23
-
 24
24
-
 25
25
-
 26
26
-
 27
27
-
 28
28
-
 29
29
-
 30
30
-
 31
31
-
 32
32
-
 33
33
-
 34
34
-
 35
35
-
 36
36
-
 37
37
-
 38
38
-
 39
39
-
 40
40
-
 41
41
-
 42
42
-
 43
43
-
 44
44
-
 45
45
-
 46
46
-
 47
47
-
 48
48
-
 49
49
-
 50
50
-
 51
51
-
 52
52
-
 53
53
-
 54
54
-
 55
55
-
 56
56
-
 57
57
-
 58
58
-
 59
59
-
 60
60


Rand McNally 0528017969 User manual
- Category
- Navigators
- Type
- User manual
Ask a question and I''ll find the answer in the document
Finding information in a document is now easier with AI
Related papers
-
Rand McNally OverDryve 7 RV User manual
-
-
Rand McNally OverDryve 7 User manual
-
-
-
Rand McNally OverDryve 7 Pro II User manual
-
-
-
-