VT Dimensions 011350010694588-60 Installation guide

Type
Installation guide
Easy to install instructions provided inside
Multiple colors available for unique design options
Durable and easy to care for
How-to-Install
Laminate Countertops and
Sheet Laminate
FREE BROCHURE | Reverso en español
Accessory Kits
Accessory Kits
For creating a professional nish
Build-Up Kit Miter Bolt Kit
End Cap Kit
End Splash Kit
Step 1: Measure & Mark
Measure the cabinets that
will be covered with your
new countertop. Always
measure the back wall of
the countertop for correct
readings.
OVERHANG: When the
countertop does not butt
up to a wall or an appli-
ance, allow an extra ¾ in.
to the total length of the
countertop for the over-
hang. Measure section by section. For section requir-
ing overhang, add ¾ in. for each overhang.
Step 2: Cutting
Recheck your measure-
ments before cutting.
Measure and draw a
heavy pencil line where
the cut is to be made on
the top (decorative laminate) side of the countertop.
Apply transparent tape to prevent chipping while
sawing. Turn the countertop over, measure and draw
a heavy pencil line again where the cut is to be made.
Recheck measurements and proceed to saw from the
bottom side.
NOTE:
If using a hand saw, measure and draw a
heavy pencil line where the cut is to be made on
the top (decorative laminate) side of the countertop.
Recheck your measurements and apply transparent
tape to avoid chipping while sawing. Use a 10 to 12
point finishing saw for cutting on the down stroke.
Step 3: Sink Cut-Outs
Follow the instructions
provided with the rim to
mark the position for the
cut-out. Mark around rim
with a pencil on outside of
vertical member. If you are
installing a self-rimmed
stainless steel sink, mark
around the outer edge
of the sink and cut out
the hole
3
/
8 in. to ½ in.
smaller than the line.
Trace the outline and cover with transparent tape.
4 f t .
0 i n .
overhang
+
¾ in.
How to Install Laminate Countertops
How to Install
Laminate Countertops
With a sharp punch or nail, tap a starter point for
drilling pilot holes at each round corner.
Step 4: Cut-Outs
Drill pilot holes.
NOTE: If using a jigsaw,
turn the countertop over
and using previously drilled
holes, mark a new cut line on the bottom surface.
Use a fine tooth keyhole
saw to make the cut-out.
File or sand the edges of
all inside corners.
Step 5: Build-up
A Build-up Kit (A KIT)
is required on some
cabinetry to ensure that
the drawers have enough
clearance to slide open.
Step 6:
Assembling
the Miter
Miter sections should be
joined together before
installing on the cabinet.
A Miter Bolt Kit (B KIT)
is required to assemble the miter.
Step 7: End
Finishing
To finish the ends of the
countertop, use an Endcap
Kit (C KIT) or Endsplash
Kit (D KIT).
Step 8: Mounting On Cabinet
The countertop can be scribed to match the
wall surface. The backsplash overhang is used for
this purpose. Place the
countertop on the cabinet,
use a pencil to mark the
top edge of the counter-
top and file or sand to
the line.
Put countertop in place, check the level and stability.
Secure to cabinets with wood screws or panel
adhesive. If using screws,
check length to ensure
that they won’t protrude
through the countertop.
Use caulking compound
to seal top to wall. Wipe
off excess.
FOLLOW INSTALLATION INSTRUCTIONS ENCLOSED
WITH YOUR SINK OR SINK RIM.
Removing Old Countertop:
For safety — disconnect all utility service. SHUT
OFF WATER under sink or at water meter valve. If
removing garbage disposal or cook top unit, SHUT
OFF ELECTRICITY at meter panel.
DISCONNECT SINK DRAIN AT TRAP.
DISCONNECT PLUMBING SUPPLY AT UNIONS.
Tools Youll Need
Pencil
Hammer
Screwdriver
Measuring tape or
ruler
Power saw or
handsaw, fine
tooth (10-12 teeth
per inch)
Keyhole saw, fine
tooth (for sink
cut-out)
File, fine
Drill and assorted
bits (for sink cut-
out & endsplashes)
Carpenters square
Sanding block &
sandpaper
Household iron (for
applying endcaps)
AVOID
How to Install
Laminate Countertops
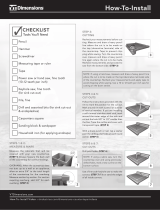
Application Instructions
Make sure laminate and the surface you are covering
are clean, dry and smooth. Do not laminate over paint,
varnish or old covering.
Step 1: Cutting Your Laminate
On the laminate sheet, mark dimensions 1/2 in. larger
than the size of the surface to be covered (substrate)
to allow for trimming after bonding. Place a strip of
masking tape over the cut line to prevent chipping.
Mark the line on the tape and cut through tape and
laminate at the same time when using a scoring knife.
When using a circular saw, cutting from the bottom
side of the laminate will
eliminate chipping of the
decorative surface. Use a
router from the top or
bottom of the laminate
when cutting.
Use the remaining material
to cut strips for the edges
in the same manner as
stated above.
Step 2: Laminating the Edges
Using a 1 in. brush, apply adhesive to the backside of
the laminate edge strips and double coat the edge
of the substrate. Do not
apply adhesive to top
surface at this time. Allow
adhesive to dry.
Important! Once the
adhesive is ready to bond,
if any contact is made
between the back side of
the laminate and the edge
of the substrate, they will bond immediately.
Be very careful to align each laminate piece with
the substrate prior to the surfaces touching.
Starting at one end of
the edge, start applying
the edge strip with
excess laminate extending
above the top side of the
counter. Use a hard rubber
J-roller to apply uniform
pressure along the entire
edge strip.
Step 3: Trimming Laminate Edge
Using the laminate trimmer/router, trim off the
excess laminate protruding above the substrate
surface. Areas that cannot
be routed may be filed
smooth. When filing
never drag a file out
toward the decorative
surface of the laminate.
Doing so can result in
chipping of the color/
pattern.
Step 4: Laminating the Top
Spread the adhesive on
the substrate using your
adhesive roller. Two thin
coats on the surface are
better than one heavy
coat. 100 percent
adhesive coverage is
required (each coat).
Before applying a second
coat, make sure that the first coat is dry. Allow
adhesive on both components to dr y.
Position the dowel rods
on the top surface
approximately 12 in. apart,
perpendicular to the front
edge. Position the
laminate carefully over
the substrate. Starting at
one end of the counter,
start removing the dowels
one at a time while holding the laminate in place.
Use a hard rubber 3 in. J-roller to apply uniform
pressure across the entire countertop. Apply
pressure to every inch of the surface for a complete
and lasting bond.
How to Install
Sheet Laminate
How to Install
Sheet Laminate
Step 5: Trimming Laminate Deck
Route off the laminate overhangs with the router
and flush trim bit. The radius left by the routing
process in any inside corner should remain. A radius
on an inside corner (minimum 1/8 in.) will strengthen
the corner. Use a file to remove sharp edges and
sharp outside corners.
Clean off excess adhesive with clean white cloth
(Acetone).
Tools Youll Need
Trim Router
3 in.-9 in. paint/
adhesive roller with
cover (1/8 in. nap)
Flush trim router
bit (carbide tips)
1 in. paintbrush
(china bristle) —
no sponge brushes
File
1/4 in. dowel rods
36 in. long (one
for every 12 in. of
countertop)
3 in. hard rubber
J-roller
Sanding block with
80-grit sandpaper
Optional Tools
Circular saw with
finetooth carbide
blade
Scoring knife
Laminate scissors
Recommended Substrates
5/8 in.or 3/4 in. thickness
Particle board
Medium density
fiberboard (MDF)
Plywood with one
Aface thickness
© 2011 by Lowe's
®
All Rights reserved Lowe's and the gable design are registered trademarks of LF, LLC
Fine Laminate Countertops featuring:
How to Install
Sheet Laminate
  • Page 1 1
  • Page 2 2
  • Page 3 3
  • Page 4 4
  • Page 5 5

VT Dimensions 011350010694588-60 Installation guide

Type
Installation guide

Ask a question and I''ll find the answer in the document

Finding information in a document is now easier with AI