21
English
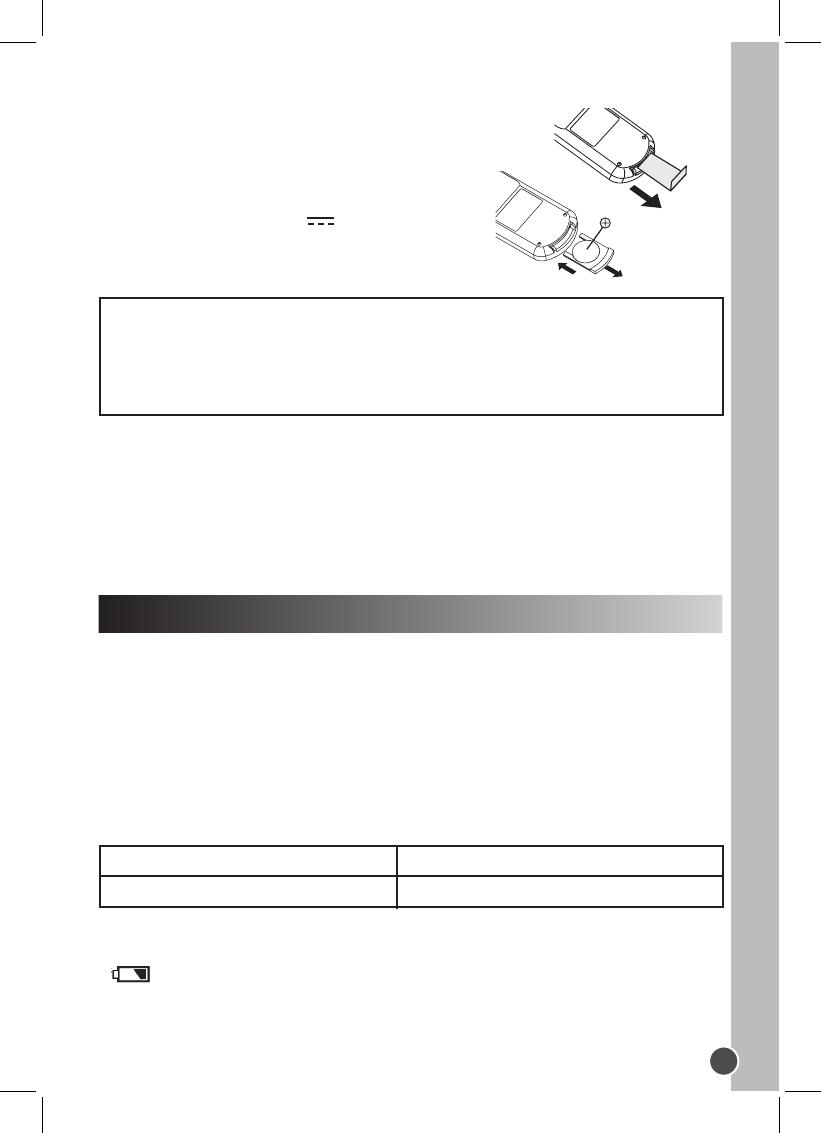
Battery installation
1. The rst time you use the remote control, remove the
battery tab located at the rear of the unit.
2. Open the battery compartment cover by pressing the
unlock switch to the right and then sliding the battery
holder out.
3. Insert 1 lithium CR2025 3V type battery
(included) as illustrated and slide the battery
cover in until it clicks rmly into place.
WARNING: Malfunction or loss of memory may be caused by strong frequency
interference or electrostatic discharge. Should any abnormal function occur, remove the
battery and insert it again.
Using the remote control
• When direct sunlight, an incandescent lamp, uorescent lamp or any other strong light
shines on the remote sensor of the unit, the remote operation may be unstable.
• When the battery becomes weak, the operating distance of the remote control reduces
signicantly and you need to replace the battery.
Your DVD player is equipped with a built-in rechargeable lithium battery.
Fully charge the battery before using it for the rst time.
1. Plug the AC/DC or car adapter into the jack on the back of the DVD player and insert
the plug into a mains wall socket or car cigarette lighter. When the unit is turned on, the
power indicator is yellow.
2. Slide the Power (CHARGE) switch to the “OFF position”.
3. When the battery is being charged, the battery indicator is red.
4. When the battery is fully charged, the indicator becomes green.
Non-rechargeable batteries are not to be recharged. Rechargeable batteries are to be removed
from the product before being charged. Rechargeable batteries are only to be charged under adult
supervision. Different types of batteries or new and used batteries are not to be mixed. Only
batteries of the same or equivalent type as recommended are to be used. Batteries are to be
inserted with the correct polarity. Exhausted batteries are to be removed from the product. The
supply terminals are not to be short circuited. Do not throw batteries into a re. Remove the
batteries if you are not going to use the product for a long period of time.
Charging the built-in lithium battery
CHARGING TIME/PLAYBACK TIME
Charging time
Approx. 4 hours
Playback time
Approx. 1½ to 2 hours
Note:
• The playback time may vary based on pattern usages of the DVD player.
• You cannot use the player while it is being charged.
• displays when the battery is low.
• Only use the adapter supplied with the DVD player. Do not use other adapter.
• The socket-outlet shall be installed near the equipment and shall be easily accessible.


