König 2 x 200W Owner's manual
- Category
- Photo studio flash units
- Type
- Owner's manual
This manual is also suitable for

KN-STUDIO70
MANUAL (p. 2)
Studio Flash
ANLEITUNG (S. 4)
Studioblitz
MODE D’EMPLOI (p. 6)
Flash d’atelier photographique
GEBRUIKSAANWIJZING (p. 8)
Studioflitser
MANUALE (p. 10)
Studio Flash
MANUAL DE USO (p. 12)
Flash de Estudio
HASZNÁLATI ÚTMUTATÓ (o. 14.)
Stúdióvaku
KÄYTTÖOHJE (s. 16)
Salama studiokäyttöön
BRUKSANVISNING (s. 18)
Studioblixt
NÁVOD K POUŽITÍ (s. 20)
Studiový blesk
MANUAL DE UTILIZARE (p. 22)
Bliţ de studio
ΕΓΧΕΙΡΙΔΙΟ XPHΣHΣ (σελ. 24)
Στούντιο Flash
BRUGERVEJLEDNING (s. 26)
Studie blitz
VEILEDNING (s. 28)
Studioblitz

2
ENGLISH
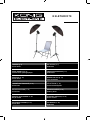
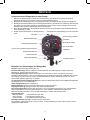
Studio Flash
Preparing Your Flash for Use
1. Carefully remove the flash unit from the box. The unit is supplied with a modeling lamp, power cord, flash
tube (installed) and synch cord.
2. Mount the flash unit on an appropriate light stand and adjust the angle to suit.
3. Install the modeling light by carefully screwing it into the receptacle. CAUTION: Do not touch the lamp with
your bare hands. Oil residue from your fingers can cause the surface of the lamp to heat unevenly and
explode.
4. Before plugging the power cord into the wall socket, be certain that the power switch is set to the off “O”
position.
5. Turn the power switch to the on “—” position. Check the settings on the following page.
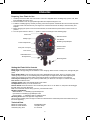
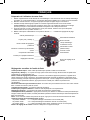
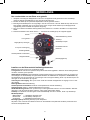
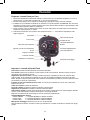
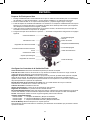
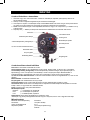
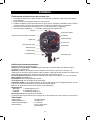
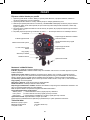
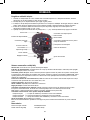
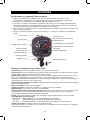
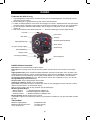
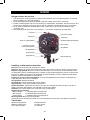
Photo Cell
Ready Light
Power Output Knob
3.5 Synch cord input
Fuse Cover
Umbrella Socket
Tilt adjustment
Remote On/Off
Test Button
Modeling Lamp/ Beeper
Power On/Off
Power Cord
Mounting Knob
Setting the Flash Unit’s Controls
Photo Cell: This Photo Cell allows the flash to fire.
Ready Light: This light will glow red while the unit is charging. When the unit is ready to fire, the light will glow
green.
Power Output Knob: This controls the power ratio, adjustable from full power, down to 1/8 power. If the
modeling lamp is turned on, the modeling lamp will also adjust in brightness. NOTE: When adjusting the
power from full power to a lower setting, press the test button to release the power in the capacitor.
3.5mm Synch Cord Input: A synch cord is provided with your flash unit. The input is a 3.5mm mini plug.
Fuse Cover: Protective Fuse.
Umbrella Socket: Place the umbrella shaft in this socket.
Tilt Adjustment: Allows you to tilt the flash unit.
Remote On/Off: Push this button to turn the built-in photo cell on or off. When on, the photo cell will trigger
the flash when any other flash fires.
Test: To fire the flash without taking a picture, push the flash button.
Modeling Light/Beeper
Middle Position: “—” Modeling Light & Beeper ON
Up Position: “O” Modeling Light & Beeper OFF
Down Position: “=” Modeling Light On & Beeper OFF
Mounting Knob: Mount the light onto a light stand.
We recommend testing the mono light in advance to determine the results that produce the effect which you
find most appealing.
Technical Data
Maximum Output Power 200 Watt/Seconds
Maximum Guide Number 165 (ISO 100/ft)
100% Recycling Time 3-5 seconds

3
Power Adjustment 1/8th to Full Power
Adjustable
Modeling Lamp On/Off Switch
Tracking
Colour Temperature Daylight 5500 Kelvin
+/-100 Kelvin
Triggering Methods Synch Cord
Test Button
Internal Photo Cell
Triggering Voltage 5 V DC
Synch Distance Up to 36 ft
Voltage Range 220-240 V AC 50/60 Hz
Flash Tube User Replaceable
Weight 1.5 lbs
Caution
• Even unplugged, the unit maintains considerable internal voltage. There are no user serviceable parts
inside. Do not disassemble! Refer to an authorized service centre for any repairs.
• Do not exceed 75 Watts modeling lamp. The excess heat can damage the unit.
• Do not use a snoot with these units. The heat can damage the flash housing.
• Do not touch the bulb when it is hot!
• When not in use, disconnect from the power supply.
• Avoid sudden impacts as this can damage the flash tube and/or modeling lamp!
Safety precautions:
To reduce risk of electric shock, this product should ONLY be
opened by an authorized technician when service is required.
Disconnect the product from mains and other equipment if a
problem should occur. Do not expose the product to water or
moisture.
Maintenance:
Clean only with a dry cloth. Do not use cleaning solvents or abrasives.
Warranty:
No guarantee or liability can be accepted for any changes and modifications of the product or damage caused
due to incorrect use of this product.
General:
Designs and specifications are subject to change without notice.
All logos brands and product names are trademarks or registered trademarks of their respective holders and
are hereby recognized as such.
Keep this manual and packaging for future reference.
Attention:
This product is marked with this symbol. It means that used electrical and electronic products should
not be mixed with general household waste. There is a separate collections system for these products.
Page is loading ...
Page is loading ...
Page is loading ...
Page is loading ...
Page is loading ...
Page is loading ...
Page is loading ...
Page is loading ...
Page is loading ...
Page is loading ...
Page is loading ...
Page is loading ...
Page is loading ...
Page is loading ...
Page is loading ...
Page is loading ...
Page is loading ...
Page is loading ...
Page is loading ...
Page is loading ...
Page is loading ...
Page is loading ...
Page is loading ...
Page is loading ...
Page is loading ...
Page is loading ...

30
Declaration of conformity / Konformitätserklärung / Déclaration de conformité /
Conformiteitsverklaring / Dichiarazione di conformità / Declaración de conformidad /
Megfelelőségi nyilatkozat / Yhdenmukaisuusvakuutus / Överensstämmelseförklaring /
Prohlášení o shodě / Declaraţie de conformitate / Δήλωση συμφωνίας /
Overensstemmelse erklæring / Overensstemmelse forklaring
We, / Wir, / Nous, / Wij, / Questa società, / La empresa infrascrita, / Mi, / Me, / Vi, / Společnost, / Noi, / Εμείς
Nedis B.V., De Tweeling 28, 5215MC, ’s-Hertogenbosch
The Netherlands / Niederlande / Pays Bas / Nederland / Paesi Bassi / Países Bajos / Hollandia / Alankomaat /
Holland / Nizozemí / Olanda / Ολλανδία
Tel. / Tél / Puh / Τηλ. : 0031 73 5991055
Email / Couriel / Sähköposti / e-post: [email protected]
Declare that product: / erklären, dass das Produkt: / Déclarons que le produit : / verklaren dat het product: /
Dichiara che il prodotto: / Declara que el producto: / Kijelentjük, hogy a termék, amelynek: / Vakuutamme,
että: / Intygar att produkten: / prohlašuje, že výrobek: / Declarăm că acest produs: / Δηλώνουμε ότι το
προϊόν: / Erklærer at produktet: / Forsikrer at produktet:
Brand: / Marke: / Marque : / Merknaam: / Marca: / Márkája: / Merkki: / Märke: / Značka: / Μάρκα: / Mærke: /
Merke: KÖNIG ELECTRONIC
Model: / Modell: / Modèle : / Modello: / Modelo: / Típusa: / Malli: / Μοντέλο: KN-STUDIO70
Description: Studio Flash
Beschreibung: Studioblitz
Description : Flash d’atelier photographique
Omschrijving: Studioflitser
Descrizione: Studio Flash
Descripción: Flash de Estudio
Megnevezése: Stúdióvaku
Kuvaus: Salama studiokäyttöön
Beskrivning: Studioblixt
Popis: Studiový blesk
Descriere: Bliţ de studio
Περιγραφή: Στούντιο Flash
Beskrivelse: Studie blitz
Beskrivelse: Studioblitz
Is in conformity with the following standards: / den folgenden Standards entspricht: / est conforme aux normes
suivantes : / in overeenstemming met de volgende normen is: / è conforme ai seguenti standard: / es
conforme a las siguientes normas: / Megfelel az alábbi szabványoknak: / Täyttää seuraavat standardit: /
Överensstämmer med följande standarder: / splňuje následující normy: / Este în conformitate cu următoarele
standarde: / Συμμορφώνεται με τις ακόλουθες προδιαγραφές: / Overensstemmelse med følgende
standarder: / Overensstemmer med følgende standarder:
EN 60598-1:2008/A11:2009, EN 60598-2-17:1989+A2:1991
EU Directive(s) / EG-Richtlinie(n) / Directive(s) EU / EU richtlijn(en) / Direttiva(e) EU / Directiva(s) UE / EU
direktívák / EU Toimintaohje(et) / Eu Direktiv(en) / Směrnice EU / Directiva(e) UE / Οδηγία(ες) της ΕΕ / EU
direktiv(er) / EU-direktiv(ene): 2006/95/EC
‘s-Hertogenbosch, 04-05-201
1
Mrs. / Mme. / Mevr. / Sig.ra / D. / Fru / Paní / Κα : J. Gilad
Purchase Director / Einkaufsleiterin / Directrice des Achats /
Directeur inkoop / Direttore agli acquisti / Director de compras /
értékesítési igazgató / Ostojohtaja / Inköpsansvarig /
Obchodní ředitelka / Director achiziţii / Διευθυντής αγορών /
Indkøbschef / Innkjøpssjef
Copyright ©
-
 1
1
-
 2
2
-
 3
3
-
 4
4
-
 5
5
-
 6
6
-
 7
7
-
 8
8
-
 9
9
-
 10
10
-
 11
11
-
 12
12
-
 13
13
-
 14
14
-
 15
15
-
 16
16
-
 17
17
-
 18
18
-
 19
19
-
 20
20
-
 21
21
-
 22
22
-
 23
23
-
 24
24
-
 25
25
-
 26
26
-
 27
27
-
 28
28
-
 29
29
-
 30
30


König 2 x 200W Owner's manual
- Category
- Photo studio flash units
- Type
- Owner's manual
- This manual is also suitable for
Ask a question and I''ll find the answer in the document
Finding information in a document is now easier with AI
in other languages
- italiano: König 2 x 200W Manuale del proprietario
- français: König 2 x 200W Le manuel du propriétaire
- español: König 2 x 200W El manual del propietario
- Deutsch: König 2 x 200W Bedienungsanleitung
- Nederlands: König 2 x 200W de handleiding
- dansk: König 2 x 200W Brugervejledning
- čeština: König 2 x 200W Návod k obsluze
- svenska: König 2 x 200W Bruksanvisning
- suomi: König 2 x 200W Omistajan opas
- română: König 2 x 200W Manualul proprietarului
Other documents
-
 Promaster Studio Flash User manual
-
Samsung SI-M8V041AD1EU User manual
-
Rollei Studio 300 & 500 - studio flash Operation Instuctions
-
Sony FA-CS1M Important information
-
Alecto ATL-180 User manual
-
HQ 110V - 230V 300W Specification
-
Elinchrom ELB 1200 User manual
-
-
Elinchrom D-Lite RX ONE User manual
-
