Page is loading ...

THANK
THANKTHANK
THANK YOU
YOUYOU
YOU
We appreciate the trust and confidence you have placed in Hampton Bay through the purchase of this lighting
system. We strive to continually create quality products designed to enhance your home. Visit us online to see our
full line of products available for your home improvement needs. Thank you for choosing Hampton Bay!
Item # 1000020910
Model # QTP22a-R4-AC-2
USE AND CARE GUIDE
SOLAR LED POST CAP LIGHT 2PK
Questions, problems, missing parts? Before returning to the store,
call Hampton Bay Customer Service
8 a.m. - 6 p.m., EST, Monday - Friday
1-8
1-81-8
1-855-HD-HAMPTON
55-HD-HAMPTON55-HD-HAMPTON
55-HD-HAMPTON
HAMPTONBAY.COM
HAMPTONBAY.COMHAMPTONBAY.COM
HAMPTONBAY.COM
®

2
Table of Contents
Table of Contents
.....................................
2
Safety Information
....................................
2
Warranty
....................................................
2
Pre-Assembly
............................................
3
Planning Installation
.................................
3
33
3
Package Contents
.....................................
3
33
3
Assembly
....................................................
4
Maintenance
..............................................
5
Care and Cleaning
....................................
6
Troubleshooting
.......................................
6
Service Parts
.............................................
7
Safety Information
WHAT
WHATWHAT
WHAT IS
ISIS
IS COVERED
COVEREDCOVERED
COVERED
This warranty applies only to the original consumer purchaser and only to products used in normal use and service.
If this product is found to be defective, the manufacturer's only obligation, and your exclusive remedy, is the repair
or replacement of the product at the manufacturer's discretion, provided that the product has not been damaged
through misuse, abuse, accident, modifications, alterations, neglect, or mishandling.
WHAT
WHATWHAT
WHAT IS
ISIS
IS NOT
NOTNOT
NOT COVERED
COVEREDCOVERED
COVERED
This warranty shall not apply to any product that is found to have been improperly installed, set-up, or used in any
way not in accordance with the instructions supplied with the product. This warranty shall not apply to a failure of
the product as a result of an accident, misuse, abuse, negligence, alteration, faulty installation, or any other failure
not relating to faulty material or workmanship. This warranty shall not apply to the finish on any portion of the
product, such as surface and/or weathering, as this is considered normal wear and tear.
Contact the Customer Service Team at 1-855-HD-HAMPTON or visit www.Hamptonbay.com.
CAUTION:
::
: This product contains a Nickle-metal hydride battery. The
battery must be recycled or disposed of properly.
Warranty

3
HAMPTONBAY.COM
Please contact 1-855-HD-HAMPTON for further assistance.
Pre-Assembly
PLANNING
PLANNINGPLANNING
PLANNING INSTALLATION
INSTALLATIONINSTALLATION
INSTALLATION
□
For optimum performance, it is best to install the solar lights in full sunlight and allow their batteries to charge for
10-12 hours. It will take 8-12 entire charging and discharging cycles to reach the batteries' maximum capacity.
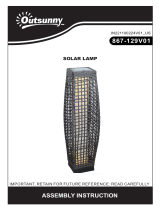
PACKAGE
PACKAGEPACKAGE
PACKAGE CONTENTS
CONTENTSCONTENTS
CONTENTS
Part
PartPart
Part Description
DescriptionDescription
Description Quantity
QuantityQuantity
Quantity
A Top Housing 2
B Lens 2
C Small Mounting Base (4 in. x 4 in.) 2
D Large Mounting Base (6 in. x 6 in.) 2
E Screws 4
A
B
C
E
D

4
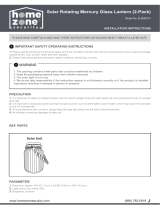
Assembly
1
Removing
RemovingRemoving
Removing the
thethe
the isolation
isolationisolation
isolation strip
stripstrip
strip
2
Assembling
AssemblingAssembling
Assembling the
thethe
the lantern
lanternlantern
lantern
□
Locate two locking tabs on the top housing (A). On
either side, push the plastic wall with appropriate
force to release the lens (B) from the locking tabs.
□
On the underside of the top housing (A), pull off the
isolation strip.
□
Replace the top housing (A) back onto the lens (B).
□
Use the screws (E) to secure the base (C) or
(D) onto a 6 in. x 6 in. or 4 in. x 4 in. wood
post.
□
Attach the lantern assembly onto the base (C)
or (D) by inserting the two locking tabs on the
lens (B) into the two slots on the base (C) or
(D).
□
Twist the lantern assembly clockwise to lock
into place.
A
C
C
E
B
A
A
B
B

5
HAMPTONBAY.COM
Please contact 1-855-HD-HAMPTON for further assistance.
Maintenance
3
Replacing
ReplacingReplacing
Replacing the
thethe
the battery
batterybattery
battery
4
Replacing
ReplacingReplacing
Replacing the
thethe
the battery
batterybattery
battery
(continued)
(continued)(continued)
(continued)
□
Twist the lens (B) clockwise and remove it from the
base (C) or (D).
□
Remove the battery compartment cover.
□
Replace the old battery with a fresh 1.2V
800mAH NI-MH rechargeable battery.
Replace the battery compartment cover.
□
Place the lens (B) back onto the base (C) or
(D). Twist counterclockwise to lock into place.
A
B
C

6
Winter tips
□
Keep debris and snow off the solar panel (A) to allow the batteries to recharge. If the lights have been covered by
snow for a long time, allow the batteries to recharge in full, direct sunlight for 10-12 hours, so they can maintain
maximum capacity.
Care and Cleaning
Troubleshooting
Problem
ProblemProblem
Problem Possible
PossiblePossible
Possible Cause
CauseCause
Cause Solution
SolutionSolution
Solution
The solar light does not turn on
at night or its nightly run time is
shorter.
The battery is not fully
charged.
Ensure the solar light is located in an area
where it can receive the maximum amount of
full, direct sunlight every day. If the solar
light does not receive enough sunlight during
a day (e.g. due to cloudy or overcast weather
conditions), the battery will be recharged on
the next sunny day and resume normal
operation. Keeping the solar panel clean is
equally important to ensure the maximum
charging performance.
The solar light is
installed close to other
light sources.
Relocate the fixture or eliminate other light
sources.
The battery is reaching
the end of its useful life.
Replace the battery.

7
HAMPTONBAY.COM
Please contact 1-855-HD-HAMPTON for further assistance.
Service Parts
QTP22a-R4-AC-2
Part
PartPart
Part Description
DescriptionDescription
Description Quantity
QuantityQuantity
Quantity
A Top Housing 2
B Lens 2
C Small Mounting Base (4 in. x 4 in.) 2
D Large Mounting Base (6 in. x 6 in.) 2
E Screw 4
F Rechargeable battery 2
B
F
C
A
E
D

Questions, problems, missing parts? Before returning to the store,
call Hampton Bay Customer Service
8 a.m.- 6 p.m., EST, Monday-Friday
1-8
1-81-8
1-855
5555
55-
--
-HD
HDHD
HD-
--
-HAMPTON
HAMPTONHAMPTON
HAMPTON
HAMPTONBAY.COM
HAMPTONBAY.COMHAMPTONBAY.COM
HAMPTONBAY.COM
Retain this manual for future use.
®
/