Raychem PI-kablar Installation guide

Category
Coaxial cables
Type
Installation guide
Installation, Maintenance
and Operation Manual
Polymer Insulated (PI)
Series Constant Wattage
Heating Cable Systems
2 | nVent.com/RAYCHEM
PI heating cable
Splice kit
1
General information ����������������������������������������������4
2
Heating cable selection and storage ��������������������6
3
Heating cable installation ������������������������������������7
4
Components selection and installation ��������������15
5
Temperature control and limitation ��������������������16
6
Thermal insulation and marking �������������������������18
7
Power supply and electrical protection ��������������20
8
System testing ���������������������������������������������������21
9
Operation, maintenance and repairs �������������������22
10
Trouble Shooting ������������������������������������������������23
nVent.com/RAYCHEM | 3
Connection kit with one heating cable
Circuit identication label
(1)
PI cold lead cable
Insulation entry kit
Junction box
Typical Set Up Of Pi-Heating Cable Circuit
(1) The use of the circuit identification label showing all circuit
design details is mandatory in hazardous area. (PI-LABEL-EX)
4 | nVent.com/RAYCHEM
1 GENERAL INFORMATION
Use of the manual
This Installation and Maintenance manual is for nVent RAYCHEM
series resistance heating cable systems on thermally insulated pipes,
vessels and associated equipment only. In particular it refers to polymer
insulated (PI) series heating cable systems, which feature a specific
power output, varying with design parameters, mostly with cable length
and voltage. This manual provides general information and shows an
overview of the most common installations and applications off PI.
In any case, the information provided for specific projects will take
precedence over this manual.
Figure 1: Typical Cable Construction
Outer jacket hybrid
construction
Protective braid of tin or nickel plated
copper strands (max. 25 Ω/km)
PTFE/polymer sandwich
High temperature resistance heating conductor
Refer to applicable product datasheet for more detailed information.
Figure 2: Typical heating element set up
Earth leads
Connection leads
Heating cable
Cable joint between heating cable and
cold lead
Cold leads
Cable gland
For information regarding other applications contact your nVent
representative.
Important
For the nVent warranty to apply, the instructions that are included in
this manual and product packages must be followed� The installation
must also be in accordance with local National requirements applicable
to electrical heat tracing systems, as well as the requirements of other
International Standards, such as IEC 60079.
Personal involved in the installation, testing and maintenance of electric
heat tracing systems must be suitably trained in all special techniques
required, as well as in general electrical installation work. All work should
be monitored by supervisors, experienced in heat tracing applications,
and all installations must be carried out using the appropriate tools as
described in the nVent literature and installation instructions.
nVent.com/RAYCHEM | 5
Area Classification – Ordinary
XPI-F, XPI and XPI-S
Area Classification - Hazardous, Zone 1 or Zone 2
Schedule of Limitations:
1. The maximum withstand temperature for the XPI- and XPI-S- cable
is +260°C. for the XPI-F- cable +90°C and for the CS-150-xx-PI Cold
Applied Connection & Splice Kits is +200°C.
2. The maximum supply voltage for the XPI cable is shown in the
component description.
3. The minimum installation temperature is –70°C for the XPI- and
XPI-S- cable. –60°C for the XPI-F-cable and for the CS-150-xx-PI Cold
Applied Connection & Splice Kits is –50°C.
4. The minimum cable spacing must not be less than 20mm.
5. For XPI and XPI-S, the minimum bend radius is 2.5x the cable
diameter for cables less than or equal to 6 mm in diameter or the
minimum bend radius is 6x the cable diameter for cables greater
than 6 mm in diameter. For XPI-F, the minimum bending radius is
7.5 x the cable diameter.
6. The XPI- or XPI-F- cable is for use in areas with low risk of
mechanical damage, therefore appropriate installation consideration
shall be taken. The XPI-S- cable is for use in areas with normal risk of
mechanicaldamage.
7. The CS-150-xx-PI Cold Applied Connection & Splice Kits shall be secured
when installed. To avoid tensile stress, heating or cold lead cable
installation shall be fixed in their position in the immediate vicinity of the
connection or splice.
CAUTION: XPI cables are only suitable for use in areas with low risk of
mechanical damage (e.g. under insulation). In areas with a high level of
mechanical impact use XPI-S or conduit systeminstead!
Certicate No. Approvals coding
XPI-F, XPI and XPI-S
System Approval
PTB 08 ATEX 1102X
II 2 G Ex eb 60079-30-1 IIC T2… T6 Gb
II 2 D Ex tb 60079-30-1 IIIC T260… T90°C Db
IECEx PTB 08.0051X
Ex eb 60079-30-1 IIC T2… T6 Gb
Ex tb 60079-30-1 IIIC T260… T90°C Db
Certificate No. Approvals coding
XPI-F, XPI and XPI-S
Bulk Cable Approval
Baseefa15ATEX0158U
II 2G Ex 60079-30-1 IIC Gb
II 2D Ex 60079-30-1 IIIC Db
IECEx BAS 15.0105U
Ex 60079-30-1 IIC Gb
Ex 60079-30-1 IIIC Db
XPI and XPI-S
TC RU C-BE.ИМ43.В.01854
1Ex e IIC T6 (80°C)...T2 (290°C) Gb X
Ex tb IIIC T80°C...290°C Db X IP66
Ta –70°C...+56°C
ООО «ТехИмпорт»
XPI-F
TC RU C-BE.ИМ43.В.01854
1Ex e IIC T4 Gb X
Ex tb IIIC T110°C Db X IP66
Ta –60°C...+56°C
ООО «ТехИмпорт»
6 | nVent.com/RAYCHEM
Information on manufacturing
All cables display per meter a print string with the approval and
production information, followed by meter marks. In this print string,
the last 4 digits prior to the meter marks indicate respectively the
week and year of manufacturing.
Example:
nVent RAYCHEM (R) XPI-xxx Ohm/km 450/750 V
Baseefa15ATEX0158U II 2 GD Ex 60079-30-1 IIC Gb Ex 60079-30-1
IIIC Db Reg No. 0598 IECEx BAS
15.0105U Ex 60079-30-1 IIC Gb Ex 60079-30-1 IIIC Db Tmin -70°C EAC
RU C-BE.ИМ43.В.01719 1Ex e II T6 (80°C) T2
(290°C) Gb X Ex tb IIIC T80°C...290°C Db X IP66 2156698756423
-15/18 – 3587
Week of manufacturing: 15
Year of manufacturing: 2018
2 HEATING CABLE SELECTION AND STORAGE
The selection of the proper heating cable and components, best suited
for the application must be checked against the relevant product
literature and the product properties, of which the most important are
summarized in following table:
Table 1: List of heating cable properties
Heating cable type
XPI-F XPI XPI-S
Maximum voltage
U
°
0/U (V AC)
300/500 450/750 450/750
Maximum
Withstand
Temperature (°C)
90 260 260
Short term
temperature
exposure (°C)
100 300 300
Temperature
Classication
T4-T6 T2-T6 T2-T6
Minimum
Clearance (mm)(*)
20 20 20
Impact Resistance
(J)
n/a 4 7
Minimum
Installation
Temperature (°C)
–60 –70 –70
Min. Bending
Radius at min
installation temp
7.5 x Ø 2,5 x Ø ( Ø< 6mm)
/ 6 x Ø ( Ø 6mm)
2,5 x Ø ( Ø< 6mm)
/ 6 x Ø ( Ø≥ 6mm)
Max. Power
Output (W/m)
See table below or use RAYCHEM Software
Chemical
resistance (*)
Moderate High High
(*) - please check against individual datasheet or contact nVent for
further details.
nVent.com/RAYCHEM | 7
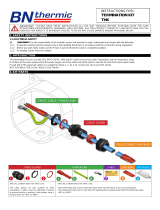
Table 2: Typical cable limits of power output
Maintain
temperature (°C)
Typ� max� cable load (W/m)
Good contact
Poor contact
XPI/XPI-S XPI-F XPI/XPI-S XPI-F
≤ 10 30 25 25 20
+ 11...30 25 20 20 15
+ 31...50 21 18 18 13
+ 51...75 18 - 15 -
+ 76...100 15 - 12 -
+ 101...125 12 - 10 -
+ 126...150 10 - 8 -
+ 151...200 8 - 5 -
The typical cable power output is shown above in table 2, depending
on application. The maximum cable power output is directly dependent
on the application and control method used. The actual limits of PI
heating cables in a specific application are given in Engineering Software
(e.g. TraceCalc Pro design software). Contact nVent for more details.
Ensure that the heating cable voltage rating is suitable for the
service voltage available and that the temperature rating of the
heating cable defined by the design is suited for theapplication.
Check equipment to be traced:
Check identification, dimensions of pipework /vessel,
actual temperatures and insulation properties against the
designdocuments.
Ensure all pressure testing of pipework/vessel is complete and
final paint and pipe/vessel coatings are dry to touch.
Walk the system and plan the routing of the heating cable on the
pipe, including tracing of heatsinks. e.g. valves, flanges, supports,
drains etc.
Inspect piping for burrs, rough surfaces, sharp edges etc. which
could damage the heating cable. Smooth off or cover with layers
of glass cloth tape, aluminium foil or rubber profiles (e.g. G-02).
Ensure that the heating cable voltage rating is suitable for the
service voltage available and that the temperature rating of the
heating cable defined by the design is suited for theapplication.
Changing any major design parameters like voltage or cable length
will result in power output other than designed, which may require a
redesign of the entire system. To prevent overload of the heating cable,
fire or explosion in hazardous areas, verify that the maximum sheath
temperature of the heating cable is below T-class or auto-ignition
temperature of the gases and/or dusts possibly present in those areas�
For further information, see design documentation (e.g. TraceCalc Pro
reports)�
Check the design specification to ensure the proper heating cable is
installed on each pipe or vessel.Refer to RAYCHEM product literature to
select an appropriate heating cable for each thermal, chemical, electrical
and mechanical environment.
Storage and transportation
Store and transport product in a clean, dry place
Temperature range: -70°C for XPI and XPI-S, -60°C for XPI-F
to +56°C for all
Protect the heating cable from moisture or mechanicaldamage
Keep ends of heating cables and kit components dry before and
during installation.
8 | nVent.com/RAYCHEM
3 HEATING CABLE INSTALLATION
Warning
As with any electrical equipment or wiring installation that operates at
line voltages, damage to heating cable and components, or incorrect
installation that allows the penetration of moisture or contamination
can lead to electrical tracking, arcing and potential fire hazard.
Any unconnected heating cable end, exposed to the environment, must
be sealed appropriately
3�1 Pre-installation checks
Check design recommendations:
Verify that you have all required engineering documents
supporting the installation.
Check for any special instructions in engineering documentation
(e.g. fixation method, use of metal mesh etc...).
Verify that the hazardous area information given in the engineering
documentation is compatible with the area classification the
material will be installed in.
Check materials received:
Inspect heating cable and components for in-transit damage.
Review the heating cable design and compare the list of designed
materials to the catalog numbers of heating cables and electrical
components received to confirm that proper materials have been
received on site. The heating cable type and hazardous area
marking is printed on the outer jacket. The application related
hazardous area details and relevant design data for each individual
heating circuit are recorded on a hazardous area label. (see 7.3)
Measure and note down the electrical resistance and the
insulation resistance of the cable. Compare these values to those
in the design documents (see section 8).
Check equipment to be traced:
Check identification, dimensions of pipework /vessel,
actual temperatures and insulation properties against the
designdocuments.
Ensure all pressure testing of pipework/vessel is complete and
final paint and pipe/vessel coatings are dry to touch.
Walk the system and plan the routing of the heating cable on the
pipe, including tracing of heatsinks. e.g. valves, flanges, supports,
drains etc.
Inspect piping for burrs, rough surfaces, sharp edges etc. which
could damage the heating cable. Smooth off or cover with layers
of glass cloth tape, aluminium foil or rubber profiles (e.g. G-02).
3�2 Heating cable pulling and laying
Heating cable pulling tips:
Use a reel holder that pays out smoothly with little tension.
Figure 3: Importance of cable pulling direction
nVent.com/RAYCHEM | 9
Avoid distortion of the cable and kinking.
When pulling the heating cable, avoid:
sharp edges
excessive pulling force
kinking and crushing
walking on it, or running over it with equipment.
Keep heating cable strung loosely but close to the pipe being
traced, to avoid interference with supports and otherequipment.
Add additional heating cable to trace the fittings, supports and
other accessories as required by the designspecification.
Leave the appropriate amount of heating cable at all power
connection, splice and tee locations. (Refer to component
installation instructions)
Pay out designed length and mark (i.e. with fixing tape) on cable
while remainder of cable still on reel (XPI: use printed metermarks
for orientation).
3�3 heating cable attachment
Do not use metal bandings, tie wire, vinyl electrical tape or duct
tape, as heating cable damage may result� Only use attachments
as specified in the design documentation�
Fix in place with a minimum of two wraps of the appropriate self-
adhesive glass cloth tape, metal mesh or fixing strip at 300 mm
intervals and additionally where necessary. Other attachments (like
aluminium tape) may be specified in the design documentation.
Cable must be installed and fixed as such, that movement of
cable during its heating up cycles is permitted, but not to allow
the cable to move freely under its own weight. The heating cables
may be installed in straight, multiple runs as required by the design
specification
On horizontal pipes fix on lower quadrant as shown below and not
on bottom of pipe.
Figure 4: Cable orientation on pipe
Sensor
Pipe
Heating cable
Pipe
Sensor
Heating cable
Read the design documents, in particular concerning the need for cable
allowances and regard the location of junction boxes/ controllers before
permanently attaching the cable to the pipe.
When installed in vertical runs, do not let heating cable hang and
carry its own weight but ensure sufficient support with steel strips.
(e.g. every 2m)
Installation on tanks might require additional fixation devices as
prepunched steel strips as shown on the next page:
10 | nVent.com/RAYCHEM
Figure 5: Typical cable layout on bigger surfaces as tank walls
Prepunched
strapping
Heating cable
Temperature
controller
Temperature
sensor
Cold leads
Junction box
Figure 6: Fixation device: prepunched steel strap
Use insulation entry kits, where cable penetrates the metallic
insulation cladding by design. In all other places, where cable
passes through metal sheet like cladding front disks (e.g.
on valves) protective rubber profiles G-02 should be used to
mechanically protect the cable.
3�4 Cutting the heating cable
Before cutting it, confirm the minimum required length and
tracing allowances.
Any change to designed circuit length will change power output
and design must be reconfirmed�
Cut the heating cable to length after it is attached to the pipe.
3.5 Attachment tapes, mesh and strips
GT-66 Glass cloth tape for attaching heating cable to pipe. Not for
stainless-steel pipes or for installation temperaturesbelow 5°C.
GS-54 Glass cloth tape for attaching heating cable to pipe.
For stainless-steel pipes or for any installation below 5°C.
ATE-180 Aluminium tape for attaching the cable to vessels.
For all surfaces and installations above 0°C.
HWA-METAL-MESH-SS-50MM-10M : Stainless-steel for attaching
heating cable onto valves, pumps or other odd shaped surface.
HWA-PI-FIX-SS-xMM-10M : Stainless-steel clip band for attaching
heating cables to pipes ensuring a regular spacing (e.g. triphase
systems)
nVent.com/RAYCHEM | 11
At long straight lengths, expansion loops may be needed to allow
for thermal expansion of the pipe without exposing cable to
excess of strain. Other attachment methods could be specified.
In that case, please refer to the design documentation.
3�6 Typical installation details
Typical installation details for fixing heating cable to pipe fittings are
shown hereafter.
Figure 7: Typical cable allowance on pipe shoe
PI heating cable
See design documenta-
tion for specic heating
cable length needed
Pipe
PI heating cables must not be overlapped and the minimum
clearance must be respected. Refer to the design documentation
for more info or contact nVent for assistance.
Figure 8: Typical cable allowance on valve
PI heating cables must not be overlapped and the minimum
clearance must be respected. Refer to the design documentation
for more info or contact nVent for assistance.
12 | nVent.com/RAYCHEM
Figure 9: Typical cable routing on pipe elbows
Pipe
Glass tape (every 0,3 m)
PI heating cable
PI heating cable is applied to outside
radius of elbow
Figure 10: Typical cable routing on flanges
Glass tape
Flange
Apply glass tape to hold
heating cable in place
Heating cable
PI heating cables must not be overlapped and the minimum
clearance must be respected. Refer to the design documentation
for more info or contact nVent for assistance.
General note:
Trace pipe fittings as shown to allow easy maintenance.
Alternatively wire mesh cages might be used.
nVent.com/RAYCHEM | 13
Figure 11-12: Cable applied on wire mesh
Do not use tie wire or straps to attach the heating cable to
the wire mesh� Use tape�
After installing the cable onto the mesh, push the mesh firmly
against the valve body to optimize contact between cable and
valve body. Air gaps between cable an heated surface should be
minimized as much as possible.
Consult the design specification for the heat tracing requirements
for fittings and supports.
Follow the instructions for cutting and stripping of heating
cables; they are included in the individual component installation
instructions.
The heating cable’s minimum bend radius must be respected
(refer to Table 1), together with the minimum clearance. Refer
to the design documentation for more info or contact nVent for
assistance.
Refer to the design documentation to ensure the correct
attachment method is used.
Figure 13: Minimal bending radius of cables
Bending the cable for XPI and XPI-S:
Cable Ø > 6 mm
6 x Ø
2,5 x Ø
Cable Ø 6 mm
14 | nVent.com/RAYCHEM
For XPI-F : 7.5 x Ø for all cables
When installing constant wattage heating cables, ensure that they
do not overlap or cross. Doing so may lead to local overheating
and hazard of fire.
Figure 14: Minimum clearance between heating cables must
be respected
Minimum clearance: 20 mm. For hazardous area applications, please
consult the RAYCHEM design software, e.g. TraceCalc Pro.
3�7 Heating cable allowances
All parts of a heat traced system that increase the surface area of the
normally insulated pipe/ vessel or metallic fins that protrude out of the
insulation (e.g. supports), will increase the overallheatloss.
These areas of increased heat loss require compensation, either by using
higher overall design safety factors or by the addition of extra cable
length.
In such cases sufficient cable should be added in such a way to at
least enable removal of instruments, valves etc (“maintenance loop”).
For pipes requiring more than one run of heating cable, apply the full
allowance for each run of cable on each fitting or support as long as
space allows. However, PI heating cables must not touch or overlap and
the minimum spacing between the heating cables must be respected.
For some applications, it may be physically impossible to install all of the
recommended allowance directly on the fitting or support. In this case,
install the excess heating cable on the pipe on either side of the fitting or
support, or distribute the additional heater length along the entire circuit
length if a lower local temperature is acceptable. If required, contact
nVent for assistance.
For further details on individual allowances please refer to the design
documentation or the RAYCHEM design software (e.g. TraceCalc Pro
reports).
nVent.com/RAYCHEM | 15
4 COMPONENTS SELECTION AND INSTALLATION
General notes:
Use the Design Specification to select required components.
RAYCHEM component kits must be used to satisfy Standards and
Approval Body requirements and the nVent warranty to apply. Installation
instructions included in the kit must be followed, including those for
preparation of the heating cable connections. Before assembly, use
the guide given in the instructions, to ensure that the kit is correct for
the heating cable and environment. The Components certified for use
in conjunction with XPI-F, XPI and XPI-S heating cables are: RAYCHEM
CS-150-2,5-PI, CS-150-6-PI, CS-150-25-PI and CS-150-UNI-PI.
4.1 Components required
For installation of all components refer to the relevant
component installation instructions.
Required for each heating cable end: Cold lead connection and
insulation entry kit
As required: Splice kits and accessories (fixing tape, support
brackets, pipe straps, labels, etc)
4�2 Component installation hints
On horizontal pipes locate junction boxes below pipe
wherever possible.
Locate junction boxes for easy access, but not exposed to
mechanical abuse.
Try to position junction boxes such, that power cable and heating
cable entries point downwards, to minimize water ingress in the
insulation.
Confirm junction box glands and stopping plugs are correct for
application and fixed firmly in place.
Route heating cable between junction box and place where it
enters the insulation cladding such, that the risk of mechanical
damage is minimized.
Do not strain heating cable as it exits/enters junction
boxes and insulation entries�
Ensure heating cable is fixed over pipe straps such as used for
junction box support brackets to avoid potential mechanical
damage.
Figure 15: Cable layout over clamps and straps
Bar hanger
Pipe
glass tape
Cable joints (splices) should be placed only in places, where cable
is not bent or mechanically stressed.
16 | nVent.com/RAYCHEM
5 TEMPERATURE CONTROL AND LIMITATION
5�1 General rules
RAYCHEM PI series heating cables are constant power output heaters
and as such typically require temperature control, unless otherwise
explicitely specified.
Good practice and local regulations may require additionally independent
temperature limitation devices. The selection of such devices also
depends on environmental conditions (non-haz. or haz. area)
For applications in hazardous areas either a stabilised design
or a thermostat control with temperature limiter complying with
the requirements EN 60079-30 can be used to limit the surface
temperature of the heating cable.
In cases where stabilised design is not applied, a control
thermostat ensures that under normal conditions, the heating
system will be switched off, as soon as maintain temperature is
reached.
An additional, independent temperature limiter ensures that if the control
thermostat fails, the surface temperature of the heating cable will
not exceed the maximum allowed temperature for hazardous area by
switching off the heating cable.
General features of such a limiting device:
A lockout function ensures that the heating cable
remains switched off, until failure has been eliminated and
normal conditions are restored. The lockout function is
manually re-armed. Reset requires a tool (e.g. a key to open a
panel or a password for software).
Value of setpoint has to be secured against
unintendedchange.
Limiter must permanently switch off in case of
sensormalfunction.
The limiter function complies to all relevant standards (e.g.
EN60730 or DIN3440 etc.).
Follow the installation instructions supplied with the thermostat
and/or the limiter.
Use a proper wiring diagram for the heating cable layout and
control method desired.
The limiter must be set to ensure that the maximum
temperature of the surface of the cable does not exceed neither
T-class nor maximum working temperature of the heater for a
given output under worse case conditions.
Warning : As with any temperature measurement equipment,
possible falsification of true temperatures due to increased
heatloss caused by the sensor itself might lead to inaccurate
temperature readings or unsafe tripping of safety limiters�
The setpoint might need to be adjusted accordingly Contact
nVent or the supplier of the limitation device in order
to obtain detailed information concerning offsetting of
limitation devices.
nVent.com/RAYCHEM | 17
5.2 Sensor placement: Temperature control device
The choice of the right location for the controller sensor depends on, but
is not limited to following aspects:
Flow direction of the fluid, best location: downstream.
Impact of heatsinks such as supports etc, best: close to heatsink.
Chimney effect on large size vertical pipes, best: on the bottom.
Accessibility for maintenance purposes, best: at ground level.
Impact of other heat sources, sun etc, best: at cold side.
For details please refer to the engineering documentation.
5.3 Sensor placement: limitation device
Typically the sensor is being placed on a length of cable, that is
separated from the pipe by means of insulating material,in order to
create an “artificial hotspot”.
The choice of the right location for the limiter sensor depends on, but is
not limited to following aspects:
Flow direction of the fluid, best location: upstream.
Impact of heatsinks such as supports etc, best: away
from heatsinks.
Accessability for maintenance purposes, best: at ground level.
Chimney effect on large size vertical pipes, best: at the top.
Impact of other heat sources, sun etc, best: at hot side of pipe.
It is the responsibility of the installer to ensure that these
conditions are met in the most appropriate way.
For details please refer to the engineering documentation.
18 | nVent.com/RAYCHEM
6 THERMAL INSULATION AND MARKING
6�1 Pre-insulation checks
Visually inspect the heating cable and components for correct
installation and possible damage. (See Section 10 if damaged.)
Insulation resistance testing (as per Section 8) is strongly
recommended prior to covering the pipe with thermal insulation.
6.2 Insulation related requirements
Correct temperature maintenance requires properly installed and
dry thermal insulation.
Check that all pipework, including fittings, wall penetrations and
other areas are completely insulated
Thermally insulate and weatherproof to design specification.
Polymeric heating cables need to be protected against mechanical
damage. Metallic insulation cladding is
considered as sufficient mechanical protection.
Ensure that heating cable is not damaged during installation of
cladding by drills, self tapping screws and sharp edges of cladding
etc.
In all stabilised design cases, the characteristics of the installed
thermal insulation (material and thickness) must comply
with the design requirements and be verified and confirmed
in the documentation, to ensure compliance with approvals
requirements.
Make sure, that under no circumstances any insulation material
is being placed between heated surface and cable, thus disabling
intended heat flow to the substrate, which may result in possible
overheating of the cable.
Good practise requires wrapping of the installed heating system
with an appropriate metal foil prior to installation of the thermal
insulation. This is especially so at places where intimate
contact between trace heating cable and heated surface is not
possible, such as valves or flanges where a suitable heat sink
of temperature rated metal foil may be used. Details may be
described in local insulation standards.
Check that all insulation entry kits are fitted correctly or that other
alternative protective devices (such as rubber profiles G-02) are
used, where appropriate.
Ensure that all places are sealed where thermostat capillaries,
sensor cables or support brackets etc. exit the cladding.
6.3 Marking
Install “Electric Traced” signs on the insulation cladding along
piping at suitable intervals (3-5 m intervals recommended) on
alternate sides as a warning.
Mark on outside of insulation the location of any heating cable
components like connection points, splices etc.
nVent.com/RAYCHEM | 19
7 POWER SUPPLY AND ELECTRICAL PROTECTION
Do not energize cable when it is coiled or on the reel.
The Metal sheath /braid of this heating cable must be
connected to a suitable earthling terminal�
7�1 General
For installations in hazardous area, each circuit shall have the means of
isolating all line conductors from the supply.
7.2 Electrical loading
Size overcurrent protective devices according to the design
specification and/or local standard practises.
7.3 Residual current (earth fault) protection
Properly rated ground fault protection equipment is required for each
circuit. nVent requires the use of a 30 mA residual current device to
provide maximum safety and protection from fire.
Where design results in higher leakage current, the preferred trip level
for adjustable devices is 30 mA above any inherent capacitive leakage
characteristic of the heating element as specified by the heating cable
supplier or alternatively, the next common available trip level for non
adjustable devices, with a maximum of 100mA or 300mA (Depending on
area classification).
All safety aspects need to be proven.
For any heating cables installed in a hazardous area, the use of residual
current devices is mandatory by the electrical codes andstandards.
7�4 Circuit marking
For all hazardous area installations make sure, that system is properly
marked with a Haz area label such as PI-LABEL-EX, which needs to
be completed with design data by the responsible installer. Results of
design documentation (TraceCalc Pro) maybe used.
20 | nVent.com/RAYCHEM
8 SYSTEM TESTING AND COMMISSIONING
WARNING: Fire hazard in hazardous locations.
Megger tests can produce sparks. Be sure there are no flammable
vapors in the area before performing this test (hot work permit).
CAUTION: De-energise all power circuits before installing
orservicing.
8�1 Testing of insulation resistance and conductor resistance
nVent recommends insulation resistance test
before installing heating cable
before installing thermal insulation
prior to initial start-up/ after completion of thermal insulation
as part of the periodic maintenance. (see Section 9.2). The heating
circuit electrical resistance needs to be measured and compared
to the design documentation before initial startup.
8�2 Test method for insulation resistance testing
After completing heating cable installation, the insulation resistance
between the conductor and the braid has to be tested (see Section 6.1).
The minimal required test voltage is 500Vdc, but the trace heating
standard EN60079-30 strongly recommends to use a testing voltage
of 2500Vdc. Hence nVent field acceptance test should be carried out
with a test voltage of 2500Vdc and the minimum reading shall be 20MΩ,
regardless of the heating cable length.
The installer should record the values for each circuit on the installation
record sheet.
Tip: Discharge heating cable before disconnecting from the Megger
8�3 Commissionning
Verify all system documentation is complete as per "9.1
Documentation"
Record and retain all installation & post insulation test values as
per the Installation record sheet in this document.
  • Page 1 1
  • Page 2 2
  • Page 3 3
  • Page 4 4
  • Page 5 5
  • Page 6 6
  • Page 7 7
  • Page 8 8
  • Page 9 9
  • Page 10 10
  • Page 11 11
  • Page 12 12
  • Page 13 13
  • Page 14 14
  • Page 15 15
  • Page 16 16
  • Page 17 17
  • Page 18 18
  • Page 19 19
  • Page 20 20
  • Page 21 21
  • Page 22 22
  • Page 23 23
  • Page 24 24
  • Page 25 25
  • Page 26 26
  • Page 27 27
  • Page 28 28
  • Page 29 29
  • Page 30 30
  • Page 31 31
  • Page 32 32
  • Page 33 33
  • Page 34 34
  • Page 35 35
  • Page 36 36

Raychem PI-kablar Installation guide

Category
Coaxial cables
Type
Installation guide

Ask a question and I''ll find the answer in the document

Finding information in a document is now easier with AI