Maytag MDB-8 Owner's manual

Category
Dishwashers
Type
Owner's manual
MA A(;
MDB-8
ii::i 8
Operating Tips ! ! !i ! !.i ! ii ii13 Troubleshooting ......... 9-10
Dishwasher Use ............ 5 Guide d'utilisation
et d'entretien .............. 12
Gui_ de uso y cuidado ...... 24
Part No. 6 920187 A www.maytag.com _2005 Maytag Appliances Sales Co.
Safety
What You Need to Know About
Safety Instructions
Warning and Important Safety Instructions appearing in this
guide are not meant to cover all possible conditions and
situations that may occur. Common sense, caution and care
must be exercised when installing, maintaining or operating
tile dishwasher.
Always contact the manufacturer about problems or
conditions you do not understand.
Recognize Safety Symbols, Words, Labels
Important Safety Instructions
Products with a _ label [lave been listed with
Underwriter's Laboratories, Inc. - those with a CSA tag [lave
been listed with Canadian Standards Association.
Nevertheless, as with any other equipment using electricity
and moving parts, there is a potential hazard.
1. Read all instructions before using the dishwasher.
2. Use the dishwasher only for its intended function.
3. Disconnect electrical power to dishwasher before
attempting to service.
4. To avoid electrical shock hazard, the sides and back
must be enclosed and the front panels must be attached
before electrical power is applied to the dishwasher.
Refer to the installation instructions for proper grounding
procedures.
5. Connect to a properly rated, protected and sized power
supply circuit to avoid electrical overload.
6. Children should never be permitted to operate, or play
in, with, or around this dishwasher.
Z To reduce the risk of injury when loading items to be
washed, sharp or pointed items should be located with the
handles up. Also, load sharp items so they are not likely to
damage the door seal.
8. Do not touch the heating element on the bottom of the
tub during or at the completion of a cycle. It will be hot.
9. Use only detergents and rinse additives designed for a
residential automatic dishwasher. Never use soap,
laundry detergent, or hand washing detergent in your
dishwasher. Keep these products out of reach of
children.
10. De not sit, stand on or abuse the door or dish racks of
the dishwasher.
11. Under certain conditions, hydrogen gas may be produced
in a [lot water system that has not been used for two
weeks or more. Hydrogen gas is explosive. If the [lot
water system has not been used for such a period, turn
on all hot water faucets and let the water flow from each
for several minutes. Thiswill release any accumulated
hydrogen gas. As the gas is flammable, do not smoke or
use an open flame during this process.
12. Do not wash plastic items unless marked "dishwasher
safe" or the equivalent. For plastic items not so marked,
check the manufacturer's recommendations.
13. Do not tamper with controls.
14. To prevent accidental child entrapment and suffocation
risks, always remove the door to the washing
compartment when removing an old dishwasher from
service or discarding it.
15. Use caution when unloading the dishwasher. Dishes will
be hot if unloaded shortly after a cycle has completed.
16. Certified residential dishwashers are not intended for
licensed food establishments.
1Z To avoid water, mold or mildew damage to your home,
inlet and drain [lose connections should be checked
periodically for leaks.
Save These Instructions
for Future Reference
WhatCanandCannotBeWashed
Most tableware, cookware and flatware can safely be washed in your dishwasher. Check with the manufacturer.
Aluminum Yes, except anodized. High water temperature and detergents may affect finish.
Cast Iron No Seasoning will be removed, and iron will rust.
China/Stoneware Yes, except antique or Always check manufacturer's recommendation before washing.
hand-painted. Antique, hand-painted or over-the-glaze patterns may fade. Gold
leaf may discolor.
Crystal Yes, except antique or Always check manufacturer's recommendation before washing.
delicate crystal. Some types of leaded crystal may etch with repeated washings.
Filters Not recommended. May leave a dingy deposit or stain on dishwasher interior.
Glass Yes A specialty glass called milk glass can yellow with repeated
dishwasher washing.
Gold-Plated No Will discolor.
Flatware
Pewter, Tin No
Plastics Yes, top rack, except Always check manufacturer's recommendation before washing.
disposable plastic Plastics vary in their capacity to withstand high water
items, temperatures and detergents. Disposable plastic items are not
dishwasher safe for this reason.
Stainless Steel Yes Run a Rinse Only cycle (select models) if not washing
immediately. Prolonged contact with foods containing salt,
vinegar, milk products or juice could damage finish.
Sterling Silver or
Silverplate
No, if has commercial
"darkening".
Always check manufacturer's recommendation before washing.
Run a Rinse Only cycle (select models) if not washing
immediately. Prolonged contact with food containing salt, acid or
sulfide (eggs, mayonnaise and seafood) could damage finish.
Commercial "darkening" may be removed by detergent.
Wooden Items No Wood may warp, crack or discolor.
2
OperutingTips
Before You Start
Don't prerinse. Simply scrape off any bones or
large food particles.
If connected to a food waste disposer, make certain
the disposer is empty before starting the
dishwasher.
Scrape off tomato-based food soils (see page 8).
Remove certain foods such as mustard,
mayonnaise, lemon juice, vinegar, salt or dressings
from stainless steel flatware as soon as possible.
These foods may cause rusting and pitting if allowed
to remain in contact with the surface for an extended
period of time.
Starting the Dishwasher
1. After loading the dishwasher and adding detergent,
select the desired cycle by pressing the Cycle
Select pad until the light next to the desired cycle
is illuminated. Choose the desired options by
pressing the pads. The indicator lights for the
selected cycle and options will illuminate. To cancel
an option press the pad again.
2. To start a cycle, close the door until it latches then
press the START/CANCEL pad once. After a
pause, the fill will begin. The display countdown
(select models) will flash until START/CANCEL is
pressed.
J ote: If START/CANCEL is not pressed within 30
seconds of choosing your cycle, the dishwasher will
turn off.
The dishwasher remembers your last cycle so you
do not have to reset the cycle each time. To start
the dishwasher using the same cycle and options
selected on the previous wash, just press the
START/CANCEL pad.
3. To cancel a running cycle, press the
START/CANCEL pad once. The dishwasher will
drain, then shut off. To turn the dishwasher off
without draining, press the START/CANCEL pad
twice. To prevent unplanned cycle or option
changes, these selections are "locked in" after 1
minute.
Note: If the cycle select pad is pressed after the
controls have been "locked in", the light beside the
selected cycle will flash three times.
Adding a Forgotten Item
For best cleaning, the forgotten item should be added
early in the cycle.
1. Grasp door handle and unlatch door without
opening completely. All lights will flash to indicate
that the cycle is suspended.
2. Wait for the water circulation to stop.
3. Open the door and add the item.
/4. Close and latch the door. Lights will stop flashing
when the door is properly shut. After a slight delay,
the cycle resumes automatically at the point of
interruption.
Notes:
If the door is opened during a running cycle,
there may be up to a 30 second delay before the
dishwasher restarts after closing the door.
Extended interruption of the wash cycle is not
recommended.
Loading
General Recommendations
(Rack features vary by model)
Items can be centered behind a single tine or loaded
at an angle to maximize space.
Avoid blocking or preventing the spray arms from
spinning freely. Do not allow items to extend beyond
the racks.
Face soiled surfaces toward the center of the
dishwasher.
For best dishwashing results follow these guidelines to
determine the best arrangement for your items.
10 Place Setting Load
(Rack features vary by model)
3 saucers are
loadedonthe
rackunderthe
Stack-RackTM
Shelf
(select
models)
3
Upper Rack Lower Rack
Loading
Upper Rack
Glasses, cups, stemware, light-weight plastics, plates,
bowls, pans, long-handled utensils etc. can be loaded
in this rack. Do not load glasses over the tines.
The Stack-Rack TM
(select models) on the
right side of the upper
rack folds up or down
for loading flexibility.
Fold it down to hold
long-handled knives,
spatulas and spoons or short items like cups or juice
glasses. Fold it up for taller items like glasses, bowls,
plates, etc.
The edge of the
Stack-Rack TM(select
models) is designed
to hold stemware in
place. Taller stemware
will fit better on the
right side as the
upper rack is deeper
on this side.
Lower Rack
A variety of items such as dinner plates, mixing bowls,
pots and pans and baking dishes can be loaded in this
rack.
Wider items can be placed along the left side and
back of this rack.
Utensil Basket
Removable Standard Utensil Basket
[style may vary]
For best cleaning results, prevent
items from nesting together by
placing some items in the basket
with handles up and some with
handles down. On slotted covers,
load knives handles up and
spoons and forks handles down.
Be sure that thin, finely pointed items do not extend
through the basket. This could block the lower wash
arm.
Auxiliary Basket [select models)
Use this supplemental basket in
the upper or lower rack for
loading miscellaneous items and
utensils. This is also a safe place
to load sharp knives and pointed
items.
Removing the Upper Rack
The rack can be removed when tall or oversized items
need to be loaded into the lower rack. Unload the
rack before removing it from the dishwasher.
To remove rack with tab-lock rack stops:
1. Roll the rack ½to _ of the way out.
2. Locate the rack stops at the end of each track.
Squeeze the tab in the middle of the rack stop and
pull the rack stop straight out. Take care to support
the rack while removing the rack stops.
3. Roll the rack all the
way out of the track
and remove from
the dishwasher.
To replace:
1. Replace the
dishwasher rack by
guiding the wheels
into the tracks.
Style may vary by model
Tab Lock
Rack Stop
2. Push each rack stop squarely into the end of the
track until the catch pops into the small hole on the
side of the track.
Important:
The dishwasher will not
operate correctly if the
wash arm is not aligned
with one of the water
inlet holes on back wall
of the dishwasher.
DishwasherUse
Hot Water
For optimal cleaning and drying results, hot water
is necessary. The incoming water temperature
should be 120 ° F [49 ° C) to properly activate the
detergent and melt greasy food soils.
To check the incoming water temperature, turn on the
hot water faucet nearest the dishwasher and let it run
into a glass in the sink. Place a candy thermometer in
the glass and check the temperature once it has
stopped rising.
Detergent
Use a detergent designed specifically for use in an
automatic dishwasher. Be sure it is fresh. Store
granular detergent in a cool, dry place (not under the
sink).
Recommended Amount
Too little detergent results in poor cleaning, hard water
filming/spotting and poor drying. Too much detergent
can cause permanent etching/cloudiness.
Suds can cause the dishwasher to overflow. Measure
the detergent carefully and use only detergents
designed for use in a dishwasher. Less detergent is
needed in soft water. Try another brand of detergent if
sudsing continues.
The amount of detergent to use is determined by the
hardness of the water and soil level of the load. Refer
to the following chart for detergent usage
recommendations.
Light Soil 2 tsp 6 tsp
Soft (0-4 gpg) Normal Soil 4 tsp 6 tsp
Heavy Soil 4 tsp 7 tsp
Medium (5-9 gpg) Light Soil 4 tsp 6 tsp
Normal Soil 4 tsp 6 tsp
Heavy Soil 5 tsp 7 tsp
Hard (10-12 gpg) All Levels 5 tsp 8 tsp
*Your local water utility or state university extension service can tell
you the degree of water hardness in your area.
In extremely hard water conditions (13 grains per
gallon or more*), it is difficult to achieve good
results with any dishwasher. A mechanical water
softener may be necessary to improve water
quality, detergent effectiveness, and protect the
dishwasher parts from the damage that hard
water can cause.
Add recommended amount of detergent to each cup
as shown and close the detergent lid.
Do not use detergent with the Rinse Only (select
models) cycle. Leave the detergent lid open when
running Rinse Only (select models).
Rinse Aid
Regular use of a rinse aid improves drying,
reduces spotting and filming, and reduces
moisture left on the dishwasher interior.
An automatic rinse aid dispenser is located next to the
detergent cup.
The window next to the dispenser cap indicates when
the rinse aid reservoir needs to be refilled. When the
level of rinse aid is below the indicator marks and the
window is nearly clear, it is time to refill the dispenser.
Check the dispenser monthly.
To add rinse aid to the
dispenser, turn the cap
counterclockwise to open.
Remove the cap and pour
liquid rinse aid into the
opening. The amount of
rinse aid dispensed during
the cycle is adjustable by moving the lever inside the
reservoir area. For most water conditions use the
manufacturer recommended setting of "2". Adjust it up to
the "MAX" setting for hard water. Set the lever anywhere
between these amounts as needed to get the best results.
Replace the cap and turn it clockwise to close.
5
Cvcles,OptionsandLights
Cycles
Choose tile cycle that best describes your dishload by pressing the cycle select pad. (See page 3, Operating Tips, for how
to begin the cycle).
Heavy Longcycle for heavy food soils. 132" 2 washes/3 rinses
Medium cycle for average food soils.
Normal The turbidity sensor is active with this 97-117" 1-2 washes**/1-2 rinses**
cycle.
Light Short cycle for light food soils. 82* 1wash/2 rinses
Rinse Only Rinses dishes being held until there 9 1 rinse
(select models) is a full load.
Includes approximately 30 minutes of dry time.
**Number of fills will vary depending on the soil level of each load.
Notes:
Depending on water temperature, there may be time added to the cycle to bring water up to temperature.
Only the following certified cycles have been designed to meet NSF requirements ([NSF/ANSI 184 Residential
Dishwasher) for sanitization: Heavy, Normal and Light cycles.
Options
In addition to choosing a cycle, choose as many available options as are needed for your dishload.
Hi Temp Wash provides additional heat during the wash portion of the cycle, All cycles
Hi femp Wash which ensures proper water temperature for better cleaning and drying results. (except Rinse Only
It also adds an additional rinse to the cycle which improves results in hard [select models])
water situations.
For enhanced drying results select this option. When Heated Dry is not
selected, towel drying of some items such as plastic and items with non-stick All cycles
Heated Dry surfaces may be necessary and more moisture may be noticed adhering (except Rinse Only
to the dishwasher interior. In models with plastic interiors, it is normal to [select models])
notice vapor escaping from the door vent as the heat dries your dishes. Vapor
will escape even if Heated Dry is not selected.
Delay Use to automatically start the cycle at a later time. See page 7 for instructions. All Cycles
Tough ScruhTM/ Select when washing loads with hard to remove soils. Depending on which All Cycles
Tough Scrub PlusTM cycle is being used, this option adds heat, water and or wash time to the wash
([select models) cycle.
Sanitize Sanitizes dishware. When cycle monitor recognizes that the proper conditions All Cycles
([select models) have been met, Sanitized light will activate at the end of the cycle. Sanitization
may not be achieved if there is an interruption of the cycle, power failure or if
the incoming water temperature is below 120° F [49° C].
START/CANCEL Starts and stops dishwasher. See page 3 under Operating lips: All Cycles
Operating the Dishwasher, for explanation.
Locks control touchpad to prevent unwanted use. See page 7for instructions. All CyclesControl Lock Option
([select models)
6
Cycles,OptionsandLights
Delay
The Delay option can be used to automatically start
the cycle at a later time to reduce daytime heat
buildup in the home or to take advantage of reduced
energy costs if available in your area. This option is
also useful for conserving hot water at times of high
household usage (showers, laundry).
To set up a Delay:
1. Select the appropriate cycle and options for the
load. Close the door.
2. Press the Delay pad until the desired amount of
delay time is selected.
3. The Delay indicator and the count down display
(select models) will flash until the START/CANCEL
pad is pressed.
4. As soon as the START/CANCEL pad is pressed, the
flashing will stop and the delay time will begin
counting down. The Delay indicator will remain lit
until the delay time has counted down.
5. The cycle will automatically start as soon as the
delay time expires.
Note: If 30 seconds elapse between setting the
cycle and options and pressing the
START/CANCEL pad, the dishwasher will turn off.
To cancel a Delay:
When the delay is counting down, press the Delay pad
again. The indicator light will go out and the cycle will
start or resume immediately.
To cancel a Delay and the cycle:
Press START/CANCEL once to drain and turn off
the dishwasher.
Or
Press START/CANCEL twice to turn dishwasher off
without draining.
Control Lock
Option (select models)
The control touchpads can be locked to prevent
unwanted use. If this feature is activated between
cycles, the dishwasher cannot be operated until the
controls are unlocked. If desired, the controls can be
locked after a cycle or Delay has started.
Setting the Control Lock:
1. Press the Heated Dry pad for three seconds.
2. An indicator light next to the lock graphic will
illuminate when the controls are locked.
To Cancel:
1. Press the Heated Dry pad for three seconds.
2. The indicator light will go off.
Notes:
If a cycle or option pad is pressed after the
controls have been locked, the indicator light next
to the lock graphic will flash five times. On select
models with a countdown display, the display will
flash an "L" simultaneously with the lock
indicator.
This option does not lock the door, only the
dishwasher controls.
Lights/Display (select models)
N ....
Clean Light Illuminatesatthe end of the cycleand remainslit until the doorhasbeenopenfor 30 secondscontinuously.
Wash/Dry Light Illuminatesduringall rinse,wash and dryportionsof the cycle.
Sanitized Light Illuminatesatthe end of the cyclewhenconditionshavebeenmet to achievesanitization. Thelight will
(select models) remainlit until the door hasbeen openfor 30secondscontinuously.
Notes:
When Sanitize is selected, cycles are monitored to assure sanitization. The Sanitized light will not activate if sanitization
requirements are not met. This could happen if the cycle is interrupted, power failure occurs or incoming water
temperature is below 120° F(49° F).
The Clean and Sanitized indicator lights (select models) will not relight after a power failure until after the next cycle is run.
7
CareandCleaning
General Recommendations
The dishwasher interior is normally self-cleaning.
Periodically check the bottom of the dishwasher tub
to see if any large particles remain.
Wipe the edge of the inner door liner to remove any
food soil splashes which occurred during loading.
When cleaning stainless steel, always wipe with the
grain. Never use products containing chlorine bleach
or citric acid.
The color from some tomato-based food soils may
occasionally adhere to various components of the
dishwasher interior, causing temporary discoloration.
To minimize this:
Remove excess tomato-based food soils from dishes,
before loading.
Run the Heavy cycle when washing loads containing
tomato-based food soils.
Use a dishwasher detergent that contains chlorine to
better fight staining.
!!i!ii !!i!i !i! !
Standard Exterior Light to moderate Soft damp cloth and liquid spray cleaner.
Daily cleaning and light soil
Stainless Steel
Exterior
(select models)
Moderate to heavy soil
Streaks or fingerprints/restore shine
Discoloration
Interior Light to moderate
Discoloration, or tomato-based stain
*Brand names are trademarks of the respective manufacturer.
**Call 1-877-232-6771 U.S.or 1-800-688-8408 Canada to order.
Do Not use abrasive powders or cleaning pads.
Soft cloth or sponge and one of the following:
Mild detergent and water
A solution of white vinegar and water
Formula/409 Glass and Surface Cleaner*, or
similar multi-surface cleaner.
Do Not use products containing chlorine
bleach or citric acid.
Follow with rinse and dry.
Soft cloth or damp sponge and Bon Ami*.
Follow with rinse and dry.
Soft cloth and Stainless Steel Magic Spray**.
Soft cloth or damp sponge and Cameo Stainless
Steel Cleaner*. Rinse immediately and dry.
Soft cloth or damp sponge.
Switch dishwasher detergent to chlorine-based
product.
Storage/Moving
Fill detergent cup with a fresh-scented dishwasher
detergent or baking soda and select the Normal cycle.
Allow the dishwasher to complete the cycle. Then turn
the water supply off and drain the dishwasher. To drain,
press the START/CANCEL pad once to activate the
dishwasher. Press START/CANCEL again to activate
the drain. Operate the drain twice to ensure most of the
water is removed. Last, disconnect the electrical supply
and prop open the door.
When turning the water supply to the home off, the
water shut off at the dishwasher must be turned off also.
8
Troubleshooting
CHECK THESE POINTS TO HELP SAVE YOU TIME AND MONEY.
Dishwasher will not fill Press the START/CANCEL pad to start the dishwasher.
Be sure door is latched securely.
Be sure the water is turned on.
Check that the pad is properly selected for a cycle.
Check your home's circuit breaker or fuse box.
Check inlet hose for a kink.
Check water valve inlet for sediment and clean if necessary.
Dishwasher will not drain/ If hooked up to a food waste disposer, be sure the knock-out is removed from the
water in tub bottom disposer inlet.
Check for food obstruction in the drain or disposer.
Check drain hose for a kink.
Check your home's circuit breaker or fuse box.
Check that the cycle is completed.
Dishwasher adds water at This is normal. The sensor (select models) in the pump must stay submerged so a
end of cycle short fill of water is added after the cycle's last drain.
Check that the cycle is completed.
Detergent cup is not empty
Be sure dispenser is not blocked.
Use fresh detergent stored in a cool, dry place.
Dishwasher seems noisy A water valve hiss during fill is normal.
Water circulation sounds are normal.
A thumping sound may be a wash arm bumping an item that is extending beyond the
racks. Readjust load to avoid obstructing wash arm.
Chopping or grinding sounds may be heard as the internal chopper blade chops hard
items like fruit seeds, nuts, etc.
Humming during the drain is normal.
A snap noise is the detergent cup lid hitting the door liner when the dishwasher door
is opened at the end of the cycle. This is normal.
Proper installation affects the noise level.
Cycle takes too long Sanitize has been selected and the cycle is extended to heat water.
Check to see that the incoming water temperature is 120° F (49° C).
Dishwasher has an odor Run dishes being held in the dishwasher through a Rinse Only cycle.
Many dishwashers have a "new" smell when first installed. This will dissipate with use.
Dishwasher may not be draining properly. (See"Dishwasher Will Not Drain" section.)
Fora strong odor, place baking soda in both sides of the detergent cup. Select Light
cycle and allow the water to circulate for about 10 minutes. Interrupt the cycle by
unlatching the door and let it stand overnight. Restart the dishwasher by latching the
door and allow it to complete the cycle. Another alternative is to use a dishwasher
cleaning product such as Jet-Dry Dishwasher Cleaner+.
Dishwasher leaks Check that the dishwasher is level. (Refer to the Installation Instructions.)
Suds can cause the dishwasher to overflow. Measure the detergent carefully and use
only detergents designed for use in a dishwasher. Less detergent is needed in soft
water. Try another brand of detergent if sudsing continues.
Follow directions closely on how to add a forgotten item (pg. 3).
Toavoid rinse aid leaking from the dispenser, be sure the lid is securely attached.
Indicator lights flashing The countdown display (select models) flashes after a cycle is selected until the
START/CANCEL pad is pressed.
The countdown display (select models) and the delay indicator flash after a delay is
selected until the START/CANCEL pad is pressed.
All active display indicators flash if the door is opened during a running cycle or delay.
The currently selected cycle flashes if an attempt is made to change the cycle after
cycle "lock-in".
The lock indicator flashes and the countdown display (selected models) flashes an "L"
if a pad is pressed while the control lock is enabled.
Cont.
*Brand names are trademarks of the respective manufacturer. 9
iiiiil i iii ii}DilOiii!ii!i}!i!i!i!i!i!i!i!i!i!i!i!i!i!i!i}}il,iii }
Display time drops This isnormal when the Auto Clean (:selectmodels} or Normal cycle is selected and the
dishwasher decides to skip or add a drain and refill.
or increases
(:select models:)
Glasses are cloudy/ Select Hi Temp option.
Check water temperature. Incoming water should be 120° F(:49° C}.
spotted Always use a rinse aid.
Confirm that the cloudiness isremovable by soaking the item in white vinegar for
approximately 5 minutes. If removed, the problem isdue to hard water. Adjust detergent
amount being used to match water hardness (pg. 5}. Be sure detergent isfresh, stored
properly and is a high quality brand.
If cloudiness is not removable, it is etching. Thisisan erosion of the surface of the
glassware and can be caused by water that istoo hot, from using too much detergent or by
prewashing. Detergent needs food soil to act upon. Ifetching has occurred, the glassware is
permanently damaged. Toprevent further etching, adjust the detergent amount to match
the water hardness, stop prewashing, and use water heating options only when incoming
water temperature isbelow 120° F (:49° C}.
Food soil remains Check water temperature. Incomingwater should be 120° F (:49° C}.
Run hot water at the sink before starting the dishwasher.
on dishes
Check water hardness and adjust detergent amount accordingly (pg. 5}.
Use fresh detergent stored in a cool dry place.
Select proper cycle for the soil level (:pg.6}.
Select proper options, Hi Temp Wash, Tough ScrubTMorTough Scrub PlusM (:selectmodels}.
Make sure the upper rack wash arm connector iscorrectly aligned in one of the water inlet
holes (:pg.4}.
Load items so they do not block the wash arms (:pgs.3-4}.
Load the utensil basket with knife handles up and spoon and fork handles down.
Do not place glasses over tines.
Before loading,scrape off burnt on foods and wipe the starchy film from utensils used with
pasta, rice and oatmeal. These soils require more energy than the rest of the load to clean.
items washed in the Aluminum utensils or pans can leave marks when they rub against other items.Leave a
dishwasher or the slight space between items.
Iron deposits in the water can leave a yellow, brown or orange film on dishes or the
dishwasher tub itself dishwasher tub. A rust filter may be needed. Check with a water treatment company.
are stained/discolored Separate silver or silver-plated silverware from stainless steel. These metals can be
damaged by contact with each other during washing.
Color from tomato sauces may adhere to the interior parts of the dishwasher (:pg.8}. If light
staining has occurred, leave the door open to oxidize the stain away. Use a dishwasher
detergent that contains chlorine to better fight staining.
Certain dishwasher detergents may stain silver. Tryanother brand of detergent.
Items not properly Be sure Heated Dry is selected.
dried/moisture is Water droplets may form on the inner door as part of the drying process.
present on the Use a rinse aid separate from the detergent like Jet Dry* or Cascade Rinse Aid* regularly, to
dishwasher interior improve drying. Turn the rinse aid selector toward the MAX setting.
Check water temperature. Incoming water should be 120° F (:49° C}.
after the dry cycle Select Sanitize option.
Increase detergent amount to match water hardness (:pg.5}.
Load properly. (pgs. 3-4}
Plastic and items with non-stick surfaces are difficult to dry because they have a porous
surface which tends to collect water droplets. Towel drying may be necessary.
Glasses and cups with concave bottoms hold water and require towel drying. Locate these
items on the more slanted side of the rack for improved results.
Dishware is chipped Load dishes according to instructions so they do not strike each other (pgs. 3-4}.
Washing fine antique china/crystal in the dishwasher is not recommended.
Do not load glasses over the tines.
Do not overload.
Sanitized light does not Sanitize was not selected.
illuminate at the end of Sanitization can only be achieved with the Heavy, Normal or Light cycles.
the cycle [select Sanitization may not be achieved if there is an interruption of the cycle, power failure or if
models:) incoming water temperature is below 120° F (:49° C}.
Dishwasher door will Be sure adjustable racks (:select models} are properly adjusted to upper or lower position
not close (:pg.4).
*Brand names are trademarks of the respective manufacturer.
10
Wurrum¥u,d Service
CUSTOMER'S SOLE AND EXCLUSIVE
REMEDY UNDER THIS LIMITED
WARRANTY SHALL BE PRODUCT REPAIR
AS PROVIDED HEREIN. IMPLIED
WARRANTIES, INCLUDING WARRANTIES
OF MERCHANTABILITY OR FITNESSFOR
A PARTICULAR PURPOSE,ARE LIMITED
TO ONE YEAR ORTHE SHORTEST
PERIODALLOWED BY LAW. MAYTAG
CORPORATION SHALL NOT BE LIABLE
FOR INCIDENTAL OR CONSEQUENTIAL
DAMAGES. SOME STATESAND
PROVINCES DO NOT ALLOW THE
EXCLUSION OR LIMITATION OF
INCIDENTAL OR CONSEQUENTIAL
DAMAGES, OR LIMITATIONS ON THE
DURATION OF IMPLIED WARRANTIES OF
MERCHANTABILITY OR FITNESS,SO
THESE EXCLUSIONS OR LIMITATIONS
MAY NOT APPLY TOYOU. THIS
WARRANTY GIVESYOU SPECIFICLEGAL
RIGHTSAND YOU MAY ALSO HAVE
OTHER RIGHTS,WHICH VARY STATETO
STATEOR PROVINCE TO PROVINCE.
What is Not Covered By These Warranties
1. Conditions and damages resulting from any of tile following:
a. Improper installation, delivery, or maintenance.
b. Any repair, modification, alteration, or adjustment not authorized by the
manufacturer or an authorized servicer.
c. Misuse, abuse, accidents, unreasonable use, or acts of God.
d. Incorrect electric current, voltage, electrical and/or gas supply.
e. Improper setting of any control.
2. Warranties are void if the original serial numbers have been removed, altered,
or cannot be readily determined.
3. Light bulbs, water filters and air filters.
4. Products purchased for commercial or industrial use.
5. The cost of service or service call to:
a. Correct installation errors. For products requiring ventilation, rigid metal
ducting must be used.
b. Instruct the user on the proper use of the product.
c. Transport the appliance to and from the servicer.
6. Any food loss due to refrigerator or freezer product failures.
Z Expenses for travel and transportation for product service in remote locations.
8. Outside of the United States and Canada this warranty does not apply.
Contact your dealer to determine if another warranty applies.
9. Consequential or incidental damages sustained by any person as a result of
any breach of these warranties. Some states do not allow the exclusion or
limitation of consequential or incidental damages, so the above exclusion may
not apply.
If You Need Service
First see the Troubleshooting section in your Use and Care Guide or call the
dealer from whom your appliance was purchased or call Maytag Services, LLC,
Customer Assistance at 1-800-688-9900 USA and 1-800-688-2002 Canadato
locate an authorized servicer.
Be sure to retain proof of purchase to verify warranty status. Refer to WARRANTY
for further information on owner's responsibilities for warranty service.
If the dealer or service company cannot resolve tile problem, write to Maytag
Services, LLC,Attn: CAIR_ Center, EO. Box 2370,Cleveland,TN 37320-2370,or call
1-800-688-9900 USA and 1-800-688-2002 Canada. U.S.customers using
TTY for deaf, hearing impaired or speech impaired, call 1-800-688-2080.
User's guides, service manuals and parts information are available from Maytag
Services, LLC,Customer Assistance.
Notes: When writing or calling about a service problem, please include:
a. Your name, address and telephone number;
b. Model number and serial number;
c. Name and address of your dealer or servicer;
d. A clear description of the problem you are [laving;
e. Proof of purchase (sales receipt).
11
NIAYFAG
MDB-8
@
Conseils d'utUisation ....... 15
Chargement ........... 15-16
Utilisation du
lave-vaisselle .............. 17
Entretien et nettoyage ...... 20
D6pannage ............ 21-22
Garantie et service ......... 23
Guilt de uso y cuidado ...... 24
Securtt6
Ce que vous devez savoir sur
les instructions de s curtid
Lesinstructions de s_curite importantes et les avertissements
paraissant dans ce guide ne sont pas destines _ couvrir toutes
lessituations et conditions eventuelles qui peuvent se
presenter.IIfaut faire preuve de bon sens et de prudence Iors
de [installation, de I'entretien ou de I'utilisation de I'appareil.
Preneztoujours contact le fabricant, au sujet de problemes
ou conditions que vous ne comprenez pas.
Reconnaissez les tiquettes, phrases
ou symboles sur la s curitb
Instructions de sbcuritb importantes
Lesproduits portant une etiquette (_ ont ete homologues par
Underwriter's Laboratories,Inc.- ceux portant une etiquette
CSAont ete homologues par la CanadianStandards Association
(CSA). Neanmoins,comme pour tout autre equipement utilisant
I'electriciteet des pieces mobiles, il y a un danger potentiel.
13
1. Lire la totalite des instructions avant d'utiliser le lave-
vaisselle.
2. Utiliser le lave-vaisselle uniquement pour les
applications.
3. Debrancher le lave-vaisselle avant tout entretien.
4. Pour eviter tout risque de choc electrique, les c6tes et
I'arriere doivent etre fermes et le panneau avant doit
etre fixe avant de brancher le lave-vaisselle. Se
reporter aux instructions d'installation pour les
methodes correctes de mise _ la terre.
5. Brancher le lave-vaisselle _ un circuit electrique
correctement protege, d'une puissance nominale
appropriee et avec fils de calibre adequat.
6. II ne faut jamais laisser les enfants utiliser ou jouer
dans, avec ou autour du lave-vaisselle.
7 Pour reduire le risque de blessure Iors du chargement
du lave-vaisselle, il faut placer les articles pointus ou
aiguises avec le manche vers le dessus. De meme,
Ioger les articles pointus pour qu'ils n'endommagent
pas le joint de la porte.
8. Ne pas toucher _ I'element chauffant au bas de la
cuve durant ou _ la fin d'un cycle car il est chaud.
9. N'utiliser que des detergents et des agents de rin_sage
con_us pour un lave-vaisselle residentiel automatique.
Ne jamais utiliser de savon, de detergent lessiviel ou
de detergent de lavage _ la main dans votre lave-
vaisselle. Garder ces produits hors de portee des
enfants.
10. Ne pas s'asseoir, se mettre debout ou maltraiter la
porte ou les paniers du lave-vaisselle.
11. Sous certaines conditions, de I'hydrogene peut se former
dans un systemed'eau chaude qui n'a pasete utilise
pendant deux semaines ou plus. L'hydrog_ne est un
gaz explos_ Si le systeme d'eau chaude n'a pas ete
utilise pendant une telle periode,ouvrir tousles robinets
d'eau chaude et laissercouler I'eaupendant plusieurs
minutes. Ceci diminuera [accumulation d'hydrogene.
Comme il s'agit d'un gaz inflammable, ne pas fumer ou
utiliser de flamme vive durant cette operation.
12. Ne pas laver d'articles en plastique ne portant pas
I'indication _<lavable en lave-vaisselle >>.Pour des
articles en plastique sans indication, verifier les
recommandations du fabricant.
13. Ne pas circonvenir les commandes.
14. Pour eviter tout risque d'enfermement et/ou de
suffocation accidentelle d'un enfant, toujours enlever
la porte du compartiment de lavage Iorsque I'on
enleve un ancien lave-vaisselle ou qu'on le jette.
15. Faire preuve de prudence en dechargeant le lave-
vaisselle. La vaisselle peut etre chaude si elle est
dechargee peu de temps apres la fin d'un cycle.
16. Leslave-vaissellea usage residentiel certifie ne sont pas
congus pour les etablissements alimentaires
homologues.
17 Poureviter que I'eau ou la moisissure ne deteriore votre
habitation, verifiez regulierement les raccordements
d'arrivee d'eau et lestuyaux d'evacuation pour
d'eventuelles fuites.
Conserver ces instructions
Articlesluvublesounonenluve-vuisselle
La plupart des articles de table et de cuisson ainsi que les couverts peuvent 6tre laves en securite dans le lave-vaisselle. Verifier avec le fabricant.
Aluminiam Oui, sauf raluminium anodis& De hautes temperatures et les detergents peuvent attaquer la finition.
Fonte Non L'appret serait enleve et le fer rouillerait.
Oui, sauf les pisces Toujours verifier les recommandations du fabricant avant le lavage. Les
Porcelaine/Gr_s d'antiquite ou peintes _ la porcelaines fines, les motifs peints _ la main ou sur le vernis peuvent s'estomper.
main. Les feuilles d'or peuvent se decolorer.
Oui, sauf les pieces Toujours v@ifier les recommandations du fabricant avant le lavage. Certains
Cristal d'antiquite et le cristal types de cristal au plomb peuvent se corroder apr_s des lavages r@etes.
delicat.
Filtres Non recommandes. Peuvent laisser un depSt crasseux ou des taches _ I'int@ieur du lave-vaisselle.
Verre Oui Un verre special appele <_verre laiteux >}peut jaunir par suite de lavages repetes
au lave-vaisselle.
Couverts plaques or Non Se decolorent.
_tain, fer blanc Non
Oui, sur panier sup@ieur Toujours v@ifier les recommandations du fabricant avant le lavage. La capacite
Plastiques sauf les articles en plastique des plastiques _ resister aux hautes temperatures et aux detergents peut varier.
jeter. Les articles en plastique jetable ne sont pas lavables en lave-vaisselle.
Oui Si ces articles ne sont pas laves immediatement, lancer un cycle Rinse Only
Acier inoxydable (Ringage seulement] (certains modules]. Le contact prolonge avec la nourriture
contenant du sel, du vinaigre, des produits laitiers ou du jus peut endommager la
finition.
Non, s'il a subi un traitement Toujours verifier les recommandations du fabricant avant le lavage. Si ces articles
Argenterie ou de <_noircissement >}. ne sont pas laves immediatement, lancer un cycle Rinse Only (certains modeles).
argent sterling Le contact prolonge avec la nourriture contenant du sel, de I'acide ou des
sulfures (oeufs, mayonnaise ou fruits de mer) peut endommager la finition. Le
_ noircissement >_commercial peut etre enleve par le detergent.
Articles en bois Non Le bois peut se ddormer, se fissurer ou se decolorer.
14
Conseilsd'udlisadon
Avant de commencer
Ne pas pr_rincer. II suffit de jeter os et gros
morceaux de nourriture.
Si le lave-vaisselle est raccord6 a un broyeur
dCchets, veiller & ce flue celui-ci soil vide avant
de mettre le lave-vaisselle en marche.
Gratter los laches tenaces laiss_es par los
aliments _ base de tomate (voir page 20).
Eliminer certains aliments (tels que moutarde,
mayonnaise, jus de citron, vinaigre, sel et
vinaigrettes) des articles en acier inoxydable
aussi rapidement que possible. Cos aliments
peuvent provoquer de la rouille et du piquage s'ils
restent en contact prolong6 avec la surface.
Utilisation du lave-vaisselle
1. Apres avoir charg6 le lave-vaisselle et ajout6 du
detergent, choisir le cycle dCsir6 en appuyant sur la
touche correspondante, jusqu'a ce que le tCmoin
lumineux _ c0t6 du cycle dCsirC, s'allume. Choisir
los options dCsirCes en appuyant sur los touches.
Les voyants de signalisation pour le cycle choisi et
los options lumineux. Pour annuler une option
appuie le coussin encore.
2. Pour dCmarrer un cycle, former la porte jusqu'a ce
qu'elle se verrouille, puis appuyer une lois sur la
touche START/CANCEL (Mise en Marche/
Annulation). /_ la suite d'une pause, le remplissage
commence. Le dCcompte de I'afficheur (certains
modeles) clignote jusqu'a ce que I'on appuie sur
START/CAN CE L
Remarque : si I'on n'appuie pas sur la touche
START/CANCEL dans los 30 secondes suivant la
sClection du cycle, le lave-vaisselle s'arrete.
Le lave-vaisselle se souvient du dernier cycle choisi.
II n'est donc pas nCcessaire de reprogrammer le
cycle a chaque lois. Pour mettre en marche le lave-
vaisselle avec le memo cycle et los memos options
que ceux choisis Iors du lavage prCcCdent, il suffit
d'appuyer sur la touche START/CANCEL
3. Pour annuler un cycle en cours de fonctionnement,
appuyer une lois sur la touche START/CANCEL Le
lave-vaisselle procede a une vidange puis s'arrete.
Pour arreter le lave-vaisselle sans qu'il ne commence
une vidange, appuyer deux lois sur la touche
START/CANCEL Pour empecher des changements
non prCvus de cycle ou d'option, il n'est plus
possible de changer cos sClections apres 1 minute.
Remarque : si ron appuie sur la touche de cycle
select apres le <{verrouillage >>des commandos, le
tCmoin lumineux situ6 _ cote du cycle sClectionn6
clignote trois lois.
Ajout d'un article oublie
Pour de meilleurs rCsultats de nettoyage, I'article oubli6
devra etre ajout6 au dCbut du cycle.
1. Saisir la poignCe de porte et dCverrouiller la porte
sans I'ouvrir completement. Tous los tCmoins lumineux
clignotent pour indiquer que le cycle est interrompu.
2. Attendre I'arret de la circulation d'eau.
3. Ouvrir la porte et ajouter I'article.
4. Fermer la porte et la verrouiller. Les tCmoins
lumineux cessent de clignoter Iorsque la porte est
correctement fermCe. Apres un court instant, le cycle
reprend automatiquement au point ca il s'est arretC.
Remarques :
Si la porte est ouverte pendant le fonctionnement
d'un cycle, il pout y avoir jusqu'_ 30 secondes
d'attente avant que I'appareil nese remette en
marche une lois la porte fermCe.
II n'est pas recommand6 d'interrompre le cycle de
lavage pendant une pCriode prolongCe.
Recommandations d'ordre
gdndral (Les caract_ristiques des paniers
varient selon le modble)
Los articles peuvent _tre centrCs derriere une tige de
retenue ou charges en biais pour tirer le meilleur
parti possible de I'espace.
I_viter de bloquer los bras gicleurs. Ne rien laisser
dCpasser des paniers.
Tourner los surfaces souillCes vers le centre du lave-
vaisselle.
Pour obtenir los meilleurs rCsultats de lavage, observer
los directives suivantes pour determiner la disposition
qui convient le mieux aux articles _ laver.
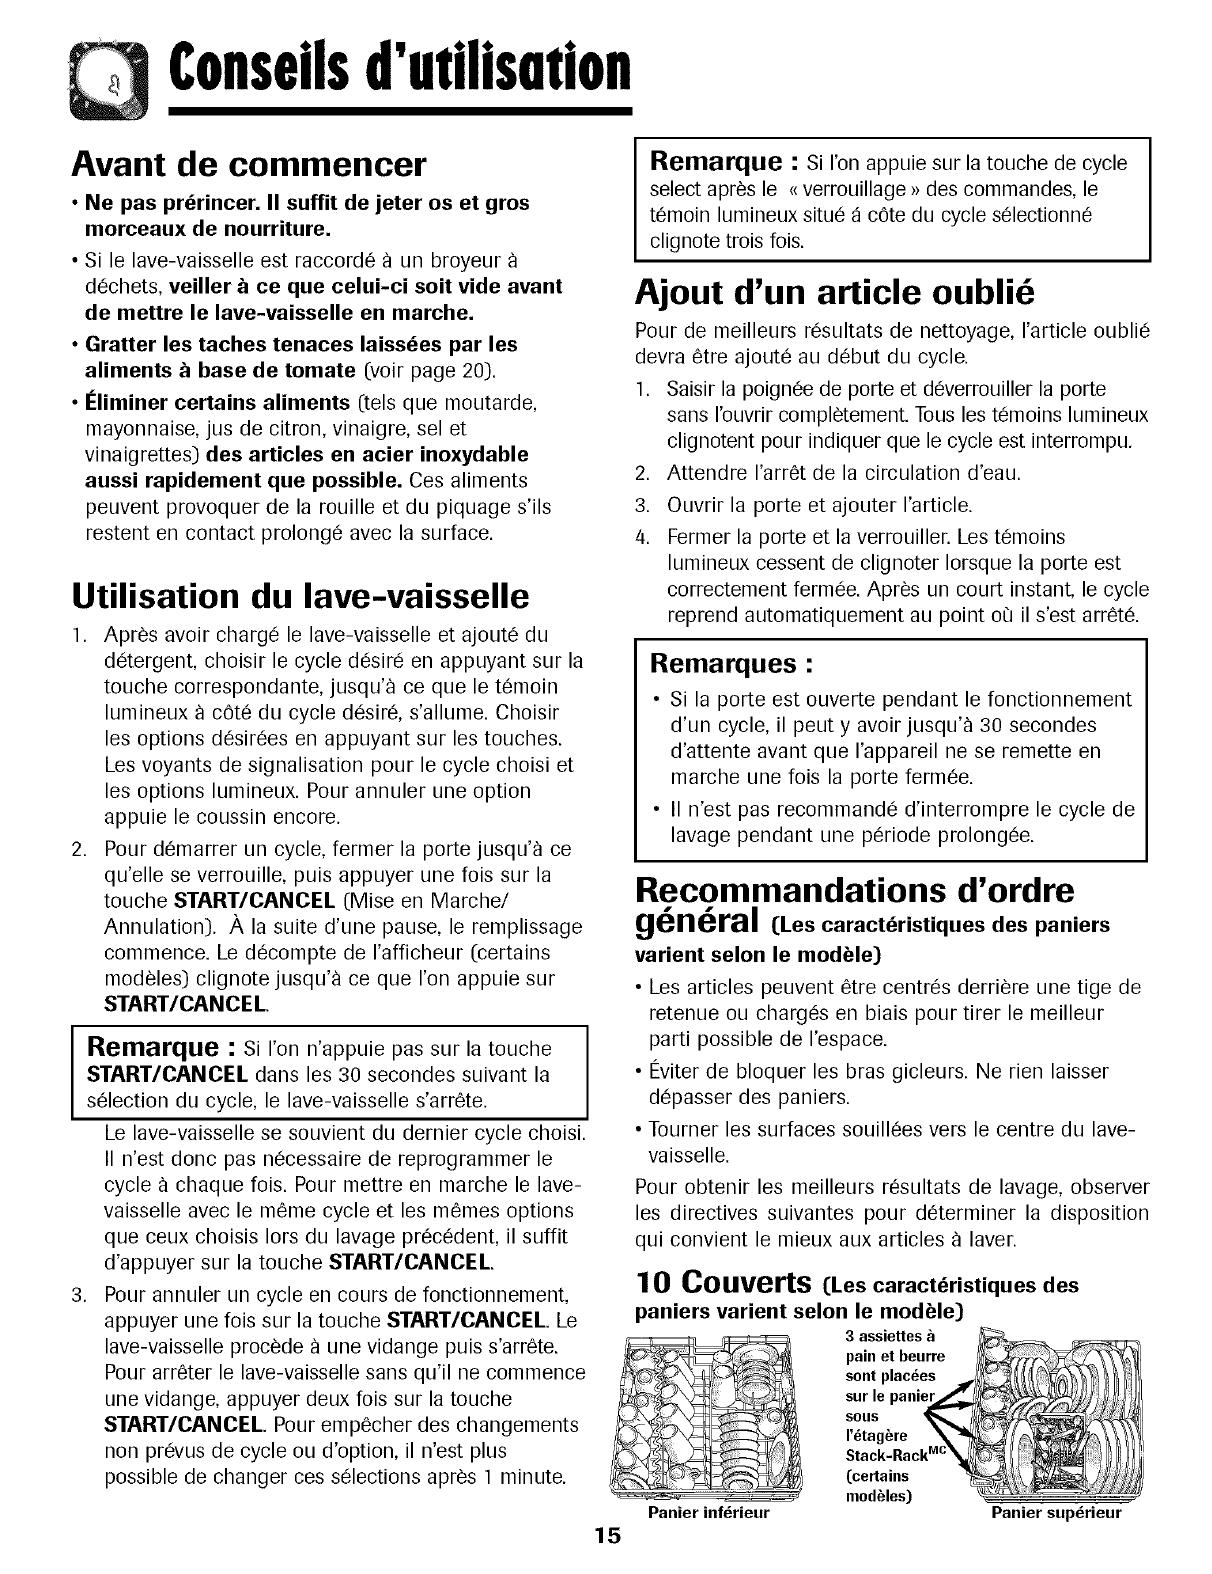
10 Couverts (Loscaracteristiquesdes
paniers varient solon le module)
3 assiettes
pain et beurre
sont plac_es
sur le paniei
SOUS
I'_tag_re
Stack-Rack ic
(certains
modules)
15
Partier inf_rieur
Panier sup_rieur
Churgement
Panier supbrieur
II peut recevoir verres, tasses, articles en plastique
leger, assiettes, bols, casseroles, ustensiles a long
manche, etc. Ne pas placer les verres sur les tiges
de retenue.
L'etagere Stack-Rack Mc.
(certains modeles) _ la
droite du panier
superieur, se releve ou
s'abaisse pour plus de
souplesse de
chargement. L'abaisser
pour retenir les couteaux, les spatules et les cuilleres
long manche ou les articles courts coming les tasses et
les verres a jus. La relever pour Ioger les grands
articles coming les verres, les bols, les assiettes, etc.
Le bord de I'etagere
Stack-Rack Mc(certains
modeles) est con(_u pour
retenir les verres _ pied
en place. II est preferable
de placer les verres dont
le pied est plus long
droite, car le panier
superieur est plus profond a cet endroit.
Panier infbrieur
II peut recevoir une variete d'articles, des assiettes
diner, des bols melangeurs, des casseroles et des plats.
Des articles plus larges peuvent etre places le long du
cote gauche et _ I'arriere de ce panier.
Panier pour ustensiles
Panier _ Ustensiles Standard, Amovible
(le style peut varier)
Pour obtenir de meilleurs resultats de lavage, empecher
les articles de s'emboiter les uns
dans les autres en mettant
certains ustensiles dans le panier
avec les manches vers le haut et
certains avec les manches vers le
bas. Sur les modeles dont les
couvercles des paniers pour
ustensiles presentent des
ouvertures, ranger les couteaux
avec le manche vers le haut, et
les cuilleres et fourchettes avec le manche vers le bas.
S'assurer que les articles minces et pointus ne
depassent pas du panier. Sinon, ils risquent de bloquer
le bras inferieur de lavage.
Panier auxiliaire (certainsmodeles)
Utiliser ce panier supplementaire
dans le panier superieur ou
inferieur pour y charger des
articles et ustensiles divers.
Ce panier est egalement un
endroit s0r pour Ioger les
couteaux aff0tes et les articles
pointus.
Desmontaje de la rejilla superior
Le panier peut etre enleve pour placer des articles
hauts ou surdimensionnes dans le panier inferieur.
Decharger d'abord le panier avant de I'enlever.
Retirer un panier muni de buttes avec languette
de sdret_ :
1.Tirez le panier vers vous du '/__ '/_.
,
Reperez les
butees au
bout de chaque
guide. Appuyez
sur les
languettes de
s0rete situees
au centre des Le style peut varier
butees et retirez
les butees completement et tout
droit. Assurez-vous de soutenir le panier au
moment de retirer les butees.
BuLges
avec
languette
de serete
3. Remettez le panier completement et sortez-le du
lave-vaisselle.
R_installation :
1. Remettez le panier du lave-vaisselle en faisant
glisser les roulettes dans les guides.
2. Inserez chacune des butees au bout des guides
de fa(_on _ ce qu'elles penetrent dans les petits
trous situes sur les cotes des guides.
Importante :
L'appareil ne fonctionne
pas correctement si le
raccord du bras de lavage
du panier n'est pas align_
avec I'un des orifices
d'arriv_e d'eau & I'arribre.
16
Udlisadondulave-vaisselle
Eau chaude
Pour des r_sultats de nettoyage et de s_chage
optimaux, reau chaude est n_cessaire. La
temperature de I'eau d'arriv_e doit se trouver
entre 49 ° C [120 ° F) pour activer correctement le
d_tergent et faire fondre la salet_ et la graisse.
Pour verifier la temperature de I'eau _]son arrivee,
ouvrir le robinet d'eau chaude le plus proche du
lave-vaisselle et faire couler I'eau dans un verre place
dans I'evier. Placer un thermometre _ confiserie dans
le verre et verifier la temperature une lois qu'elle s'est
stabilisee.
Ddtergent
Utiliser un detergent con£u specifiquement pour etre
utilise dans un lave-vaisselle automatique. S'assurer
qu'il n'est pas perime et s'il est en poudre, le ranger
dans un endroit sec et frais (pas sous I_vier).
Quantit_ recommand_e
Une trop faible quantite de detergent entrafnerait de
faibles resultats de lavage, un depot et I'apparition de
taches dus a I'eau dure et un sechage inefficace. Une
trop grande quantite de detergent peut causer un
piquage et un aspect terne permanent.
La mousse peut faire deborder le lave-vaisselle. Dosez
soigneusement le detergent et n'utilisez que des
produits specialement con£us pour le lave-vaisselle. La
quantite de detergent doit etre reduite en presence
d'eau douce. Essayez une autre marque de detergent
si la quantite de mousse reste excessive.
La quantite de detergent _ utiliser est determinee par
la durete de I'eau et le niveau de salete de la vaisselle.
Se referer au tableau ci-dessous pour connaitre les
recommandations d'utilisation du detergent.
L6ger 2 cuill@es _ th6 6 cuill_res _ the
Douce 1:0-4 gpg) Normal 4 cuill@es _ th6 6 cuill_res _ the
Intense 4 cuill@es _ th6 7 cuill_res _ the
L6ger 4 cuill@es _ th6 6 cuill_res _ the
Moyenne (:5-9 gpg) Normal 4 cuill@es _ th6 6 cuill_res _ the
Intense 5 cuill@es _ th6 7 cuill_res _ the
Dare (:10-12 gpg) Tousles 5 cuill@es _ th6 8 cuill_res _ the
Niveaux
*Votre station locale d'approvisionnement en eau ou tout autre service
comp6tent de votre province, peut vous donner le degr6 de durete de
I'eau dans votre r6gion.
En cas d'eau extremement dure (13 grains par
gallon ou plus*), il est difficile d'atteindre de bons 17
r_sultats avec n'importe quel lave-vaisselle. Un
adoucisseur d'eau m_canique peut _tre
n_cessaire pour am_liorer la qualit_ de I'eau et
I'efficacit_ du d_tergent et prot_ger les pibces du
lave-vaisselle contre les dommages provoques
par I'eau dure.
Ajouter la quantite recommandee de detergent dans
chaque tasse comme il est illustre et fermer le
couvercle du compartiment.
Ne pas utiliser de detergent avec le cycle Rinse Only
(Rin£age seulement) (certains modeles). Laisser le
couvercle du distributeur de detergent ouvert Iors du
cycle Rinse Only (certains modeles).
Agentde rin£age
L'utilisation r_guli_re d'un agent de rin£age
am_liore le s_chage, r_duit les taches et les
d_p6ts de film ainsi que I'humidit_ & I'int_rieur du
lave-vaisselle.
Un distributeur automatique d'agent de rin£age se
trouve _ cote du godet de detergent.
Le hublot _ cote du capuchon du distributeur indique
quand il est necessaire de remplir le reservoir d'agent
de rin£age. Lorsque le niveau d'agent de rin£age se
trouve en dessous de I'indicateur et que le hublot est
presque transparent, il est temps de remplir le
distributeur. V_rifier le distributeur tous les mois.
Pour ajouter de I'agent de
rin£age dans le
distributeur, tourner le
capuchon vers la gauche RINSE
pour I'ouvrir. Enlever le
capuchon et verser I'agent
de rin£age dans I'ouverture.
La quantite d'agent de rin(;age distribuee au cours du
cycle peut etre reglee en depla(;ant le levier
I'interieur de la zone du reservoir. La plupart du temps,
utiliser le reglage {{2 >>,recommande par le fabricant.
Regler a la position {{ MAX _>pour une eau dure. Placer
le levier n'importe oa entre ces deux reperes pour
obtenir les meilleurs resultats. Remettre le capuchon et
le tourner vers la droite pour le fermer.
Cycles,optionsettemoinslumineux
Cycles
Choisir le cycle qui convient le mieux _ la vaisselle en appuyant sur la touche cycle select. (Voir page 15,Conseils
d'utilisation, pour la mani6re de dCbuter le cycle.)
Heavy [intense) Cycle long pour vaisselle tr_s sale. 132" 2 lavages/3 rin_.ages
Normal [Normal) Cycle moyen pour vaisselle normale-ment sale. 97-117" 1-2 lavages**/1-2 rin_.ages**
Le capteur de turbidit6 est actif avec ce cycle.
Light [Leger) Cycle court pour vaisselle peu sale. 82* 1 lavage/2 rin£ages
Rinse Only Rince la vaisselle en attente de prochaines 9 1 rin_.age
(Ringage seulementD charges.
[certains modules)
* Comprend une durCe de sCchage d'environ 30 minutes.
** Le nombre de remplissages varie selon le degr6 de salet6 de chaque charge.
Remarques :
Selon la tempCrature de I'eau, il pourra y avoir une augmentation de la durCe du cycle pour amener I'eau _ la tempCrature
souhaitCe.
Seuls les cycles certifiCs suivants ont 6t6 con£us pour r@ondre aux exigences d'assainissement NSF (NSF/ANSI 184 - lave-
vaisselle rCsidentiel) : Lavage intense, Lavage normal et Lavage 16ger.
Options
En plus de choisir un cycle, choisir, parmi les options suivantes disponibles, toutes celles qui seront n_cessaires selon la
charge en cours.
Hi Temp Wash Tousles cycles
(saul Rinse Only)
(certains modules)
Heated Dry
[Sbchage avec chaleur)
La fonction Hi Temp Wash fait en sorte que I'eau soit plus chaude au cours du
cycle de lavage, assure une temp@ature idCale pour des lavages et des sCchages
optimaux. SClectionner pour ajouter un rin£age supplCmentaire au cycle. Un
rin£age supplementaire permet d'ameliorer les resultats en cas d'eau dure.
Pour de meilleurs resultats de sechage, selectionner cette option. Lorsque Heated
Dry (SCchageavec chaleur) n'est pas choisi, il peut 6tre nCcessaire de sCcher
la main certains articles comme ceux en plastique et ceux avec surface non
adherente. Plus d'humidite peut aussi rester sur I'int@ieur du lave-vaisselle. Dans
les modules avec int@ieur en plastique, il est normal que de la vapeur s'Cchappe
de I'event de la porte pendant que la chaleur s_che la vaisselle. De la vapeur
s'Cchappera mCmesi I'option Heated Dry n'est pas sClectionnCe.
L'option peut 6tre utilisCe pour mettre le cycle automatiquement en marche, plus
tard. Voir les instructions au-dessous.
Tousles cycles
(sauf Rinse Only)
(certains modules)
Delay Tousles cycles
[Demarrage differe)
Tough ScrubM°/ SClectionner cette option Iors du lavage de vaisselle avec des taches tenaces Tousles cycles
Tough Scrub PlusMc Selon le cycle selectionnC, cette option augmente la durCe du lavage et/ou
[certains modbles) la temperature.
Sanitize Assainissement de la vaisselle. Lorsque le contrCleur du cycle reconnait que Tousles cycles
[Lavage sanitaire) les bonnes conditions ont et6 atteintes, le temoin lumineux Sanitized s'allume
[certains modules) la fin du cycle. Le lavage assainissant peut ne pas avoir lieu en cas d'interruption
du cycle, de panne de courant ou si la temperature d'arrivCed'eau est inferieure
49° C (120° F).
START/CANCEL Demarre et arrCte le lave-vaisselle. Voir les explications _ la page 15 sous Tousles cycles
[Mise en Utilisation du lave-vaisselle.
Marche/Annulation)
Control Lock Option Verrouille les touches de corrlmande pour empCcher une utilisation non souhaitCe. Tousles cycles
[terrains modules) Voir les instructions _ la page 19.
18
Cycles,optionsettemoinslumineux
Delay (D marmge differed
I'option Delay peut etre utilisee pour mettre le cycle
automatiquement en marche, plus tard, pour reduire
raccumulation de chaleur pendant la journee dans la
maison, ou pour bendicier de co0ts energetiques reduits,
si ceci est disponible dans la region. Cette option est aussi
utile pour conserver reau chaude, _ des periodes
d'utilisation domestique elevee (douches, lessive).
R_glage d'un d_marrage Diff_re :
1. Selectionner le cycle et les options appropriees pour la
charge. Fermer la porte.
2. Appuyer sur la touche Delay et selectionner la duree
d'attente souhaitee.
3. Le temoin lumineux Delay et I'affichage du compte _]
rebours (certains modeles) clignoteront jusqu'_ ce que
ron appuie sur la touche START/CANCEL (Mise en
Marche/Annulation).
4. Une fois que I'on a appuye sur la touche
START/CANCEL le temoin lumineux s'arrete de
clignoter et le compte _]rebours commence. Le temoin
lumineux Delay restera allume jusqu'a la fin du
compte a rebours.
Annulation d'un d_marrage diff_r_ et d'un cycle :
Appuyer une fois sur la touche START/CANCEL pour
evacuer I'eau et arreter le lave-vaisselle.
Ou
Appuyer deux fois sur la touche START/CANCEL pour
arreter le lave-vaisselle sans evacuer I'eau.
Option de verrouillage de
commandes [certains modules)
Les touches de commande peuvent etre verrouillees
pour empecher toute utilisation non autorisee. Si cette
fonction est activee entre les cycles, le lave-vaisselle ne
peut pas etre utilise jusqu'au deverrouillage des
commandes. Au besoin, les commandes peuvent etre
verrouillees apres le demarrage d'un cycle ou d'un
depart differ&
R_glage du verrouillage des commandes :
1.Appuyer sur la touche Heated Dry (Sechage avec
chaleur) pendant trois secondes.
2. Un temoin lumineux situe _ cote de I'ic0ne de
verrouillage s'allume Iorsque les commandes sont
verrouillees.
Annulation :
5. Le cycle commencera automatiquement _]rexpiration
du delai d'attente.
1. Appuyer sur la touche Heated Dry pendant trois
secondes.
Remarque : Si trente secondes s'ecoulent entre un
reglage du cycle et des options et une pression sur la
touche START/CANCEL le lave-vaisselle se mettra
I'arret.
Annulation d'un d_marmge diff_r_ :
Lors du compte _ rebours, appuyer sur la touche Delay
de nouveau. Le temoin lumineux s'eteindra et le cycle
commencera ou reprendra immediatement.
2. Le temoin lumineux s'eteint.
Remarques :
Si I'on appuie sur la touche d'un cycle ou d'une option
apres le verrouillage des commandes, le temoin
lumineux situe _ cote de I'ic0ne de verrouillage
clignotera cinq lois. Sur certains modeles avec
I'affichage du compte _ rebours, un _{L >>clignote
I'affichage en meme temps que le temoin lumineux de
verrouillage.
Cette option ne verrouille pas la porte, uniquement les
commandes du lave-vaisselle.
T moins lumineux/affichage [certains modbles)
S'allume _ la fin du cycle et reste allume _ moins que la porte ne reste ouverte en continu pendant
Clean [Netteyage) 30 secondes.
Wash/Dry [Lavage/Sechage) S'allume durant toutes les portions de lavage, de rin_.age et de sechage du cycle.
Sanitized [Lavage Sanitaire) S'allume _ la fin du cycle Iorsque toutes les conditions ont 6t6 respectCes pour un lavage sanitaire. Le
(:certains modules) tCmoin lumineux reste allume _ moins que la porte ne reste ouverte en continu pendant 30 secondes.
Remarques :
LorsqueSanitize est choisi, les cycles sont contrCles pour s'assurer du lavage sanitaire. Le tCmoin lumineux Sanitized ne s'allume pas si
les exigences du lavage sanitaire ne sont pas respectCes. Ceci peut se produire si le cycle est interrompu, en cas de panne de courant
ou d'arrivee d'eau _ une tempCrature infCrieure _ 49° C 020 ° F).
Les tCmoins lumineux Clean et Sanitized (certains modules] ne se rCallument pas _ la suite d'une panne de courant et tant que le
prochain cycle n'est pas en marche.
19
1 / 1

Maytag MDB-8 Owner's manual

Category
Dishwashers
Type
Owner's manual

Ask a question and I''ll find the answer in the document

Finding information in a document is now easier with AI

Ask the document