Page is loading ...

XT2+ User Manual
Technology at Work
®
* 2019 Janam Technologies LLC. All rights reserved.
Version 2
March 2019

XT2+ User Manual
Janam Technologies LLC Version 2, March 2019 II
Copyright 2019 Janam Technologies LLC. All rights reserved.
XT2+ Rugged Touch Computer, Janam and the Janam logo are trademarks of Janam Technologies
L
LC. ARM and Cortex are registered trademarks of ARM Limited (or its subsidiaries) in the EU and/or
elsewhere. Android is a trademark of Google Inc. Other product and brand names may be trademarks
or registered trademarks of their respective owners.
Janam Technologies LLC assumes no responsibility for any damage or loss resulting from the use of
this guide.
Janam Technologies LLC assumes no responsibility for any loss or claims by third parties which may
arise through the use of this product.
Janam Technologies LLC assumes no responsibility for any damage or loss caused by deletion of data
as a result of malfunction, dead battery or repairs. To protect against data loss, be sure to make
backup copies (on other media) of all important data.
Follow all usage, charging and maintenance guidelines in the Product User Guide. If you have ques-
tions, contact Janam.
Important: Please read the End User License Agreement for this product before using the device or
the accompanying software program(s). Using the device or any part of the software indicates that
you accept the terms of the End User License Agreement.

Contents XT2+ User Manual
Janam Technologies LLC Version 2, March 2019 Contents—1
Contents
1 Introduction CH-PG
Introduction 1-1
Key Features 1-1
Hardware Overview 1-2
2 Getting Started CH-PG
Unpacking the XT2+ 2-1
Recommended Host PC Requirements 2-1
XT2+ SDK 2-1
Battery Safety 2-2
Installing the Battery 2-2
Charging the XT2+ Battery 2-3
XT2+ Battery Condition Information 2-4
Turning the XT2+ On 2-5
Turning the XT2+ Off 2-6
Touch Screen Navigation 2-6
Screen Rotation 2-7
Lock Screen 2-7
Home Screen 2-8
App Screen 2-9
Function Keys 2-9
3 Janam XT2+ Setup CH-PG
microSD Card Storage 3-1
SIM Cards 3-2
USB Port 3-2
Backup and Restore: Auto Backup 3-3
Backup and Restore: Manual Backup 3-4
Backup and Restore: Restore 3-4
Resetting to Factory Condition 3-5
Android Security 3-6
Lock Screen Types 3-6
Additional Screen Security Settings 3-7
Device Settings: Display 3-8
Device Settings: Sound & Notifications 3-8
Device Settings: Storage 3-9
Device Settings: Apps 3-9
Personal Settings: Accounts 3-10
Personal Settings: Google Account 3-10
Personal Settings: Language & Input 3-11
System Settings: Date & Time 3-12
System Settings: Accessibility 3-12
4 Wireless Network Connection CH-PG
Introduction 4-1
Connecting to a WLAN network 4-2
WLAN options 4-3
Advanced WLAN options 4-3
5 Bluetooth CH-PG
Introduction 5-1
Bluetooth Concepts 5-2
Making Bluetooth Discoverable 5-2
Bluetooth Pairing 5-3
Bluetooth Services 5-3
6 Camera CH-PG
Introduction 6-1
Camera Controls Overview 6-2
Camera Settings 6-3
Camera Zoom 6-4
Editing Pictures 6-5

Contents XT2+ User Manual
Janam Technologies LLC Version 2, March 2019 Contents—2
7 Email CH-PG
Introduction 7-1
Setting up Email 7-1
Manual Email Setup 7-2
During Email Setup 7-2
General and Account Settings 7-2
General Email Settings 7-3
Account-specific Email Settings 7-3
Email Settings: Signature 7-3
Email Settings: Data Usage 7-3
Email Settings: Notification Settings 7-3
Email Settings: Server Settings 7-3
Email Inbox 7-4
Creating and Sending an Email 7-4
Deleting an Email Account 7-4
9 Barcode Scanning CH-PG
Using the Imager 9-1
Scanning with the Janam XT2+ 9-1
Scan Settings 9-2
Scan Settings Table 9-2
Scan Settings Options 9-3
Scan Symbologies 9-4
Scan Demo app 9-5
Scan Wedge app 9-6
15 Regulatory and Maintenance CH-PG
XT2+ Regulatory Information 15-1
Regulatory and Safety Approvals 15-1
XT2+ w/ WWAN, WLAN and Bluetooth 15-2
XT2+ w/ WLAN and Bluetooth 15-2
Battery Safety Guidelines 15-4
Battery Charger Guidelines 15-4
11 GPS CH-PG
Introduction 11-1
Janam XT2+ GNSS Support 11-1
GPS and Location Services 11-2
Location Service by App 11-2
14 Specifications CH-PG
Janam XT2+ Specifications 14-1
16 Troubleshooting CH-PG
Troubleshooting the Janam XT2+ 16-1
12 User Applications CH-PG
Google Play Store 12-1
Play Store My Apps & Games Listing 12-1
Google Play Store Settings 12-2
Settings: General 12-2
Settings: User Controls 12-2
Alternate App Sources 12-2
Uninstalling Apps 12-2
Access and User Restrictions 12-2
8 Tools CH-PG
CPU Settings 8-1
Astro File Manager 8-1
Program Buttons 8-2
System Information 8-2
10Phone Functionality CH-PG
Introduction 10-1
Phone Screen 10-1
During Call Features 10-2
Answering a Call 10-2
Settings 10-2
Using Apps During a Call 10-2
13 FOTA Update CH-PG
Update via FOTA Client 13-1

Introduction XT2+ User Manual
Janam Technologies LLC Version 2, March 2019 Introduction 1—1
XT2+ Rugged Touch Computer
Key Features
— Pocket-sized powerhouse weighing only 10 ounces
— Android 6 operating system
— Brilliant 5-inch color display with Corning® Gorilla® Glass 3
— High-performance 1D and 2D barcode scanning
— Quad-core Qualcomm MSM8916 CPU @1.2GHz
— Multiple 5’/1.5m drops to concrete per MIL-STD 810G
— Sealed to IP67 standards against dust and immersion in up to 3 feet of water
— Embedded RFID/NFC reading capabilities
— 8GB or 16GB of built-in memory with expansion capability
— User-accessible microSD card slot with SD and SDHC support
— Dual-band 802.11a/b/g/n Wi-Fi and Bluetooth 4.0 connectivity
— 4G LTE WWAN
— 8.0MP/2.0MP front- and rear-facing color auto-focus cameras
— High-sensitivity GNSS (GPS, BeiDou and GLONASS or Galileo concurrently)
— 3000mAh Li-ion battery
Introduction
1

Introduction XT2+ User Manual
Janam Technologies LLC Version 2, March 2019 Introduction 1—2
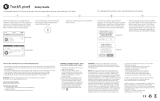
Hardware Overview
1 3 4 5 6 7 8 92
10
11
12
13
14 15 16 17 18
19 20
21
22
1. Illuminance sensor
2. LED indicator
3. Barcode scanner
4. Front camera
5. Lanyard port
6. Mag stripe reader (if equipped)
7. Speaker
8. Rear camera (if equipped)
9. Camera LED flash (if equipped)
10. Audio jack
11. Power key
12. Scan trigger
13. Battery compartment lock
14. Recent apps key
15. Home key
16. Back key
17. Programmable key
18. Microphone
19. Power jack
20. Dock connector
21. Scan trigger
22. Volume

Getting Started XT2+ User Manual
Janam Technologies LLC Version 2, March 2019 Getting Started 2—1
Getting Started
Unpacking the Janam XT2+ Rugged Touch Computer
Make sure you have the following:
— Janam XT2+ Rugged Touch Computer
— Stylus with Tether
— Screen protector
— Power Supply (includes US Type A, Europe CEE 7/7, UK BS89/13 adapters)
Recommended Host Computer Requirements
— Microsoft® Windows®-compatible host computer with USB port
— Microsoft Windows 10, Windows 8/8.1, Windows 7
— If installing the Android™ SDK, at least 1.5 GB disk space for the Android SDK,
emulator system images, and caches, plus 500 MB disk space for Android Studio is needed.
Janam XT2+ SDK
The Janam XT2+ Software Development Kit enables programmers to develop applications for
Janam XT2+ rugged touch computers running the Android™ operating system. It contains details
and instructions for developing applications that access the XT2+ embedded scanner.
The development kit, which can be downloaded from Janam’s Product Zone (login required), is
designed for use with the publicly available Android SDK.
2

Getting Started XT2+ User Manual
Janam Technologies LLC Version 2, March 2019 Getting Started 2—2
Charging the Janam XT2+ Rugged Touch Computer
BATTERY SAFETY GUIDELINES
T
he XT2+ has a removable and rechargeable battery. Replace only with a Janam-approved battery.
There is the risk of explosion if the battery is replaced by an incorrect type. For more information on
battery replacement contact JanamCare at 866-915-5311. Use only battery chargers approved for
the XT2+ by Janam. Janam and its affiliates disclaim any liability for damage caused by the use of
other chargers or batteries. Observe the following guidelines for safe use of Li-Ion batteries:
1. Do not expose the battery to excessive heat or cold. Do not short-circuit. Do not incinerate.
2. To avoid risk of fire, burn or damage to your battery, do not allow a metal object to touch
battery contacts.
3. Do not disassemble the battery. There are no user serviceable parts inside.
4. If battery leakage is observed, avoid any contact with affected area and properly dispose
of the battery.
5. If you come in contact with battery leakage, rinse exposed area with soap and water.
If it contacts the eye, flush the eye with water for 15 minutes and seek medical attention.
6. Dispose of used battery promptly. Keep away from children. Do not disassemble or
dispose of in fire.
7. When discarding a battery, contact your local waste disposal provider to understand
local restrictions for disposal or recycling of batteries.
BATTERY CHARGER SAFETY GUIDELINES
1. Do not use the equipment in or near areas in which sparks are likely or possible.
2. Do not let equipment’s metal contacts and electrical sockets come in contact with metal objects.
3. For indoor use only. Do not expose the equipment to rain or any liquids.
4. Do not use or store the equipment in direct sunlight or in areas that are prone to get hot
such as in a parked vehicle, near a heat duct or close to other heat sources.
5. Keep equipment’s metal contacts and electrical sockets free from debris that could
obstruct charging or could cause a short circuit.
Installing the XT2+ battery
To install or replace the XT2+
battery, remove the battery
compartment cover on the back
of the unit by sliding the spring-
loaded cover lock to the left,
holding it in that position, and
then gently pulling the cover up
by the two tabs on the left and
right of the cover.

Getting Started XT2+ User Manual
Janam Technologies LLC Version 2, March 2019 Getting Started 2—3
Glide the battery into the com-
partment, making sure not to
c
over up the plastic pull tab. The
tab is used to pull the battery out
of the compartment. Firmly push
the battery into place.
Before putting the battery com-
partment cover back in place,
check for the presence and condi-
tion of the blue seal along the in-
side perimeter of the cover. If the
blue seal is damaged or missing,
replace it. Do not operate the
XT2+ with a missing or damaged
battery compartment seal, as this
could allow liquids to enter and
damage the device.
To put the cover back on, insert
its upper part first. Then, starting
with the upper part, gently close
the cover until all of the cover
clips have snapped into place and
the cover lock is in its locked position.
Charging the XT2+ battery
To charge the battery using the DC Power Adapter Kit:
1. Slide the appropriate US/UK/EUR adapter plug onto the AC/DC power adapter housing.
2. Insert the DC power plug into the DC power jack on the bottom of the XT2+.
3. Plug in the AC/DC power supply. The XT2+ LED indicator will light red while charging
and will change to green when fully charged. Use only easily accessible wall sockets
that are easily reached with the length of the supplied power cable.
To charge the battery using the Cradle Kit:
1. Insert the DC power plug into the DC power jack on the
cradle. Insert the XT2+ into the cradle.
2. Plug in the AC/DC power supply. The XT2+ LED indicator
will light red while charging and will change to green when fully
charged. Use only easily accessible wall sockets that are
easily reached with the length of the supplied power cable.

Getting Started XT2+ User Manual
Janam Technologies LLC Version 2, March 2019 Getting Started 2—4
XT2+ Battery Condition and Usage Information
A
ndroid provides information on battery charge level in percent, estimated amount of battery charge
remaining, and how much of the battery capacity has been used by various applications and device
functions. This information can be accessed as follows:
On the start screen, swipe down from the top to open status bar,
then touch and hold Battery to get to Battery screen.
Or, from the apps screen, swipe left to get to the Battery icon,
tap on it to get to the Settings menu,
tap on Battery to get to the Battery screen.
View battery status and level, and estimated battery life remaining.
To view battery usage by application, tap on Battery use.
Tip — You can conserve battery life by:
1. Using the AC adapter to plug the
XT2+ into an external power source.
2. Manually or auto-suspend device
operation when possible.
3. Reducing screen brightness.
4. Turning off wireless functionality
(Wi-Fi, Bluetooth, location services,
or GPS) when not in use.

Getting Started XT2+ User Manual
Janam Technologies LLC Version 2, March 2019 Getting Started 2—5
Turning the Janam XT2+ Rugged Touch Computer on
1
. Press and hold the Power Key (marked red in its center)
on the top right-hand side of the XT2+.
⎯ If the XT2+ is being powered on for the first time,
follow the on-screen setup instructions.
⎯ When the XT2+ is on, pressing the power button briefly
will suspend operation until it is pushed again.
2. When powered on, an unsecured XT2+ will first display the
Android lock screen. It is unlocked by swiping up on the
screen. The lock screen will be replaced with the start
screen. For information about securing the XT2+ with a
password or pin code, refer to Chapter 3.
3. When powered on, a secured XT2+ will also first display the
Android lock screen. Swipe up to get to the pin code
keypad. Enter your pin code. Once the correct pin code has
been entered and you’ve tapped on the check mark, the
welcome screen with the pin code keypad will be replaced with the start screen. For
information about securing the XT2+ with a password or pin code, refer to Chapter 3.
Unsecured: just swipe up Secured: enter pin, then swipe up Both ways get to the start screen

Getting Started XT2+ User Manual
Janam Technologies LLC Version 2, March 2019 Getting Started 2—6
Turning the Janam XT2+ Rugged Touch Computer off
Note that there are different levels of turning off power to the XT2+.
1. To put the XT2+ display to sleep, briefly press the Power Button (marked red in its center). The
display will turn off. To turn the XT2+ back on from this state of sleep, depress the Power Key
again. The welcome screen will come up, and by swiping up it will return you to the last used
app.
2. To put the XT2+ display to sleep and also shut down Android, press and hold the Power Button
(marked red in its center) until the “Power off/Reboot” overlay appears. Tap on Power off and the
XT2+ will power down. To turn it back on, press and hold the Power Button until the device
vibrates and the screen turns on, showing “Technology at Work.”
3. To completely power down the XT2+ and reboot it from a cold start, press and
hold the Power Button and keep holding it for about ten seconds. The display
will go black, and in a few seconds the XT2+ will reboot automatically.
Touch Screen Navigation
The Janam XT2+ uses capacitive multi-touch technology. Almost all of the XT2+’s functions can
be accessed and used by tapping, swiping or dragging with one finger. Some operations, such as
zooming in and out, are performed with pinching two fingers together or dragging them farther
apart.
Note that capacitive touch works by sensing your fingers. Never use an actual pen, pencil, or any
sharp object to operate the touch screen. They may damage the touch screen.
Touch
Touch a tile or object
to select or open it.
Touch and hold
Touch and hold a tile
or object to bring up
available options.
Touch and drag
Touch and then drag/
swipe an object to
move it in any direc-
tion.
Pinch and spread
Put two fingers on
the display, then
drag them together
or apart to zoom in
or out.

Getting Started XT2+ User Manual
Janam Technologies LLC Version 2, March 2019 Getting Started 2—7
Screen Rotation
T
he XT2+ was designed to be used in portrait (vertical) orientation. Many screens and apps, however,
can also be used in landscape (horizontal) orientation. By default, the XT2+’s internal sensors auto-
matically present a vertical or horizontal view in sync with the physical orientation of the device. If
automatic orientation is not desirable, the screen can be locked in its current orientation in Settings.
Lock Screen
When turned on, the XT2+ first displays the Android lock screen. The
lock screen shows the current time and date. If the XT2+ is secured, it
may also display an access prompt. The lock screen can be personalized
by changing its color, picture, and sounds. It may also provide a quick
status of selected apps (such as calls, messages, emails, etc.).
Along the top of the lock screen is a status bar with small icons that
display information about various functions. Examples include WLAN and
Bluetooth, cellular signal, the presence of notifications, SIM card,
battery charge, airplane mode, the current time and more. Some
function icons are static and indicate the presence of something (like
airplane mode). Other icons provide information on a function (like the
cellular or WLAN signal strength, battery charge, or type of data
service).
Below is a sample of the icons that may appear in the status bar of the
lock screen, as well as what the icons indicate. Note that swiping down
from the top of the lock screen reveals a screen with tiles that provide
one-tap access to various important functions. Examples are airplane
mode on/off, camera on/off, brightness settings, flashlight on/off, etc.

Getting Started XT2+ User Manual
Janam Technologies LLC Version 2, March 2019 Getting Started 2—8
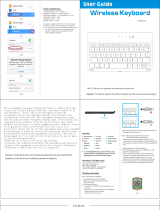
The Home Screen
In Android, the home screen is the central launchpad for all of the XT2+’s most frequently used
f
eatures and applications. The home screen can consist of multiple screens (on the XT2+ there are
two additional screens to the left of the home screen and two to the right).
The home screen contains the status bar on top of the screen and the favorites tray at the bottom.
The status bar displays various information icons. Swipe down to expand it and show more detail.
The favorites tray has the apps screen button in the center, flanked by two (changeable) favorites on
each side.
Between the status bar and the favorites tray are apps icons (which can also be folders containing
multiple apps) and widgets. Tapping on apps icons launches the app. Widgets perform functions,
like showing the time, weather, news, or act as shortcuts.
2
1. Status bar
2. Indicates USB debugging enabled
3. Indicates scanning enabled
4. Indicates Bluetooth enabled
5. Indicates cell signal strength
6. Indicates battery charge level
7. Indicates time
8. Favorites tray
3 4 5 71
8 9 10 11 12
14
6
13
9. Favorite app: phone
10. Favorite app: contacts
11. Application screen button
12. Favorite app: messaging
13. Favorite app: Chrome browser
14. Search bar widget
15. Go to Navigation widget
16. Weather widget
17. Two more apps and widget pages
18. Open Google apps folder
19. Exchangeable wallpaper
20. Take photo widget
21. Launches Settings
22. Launches Google Play Store
23. Opens Tools folder
24. Opens Search
15
16
18
17
19
20
21
22
23
24

Getting Started XT2+ User Manual
Janam Technologies LLC Version 2, March 2019 Getting Started 2—9
App Screen
While the Android home screen serves as the XT2+’s “dashboard” that provides status, information,
a
nd quick access to all the most important functions of the device, the
a
pps screen
p
rovides an
alphabetically listed grid of all applications installed on the device. Tap on the apps button on the
home screen to get to the app screen. From the apps screen, press the physical Home key below
the XT2+’s display to get back to the home screen.
To launch an application from the app screen, tap on it. If you have a lot of apps, swipe to move
between apps screens. To get to your widgets library, tap on WIDGETS underneath the status bar.
Function Keys
The Janam XT2+ has four physical, metallic function keys with white labels located along the bottom
of the display. Depressing these keys, from left to right, brings up 1) recent apps, 2) the start
screen, 3) executes a back/esc (to get back to the prior screen, close a dialogue box, etc.), and 4)
a programmable function.
Recent App Start/Home Back/Esc Programmable

XT2+ Setup XT2+ User Manual
Janam Technologies LLC Version 2, March 2019 XT2+ Setup 3—1
Removable Memory
IMPORTANT NOTE!
To avoid possible damage to microSD and/or SIM cards or the XT2+ itself, ESD
(electrostatic discharge) precautions are recommended when installing or removing
microSD and/or SIM cards. Before handling, discharge any personal static electric
buildup to a point of discharge other than the device.
microSD Card
About microSD Cards
The XT2+ rugged touch computer has a microSD flash memory card slot in its battery compartment
that is compatible with microSD memory storage cards with a capacity of up to 64GB (FAT32 file
format). Removable microSD memory is useful for general file storage, uploading and downloading
of user data, and more. The use of high-quality microSD cards supplied by a reputable manufacturer
is recommended.
To access the microSD card slot:
Remove the battery compartment cover on the back of the unit by
sliding the spring-loaded cover lock to the left, holding it in that position,
and then gently pulling the cover up by the two tabs on the left and right
of the cover. Remove the XT2+ battery by pulling on the black plastic
tab until the battery pops out.
To install the microSD card:
Locate the microSD card slot in the battery compartment. Place a
compatible microSD card with its straight edge down (towards the
bottom edge of the XT2+) and its brand and capacity markings facing
toward you. Fully insert the microSD card. DO NOT attempt to insert the
microSD card in any other orientation. Put the battery back into its
compartment and put the battery compartment cover back on.
To remove the microSD card:
Before removing a microSD card, Go to Settings > Storage and USB
> SD card. Tap the eject symbol and the card will be unmounted. Then
remove the battery compartment cover, remove the battery, and gently
remove the microSD card.
XT2+ Setup
3

XT2+ Setup XT2+ User Manual
Janam Technologies LLC Version 2, March 2019 XT2+ Setup 3—2
SIM Cards
A
bout SIM Cards
SIM (Subscriber Identity Module) cards are needed to add cellular voice and/or data communication
service to devices equipped for cellular signal functionality. SIM cards can be transferred between
devices supporting the same communications standards.
Janam XT2+ models equipped with optional WWAN (Wireless Wide Area
Network) cellular signal functionality include a removable SIM card slot. Neither
cellular signal connectivity for internet access nor optional 3rd party voice
telephone applications can function without an activated SIM card installed.
The XT2+ SIM card slot is designed for use with a standard SIM card. If a SIM card provided by
your cellular carrier uses the micro or nano format, you need a (readily available) SIM card adapter
to use it in the XT2+. Contact Janam or your local GSM/GPRS based carrier for more information
about SIM cards and wireless service.
To access the SIM card slot:
Remove the battery compartment cover on the back of the unit by sliding the spring-loaded cover
lock to the left, holding it in that position, and then gently pulling the
cover up by the two tabs on the left and right of the cover. Remove
the XT2+ battery by pulling on the black plastic tab until the battery
pops out.
To install a SIM card:
The location of the SIM card slot in the battery compartment is shown
in the illustration to the right. Orientate a compatible SIM card (or
micro or nano SIM card in a standard SIM adapter) with its straight
edge facing into the slot and its golden contacts surface facing down.
Carefully insert the SIM card fully into slot.
NEVER attempt to insert a SIM card in any other orientation or force a
SIM card into its slot.
Once the SIM card is installed, replace the battery and carefully put
the battery compartment cover back on.
standard micro nano
USB Port
The Janam XT2+ provides USB connectivity through its Direct Sync I/O Connector at the bottom
of the device. An optional USB Sync cable is required. Wired USB connectivity is also possible through
the optional Single-Slot Cradle.

Backup, Restore, and Reset
Android backup concept
Android does not offer a traditional full backup (i.e. one large file from which all software, settings,
a
nd data can be restored). Instead, Android synchronizes settings and data with Google, including
WLAN passwords, bookmarks, contact and email information, a list of installed applications,
application data, words added to dictionaries, app data, and most of the device settings.
All of this can be restored in case of a failure, or when moving onto a new device. The idea here is to
provide continuity rather than a total 1:1 full backup.
Auto Backup for Apps
Android 6 allows you to back up various settings and data to your account in the cloud. Enable the
process in
Settings > Backup & Reset > Backup account. Then go to Settings > Accounts >
Google and check what you want to sync.
XT2+ Setup XT2+ User Manual
Janam Technologies LLC Version 2, March 2019 XT2+ Setup 3—3
With the above settings in place, all of the selected
data, settings, and configurations will automati-
cally be backed up to Google. You can also opt to
sync at any time, either all supported applications
or just a subset.
To restore everything, log into your Google ac-
count and all information and settings will be re-
stored.

XT2+ Setup XT2+ User Manual
Janam Technologies LLC Version 2, March 2019 XT2+ Setup 3—4
Option B: Manual backup onto card
Android also offers a backup to local storage media. A removable microSD card can be used to restore
t
he XT2+ to its fully configured state. This process can also serve as a rapid deployment tool.
To create a card backup, go to Tools, then tap on Backup & Restore. In the Backup tab select
everything you wish to be included in the backup. You can do that both for System Settings and
User Applications. Note that not all user apps are allowed to be backed up (you can always
download them again from the Play Store). Then tap Backup at the bottom of the screen. The backup
file can be stored either on internal storage or on a microSD card.
Note that these backup methods do not include photos, videos, and documents. Pictures can be
backed up using the Google Photos app. Settings for that process are in the Photos app. Other
options are third party apps such as Flickr, Dropbox, Photobucket, or Microsoft OneDrive. There are
also comprehensive third party solutions that back up everything, like MyBackup Pro.
Restoring from a backup
To restore from a card backup, go to Settings >
Backup & Reset, then tap on Backup &
restore. If there are multiple backup files, select
the one you wish to restore and tap on it.

XT2+ Setup XT2+ User Manual
Janam Technologies LLC Version 2, March 2019 XT2+ Setup 3—5
Resetting the XT2+ to factory condition
Resetting the XT2+ erases all personal data from internal device storage. This includes Google Account
i
nformation, information about any other accounts, system and application settings and configura-
tions, and any downloaded applications. The device is returned to factory condition.
To perform a full reset go to Settings > Backup & Reset, then tap on Factory data reset at the
bottom of the screen. This brings up a warning screen. If you wish to proceed, tap on RESET PHONE.
Depending on your access security options, you will be asked to supply your PIN, password, or
pattern. Once everything has been erased, you can turn off the device, or opt to reboot and set it
up from scratch or from a backup.
If you are unable to power on your device, you can perform a factory data reset by pressing the Power
key and the Volume up key at the same time until the screen lights up.
/