9
Mounting
8
Register your cordless handset and headset
6
Install your deskset
Obtain an IP address
After the system startup, the deskset is set to
obtain IP address automatically. Once the deskset
is obtaining IP address, the screen displays:
»
Obtaining IP from DHCP server. Please
wait...
After an IP address is obtained, the screen
displays:
»
IP obtained: XXX.XXX.X.XXX Please
SELECT to proceed.
Register the deskset to the
console
1 Press MENU/SELECT to select the obtained IP
address.
»
The screen displays Enter the name of the
Console connecting to this phone.
2 Press
MENU/SELECT again.
»
The screen displays Console's name.
»
Then, the screen displays Please set an
extension number to this phone.
Note
•
By default, the console’s name is Console.
Tip
•
If you have changed your console’s name,
enter the same name using the dialing keys
on the deskset.
»
Press DELETE to delete a character.
»
Press
t
/REPEAT or
u
/SKIP
to move the
cusrsor left or right.
»
Press 0 to add a space.
»
Press
MENU
/SELECT to save.
3 Press
MENU/SELECT.
4 Press t/REPEAT or u/SKIP to choose the
desired extension number.
• The extension numbers ranges from 11 to 26.
5 Press
MENU/SELECT.
»
The screen displays Connecting to
Console.... This takes up to 60 seconds to
complete.
»
Once completed, the screen displays
Connected to Console, and then
Starting....
Note
•
Console in here represent the console’s
name. If you have changed it, it would
display your chosen console’s name.
• When the startup is complete, the deskset
enters idle screen.
6 Lift the handset to check on the dial tone for
successful installation.
Tips
•
If the registration between the console and
the deskset is not successful, the deskset
screen will return to the previous menu. Try
the registration process again.
•
If you want to replace a deskset and keep
the same extension number, release the
extension number after disconnected
from the console, see Release extension
number of the UP416 online complete
user’s manual.
Note
•
Make sure you assign a unique extension
number to the UP406 deskset.
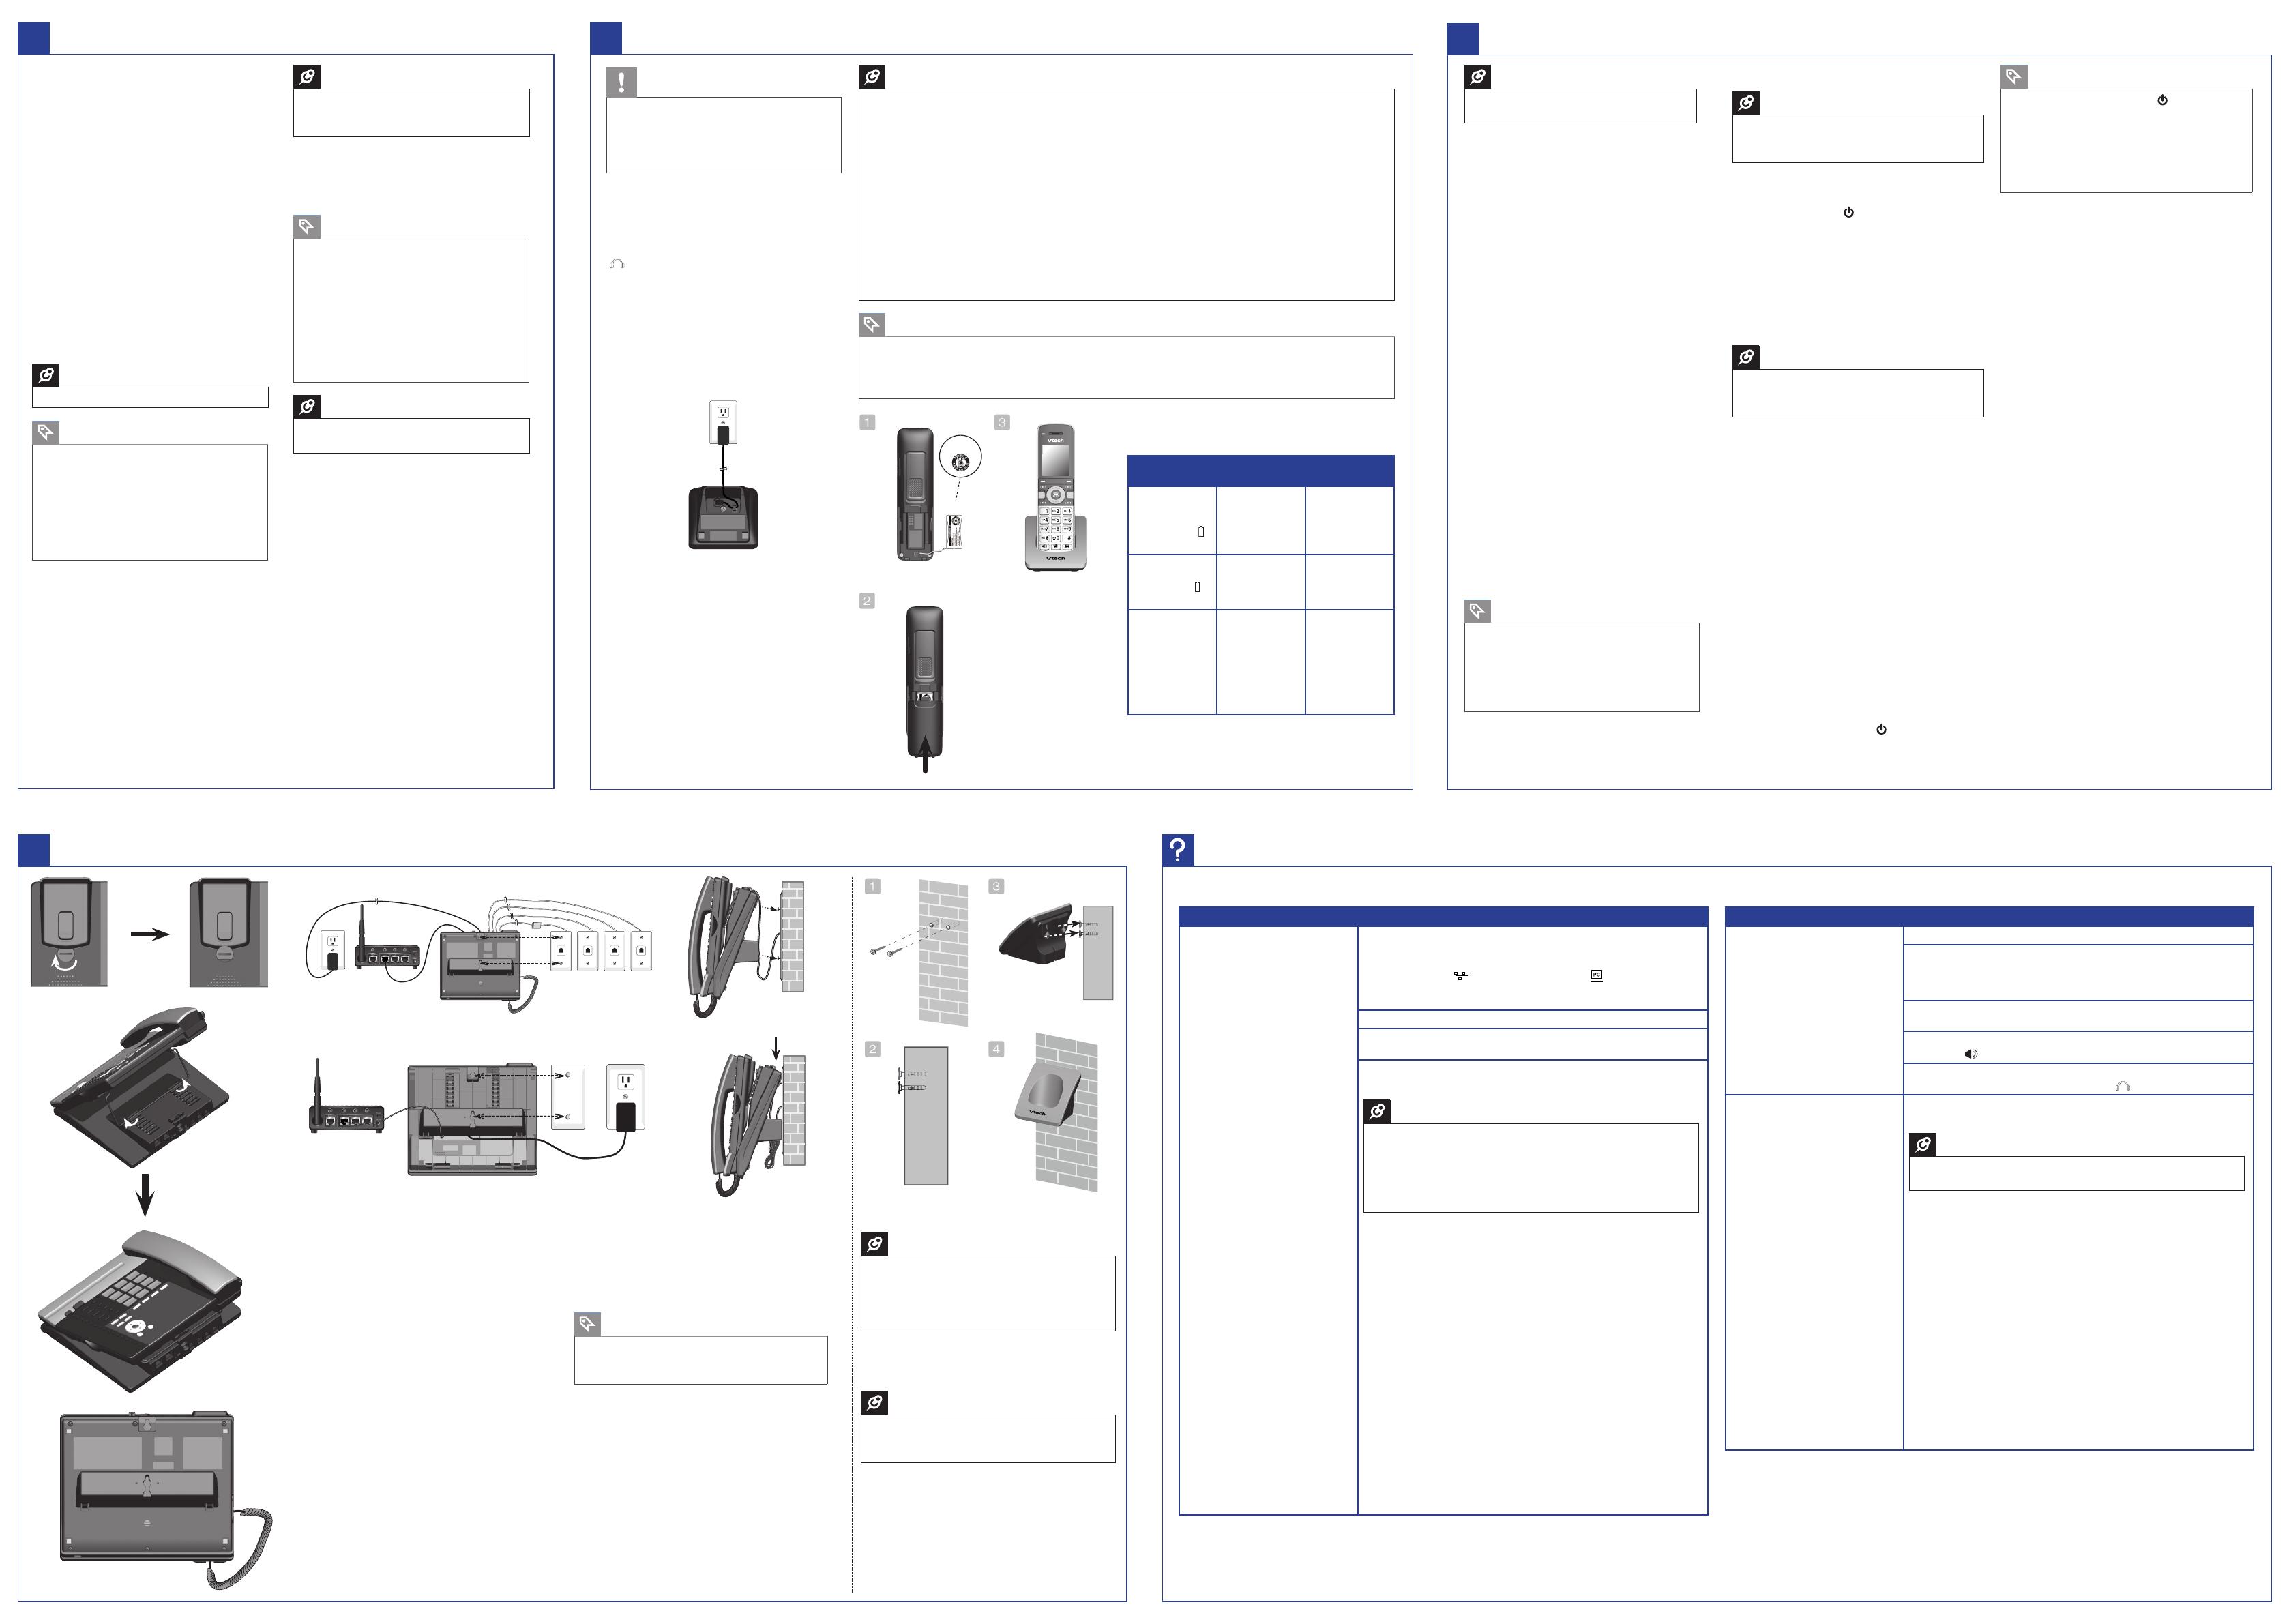
7
Connect and charge your accessories
Battery indicator
Once you have installed the battery, the screen
indicates the battery status.
Battery
indicators
Battery status Action
The screen
is blank, or
shows Place in
charger and
flashes.
The battery has
no or very little
charge. The
handset cannot
be used.
Charge without
interruption
for at least 30
minutes.
The screen
shows Low
battery and
flashes.
Battery has
enough charge
to be used for a
short time.
Charge without
interruption
for at least 30
minutes.
The screen
shows EXT XX.
(XX represents
the extension
number of the
device, which
the handset is
registered to).
Battery is
charged.
To keep
the battery
charged, dock
the handset
to the charger
when not in
use.
Caution
•
The power adapter is intended to be
correctly oriented in a vertical or floor mount
position. The prongs are not designed to
hold the plug in place if it is plugged into a
ceiling, under-the-table, or cabinet outlet.
Notes
•
Make sure you connect no more than five cordless accessories.
•
Only one UP407 cordless handset and one IS6100 cordless headset can be connected to the UP416
console or a UP406 deskset.
•
For the optimum range and better reception of your cordless accessories, place the UP416 console and
UP406 deskset in center of an open location.
•
If a station has cordless accessories, the cordless accessories are a part of that station with the same
extension number. Only one extension device can be used at a time.
•
The HEADSET button on the UP416 console or UP406 deskset is for the corded headset only. For
operation details of the corded headset, refer to the user’s manual of the corded headset.
•
Connect the charger to the power outlets that are not controlled by a wall switch.
•
Use only the supplied power adapter and supplied rechargeable battery with this product, or replacement
battery (model BT166342). To order a replacement power adapter or repacement battery, visit our website
at businessphones.vtech.com, or call 1(800) 595-9511. In Canada, dial 1 (800) 267-7377.
•
N’utilisze que le bloc-piles inclus avec cet appareil ou l’equivalent (modèle BT166342). Pour commander
un bloc-piles, composez le 1 (800) 267-7377 ou visitez notre site Web au businessphones.vtech.com.
Tips
•
If you plan to have a UP407 cordless handset and an IS6100 cordless headset to your UP416 console or
UP406 deskset, connect the cordless handset first, and then the cordless headset.
•
Disconnect and remove the battery to prevent possible leakage if you do not use the handset for a long
time.
You can connect corded or cordless accessories
to the system.
Connect corded headset
Plug any industry-standard 2.5mm corded
telephone headset into the HEADSET jack
(
Use only
Supplied
Adapter
L4 L3/4L2 L1/2
5.1
MS2085 Engraving:
MS2015 Engraving:
Use only
Supplied
Adapter
) on the side of the console or deskset.
For optimal result, use a VTech 2.5mm corded
headset (sold separately).
Connect cordless devices
You can connect a UP407 cordless handset
and an IS6100 cordless headset to the UP416
console or a UP406 deskset.
Connect the cordless handset
charger
Install the cordless handset
battery
Note
•
Register each UP407 cordless handset or
IS6100 headset separately.
Cordless handset
Register handset
1 Lift the cordless handset up from its charger.
»
The handset screen displays Choose
Handset in Registration at base menu. Put
handset on cradle to register.
Then, on the UP416 console or UP406 deskset:
2 Press MENU/
SELECT.
3 Press p or q to scroll to Registration, and press
MENU/SELECT or u/SKIP.
4 Press
MENU/SELECT or u/SKIP again to select
Handset.
»
The console or deskset screen displays
Registering handset...(Put handset on
cradle to start).
5 Dock the unregistered cordless handset back to
the charger.
»
The handset screen displays Registering...
Please wait. The handset beeps once and
begins registering.
• The registration takes up to 60 seconds to
complete.
• When the registration is complete, the
console or deskset screen displays Handset
registered, and the handset screen displays
Ext Handset.
6 Lift the handset, then press the desired line key
(LINE 1 to Line 4).
• If you hear a dial tone, the registration is
successful.
Tip
•
If there is no dial tone, and the registration
is not successful, the console or deskset
screen will return to the previous menu.
Wait for about two minutes, then try the
registration process again - starting from
step 1 of Register handset.
Cordless headset
Note
•
Make sure the IS6100 headset is charged
before use. Refer to the IS6100 user’s manual
for the detailed opeartions.
Before registering
Place the headset in the headset charger, and take
note of the color of the button.
• If it flashes in red and blue alternately, the
headset is unregistered.
• If it is in constant red light, the headset is charging
and registered to other device.
• If it is in constant blue light, the headset is fully
charged and registered to other device.
If your headset is previously registered to other
device, deregister it first.
Note
•
To deregister, refer to the user’s manual of the
telephone to which your headset is currently
registered.
Register headset
1 Place the headset in its charger, and charge it for
at least five minutes.
2 Lift the headset up from its charger.
Then, on the UP416 console or UP406 deskset:
3 Press MENU/
SELECT.
4 Press p or q to scroll to Registration, and press
MENU/SELECT or u/SKIP.
5 Press p or q to scroll to select DECT Headset,
and then press
MENU/SELECT or u/SKIP.
»
The console or deskset screen displays
Registering DECT Headset...(Put DECT
headset in charger).
6 Dock the headset back to its charger.
• The registration takes up to 60 seconds to
complete.
• When the registration is complete, the console
or deskset screen displays DECT Headset
registered.
7 Lift the headset, then press
on the headset.
• If you hear a dial tone, the registration is
successful.
Tip
•
If there is no dial tone, or the
button on the
headset flashes in red and blue alternately,
then the registration is not successful. Remove
the headset from its charger, and wait for about
two minutes. Then, try the registration process
again - starting from step 2 of Register
headset.
Mount your console or deskset
1 Unplug the power adapter from the power outlet,
and unplug the Ethernet cable from the Ethernet
switch or router.
• For console, unplug the telephone line cords
from the wall jacks or DSL filters.
2 Put the corded handset aside.
3 Use a coin to rotate the handset tab 180 degrees.
• The protruding edge holds the corded handset
when the phone is mounted on the wall.
4 Lift the kickstand to release it from the grooves.
5 Snap the kickstand into the outermost groove until
it locks into place.
6 Install the wall mount bracket to the console or
deskset. Make sure it locks into place.
• Insert the upper tabs of the mounting bracket
into the upper slots at the back of the console or
deskset.
• Press the lower tabs of the mounting bracket
into the lower slots at the back of the console or
deskset.
7 Reconnect the telephone line cords, the Ethernet
cable, and the power adapter back.
• For details, refer to the Connect your system -
Console and Connect your system - Deskset
sections.
8 Align the upper wall mounting hole on the back of
the console or deskset with the upper tab of the
standard wall plate.
• Same goes for the lower mounting hole and the
lower tab.
9 Push the console down until it clicks securely in
place.
Tip
•
For better cable and cord management, bundle
the telephone line cords, Ethernet cable, and
the power adapter neatly with twist ties.
Wall mount to tabletop installation
1 Untie the bundled cable and cords.
2 Push the console or deskset up to unmount from the
standard wall plate.
3 Unplug the telephone cords (or DSL filters from the
wall, the Ethernet cable, and the power adapter.
4 Reconnect the telephone line cords, the Ethernet
cable, and the power adapter back.
• For details, refer to the Connect your system -
Console and Connect your system - Deskset
sections.
If you cannot find the answer to your question, visit our website at businessphones.vtech.com or call 1 (800) 595-9511 for customer service. In Canada, call 1 (800) 267-7377.
Frequent asked questions
+06
1((
%#0%'.
1 Plug the battery connector securely into
the socket inside the handset battery
compartment. Make sure the THIS SIDE UP
label faces up.
2 Align the cover flat against the battery
compartment. Slide it upwards until it clicks
into place.
3 Dock the handset to the charger. The
CHARGE light is on when charging.
THIS SIDE UP
Question Solution
I cannot obtain an IP address
after I powered up the console or
deskset. What should I do?
Make sure the Ethernet cable is connected properly and securely on
both ends.
• On the console or deskset, connect the Ethernet cable to the
Ethernet port (
Use only
Supplied
Adapter
L4 L3/4L2 L1/2
5.1
MS2085 Engraving:
MS2015 Engraving:
Use only
Supplied
Adapter
) instead of the PC port (
Use only
Supplied
Adapter
L4 L3/4L2 L1/2
5.1
MS2085 Engraving:
MS2015 Engraving:
Use only
Supplied
Adapter
).
• On the router end, connect the Ethernet cable to the LAN port
instead of the WAN port.
Make sure the router is on and working properly.
Make sure the router’s DHCP server is on. Contact your technical
support for more details.
If you do not want to use the DHCP server for automatic IP
assignment, you can assign a fixed IP manually.
Notes
•
When you enter a specific IP, make sure the IP range is not
blocked by the Ethernet switch or router.
•
Make sure you assign a unique IP for each station, and no other
network device is using the same IP address.
•
Make sure the first 3 sets of digits in the IP address are the same
among the console and all desksets.
1 Press p or q to scroll to Set static IP.
»
The screen displays Enter static IP.
• Use the dialing keys to enter a specific IP
• Press DELETE to delete a character.
• Press # to add a dot.
• Press t/REPEAT or u/SKIP to move the cursor to the left or
right.
2 Press
MENU/SELECT.
»
The screen displays Subnet mask:
• Use the dialing keys to enter a specific subnet mask.
3 Press
MENU/SELECT again.
»
The screen displays Router/Gateway:
• Use the dialing keys to enter a specific gateway.
4 Press
MENU/SELECT the third time to save.
For console, follow the screen display instructions to set the
extension number.
For deskset, follow the screen display instructions to connect the
console and set the extension number.
Question Solution
There is no dial tone. What should
I do?
Make sure the console and deskset is installed properly.
Disconnect the telephone line from the console and connect it to a
different telephone. If there is no dial tone on that telephone either,
the problem is in your wiring or local service. Contact your telephone
service provider.
Your telephone line cords or Ethernet cable might be defective. Try
installing new ones.
Make sure a line is selected. Press a line key (Line 1-Line 4) or
SPEAKER
.
If there is no dial tone when you press HEADSET, make sure the
corded headset is firmly connected to the
Use only
Supplied
Adapter
L4 L3/4L2 L1/2
5.1
MS2085 Engraving:
MS2015 Engraving:
Use only
Supplied
Adapter
jack.
I want to replace my cordless
handset or cordless headset.
What should I do?
You have to deregister the registered cordless devices first, and then
register each device separately.
Note
•
Make sure the console or deskset is not in use before
deregistration.
On the console or deskset:
1 Press MENU/
SELECT.
2 Press p or q to scroll to Registraion, and press
MENU/SELECT or
u/SKIP.
3 Press p or q to scroll to Deregistraion, and press
MENU/SELECT
or u/SKIP.
»
The console or deskset screen displays Deregister all
devices? Press 'SELECT' to confirm.
4 Press
MENU/SELECT to confirm.
• The process takes up to 10 seconds to complete.
• If the deregistration is successful, the console or deskset screen
will display Handset deregistered. DECT headset deregistered.
The console or deskset screen returns to the Registration menu.
To return to the idle screen, press CANCEL twice.
• To register a cordless handset or cordless headset again, see
Register your cordless handset and headset section.
Mount your handset charger
Notes
•
Use two 10mm screws and wall anchor (not
provided) to hold charger. Purchase them in
any hardware or consumer electronics retailers.
•
Suggest to use a professional to install the
charger.
1 Use a pencil to mark two holes, with 30mm apart,
onto the desired location of the wall.
2 Drill two holes in the wall according to the marks.
Notes
•
If you drill the holes into a stud, go to step 3.
•
If you drill the holes into an object other than a
stud, go to step 4.
3 Insert the screws (not provided) into the holes, and
tighten them until only 1/4 inch of the screws are
exposed.
4 Insert the wall anchors (not provided) into the
holes, and tap gently on the ends with a hammer
until the wall anchors are flush with the wall.
5 Align the mounting holes of the charger with the
screws on the wall. Slide the charger down to
mount.
Line 1/2 Line 2 Line 3/4 Line 4
Router
Console:
RouterRouter
Deskset:

