Page is loading ...

Instruction
Book
1
®
CPFAFFD
84
CPFAFFD
85
-=-

Needle
and
Thread
Chart
Thread
Needle
Type
of
Fabric
Type
Size
Size
Point
Style
Bed
linen
80
Fine
linen
Cotton
40
70—80
Muslin
70—80
Dress
fobrics,
such
as
brocade,
Silk
50
satin
ottoman,
taffeta,
georgette,
—
--
—----
70—80
crepe,
chiffon,
botiste,
blouse
Cotton
or
mercerized
fobrics
ond
poplin
shirting
cotton
Suitings
ond
montlings
Silk
40
80—90
Twill,
denim
Cotton
40
90—
100
130
R
Heavy
linen
Cotton
40
90—
100
Cottonorlinen
40
90—100
Burlop
Linen
40
110
Terry
cloth,
chenille
goods,
Cotton
40
knitted
pile
fabric
for
bathrobes,
---:—-———
---—
—--—--------—-—--
-
80—90
corduroy
Silk
50
Cotton,
royon
staple
fabrics
Cotton
50
70—80
Jersey
fabrics
(synthetic)
-—--——-—
70—80
130
ses
Lostex,
Helanca
fabrics
——
—---—
70—90
130
ses
Synthetic
40
70—80
Foombacks
Silk
—
—--—----—
130
R
Jersey
fabrics
(wool)
Silk
-—
50
80
130
ses
—
Woolens
Mercerized
cotton
50
70—80
130R
Cotton
curtoins
Mercerized
cotton
40
70—80
130
sk
Synthetic
curtoins
Synthetic
thread
40
70—80
Acella,
leotherette,
oilcloth
Cotton
40
80
PCL
Elastic
corsetry
fabrics,
Firm
Synthetic
thread
40
-
90__
ses
corsetry
fabrics,
corset
satin
Cotton
40
90
Leather
110
130
Lr
Embroidery
thread
30—50
70
Heavy
embroidery
thread
90—
100
Buttonhole
silk
90—
100
Decorative
stitching
Embroidery
and
30
80
130
R
darning
thread
50
70—80
Silver-gold
thread
70
80—
100
Silver
thread

Instructions
CPFAFFI
84
and
85
Foreword
Your
new
Pfaff
sewing
machine
will
enable
you
to
master
a
large
variety
of
sewing,
embroidering
and
darning
jobs
easily
and
quickly.
This
instruction
book
has
been
com
piled
in
order
to
familiarize
you
thoroughly
with
all
the
sewing
jobs
coming
up
in
a
home.
We
suggest
that
you
try
out
the
various
sew
ing
techniques
discussed
in
this
book
so
that
you
will
become
well
acquainted
with
your
machine.
If
you
have
any
sewing
problems,
please
do
not
hesitate
to
contact
your
Pfaff
dealer
who
will
be
glad
to
help
you
at
any
time.
We
hope
you
will
always
enjoy
sewing
with
your
Pfaff.
PFAFF-Haushaltmaschinen
GmbH
Karsruhe-DurIach

Essential
Parts
of
Your
Pfaff
84
1
Face
cover
2
Take-up
lever
3
Thread
guide
4
Top
cover
5
Thread
retainer
stud
6
Spool
pins
7
Bobbin
winder
8
Balance
wheel
9
Stop
motion
knob
10
Motor
disengaging
mechanism
11
Stitch
length
control
12
Reverse
feed
control
13
Bed
cover
14
Transverse
rotary
hook
15
Needle
plate
16
Sewing
foot
thumb
screw
17
Light
switch
18
Stitch
width
control
19
Needle
position
lever
20
Needle
thread
tension
21
Presser
bar
lifter
(on
back
of
machine
arm)
22
Needle
set
screw
23
Sewing
foot
17
I
2

1
Face
cover
2
Take-up
lever
3
Thread
guide
4
Top
cover
5
Thread
retainer
stud
6
Spool
pins
7
Bobbin
winder
8
Balance
wheel
9
Stop
motion
knob
10
Motor
disengaging
mechanism
11
Stitch
length
control
12
Reverse
feed
control
13
Free
arm
14
Free
arm
cover
(enclosing
transverse
rotary
hook)
15
Needle
plate
16
Sewing
foot
thumb
screw
17
Light
switch
18
Stitch
width
control
19
Needle
position
lever
20
Needle
thread
tension
21
Presser
bar
lifter
(On
back
of
machine
arm)
22
Needle
set
screw
23
Sewing
foot
Essential
Parts
of
Your
Pfaff
85
12
3
4
5
—G—
7
8
I
I
I
f
I
9
15—
14

To
remove
the
bobbin
case,
rotate
the
ba
lance
wheel
until
the
needle
is
at
the
top
of
its
stroke.
On
the
Pfaff
84,
remove
bed
cover
(13),
as
illustrated.
Lift
latch
k
on
the
bobbin
case
and
pull
out
the
bobbin
case
with
the
bob
bin.
The
bobbin
cannot
fall
out
as
long
as
you
hold
the
case
by
its
open
latch.
When
you
release
the
latch,
the
empty
bobbin
drops
out.
On
the
Ptaft
85,
the
bobbin
case
is
removed
just
like
on
the
Pfaff
84.
To
get
at
the
bobbin
case,
however,
you
must
first
open
free
arm
cover
(14)
by
swinging
it
toward
the
left.
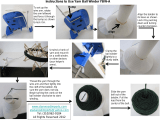
6

For
bobbin
winding,
disengage
the
sewing
mechanism.
Hold
balance
wheel
(8)
while
turning
stop
motion
knob
(9)
toward
you
(see
ill.).
To
engage
the
sewing
mechanism
after
the
bobbin
has
been
wound,
turn
the
stop
mo
tion
knob
away
from
you
(as
indicated
by
an
arrow
in
the
ill.).
Pass
the
thread
around
the
thread
retainer
stud
in
the
direction
indicated
by
an
arrow.
Place
a
bobbin
on
the
bobbin
winder
spindle,
making
sure
that
key
A
at
its
base
enters
slot
B
in
the
bobbin
(see
ill.).
Wind
a
few
turns
of
thread
on
the
bobbin
and
push
the
bobbin
toward
the
right.
Start
the
ma
chine.
When
the
bobbin
is
full,
it
is
pushed
toward
the
left
and
can
be
removed
from
the
spindle.
A
7

Hold
the
full
bobbin
so
that
the
thread
un
winds
toward
the
right
and
place
it
in
the
bobbin
case
(1).
Pull
the
thread
into
slot
(2)
and
under
spring
(3).
As
you
pull
the
thread,
the
bobbin
should
rotate
clockwise
(4).
Leave
about
three
inches
of
thread
hanging
from
the
bobbin
case.
1
2
8

To
insert
the
bobbin
case
into
the
machine,
rotate
the
balance
wheel
until
the
needle
is
at
its
highest
point.
Lift
the
latch
and
place
the
bobbin
case
on
center
stud
s
(see
ill.),
making
sure
its
slot
(white
arrow)
points
up.
Release
the
latch
and
press
against
the
bobbin
case
until
you
hear
t
snap
into
place.

To
remove
the
workplate,
swing
up
its
sup
port
and
unlock
it
by
pulling
out
and
swing
ing
up
the
lever
on
the
back
of
the machine
(see
arrow
in
Fig.
2).
On
machines
having
no
carrying
case
base,
the
workplate
support
is
pressed
against
the
baseplate
of
the
machine.
10
The
sewing
area
of
the
Pfaff
84
Portable
is
enlarged
with
the
aid
of
an
extension
(4).
To
enlarge
the
sewing
area
of
the
Pfatf
85
for
ordinary
sewing
operations,
push
the
workplate
onto
the
free
arm
as
far
as
it
will
go
(1).
Then
lock
it
in
place
by
turning
down
the
lever
on
the
back
of
the
machine
(2)
until
the
locking
stud
snaps
into
the
hole
in
the
free
arm.
Press
the
workplate
support
against
the
machine
base
until
it
snaps
into
place
(3).
3
4

Upper
threading
is
illustrated
opposite.
Please
note
that
the
thread
is
placed
be
tween
any
two
of
the
discs
of
tension
(20),
pulled
clockwise
around
the
tension
stud
and
drawn
toward
the
right
with
a
jerk
(see
ill.).
As
you
do
this,
hold
the
thread
steady
somewhere
between
the
spool and
the
ten
sion.
Thread
the
needle
from
front
to
back.
3
3
—20
11

The
sewing
foot
is
raised
and
lowered
by
operating
the
presser
bar
lifter on
the
back
of
the
machine
(see
ill.).
A
Presser
bar
lifter up
B
Presser
bar
lifter
down
12
To
draw
up
the bobbin
thread,
hold
the
needle
thread
and
lower
the
sewing
foot.
Turn
the
balance
wheel toward
you
a
full
turn.
Pull
the
needle thread
to
draw
up
the
bobbin
thread.
Place
both
threads
back
un
der
the
sewing
foot
after
it
has
been raised
again.

Fundamentals
of
Machine
Operation
Make
sure
the
take-up
lever
(2)
is
at
its
highest
point
before
you
begin
and
after
you
have
completed
a
seam.
Always
rotate
balance
wheel
(8)
toward
you
(see
arrow).
As
you
do
this,
check
to
make
sure
the
stop
motion
knob
is
tightened
firm
ly.
For
ordinary
sewing,
needle
position
lever
(19)
should
be
in
its
center
position.
19
13

Begin
by
sewing
a
straight-stitch
seam.
To
this
end,
push
the
stitch
width
control
to
the
right
as
far
as
it
will
go.
The
stitch
length
is
regulated
by
turning
the
stitch
length
control.
The
number
indi
cating
the
stitch
length
chosen
should
be
opposite
the
dot
on
the
left-hand
side
of
the
slot.
For
ordinary
sewing
operations,
set
the
stitch
length
control
on
“2”.
Place
the
material
under
the
sewing
foot
and
lower
the
presser
bar
lifter.
Place
the
foot
control
within
easy
reach
of
your
foot
and
depress
the
pedal.
The
harder
you
press,
the
faster
the
machine
will
run.
14

To
sew
in
reverse
or
bacictack
the
end
of
a
seam,
simply
depress
the
fingertip
control.
The
stitch
width
is
regulated
by
pushing
the
stitch
width
control
toward
the
left,
as
may
be
desired.
Various
zigzag
sewing
operations
are
dis
cussed
on
page
25
and
the
following
pages.

Balanced
tensions
are
essential
for
sewing.
Both
tensions
are
correctly
balanced
if
the
needle
and
bobbin
threads
interlock
in
the
center
of
the
material.
The
bobbin
thread
tension
is
regulated
by
turning the
small
knurled
screw
on
the
bob
bin
case.
Turn
this
screw
right for
a
tighter
tension,
or
left
for
a
looser
tension.
If
the
same
size
threads
are
used
in
the
needle
and
on
the
bobbin,
there
is
no
need
to
adjust
the
bobbin
thread
tension.
This
tension
is
set
correctly
if
a
slight
resistance
has
to
be
overcome
when
pulling
the
thread.
Numbers
0
to
10
indicate
different
degrees
of
tension
on
the
upper
tension
dial. The
higher the
number,
the tighter the
tension.
For
ordinary sewing
operations,
the
upper
tension
should
be
set
at
about
5.
Upper
tension
too
tight
or
lower
tension
too
loose.
bottom
top
bottom
top
Upper
tension
too
loose
or
lower
tension
too
tight.
bottom
top
Both
tensions
correctly
balanced.
16

The
accessory
box
which
belongs
to
your
machine
contains
several
sewing
feet
for
special
sewing
operations.
To
change
the
sewing
foot,
bring
the
needle
to
its
highest
point
and
raise
the
foot.
Turn
out
screw
16
until
the
sewing
foot
can
be
removed,
tilt
ing
it
sideways
(see
ill.).
The
new
foot
is
at
tached
in
the
reverse
order.
For
elastic
fabrics,
use
ordinary
sewing
foot
No.
93-838
954-00
instead
of
clear-view
foot
No.
93-100
179-00.
Insert
the
needle
and
push
it
up
as
far
as
it
will
go,
making
sure
that
the
flat
side
of
its
shank
faces
toward
the
back.
Tighten
screw
22
securely.
To
change
the
needle,
bring
the
needle
bar
to
its
highest
point
and
lower
the
sewing
foot.
Loosen
needle
set
screw
22
and
pull
the
old
needle
out
of
the
needle
clamp.
Use
System
130
R
needles
only.
17

Attaching
the
Embroidery
and
Darning
Plate
Darning
Embroidery
and
darning
plate
No.
93-030
125-45
For
certain
sewing
operations,
the
machine
feed
must
be
rendered
inactive.
For
this
pur
pose,
an
embroidery
and
darning
plate
is
in
cluded
in
the
accessories
of
your
Pfaff
84.
Apply
this
plate
as
follows:
Bring
the
needle
to
its
highest
point.
Remove
the
sewing
foot.
Raise
the
bed
cover
and
pull
forward.
Place
the
embroidery
and
darn
ing
plate
over
the
machine
feed
so
that
its
lug
enters
the
center
feed
slot
(see
ill.).
Re
place
the
bed
cover.
Piaff
85
In
this
case
it
is
not
necessary
to
remove
the
cover
plate.
Simply
press
the
darning
plate
into
the
corresponding
cutouts
in
front
of
the
needle
plate.
To
prepare
your
machine
for
darning,
pro
ceed
as
follows:
Darning
foot
No.93-106103-91
Replace
the
ordinary
sewing
foot
by
darn
ing
foot
No.
93-106
103-91,
attaching
it
from
the
rear
so
that
spring
clip
a
rests
on
needle
set
screw
(22).
Tighten
sewing
foot
thumb
screw
(16).
Lower
the
presser
bar
lifter.
---.-‘
/
18

Darning
sheer
and
soft
materials
is
greatly
facilitated
by
placing
them
in
darning
hoops.
Draw
up
the
bobbin
thread
and
hold
both
threads
lightly
with
your
left
hand
while
the
first
stitches
are
being
made.
Trim
the
threads
and
start
stitching
back
and
forth
across
the
hole
in
sewing
direction.
Make
sure
the
threads
are
anchored
in
the
unworn
area
around
the
hole.
Turn
the
fabric
at
right
angles
and
sew
back
and
forth
over
the
preceding
work
with
short
stitches.
Select
the
darning
hoops
in
a
size
match
ing
the
darning
job
to
be
performed.
If
the
needle
thread
should
break,
the
up
per
tension
is
too
tight.
19

Zipper
Insertion
Attach
zipper
foot
without
quilting
gauge
(which
can
be
obtained
from
your
Pfaff
deal
er).
Stitch
length:
1.5
to
2
1
Baste
closed
zipper
on
the
fabric,
then
open
it.
Stitch
close
to
the
left
edge
of
the zipper
for
about
1
inch,
guiding
the
right
edge
of
the
foot
along
the
zipper
teeth
(1).
Leave
the
needle
in
the
material,
raise the
zipper
toot
and
close
the
zipper
(2).
Continue
stitching
until
you
reach
the
end
of
the
zipper.
Then
stitch
across
this
end
(3)
and
up
the other
side.
The
finished
zipper
closure
is
shown
in
Fig.
4.
2
3
4
20
/