Page is loading ...

AtlonA
HDMI™ Media Center 6 inputs 1 output
Switcher & Converter & 1080p Up-Scaler
AT-LINE-EX
User Manual

TABLE OF CONTENTS
1. Introduction ........................................................ 1
2. Features ........................................................ 1
3. Package Contents ........................................................ 1
4. Operation Controls and Functions .................................. 2
4.1 Front Panel ........................................................ 2
4.2 Rear Panel ........................................................ 2
5. IR Remote Control Operation mode .................................. 4
6. Connection and Installation ............................................. 5
7. TROUBLE SHOOTING ........................................................ 5
8. NOTICE ........................................................ 5
9. SAFETY INFORMATION ............................................. 6
10. WARRANTY ........................................................ 7

Introduction
Features
Package Contents
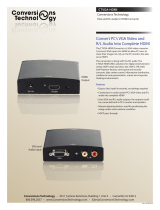
Congratulations on your purchase of the AT-LINE-EX HDMI Media Center.
Your satisfaction is very important to us. AT-LINE-EX is the product that can
offer the best integration solution for your home entertainment equipment.
AT-LINE-EX is designed for HDMI™, VGA and analog sources selection. It solves the
inconvenience of changing cable connection. AT-LINE-EX is a switcher, converter and
scaling box. It enables users to keep their non-HDMI™ source devices to use with more
advanced HDMI™ input device. With AT-LINE-EX, the VGA, composite, component, and
s-video signals can be converted to HDMI™ signal.
For the best performance of AT-LINE-EX, please read this manual carefully and keep
it for further information.
• HDMI™ (v1.3, Pixel Clock Rate: 25MHz ~ 225 MHz)
• Support 1080P video scaling
• 3D Y/C separation Comb-lter
• 10 bits video processor for A/D conversion
• Support IR remote control and manual control
• Convert analog audio and video signal to digital HDMI™ signal; and switch among 6
sources, which including 2 HDMI™, 2 analog (AV, s-video, or YPbPr) and 2 VGA.
• DTS-HD, Dolby TrueHD lossless compressed digital audio compliant (HDMI™
inputs)
• Gold plated connecters
• Support HDCP compliant devices
• Fashionable metal housing design, free of interference
• DC 5V/4A Power Adaptor
• AT-LINE-EX Media Center main unit
• IR Remote Controller
• User’s manual
• Fashionable metal housing design, free of interference
1

2
Operation Controls and Function
4.1 Front Panel
4.2 Rear Panel
Connect your devices to AT-LINE-EX Media Center
1. Connect the HDMI cables from your displays (monitor or projector) to the outputs
of the AT-LINE-EX.
2. Connect the input sources to the input ports of AT-LINE-EX. (You can connect 2
HDMI™ sources to the HDMI inputs of AT-LINE-EX, 2 VGA sources to the VGA
inputs of AT-LINE-EX, and 2 analog sources to the analog inputs of AT-LINE-EX.)
3. Plug the power adaptor to an AC power outlet. Plug the 5VDC output power plug
into the DC jack of AT-LINE-EX Media Center.
4. Turn on the power of your source device that you are going to use.
5. Check the power of AT-LINE-EX. If the power LED light is not on, please press the
power key to turn on the power of AT-LINE-EX.
6. Check the input indication LED at the front panel. Please press the button of input
source to choose input source. For example, if your are going to choose HDMI™
input 1, please press the key with “1” in the HDMI™
7. Use the “RES.” key to adjust the resolution.
8. Use IR Remote control for more control features.

2 3
Operation Controls and Functions
• AT-LINE-EX is designed with 2 HDMI™, 2 VGA and 2 analog sources selection.
• For each analog video connection, you can choose to connect Composite Video, S-video or Component Video. A RCA
audio input can be used as the audio input of Composite, S-video or Component.
• The VGA input support VGA video to HDMI™ video conversion only. If you need audio, please connect a speaker or
other sound device to the audio output of your VGA sources.
• VGA input supports resolution:
640×480(60/72/75 Hz), 800×600(60/72/75 Hz), 1024×768(60/70/75 Hz), 1280×768(60 Hz),1280×960(60 Hz),
1280×1024(60/75 Hz), 1400×1050(60 Hz), 1440×1050(60 Hz), 1440×900(60 Hz), 1360×768(60 Hz), 1920×1080(60 Hz),
DOS720×400(70 Hz), MAC640×480(67 Hz), MAC832×624(75), MAC1024×768(75 Hz)
* Due to various resolution designs of VGA input devices, you may encounter some difculty to show the pictures on
screen in some case. If you cannot see the pictures, it is suggested to try with a different VGA resolution.
* The picture can not show in full screen or the picture shows over the screen when use VGA input, you may use
Auto Frame or Full TV Frame function of your display device to adjust it, if the function applies to your TV.
• HDMI™ input supports resolution:
480i, 480p, 576i, 576p, 720p (50/60 Hz), 1080i (50/60 Hz), 1080p (50/60 Hz);
640×480 (60 Hz), 800×600 (60 Hz), 1024×768 (60 Hz), 1280×720 (60 Hz), 1280×1024 (60 Hz), 1920×1080 (60 Hz)
• YPbPr input supports resolution:
480i, 480p, 576i, 576p, 720p(50/60 Hz), 1080i(50/60 Hz), 1080p(50/60 Hz)
• AV / S-video input support: NTSC, PAL
• HDMI™ output supports resolution:
480p (60 Hz), 720p (60 Hz), 1080i (60 Hz),1080p (60 Hz)
Note:
1. AT-LINE-EX is designed mainly for up-scaling the HDMI™ Output signal to 480P, 720P and 1080P. The function
of 1080i is a simulated sub-function. Users are strongly recommended to use 720P and 1080P up-scaling to avoid the
compatibility issue between TV and AT-LINE-EX.
2. AT-LINE-EX is designed to support the input resolution listed above. But you may encounter some difculty in
compatibility due to varied designs of sources and display devices. When this occurs, please try to use different input
resolution.
Operations of AT-LINE-EX Media Center
Manual Operation mode
• Power On: Please use the power key to turn on the AT-LINE-EX from standby mode. The LED indication light of power
will be on.
• Power Off: Please use the power key to turn the AT-LINE-EX into standby mode. The LED indication light of power will
be off.
• Selection: Press the selection key of each input source to select the inputs. After you press the selection key, the
selection key will be light on to indicate the input source device.
1. Press AV1 key to select analog video input between Composite Video 1, S-video 1, and Component video 1.
2. Press AV2 key to select analog video input between Composite Video 2, S-video 2, and Component video 2.
3. Press VGA1 key to select VGA 1 video input.
4. Press VGA2 key to select VGA 2 video input.
5. Press HDMI1 key to select HDMI 1 input.
6. Press HDMI2 key to select HDMI 2 input.
• Resolution setting: 480P, 720P, 1080i, 1080P.
Use “RES.” key at front panel to set the output resolution. The sequence is in a circling order.
If the picture can not show on screen, the TV may not support that resolution you select. Please change to another
resolution. For example, if the TV can not show while you select 1080i, please try to change resolution to 720p, 1080p etc. to
meet the resolution and format that TV supports.

4
IR Remote Control Operation mode
1. Input Selection key: AV1, AV2, VGA, HDMI™
• Press “AV1” for Video 1, S-video 1, YPbPr 1 video selection. The
sequence is in a circulating order. Started from Video 1.
• Press “AV2” for Video 2, S-video 2, YPbPr 2 video selection. The
sequence is in a circulating order. Started from Video 2.
* Analog audio (R/L audio) inputs will be converted to digital audio
(R/L audio) for HDMI output
• Press “VGA” for VGA video selection. You can choose between
VGA 1 and VGA 2.
• Press “HDMI” for HDMI™ selection. You can choose between
HDMI™ 1 and HDMI 2.
2. Power ON/OFF
3. [RES.] Resolution setting: 480P, 720P, 1080i, 1080P. Use
“RES.” key to set the scaling resol ution. The sequence is in a
circulating order. If the picture can not show on screen, the TV may
not support the resolution you select. Please change to another
resolution. For example, if the TV can not show while you select
1080i, please try to change the resolution to 720p or 1080p etc.
4. [OSD] On Screen Display information. Show Input source and
output resolution info.
5. [Scal.] Aspect ratio information display. Show aspect ration information.
6. [MENU] Menu of Brightness, Contrast, Saturation, Hue, and Sharpness adjustment.
• Press the “MENU” button, a menu will show on the TV screen for setting adjustment.
• Press down button to enter the setting. The selected item will show in yellow color.
• Use up and down button to select different items, and use left and right button to adjust the
setting. The preset value is 50. The setting range is from 0 to 100.
• After nish the setting, press the “MENU” button again to leave to the menu setting mode.
7. [Mute] Press “Mute” button to mute the audio output.
8. [Reset] System Reset. Press the “Reset” button the system will set to original setting.
9. [P.M] Picture mode . Press “P.M” for picture mode selection. Three picture modes (Clear, Normal,
and Dark) are available for selection.
10. [N.R] Noise reduction. Press “N.R” for noise reduction. Three noise reduction modes are avail able
for selection.
11. [Aspect] Press “Aspect” key to transfer 4:3 aspect ratio to 16:9 aspect ratio.
* When the aspect ratio of original input signal is 16:9, only 16:9 aspect ratio will be showed.
* VGA input does not support aspect ratio adjustment.
Note:
The left and right keys on the Remote control can be used as volume control keys. Press the left key to
turn down the volume. Press the right key to turn up the volume.
1
2
3
4
8
9
11
5
6
7
10

4 5
Connection and Installation
TROUBLE SHOOTING
NOTICE
1. When there is no picture present, please:
• Check all the connection is correct and all connectors connect well.
• Check the quality of connecting cable, and make sure the cable does not damage.
• When use VGA as input source, due to various resolution designs of VGA input devices, you may encounter some difculty to
show the pictures on screen in some case. If you cannot see the pictures, it is suggested to try with a different VGA resolution.
• Reset the AT-LINE-EX.
2. When there is only picture displayed and without sound:
• Check all the connection is correct and all connectors connect well.
• Check your cable to see if it supports video transmission only or it is damaged.
• HDCP may not match very well at rst connection; please reset your AT-LINE-EX again.
• Do you connect any output to your Video recorder? HDCP will automatically lock up audio part.
3. When AT-LINE-EX does not respond to remote control or manual control:
• Please unplug the power cord to reset AT-LINE-EX.
4. When resolution could not show in 1080p?
• Make sure your sources (HD Player) and displays are fully supporting 1080p.
5. When the TV could not show in 1080i? ( “ i ” for interlaced scan)
• LCD TV or other at panel TV do not support “interlaced” video signal as CRT TV does. When 1080i video signal is delivered
to LCD TV, the video signal must be de-interlaced before showing on TV screen. When up-scaling the video signal to 1080i,
some of TV may not support the interlaced video format that is produced by AT-LINE-EX. If 1080i can not show on your TV,
please change the resolution to 720p, 1080p etc. to match what TV supports.
• Manufacturer reserves the right to make changes in the hardware, packaging and any accompanying documentation without prior written notice.
• HDMI, the HDMI™ Logo and High-Denition Multimedia Interface are trademarks or registered trademarks of HDMI™ Licensing LLC.
• AT-LINE-EX incorporates HDMI™ technology.
• Trademarks and brand names are the properties of their respective owners.
Computer
Blue-Ray DVD
in 2
in 1
AV2 AV1
OUTPUT
VGA 1
PS3
XBOX 360™
Wii
HDTV
IPTV Box
VGA 2

SAFETY INFORMATION
Safeguards
To reduce the risk of electric shock, do not
expose this product to rain or moisture.
If the wall plug does not t into your local
power socket, hire an electrician to replace
your obsolete socket.
Do not modify the wall plug.
Doing so will void the warranty and safety
features.
This equipment should be installed near
the socket outlet and the device should
be easily accesible in case it requires
disconnection.
Precautions
FCC Regulations state that any
unauthorized changes or modications to
this equipment not expressly approved by
the manufacturer could void the
user’s authority to operate this
equipment.
Operate this product using only the
included external power supply. Use of
other power supplies could impair
performance, damage the product or cause
res.
In the event of an electrostatic discharge,
this device may automatically turn off. If this
occurs, unplug the device, and plug it back
in.
Protect and route power cords so they will
not be stepped on or pinched by anything
placed on or against them. Be especially
careful of plug-ins, or cord exit points from
this product.
Avoid excessive humidity, sudden tempera-
ture changes or temperature extremes.
Keep this product away from wet locations
such as bathtubs, sinks, laundries, wet
basements and swimming pools.
Use only accessories recommended by AT-
LONA to avoid re, shock or other hazards.
Unplug the product before cleaning. Use a
damp cloth for cleaning. Do not use clean-
ing uid or aerosols, which could
enter the unit and cause damage, re or
electrical shock. Some substances may
also mar the nish of the product.
Never open or remove unit panels or make
any adjustments not described in this
manual. Attempting to do so could expose
you to dangerous electrical shock or other
hazards. It may also cause damage to your
AT-LINE-EX. Opening the product will void
the warranty.
Do not attempt to service the unit. Instead
disconnect it and contact your Authorised
ATLONA reseller or contact ATLONA di-
rectly.
6

WARRANTY
6 7
1. LIMITED WARRANTY
Atlona Technologies warrants that (a) its products (the “Product”) will perform substantially in accordance with the
accompanying written materials for a period of 3 YEARS from the date of receipt and (b) that the Product will be
free from defects in materials and workmanship under normal use and service for a period of 3 years. In the event
applicable law imposes any implied warranties, the implied warranty period is limited to 3 years from the date of
receipt. Some jurisdictions do not allow such limitations on duration of an implied warranty, so the above limitation
may not apply to Customer.
2. CUSTOMER REMEDIES
Atlona Technologies and its suppliers’ entire liability and Customer’s exclusive remedy shall be, at Atlona Technolo-
gies’ option, either return of the price paid for the Product, or repair or replacement of the Product that does not meet
this Limited Warranty and which is returned to Atlona Technologies with a copy of Customer’s receipt. This Limited
Warranty is void if failure of the Product has resulted from accident, abuse, or misapplication. Any replacement Prod-
uct will be warranted for the remainder of the original warranty period or 3 year, whichever is longer.
3. NO OTHER WARRANTIES
TO THE MAXIMUM EXTENT PERMITTED BY APPLICABLE LAW, ATLONA TECHNOLOGIES AND ITS SUPPLI-
ERS DISCLAIM ALL OTHER WARRANTIES, EITHER EXPRESS OR IMPLIED, INCLUDING, BUT NOT LIMITED
TO IMPLIED WARRANTIES OF MERCHANTABILITY AND FITNESS FOR A PARTICULAR PURPOSE, WITH
REGARD TO THE PRODUCT AND ANY RELATED WRITTEN MATERIALS. THIS LIMITED WARRANTY GIVES
CUSTOMER SPECIFIC LEGAL RIGHTS. CUSTOMER MAY HAVE OTHER RIGHTS DEPENDING ON THE JU-
RISDICTION.
4. NO LIABILITY FOR DAMAGES
TO THE MAXIMUM EXTENT PERMITTED BY APPLICABLE LAW, IN NO EVENT SHALL ATLONA TECHNOLO-
GIES OR ITS SUPPLIERS BE LIABLE FOR ANY DAMAGES WHATSOEVER (INCLUDING WITHOUT LIMITA-
TION, SPECIAL, INCIDENTAL, CONSEQUENTIAL, OR INDIRECT DAMAGES FOR PERSONAL INJURY, LOSS
OF BUSINESS PROFITS, BUSINESS INTERRUPTION, LOSS OF BUSINESS INFORMATION, OR ANY OTHER
PECUNIARY LOSS) ARISING OUT OF THE USE OF OR INABILITY TO USE THIS PRODUCT, EVEN IF ATLONA
TECHNOLOGIES HAS BEEN ADVISED OF THE POSSIBILITY OF SUCH DAMAGES. IN ANY CASE, ATLONA
TECHNOLOGIES’ AND ITS SUPPLIERS’ ENTIRE LIABILITY UNDER ANY PROVISION OF THIS AGREEMENT
SHALL BE LIMITED TO THE AMOUNT ACTUALLY PAID BY YOU FOR THE PRODUCT. BECAUSE SOME JU-
RISDICTIONS DO NOT ALLOW THE EXCLUSION OR LIMITATION OF LIABILITY FOR CONSEQUENTIAL OR
INCIDENTAL DAMAGES, THE ABOVE LIMITATION MAY NOT APPLY TO YOU.
ATLONA
2151 O’toole Ave, Ste D
San Jose CA 95131
Toll Free: 1-877-536-3976
International: 408-954-8782
FAX: 408-954-8792
Website: www.atlona.com
E-MAIL: [email protected]
/