Page is loading ...

GLASS PANEL HEATERS
The TCP Smart Wi-Fi glass panel heaters offer an efficient and quick heating solution combined with
a sleek, modern look. Control your heating exactly as you desire either using control panel situated
on the heater or remotely using the TCP Smart App.
USER INSTRUCTIONS
IP24 ELECTRONIC SERIES
MODEL POWER
SMARADGBL1500UK/ AC220-240V 50-60Hz 1300-1500W Class I
SMARADGWH1500UK
SMARADGBL2000UK/ AC220-240V 50-60Hz 1800-2000W Class I
SMARADGWH2000UK
IMPORTANT: Read these instructions fully before using the heater. Retain these instructions for
future reference.
SAFETY INSTRUCTIONS (to be read before operating the heater).
1.
Ensure the feet are correctly attached before using the heater.
2.
CAUTION: Some parts of this product can become very hot and cause burns. Particular attention has to
be given where children and vulnerable people are present. Children 3 years and younger should be
continually supervised when in close proximity to the heater. Children aged from 3 years to less than
8 years shall only switch on/off the appliance provided that it has been placed or installed in its
intended normal operating position and they have been given supervision or instruction concerning
use of the appliance in a safe way and understand the hazards involved. Children aged from 3 years
and less than 8 years shall not plug in, regulate and clean the appliance or perform user
maintenance.
3.
Use this heater on a flat, horizontal and stable surface, or fix it to the wall, as applicable.
4.
Ensure the power supply to the socket into which the heater is plugged is in accordance with
the rating label on the heater and that the socket is earthed.
5.
Keep the power cord away from the hot body of the heater.
6.
Indoor use only.
7.
Do not place the heater on carpets with a very deep pile.
8.
Always ensure that the heater is placed on a firm level surface.
9.
Do not place the heater close to curtains or furniture in order to avoid a fire hazard.
10.
Do not insert any object through the heat outlet or air grilles of the heater.
11.
Do not use the heater in areas where flammable liquids are stored or where flammable

fumes may be present.
12.
Always unplug the heater when moving it from one location to another.
13.
Do not use this heater if it has been dropped.
14.
Do not use if there are visible signs of damage to the heater;
15.
CAUTION:
In order to avoid a hazard due to inadvertent resetting of the thermal cut-out,
this appliance must not be operated through an external switching device, such as a timer,
or connected to a circuit that is regularly switched on and off by the utility.
WARNINGS
-
In order to avoid overheating, do not cover the heater.
-
Always use the heater in an upright position.
-
Do not use the heater to dry your laundry. Never obstruct the intake and outlet grilles to
avoid the danger of overheating.
-
The heater must be positioned at least 100 cm from furniture or other objects.
-
Do not place it up against walls, furniture, curtains, etc.
-
This appliance comes with a Y-type connection. Replacement of the cable must be
undertaken by a technician authorized by the manufacturer, because such work requires
special tools.
-
If the supply cord is damaged, it must be replaced by the manufacturer, their service agent
or a similarly qualified person in order to avoid a hazard.
-
In order to avoid overheating, do not cover the heater.
-
Do not locate the heater immediately below a socket-outlet.
-
Do not use this heater in the immediate surroundings of a bath, a shower or a swimming
pool.
-
Do not use this heater in small rooms when they are occupied by persons not capable of
leaving the room on their own, unless constant supervision is provided.
CERTIFICATION CONFORMITY
-
Hereby, Technical Consumer Products Ltd declares that the radio equipment type TCP Smart Wifi Fan
1500W – White, TCP Smart Wifi Fan 1500W – Black, is in accordance with Directive 2014/53/EU.
-
The full text of the EU declaration of conformity is available at the following internet address –
https://tcpi.eu/compliance-data/
-
REGISTERED OFFICES
-
TCP UK Ltd, 1 Exchange Court, Cottingham Road, Corby, Northants, NN17 1TY.
-
TCP France, Quai Gabriel P’ri, 1, Joinville Le Point, France, 94340.

ASSEMBLY OF THE HEATER
FREE STANDING
Before using the heater, the feet (supplied separately in the carton), must be fitted to the unit. These
are to be attached to the base of the heater using the 4 self-tapping screws provided, taking care to
ensure that they are located correctly in the bottom ends of the heater side mouldings.
1
Turn the heater upside down.
2
Put the feet into position and align the screws with the holes on the underside of the feet.
3. Insert the screws into the feet and fully tighten.
4 After the installation is complete turn the heater the correct way up
WALL MOUNTING
Caution: there should be a distance of at least 40cm between the lower part of the appliance and the floor. The feet
must be removed before mounting the appliance on the wall.
IMPORTANT:
Before drilling, ensure that no wires or pipes are behind the wall to prevent damage.
1. Measure the distance between the two slots situated at the back of appliance for “A” and “B” (see picture 1)
2. Remove the bracket from the product as shown in Figure 3.
3. Drill four holes at the same distance in the wall and insert a plug in each hole you just drilled. Place the brackets
facing the holes as indicated on picture 2;
4. Install the bracket on the wall as shown in Figure 2 and attach them in this position with the screw supplied.
5. Attach the appliance on the wall. To do so, hold it in such way that the slots are facing the brackets; insert the
appliance halfway onto the brackets until the appliance can go down into the grooves of the brackets.
6. Then install the appliance by proceeding the other way around compared to point 2 above.
7. Attach the appliance back on the wall as indicated in point 4. Use tools to rotate the safety buckle into the hole on
the back of the product;

OPERATING THE HEATER
Note, it is normal when the heaters are turned on for the first time, or when they are turned on
after a long period of time not being used, the heaters may emit some smell and fumes. This will
disappear when the heater has been on for a short while.
Choose a suitable location for the heater, taking into account the safety instructions above. Insert
the plug of the heater into a suitable socket.
CONTROL PANEL LAYOUT
Set Week
On / Off Display
Temperature Display
Heat Selection Display
Function Buttons
+ Button
Child Lock
- Button
Heat Mode
Set
Function Buttons
Display Night
Mode Child Lock
Schedule
Open Window
Detection
Schedule /
Timer Button
Standby
Anti
Frost Wi-Fi

STANDBY ON/OFF
Before using the panel controls or Smart App please ensure the heater is switched on using the On/
Off switch (see figure 1 below). The glass panel heater is now ready for use.
1 Press the STANDBY button to turn the heater on (figure
1). The display panel will light up and the unit will start
to operate with the default settings.
2 When using for the first time, set the current day and
time (see below instructions).
3 Use the UP and DOWN button to change the desired
temperature, and the MODE button to change the High
Heat and Low Heat modes (see figure 2)
SETTING THE DAY AND TIME
1
With the appliance turned on, hold the SET button for 3 seconds until the SET/WEEK is
highlighted. The SET/WEEK value will start to flash. (week 1 -7 indicative of days of the
week)
2
Change the week value using the UP and DOWN buttons.
3
Hold the SET button to confirm the week value, the hour and minute values starts to flash.
4
Change the hour value using the UP and DOWN buttons.
5
Hold the SET button to confirm the hour value.
6
Change the minute value using the UP and DOWN buttons.
7
Hold the MODE button to confirm the minute value.
8
Or leave the unit for 5 seconds and the day and time will be saved.
The above operation can be performed using the TCP Smart App.
HOW TO OPERATE
TURNING ON AND OFF
The STANDBY button can be pressed to enter and exit standby mode. If the unit is not to be used
for a while, we would advise switching off and unplugging the heater.
CHANGING THE ROOM THERMOSTAT
The room temperature can be adjusted in both High Heat and Low Heat modes, using the UP and
DOWN buttons. After the UP or DOWN button has been pressed, the display will show the target
temperature. The target temperature can be adjusted between 10°C and 40°C.
Please note: The initial temperature shown on the display is the current surrounding temperature.
When setting the temperature you desire (target temperature) press the UP and DOWN buttons
until you reach your target temperature, then stop. The display will then flash 4 times and show the
surrounding room temperature.

Example 1 If the target temperature is 27°C, and the surround temperature is hotter at 30°C then
the device will not heat as 27°C is lower than 30°C.
Example 2 If the target temperature is 27°C, and the surround temperature is cooler at 20°C then
the device will heat until 27°C is reached.
Set Week
Temperature
Display
This feature can be performed using the TCP Smart App
CHILD LOCK
To activate: Press the SET button until the Child Lock symbol (shown
above) is highlighted green. Press MODE button or leave for 10 seconds
and the operation will be saved.
To deactivate: Press the SET button until the Child Lock symbol is
highlighted. Press DOWN button. Press MODE button or leave for 10
seconds and the operation will be saved.
This feature can be performed using the TCP Smart App
CHANGING THE POWER MODE
Repeatedly press the MODE button to change between the 2 available power modes:
High Heat
The heater will operate at higher power to reach the desired temperature
quicker. The temperature can be specified between 10˚C and 40˚C
Low Heat
The heater will operate at lower power to reach the desired temperature
quicker. The temperature can be specified between 10˚C and 40˚C
Please note:
This feature is only available if the target temperature, is above the surrounding
temperature.
ANTI-FROST MODE
Anti-Frost
The heater will operate to keep the room temperature between 5˚C and
9˚C in order to prevent freezing within the room. The desired temerature
cannot be changed.
To activate: Press the SET button until the Anti Frost symbol (shown above) is highlighted green.
Press UP button. Press the UP. Press the MODE button or leave for 10 seconds and the
operation will be saved.
To deactivate: Press the SET button until the Anti Frost symbol is highlighted again. Press DOWN
button. Press the MODE button or leave for 10 seconds and the operation will be saved.
This feature can be performed using the TCP Smart App.

OPEN WINDOW DETECTION
This feature detects when the ambient temperature drops by 5°C within 10 minutes, the heater will
register the possibility of an open window in the room. If this happens, it will stop heating and enter
standby mode.
To activate: Press the SET button until the Open Window Detection symbol is highlighted.
Press UP button. Press the MODE button or leave for 10 seconds and the operation will be
saved.
To deactivate: Press the SET button until the Open Window Detection symbol is highlighted. Press
DOWN button. Press the MODE button or leave for 10 seconds and the operation will be saved.
This feature can be performed using the TCP Smart App.
STANDBY TIMER
With the unit running with the desired settings, press the TIMER button. The timer symbol will
illuminate and the display will flash 00:00. Repeatedly press the + or - buttons to increase or reduce
the duration of the time (up to a maximum of 24 hours). Once the chosen timer length is selected,
press the mode button or leave the heater, and after 10 seconds the timer will start. After the
chosen time period the heater will enter standby mode.
This feature can be performed using the TCP Smart App.
SCHEDULE
When you activate the schedule, you can start to set the weekly schedule according to following
steps.
Press the SET button to highlight SET WEEK. The number “1” will begin to flash on the display to
show that the first day is selected. Use the UP and DOWN buttons to select the weekday to edit.
Press the SET button once again to set the time of hours. The number “00” will flash and the
ON/OFF light is highlighted. Press the UP and DOWN buttons to select the hours to change. On
is turn on, OFF is turn off.
Press the SET button again to set the time for minutes, the number “00” will flash and the ON/OFF
is highlighted. Use the UP and DOWN buttons to select the minutes. ON is turn on and OFF is turn
off. Once the hours and minutes have been selected for the ON time, press the SET button to go
through the process again for the OFF time. Once this is done press SET and the timings are saved.
The above steps can then be repeated to set other time periods throughout the week.
Press the MODE button or leave for 10 seconds and all of the timings will be saved.
This scheduling can only be used for one time period per day. More enhanced timings can be saved
using the TCP Smart App.
To change any timings please follow the above.

DISPLAY NIGHT MODE
To activate: Press the SET button until the Night Mode symbol (shown above) is highlighted. Press
UP button. Press the MODE button or leave for 10 seconds and the operation will be saved.
To deactivate: Press the SET button until the Night Mode symbol is highlighted. Press DOWN button.
Press the MODE button or leave for 10 seconds and the operation will be saved.
The panel light is reduced to 50% when using this mode. This feature is not available using the App.
CLEANING THE HEATER
Always un-plug the heater from the wall socket and allow it to cool down before cleaning. Clean
the outside of the heater by wiping with a damp cloth and buff with a dry cloth. Do not use any
detergents or abrasives and do not allow any water to enter the heater.
STORING THE HEATER
When the heater is not used for long period of time it should be protected from dust and stored in a
clean dry place.
CORRECT DISPOSAL OF THIS PRODUCT
This marking indicates that this product should not be disposed with other household wastes
throughout the EU. To prevent possible harm to the environment or human health from uncontrolled
waste disposal, recycle it responsibly to promote the sustainable reuse of material resources. To
return your used device, please use the return and collection systems or contact the retailer where
the product was purchased. They can take this product for environmental safe recycling.
WARRANTY INFORMATION
The manufacturer provides warranty in accordance with the legislation of the customer’s own country
of residence, with a minimum of 2 year, starting from the date on which the appliance is sold to the
end user.
The warranty only covers defects in material or workmanship.
The repairs under warranty may only be carried out by an authorized service centre. When making a
claim under the warranty, the original bill of purchase (with purchase date) must be submitted. The
warranty will not apply in cases of:
-
Normal wear and tear
-
Incorrect use, e.g. overloading of the appliance, use of non-approved accessories
-
Use of force, damage caused by external influences
-
Damage caused by non-observance of the user manual, e.g. connection to an unsuitable
mains supply or non-compliance with the installation instructions
-
Partially or completely dismantled appliances

CONNECTING THE APPLIANCE TO WI-FI
Use the QR code below to download the TCP Smart App for control of the heater remotely.
QR code for both android and iOS
To control the heater using the TCP Smart App the unit must be turned on.
The heater only has 1 set up mode: Quick Connection. The quick connection is a quick and simple
way to set up the heater.
Before you get started you will need the following:
•
Smart device such as a mobile phone
•
Access to the Google or Apple app store, log on and passwords
•
The name of your Wi-Fi network and password to your Wi-Fi network
•
Confirm your home Wi-Fi router is running on 2.4Ghz and not 5Ghz. If you are unsure,
please consult your broadband provider for details on how to change the settings.
•
Turn off any Wi-Fi extenders during set up
•
Check you do not have any limitations on the number of devices with your broadband
provider
Please note: Our products do not work on 5Ghz only 2.4Ghz.
For instructions on how to connect to Amazon Alexa or Google Nest please visit https://www.
tcpsmart.eu/how-to-alexa-google-nest
When turning on for the first time, press the STANDY button. The Wi-Fi at this stage will be turned
off. To activate the Wi-Fi press the SET button until the Wi-Fi symbol (show above) is highlighted
green. Press the UP button to activate, the Wi-Fi symbol flashes quickly to indicate the unit is in
quick connection mode. In quick connection mode follow the steps as indicated in the TCP Smart
App.
To turn off the Wi-Fi setting press the SET button until the Wi-Fi symbol is highlighted green. Press
DOWN button to deactivate.

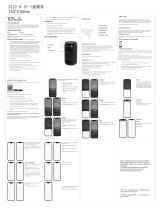
USING THE
APPLIANCE WITH
WIFI
DEVICE CONTROL SCREENS
1. Switch - (power On or Off)
2. Mode - to select Anti-Frost, High Heat or Low
Heat
3. Timer - to select time countdown function
4. Settings - to select Child Lock, Open Window
Detection or Schedule
MODES
ANTI FROST
Press Mode for options, only one mode can be
selected at any one time. Press Anti-Frost Mode
once to activate.
LOW HEAT
Press Mode. Press Low Heat Mode to activate.
Set Target Temperature by using + or - buttons.
2. 3.

HIGH HEAT
Press Mode. Press High Heat Mode once to
activate.
Set Target Temperature by using + or - buttons.
TIMER
Using the Timer function, the heater can be
set to turn off after a specified amount of time.
Choose Timer at the bottom of the screen,
select the duration of time that you want the
heating to stay on for. The heater will turn off
after the selected amount of time has passed.
SETTINGS
CHILD LOCK
Press Settings. Slide Child Lock button to the
right to activate. Slide to the left to turn off.
OPEN WINDOW
Press Settings. Slide Open Window detection
button to the right to activate. Slide to the left
to turn off.

SCHEDULE
In settings operate the schedule by pressing the
Shedule > button.
Press Add button to show timings and days of
the week.
To add just one occurrence select the time you
want to start the heater, press Switch and select
on. Press Done followed by Save.
Select the time you want the heater to turn off,
press Switch and select off. Press Done followed
by Save.
Press Add button to show timings and days of
the week.
Select the time you want the heater to turn off,
press Switch and select off. Press Done followed
by Save.
The dark grey screens are not required by IOS
users.

WEEKLY SCHEDULE
To turn the heater on for specific time(s) and
date(s), select the time you want the heater to
start using the above screen. Press switch.
Press ON followed by Done.
Press the repeat button to show the list of days.
Tick the day(s) of the week you want the start
time to be used. Press the < on top left hand of
the screen.
Press Save to save your time and date(s) for
the heater to turn on. To receive a notification
to your phone to alert when the schedule has
activated, before saving press notification.
To turn the heater off for specific time(s) and
date(s), select the time you want the heater to
stop using the above screen. Press switch.
Press OFF followed by Done.

Press the repeat button to show the list of days.
Select the day(s) of the week you want the end
time to be used. Press the < on top left hand of
the screen.
Press Save to save your time and date(s) for the
heater to turn off. The process for scheduling
can be done as many times as you need.
/