Page is loading ...

1
Questions, problems, missing parts? Before returning to your retailer, call our customer service department at 1-877-319-3757,
7 a.m. - 5 p.m., CST, Monday - Friday.
LAUNDRY TUB FAUCET
W/EXTENSION LEGS
Español p. 4
04-20-2018
www.homewerksww.com
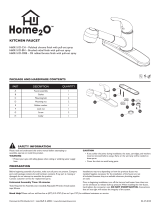
PACKAGE AND HARDWARE CONTENTS
PREPARATION
PART DESCRIPTION QUANTITY
A Faucet 1
B Extension legs 2
C Hose thread aerator 1
AA Mounting screws 5
BB O-ring 2
CC Union tailpiece 2
DD Union nut 2
SAFETY INFORMATION
Please read and understand this entire manual before
attempting to assemble, operate or install the product.
CAUTION
• If you solder the joints during installation of the faucet,
the seats, cartridges, and washers must be removed
before using a ame or the warranty will be voided on
these parts.
• Cover the sink drain to avoid losing parts.
WARNING
• Protect your eyes with safety glasses when cutting or
soldering water supply lines.
Before beginning assembly of product, make sure all parts
are present. Compare parts with package contents list and
hardware contents. If any part is missing or damaged, do
not attempt to assemble the product. Contact customer
service for replacement parts.
Estimated Assembly Time: 30 minutes
Tools Required for Assembly (not included): Adjustable
Wrench, Groove Joint Pliers, Pipe Wrench, Phillips Screw-
driver, Pipe Tape or Pipe Thread Compound, and Supply
Lines
Installations may vary depending on how the previous faucet
was installed. Supplies necessary for the installation of the
faucet are not all included; however, they are available
wherever plumbing supplies are sold.
Prior to beginning installation, turn off the hot or cold water
lines, then turn on the old faucet to release built-up pressure.
When installing the new faucet, hand tighten the connector
nuts. DO NOT OVERTIGHTEN. Connections that are too
tight will reduce the integrity of the system.
MODEL #3310-255-RB-B
B
AA
BB CC
DD
A
C
C
NSF/ANSI61

2
PRODUCT SPECIFICATIONS
SPECIFICATIONS SPECIFICATIONS
Max. ow rate of aerator: 2.2 GPM (8.3 LPM) at 60 PSI 1/4-turn drip-free cartridge
Max. ow rate of hose end: 4.0 GPM (15.1 LPM) at 20 PSI 1/2" solder or female threaded inlets
ASME A112.18.1/CSA B125
Total weight of item: 1.87 lbs.
www.homewerksww.com
ASSEMBLY INSTRUCTIONS
1. Turn off water at the supply valve
under the sink or at the main water
supply, disconnect the supply line,
and remove old faucet.
Clean and dry surface area where
new faucet will be mounted.
1
2. Screw threaded leg extensions onto
faucet.
C
2
3. Mount the faucet to the laundry sink
either directly or using a mounting
block (not included).
The two (2) mounting tabs should
face the FRONT of the laundry tub
(over the basin), the single tab
should face the rear of the basin.
C
3
4. Attach the supply lines to the faucet.
Cold to the right side, hot to the left.
Slide the union nuts over the supply
lines.
Install the union tailpieces to each
supply line.
If soldering the supply lines, remove
the rubber O-rings from the union
tailpiece, solder, and replace when
cool. If threading, cover all male
threads with thread sealant tape
(wrapped clockwise), or pipe joint
compound. Attach rmly but do
not over tighten.
C
4
5. Turn water supply or shut off valve
back on and check for leaks.
Remove aerator from spout.
Turn on faucet and run at least 30
seconds to ush out water line. Turn
off water and replace aerator.
REMOVE
AERATOR
5
INSTALLING HOSE AERATOR
1. Turn off water at handles. Use an adjustable plier to
grasp the aerator housing while holding the spout
with your other hand.
2. Rotate aerator to the left to loosen.
3. Remove aerator with ngers.
4. Thread hose aerator onto spout make sure washer
is in place.
5. Tighten hose aerator by turning aerator to the righ
while holding the spout with your other hand.
6. Turn water on at handles. Faucet will work normally
with hose thread aerator in place.

3
www.homewerksww.com
OPERATION INSTRUCTIONS
CARE AND MAINTENANCE
TROUBLESHOOTING
Clean periodically with a soft cloth. Avoid abrasive cleaners,
steel wool, and harsh chemicals as these will dull the nish
and void your warranty.
PROBLEM: Leaks underneath handle.
CAUSE: Bonnet has come loose or O-ring on cartridge is
dirty or twisted.
ACTION:
1. Move the handle to the off position. Unscrew the handle
screw and remove the handle.
2. Tighten the bonnet by turning it clockwise. Move the
cartridge stem to the on position. The leak should stop
draining out from around the cartridge stem.
3. If the leak does not stop, shut off the water supply. Remove
the bonnet by turning it counter-clockwise. Lift out the
cartridge valve. Inspect the larger O-ring on the cartridge
bonnet and the smaller O-ring on the cartridge stem.
Remove any debris from the O-rings. If either O-ring is
twisted, straighten it out. If either O-ring is damaged,
replace the cartridge by calling Customer Service.
4. Position the cartridge back into the faucet body. Make
sure the ridges on the two sides of the cartridge bonnet t
into the grooves on the two sides of the faucet body.
Tightly screw the bonnet onto the faucet body.
5. Re-install the handle.
PROBLEM: Water does not completely shut off.
CAUSE: Rubber valve seat is dirty, stuck, or broken.
ACTION:
1. Shut off the cold water supply. If leak stops, the problem
is on the cold side. If leak continues, the problem is on
the hot side. Shut off the hot water supply to determine if
both the cold and hot side have a problem.
2. Remove the handle on the problem side. Loosen the
bonnet by turning it counter-clockwise. Lift out the
cartridge assembly.
3. Inspect the rubber valve seat in the faucet body. If there
is debris or brass scrap on the surface of the seat,
remove it. If the rubber seat is stuck tightly in the water
inlet hole, push it gently with a ngertip so that it moves up
and down smoothly. The spring (smaller end up) must be
replaced underneath the valve seat. If the rubber valve
seat is worn out or broken, replace the cartridge by calling
Customer Service.
4. Replace the cartridge in the faucet body. Make sure that
the ridges on the two sides of the cartridge bonnet t into
the grooves on the two sides of the faucet body. Tightly
screw the bonnet onto the faucet body.
5. Re-install the handle.
PROBLEM: Faucet leaks around aerator.
CAUSE: Aerator incorrectly tted.
ACTION:
1. Unscrew the aerator by turning it clockwise. Inspect the
black rubber packing inside the aerator. The rubber
packing should be at.
2. Screw the aerator onto the spout end and tighten.
PROBLEM: Improper water pattern.
CAUSE: Aerator dirty or small parts inside aerator improperly
installed.
ACTION:
1. Remove the aerator from the spout end by turning it
clockwise.
2. Gently ush the small parts inside the aerator to clear
away any debris.
3. Re-install the small parts as shown in the exploded
diagram. Metal screens must be at and plastic
supporter must be straight.
4. Screw the aerator onto the spout end and tighten.
Instructions for connecting hose:
Use a standard 3/4" hose thread connector to attach the
hose to the threaded aerator, making sure the hose
washer is in place. Tighten by turning the hose connector
to the right. Do not overtighten.
If leaking occurs you can tighten the hose aerator more.
When removing the hose make sure water is turned off at
the faucet and that you have allowed the hose to drain. On
a long hose some water may remain in the hose and drain
out when you remove the hose.
Instructions for use:
Adjust water to proper temperature by turning on the hot
and cold water valves. Swivel faucet spout as needed to
add and remove items from the laundry tub.
Do not hang items like pails or buckets from the spout.

4
www.homewerksww.com
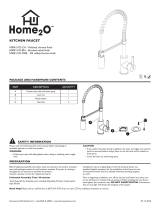
ROUGH-IN
PARTS LIST
For replacement parts, call our customer service department at 1-877-319-3757, 7 a.m. - 5 p.m., CST, Monday - Friday.
PART DESCRIPTION
PART
NUMBER
1 Body –
2 O-ring
RP004143 Union tail piece
4 Union nut
5 O-ring
RP014206 O-ring
7 Spout nut
8 Spout –
9 Cartridge - cold RP00408
10 Cartridge - hot RP00407
11 Spring
RP00413
12 Washer
13 Nut RO00412
14,16 Handle and screw - cold RP00410
15,16 Handle and screw- hot RP00409
17 Aerator washer
RP00411
18 Aerator diffuser
19 Aerator shell
20 O-ring
RP0042421 Screen lter
22 Hose adaptor
23
Mounting block screw RP00427
24
Mounting Screw –
25
Extension leg –
26
Mounting screw –
9.375
7.375
7.00
2.00
NPT 1/2-14
UNS 55/64-27
3.375
7.75
3.375
6
7
9
10
8
5
4
11
12
13
14
16
15
17
18
19
20
21
22
24
25
23
26

5
www.homewerksww.com
¿Preguntas, problemas, piezas faltantes? Antes de regresar a la tienda, llame a nuestro departamento de servicio al cliente al
1-877-319-3757, 7 a.m.-5 p.m., hora del centro, de lunes - viernes.
LAVANDERÍA GRIFO DE
LA BAÑERA CON PATAS
DE EXTENSIÓN
CONTENIDO DEL PAQUETE
PREPARACIÓN
INFORMACIÓN DE SEGURIDAD
Lea y comprenda completamente este manual antes de inten-
tar ensamblar, usar o instalar el producto.
PRECAUCIÓN
• Si suelda las juntas durante la instalación del grifo, se
deben retirar los asientos, los cartuchos y las arande
las antes de usar la llama. De lo contrario, se anulará la
garantía de dichas piezas.
• Cubra el desagüe para evitar que se pierdan piezas.
ADVERTENCIA
• Proteja sus ojos con las gafas de seguridad al cortar
o soldando líneas de suministro del agua
Antes de comenzar a ensamblar el producto, asegúrese de
tener todas las piezas. Compare las piezas con la lista del
contenido del paquete y los aditamentos. Si falta alguna pieza
o hay piezas dañadas, no intente ensamblar el producto.
Póngase en contacto con el Departamento de Servicio al
Cliente para obtener piezas de repuesto.
Tiempo calculado de ensamblaje: 30 minutos
Herramientas necesarias para el ensamblaje (no se incluyen):
Llave inglesa ajustable, pinzas con dientes ranurados, llave
para tuberías, destornillador Phillips, cinta para tuberías o
compuesto para roscas de tubería y tuberías de suministro.
Las instalaciones pueden variar según cómo se instaló el grifo
anterior. No se incluyen todos los materiales necesarios para
la instalación del grifo; no obstante, estos están disponibles en
cualquier lugar donde se vendan artículos de plomería.
Antes de comenzar la instalación, corte el suministro de agua
fría y caliente, y luego abra el grifo viejo para liberar la presión
acumulada. Cuando instale el grifo nuevo, Apriete las tuercas
de conexión. NO APRIETE. Las conexiones que estén muy
apretadas reducirán la integridad del sistema.s
MODELO #3310-255-RB-B
PIEZA DESCRIPCIÓN CANTIDAD
A Grifo 1
B Patas de extensión 2
C Manguera de aireador hilo 1
AA Los tornillos de montaje 5
BB Junta tórica 2
CC Unión tubo de desagüe 2
DD Tuerca 2
B
AA
BB CC
DD
A
C
C
NSF/ANSI61

6
www.homewerksww.com
ESPECIFICACIONES DEL PRODUCTO
INSTRUCCIONES DE ENSAMBLAJE
ESPECIFICACIONES ESPECIFICACIONES
Max. caudal de aireación: 8,3 LPM (2,2 GPM) a 60 PSI 1/4-giro por goteo libre de cartucho de
Max. velocidad de ujo de extremo de la manguera:
15,1 LPM (4,0 GPM) a 20 PSI
1,27 cm de soldadura o hembra entradas roscadas
El peso total de la partida: 0,85 kg.
ASME A112.18.1/CSA B125
1.
Cierre el agua en la válvula de suministro
debajo del fregadero o en el suministro
de agua principal, desconecte la línea
de alimentación y retire la llave vieja.
Supercie limpia y seca en la que se
monta nuevo grifo.
1
2.
Atornille las extensiones de la pierna en
el grifo de rosca.
C
2
3.
Monte el grifo a la lavandería se hunden,
ya sea directamente o utilizando un
bloque de montaje (no incluido).
Las chas de dos (2) montaje debe
mirar hacia el frente del lavadero (en la
cuenca), la cha individual debe hacer
frente a la parte trasera de la cuenca.
C
3
4.
Conecte las líneas de suministro al
grifo. Fría en el lado derecho, caliente
a la izquierda.
Deslice las tuercas de unión sobre las
líneas de suministro.
Instale los apéndices sindicales a cada
línea de suministro.
Si se necesita soldar las líneas de
suministro, eliminar las juntas tóricas
de goma desde el tubo de desagüe
de la Unión, la soldadura, y sustituir
cuando esté frío. Si rosca, cubrir todas
las roscas macho con cinta selladora de
roscas (envuelto en sentido horario), o
compuesto para juntas de tuberías. Fije
rmemente, pero no apriete demasiado.
C
4
5.
Abra el suministro de agua o la válvula
de cierre en marcha y vericar que no
haya fugas.
Quite el aireador del surtidor. Abra el
grifo y ejecutar al menos 30 segundos
para eliminar la línea de agua. Cierre el
grifo y reemplace el aireador.
REMOVE
AERATOR
5
INSTALACIÓN DE LA MANGUERA AIREADOR
1. Cierre el agua en las manijas. Use un alicate ajustable
para captar el alojamiento del aireador mientras se
mantiene el pico con la otra mano.
2. Gire el aireador hacia la izquierda para aojar.
3. Quite el aireador con los dedos.
4. Aireador de rosca de la manguera del surtidor en
asegurarse de que la lavadora esté en su lugar.
5. Apriete la manguera de aireador girándolo aireador
a ña derecha mientras sujeta el tubo de salida con
la otra mano.
6. Abra el agua en el mango. Grifo funcionará normalmente
con aireador manguera de rosca en su lugar.

7
INSTRUCCIONES DE FUNCIONAMIENTO
CUIDADO Y MANTENIMIENTO
Limpie periódicamente con un paño suave. Evite utilizar
limpiadores abrasivos, lana de acero y químicos agresivos,
ya que pueden dañar el acabado y anular su garantía.
SOLUCIÓN DE PROBLEMAS
Instrucciones para la conexión de la manguera:
Utilice un nivel 3/4 "conector de rosca de la manguera para
conectar la manguera al aireador roscado, asegurándose de
que la manguera de la lavadora está en su lugar. Apriete girando
el conector de la manguera hacia la derecha. No apriete
demasiado.
Si la fuga se produce se puede apretar la manguera de
aireador más.
Al quitar la manguera de hacer que el agua esté apagado en el
grifo y que han permitido que la manguera de desagüe. En una
manguera larga un poco de agua puede permanecer en la
manguera y hacer salir al quitar la manguera.
Instrucciones de uso:
Ajuste de agua a la temperatura adecuada mediante la acti-
vación de las válvulas de agua fría y caliente. Grifo de caño
giratorio, según sea necesario para añadir y eliminar elementos
de la tina para lavar ropa.
No cuelgue objetos como cubos o baldes de la boquilla.
PROBLEMA: Fugas debajo de la manija.
CAUSA: El capuchón se aojó o la junta tórica en el cartucho
está sucia o doblada.
ACCIÓN:
1. Mueva la palanca a la posición de apagado. Aojar el tornillo
del mango y retire la manija.
2. Ajuste el capuchón girándolo hacia la derecha. Mueva el
vástago del cartucho a la posición de encendido. La fuga
debe detenerse en el vástago del cartucho.
3. Si la fuga no se detiene, cierre el suministro de agua. Retire el
capuchón girándolo en sentido contrario a las agujas del reloj.
Saque el cartucho de la válvula. Inspeccione la junta tórica
más grande en la tapa del cartucho y la más pequeña junta
tórica en el vástago del cartucho. Quite los desechos de las
juntas tóricas. Si bien la junta tórica se tuerce, enderezarla. Si
bien la junta tórica está dañada, reemplace el cartucho
llamando al Servicio al Cliente.
4. Coloque el nuevo cartucho en el cuerpo del grifo. Asegúrese
de que las crestas de los dos lados de la tapa del cartucho
encajen en las ranuras en los dos lados del cuerpo del grifo.
Atornille rmemente el capuchón al cuerpo del grifo.
5. Vuelva a colocar el mango.
PROBLEMA: El agua no se cierra por completo.
CAUSA: asiento de la válvula de goma está sucio, atascado
o roto.
ACCIÓN:
1. Cierre el suministro de agua fría. Si se detiene la fuga, el
problema está en el lado frío. Si la fuga continúa, el problema
está en el lado caliente. Cortar el suministro de agua caliente
para determinar si tanto el frío y la parte caliente tiene un
problema.
2. Retire la manija en el lado de problema. Aoje el capuchón
girándolo en sentido contrario a las agujas del reloj. Levante
el conjunto del cartucho.
3. Inspeccione el asiento de la válvula de goma en el cuerpo del
grifo. Si hay restos de chatarra o latón sobre la supercie del
asiento, retirarlo. Si el asiento de goma se pega rmemente
en el agujero de entrada de agua, empujar suavemente con
un dedo de manera que se mueve arriba y abajo suave-
mente. El resorte (más pequeño hasta nal) debe ser
reemplazado por debajo del asiento de la válvula. Si el
asiento de la válvula de goma está gastada o rota, sustituya
el cartucho llamando al Servicio al Cliente.
4. Vuelva a colocar el cartucho en el cuerpo del grifo. Asegúrese
de que las crestas de los dos lados de la tapa del cartucho
encajen en las ranuras en los dos lados del cuerpo del grifo.
Atornille rmemente el capuchón al cuerpo del grifo.
5. Vuelva a colocar el mango.
PROBLEMA: La llave tiene fugas alrededor del aireador.
CAUSA: El aireador no está colocado correctamente.
ACCIÓN:
1. Destornille el aireador girándolo hacia la derecha. Revise el
empaque de caucho negro en el interior del aireador. La junta
de goma debe ser plana.
2. Atornille el aireador en el extremo del tubo y apriete.
PROBLEMA: El chorro de agua inadecuado.
CAUSA: El aireador partes sucias o pequeñas dentro del
aireador no estén bien instalados.
ACCIÓN:
1. Quite el aireador del extremo del caño girándolo hacia la
derecha.
2. Lave suavemente las piezas pequeñas en el interior del
aireador para limpiar cualquier escombro.
3. Re-instalar las piezas pequeñas, como se muestra en el
diagrama de despiece. Pantallas de metal deben ser planas y
de plástico partidario debe ser recto.
4. Atornille el aireador en el extremo del tubo y apriete.

8
PREPARACIÓN EN
LISTA DE PIEZAS
Para piezas de repuesto, llame a nuestro departamento de servicio al cliente al 1-877-319-3757, de 7 am - 5 pm, hora central,
Lunes - Viernes.
9.375
7.375
7.00
2.00
NPT 1/2-14
UNS 55/64-27
3.375
7.75
3.375
PART DESCRIPTION
PART
NUMBER
1 Cuerpo –
2 Junta tórica
RP004143 Unión cola
4 Tuerca
5 Junta tórica
RP014206 Junta tórica
7 La tuerca del surtidor
8 Pico –
9 Cartucho - frío RP00408
10 Cartucho - caliente RP00407
11 Primavera
RP00413
12 Lavadora
13 Tuerca RP00412
14,16 Manejar y atornille - frío RP00410
15,16 Manejar y atornille - caliente RP00409
17 El aireador lavadora
RP00411
18 El aireador difusor
19 El aireador de shell
20 Junta tórica
RP0042421 Filtro de malla
22 Manguera del adaptador
23
Bloque de montaje del tornillo RP00427
24
Tornillo de montaje –
25
Extensión de la pierna –
26
Tornillo de montaje –
6
7
9
10
8
5
4
11
12
13
14
16
15
17
18
19
20
21
22
24
25
23
26
/