Hobart AUPL-10A Installation And Operation Instructions Manual
- Category
- Dishwashers
- Type
- Installation And Operation Instructions Manual

EN
DSN: AMX-14-01
From SN: 86 60 30001
6. Jun. 2014
WAREWASHING
AUP-10A
AUPS-10A
AUP-90A
AUPT-10A
AUPL-10A
AUPLS-10A
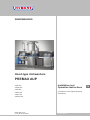
Hood-type dishwashers
PREMAX AUP
(Translation of the original operating
instructions)
Installation and
Operation Instructions

IO-0000000168-001-EN / 6. Jun. 20142 HOBART
PREMAX AUP Installation and Operation Instructions
EN
Publisher
HOBART GmbH
Robert-Bosch-Str. 17
77656 Offenburg
Tel. +49(0)781 600 0
Fax +49(0)781 600 23 19
E-mail: [email protected]
Internet: www.hobart.de
Product disclaimer
Installations and repairs carried out by non-authorized technicians or using non-genuine spare parts, and any tech-
nical alterations to the machine not approved by the manufacturer will invalidate the manufacturer’s warranty and
product liability.
HOBART reserves the right to make changes or improvements to its products without prior notice.
© HOBART GmbH, Offenburg 2014

IO-0000000168-001-EN / 6. Jun. 2014 3HOBART
Installation and Operation Instructions PREMAX AUP
EN
Table of Contents
Table of Contents
1 Notes on the documentation .............................................................. 5
1.1 Application ..................................................................................... 5
1.2 Layout of the documentation ..................................................................... 5
1.3 Representation convention ....................................................................... 5
2 Safety instructions and regulations ...................................................... 7
2.1 Safety instructions and warning notices ........................................................... 7
2.2 Basic safety instructions ......................................................................... 7
2.3 Property damage ............................................................................... 10
3 Product description ....................................................................... 11
3.1 Intended purpose .............................................................................. 11
3.2 Conformity..................................................................................... 11
3.3 Designation .................................................................................... 11
3.4 Technicalspecications ......................................................................... 11
4 Controls .................................................................................... 13
4.1 Controls ....................................................................................... 13
4.2 Operating states ............................................................................... 14
4.3 Display of faults and information ................................................................. 14
4.4 Display function ................................................................................ 15
4.5 Overview of main menus ........................................................................ 15
4.6 Overview of display symbols .................................................................... 16
5 Installation ................................................................................. 18
5.1 Personnelqualication .......................................................................... 18
5.2 Special safety instructions ...................................................................... 18
5.3 Transporting to the installation location ........................................................... 19
5.4 Removing the packaging ........................................................................ 19
5.5 Installing the machine .......................................................................... 19
5.6 Connecting to the power supply ................................................................. 20
5.7 Connecting the water ........................................................................... 21
5.8 Connect steam (optional) ....................................................................... 22
5.9 Connecting the drain ........................................................................... 22
5.10 Connecting the dispenser ....................................................................... 23
5.11 Install the automatic soil removal unit ............................................................ 24
6 Commissioning ............................................................................ 25
6.1 Personnelqualication .......................................................................... 25
6.2 Special safety instructions ...................................................................... 25
6.3 Starting the commissioning procedure ........................................................... 25
6.4 Setting the language ........................................................................... 25

IO-0000000168-001-EN / 6. Jun. 20144 HOBART
PREMAX AUP Installation and Operation Instructions
EN
Table of Contents
6.5 Setting the date ................................................................................ 25
6.6 Setting the time ................................................................................ 26
6.7 Setting the water hardness (optional) ............................................................ 26
6.8 Filling the salt reservoir (optional) ................................................................ 26
6.9 Filling chemical hoses .......................................................................... 27
6.10 Completing the commissioning procedure ........................................................ 28
6.11 Startingupthechemicaldeciencysensorsystem ................................................ 28
7 Operation ................................................................................... 30
7.1 Personnelqualication .......................................................................... 30
7.2 Special safety instructions ...................................................................... 30
7.3 Notes for optimum washing result ................................................................ 30
7.4 Preparations for washing ....................................................................... 31
7.5 Displaying and selecting the program ............................................................ 32
7.6 Washing ....................................................................................... 33
7.7 Switch off machine ............................................................................. 34
7.8 Executing daily cleaning ........................................................................ 34
7.9 Executing weekly cleaning ...................................................................... 35
7.10 Executing hygiene cleaning ..................................................................... 35
7.11 Executing the basic cleaning program for washware ............................................... 35
7.12 Displaying the temperatures ..................................................................... 36
8 Setting options, operating and hygiene data .......................................... 37
8.1 Overview of operator menu ..................................................................... 37
8.2 Opening the operator menu ..................................................................... 38
8.3 Navigating, selecting and setting within the menu ................................................. 38
8.4 Exiting the operator menu ....................................................................... 39
8.5 Making the general settings ..................................................................... 39
8.6 Setting the display indications ................................................................... 39
8.7 Setting the acoustic signal ...................................................................... 40
8.8 Making the chemical settings .................................................................... 40
8.9 Conguringthecounterforexternalwatertreatment(optional) ..................................... 41
8.10 Setting the water hardness (optional) ............................................................ 41
8.11 Activate/deactivate VAPOSTOP (optional) ........................................................ 42
8.12 Displaying the operating/hygiene data ............................................................ 42
8.13 Setting automatic switch-on ..................................................................... 44
9 Fault indications and problems.......................................................... 46
9.1 Fault indications ............................................................................... 46
9.2 Remedying the problem ........................................................................ 48
10 Maintenance ............................................................................... 50
11 Disposal .................................................................................... 51

IO-0000000168-001-EN / 6. Jun. 2014 5HOBART
Installation and Operation Instructions PREMAX AUP
EN
Notes on the documentation
1.1 Application
This document contains the most important information for the
installationandcommissioningofthemachinebyqualiedperson-
nel, as well as the information required for day-to-day operation by
the operator.
► Keep the operating instructions and all referenced documents in
a safe and accessible place.
► If you sell the machine, pass on the installation and operating
instructions.
1.2 Layout of the documentation
Referenced documents are all instructions that describe the instal-
lation, operation, maintenance and repair of the device, as well as
additional instructions for all accessories used.
For the operator:
– Comic Card (brief instructions)
– Operating instructions
For the specialised tradesman:
– Installation instructions
– Service Manual
– Service Software Manual
– Trouble shooting list
– Circuit diagram
– Spare parts catalogue
1.3 Representation convention
1.3.1 Symbols used
Symbol Meaning
Warning of hazardous electrical voltage
EX
Beware of explosion
1 Notes on the documentation

IO-0000000168-001-EN / 6. Jun. 20146 HOBART
PREMAX AUP Installation and Operation Instructions
EN
Notes on the documentation
Symbol Meaning
Warning of risk of crushing
Beware of hazardous substances
Beware of hand injuries
Beware of slipping
Beware of hazard area
Useful additional information and tips
1.3.2 Representation in the text
Representa-
tion
Meaning
NOTE Important information on machine operation, not
a warning notice
► Step
Outcome/result
‒ Listing 1st level
• Listing 2nd level

IO-0000000168-001-EN / 6. Jun. 2014 7HOBART
Installation and Operation Instructions PREMAX AUP
EN
Safety instructions and regulations
2.1 Safety instructions and warning notices
► During machine operation, observe the general safety instruc-
tions and warning notices that precede each action.
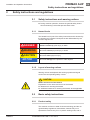
2.1.1 Hazard levels
The hazard level is part of the safety instructions and is denoted by
the signal word. Potential consequences are differentiated by the
choice of signal word.
DANGER
imminent danger:
results in serious physical injury or death
WARNING
potentially hazardous situation:
can cause serious physical injury or death
CAUTION
potentially hazardous situation:
can cause minor physical injury
NOTICE
potentially harmful situation:
can cause damage to the product or other objects
2.1.2 Layout of warning notices
Warning notices are depicted with warning symbols and signal
word in the corresponding safety colours.
!
CAUTION
Nature and source of the hazard
Explanation on the nature and source of the hazard
► Measures for averting the hazard
► additional measures for averting the hazard, where applicable
2.2 Basic safety instructions
2.2.1 Product safety
The machine conforms to state-of-the-art technology and the rec-
ognised safety regulations. Nonetheless, hazards may occur.
Operate the machine only if it is in perfect working order, and in
2 Safety instructions and regulations

IO-0000000168-001-EN / 6. Jun. 20148 HOBART
PREMAX AUP Installation and Operation Instructions
EN
Safety instructions and regulations
compliance with the operating instructions.
Allmodicationsandalterationstotheproductarereservedfor
personsauthorisedbyHOBART.Congurationispassword-pro-
tected.
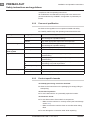
2.2.2 Personnel qualication
► Observe the regulations on occupational health and safety.
► Carefully read through the operating instructions before use.
Activity User group Qualication/training
Installation Qualiedpersonnel Authorisedelectricians(qualiedelectriciansorpersonswho
have undergone equivalent training)
Trainees only under appropriate supervision and inspection
Commissioning Qualiedpersonnel Authorisedelectricians(qualiedelectriciansorpersonswho
have undergone equivalent training)
Trainees only under appropriate supervision and inspection
Working on the elec-
trical system
Qualiedpersonnel Qualiedelectrician
Operation Laymen Training by the operator using the operating instructions,
hazardbrieng
Disabled persons Training by the operator using the operating instructions,
hazardbrieng
Children from 14 years
old
Training by the operator using the operating instructions, haz-
ardbrieng,onlyundersupervision
Children up to 13 years
old
not permitted
Maintenance, repair Qualiedpersonnel Hobart Service or Hobart trained service technicians
Trainees only under appropriate supervision and inspection
2.2.3 Product-specic hazards
Avoid body parts being crushed or knocked:
► Observe the instructions on the packaging for storage, lifting or
transporting.
Avoid risk of explosion:
► Do not install machine in a potentially-explosive location.
Avoid electric shock:
► Donotallowwatertoowunderlivecomponents.
– Make sure the machine is correctly stored (see frost damage
section 2.3).
– Makesurethatthemachinedoesnotoverowwhenbeing
lled.
► Do not damage the connection cable while unpacking.

IO-0000000168-001-EN / 6. Jun. 2014 9HOBART
Installation and Operation Instructions PREMAX AUP
EN
Safety instructions and regulations
► Havethemachineconnectedtothepowersupplybyqualied
personnel.
► Haveadditionalfeedtanksmountedbyqualiedpersonnel.
Avoid re risk:
► Donotallowwatertoowunderlivecomponents.
– Make sure the machine is correctly stored (see frost damage
section 2.3).
– Makesurethatthemachinedoesnotoverowwhenbeing
lled.
► Havethemachineconnectedtothepowersupplybyqualied
personnel.
► Haveallmodicationstothemachinecarriedoutbyqualied
personnel.
Avoid chemical burns, sensitisation of the skin, poisoning:
► Wear protective equipment (gloves, safety goggles, protective
clothing) when handling chemicals.
► Use only suitable chemicals. Observe the manufacturer’s data.
► Have chemical sensor system set by authorised trained service
technicians.
► Do not open the machine during operation, wait for the program
tonish.
► Disconnect the machine from the mains prior to cleaning.
► For cleaning, wear protective equipment (gloves, safety gog-
gles, protective clothing) when touching parts contaminated by
detergent.
Avoid burns, scalds (to the hands):
► Do not open the machine during operation or the evaporation
phase,waitfortheprogramtonish.
► Disconnect the machine from the mains prior to cleaning.
► For cleaning, wear protective equipment (gloves, safety gog-
gles, protective clothing) when touching parts contaminated by
washing solution.
Avoid slipping:
9 Moisturecanbuilduponthemachineoor.
► Provideaoorcoveringthatisguaranteedtobenon-slipin
case of moisture.
Residues on the washware, hygiene regulations not main-
tained.
► Hygiene regulations must be maintained and/or demonstrated
in accordance with the national provisions.
2.2.4 Additional hazards
Potential hazards caused by operating resources to be used can
be found in the enclosed safety datasheets. Workplaces must be

IO-0000000168-001-EN / 6. Jun. 201410 HOBART
PREMAX AUP Installation and Operation Instructions
EN
Safety instructions and regulations
signed accordingly.
2.3 Property damage
Avoid frost damage:
9 Temperatures below 0°C during transport/storage cause func-
tion impairments.
► Prior to installation, store the machine at room temperature
(min. 15°C) for 24h.
Avoid water damage:
► Congurationispassword-protectedandpermittedonlybycerti-
edservicetechnicians.Observedocumentation.
► Do not operate the machine unsupervised.
► Close site shut-off valves at end of operation.
Avoid environmental hazards:
► Dispose of the machine correctly and in accordance with envi-
ronmental regulations (see section 11)

IO-0000000168-001-EN / 6. Jun. 2014 11HOBART
Installation and Operation Instructions PREMAX AUP
EN
Product description
3.1 Intended purpose
The machine is an item of technical equipment intended solely for
commercial dishwashing.
The machine is designed solely for cleaning crockery (porcelain,
glass, ceramic, temperature-resistant plastics or stainless steel or
similar) from the food industry.
Not for washing:
– Containers that do not come into contact with foodstuffs, such
as ashtrays, candlesticks, electric appliances etc.
– Animals or textiles
– Foodstuffs intended for further consumption
3.2 Conformity
See separate EC Conformity Declaration.
3.3 Designation
The rating plate is located at the side of the machine and contains
the following information: model, serial number, date of manufac-
ture, country of manufacture, voltage, connection rating, design-
state number and CE mark.
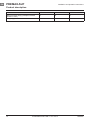
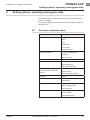
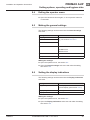
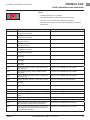
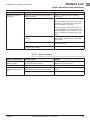
3.4 Technical specications
AUP AUPL AUPT
Height (mm) 1,510 1,610 1,510
Width (mm) 635 735 1,265
Depth (mm) 635 635 635
Water consumption per basket 1.4 to 3.5 l, depending on contamination
Flow pressure 0.5 – 10 bar
bar min. 0.8 bar with integrated softener
Cold or hot water connection max. 60°C
Voltage see rating plate
Total connected load
Fuse protection
Tank capacity (l) 40 40 80
Rack height 440 540 440
3 Product description

IO-0000000168-001-EN / 6. Jun. 201412 HOBART
PREMAX AUP Installation and Operation Instructions
EN
Product description
AUP AUPL AUPT
Noise emission dB (A) (workplace-related
emission value)
67 68 71
Weight (kg) 140 150 208

IO-0000000168-001-EN / 6. Jun. 2014 13HOBART
Installation and Operation Instructions PREMAX AUP
EN
Controls
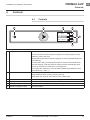
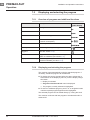
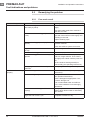
4.1 Controls
60s Short
90s Standard
120s Intensive
6
5
4
32 1
ON/OFF button Pressing this button switches the machine on.
As soon as the machine is ready for operation, the rinse program can be
started by closing the hood.
Brieypushingthisbuttonwhiletheprogramisrunningactivateshigh-pres-
sure washing.
Pushing and holding (3 seconds) the button activates the automatic drain
and self-cleaning cycle and switches off the machine automatically. After
switch off, however, the machine is not voltage free!
The button also shows the current operating state through different colors
(see sections 4.2 and4.3 )
STOP button In case of operating error or faults, the machine can be switched off immedi-
ately without the drain cycle by pressing this key.
After switch off, however, the machine is not voltage free!
Display Selection menu / fault and information displays
Display navigation button Scroll / set / select
Display navigation button Changemenulevel/conrm/back/acknowledgefault
Display navigation button Scroll / set / select
4 Controls

IO-0000000168-001-EN / 6. Jun. 201414 HOBART
PREMAX AUP Installation and Operation Instructions
EN
Controls
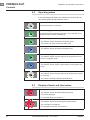
4.2 Operating states
In the operating panel display, the ON/OFF switch shows the cur-
rent operating state through different colours.
Machine is Off
The ON/OFF button is colourless.
Machine being prepared for operation
The ON/OFF button gradually goes green. The wash tank is be-
inglledandthemachineisheatingup.
Machine ready
– The ON/OFF button illuminates completely green.
– The machine is ready for the next wash cycle.
Wash program starts
– The ON/OFF button illuminates completely blue.
Machine is washing
– The ON/OFF button changes segment-by-segment from blue
back to completely green.
VAPOSTOP (vaporisation phase)
– The ON/OFF button display a permanently revolving blue seg-
ment.
Switch off machine
– The ON/OFF button changes segment-by-segment from green
to colourless.
– The machine is being emptied and switched off.
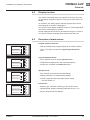
4.3 Display of faults and information
Fault: operation not possible
– The ON/OFF button illuminates permanently red.
– The fault is displayed.
– For potential faults, see section 9.1
Information: limited operation is possible
– The ON/OFF button illuminates green/red alternately.
– The information is displayed.
– For potential information, see section 9.1

IO-0000000168-001-EN / 6. Jun. 2014 15HOBART
Installation and Operation Instructions PREMAX AUP
EN
Controls
4.4 Display function
The display is activated (when the machine is turned on) by push-
ing the display navigation buttons or moving your hand near to the
display.
Onactivation,thewashprogramselectionappearsrst.These-
lected program or function is highlighted.
The function of the display navigation buttons is context-dependent
and shown in the display by symbols.
Further displays/menu levels can be selected using the button.If
no button is pushed, the display de-activates again after 10s.
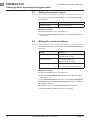
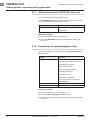
4.5 Overview of main menus
60s Short
90s Standard
120s Intensive
Program selection and info:
– Selects possible wash programs (depends on model variants)
– The ("i”) button accesses the Login/Temperatures/Info
menu
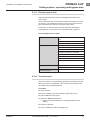
info/maintena...
temperatures
login
Login/Temperatures/Info:
– Login: Operator code accesses Operator menu
– Temperatures: Displays tank and rinse temperatures.
– Info/service: Accesses the Info/Service menu
acoustic signal
display indica...
general settin...
Operator menu:
– Gen. settings: Accesses the machine settings
– Display indications: Accesses display settings
– Acoustic signal: Accesses the signal sensor setting
– ... see also section 8.1.
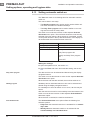
maintenance
operating data
machine type
Info/Service:
– Machine type: Indicates machine type and serial number.
– Operating data: Displays operating data (see section 8.12).
– Service: Displays service address.

IO-0000000168-001-EN / 6. Jun. 201416 HOBART
PREMAX AUP Installation and Operation Instructions
EN
Controls
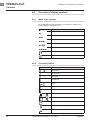
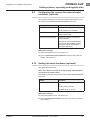
4.6 Overview of display symbols
4.6.1 Wash cycle symbols
As an alternative to the text display, it is possible to switch to the
symbol display (see section 8.6).
Symbol Program
Short
Standard
Intensive
Eco
Continuous
Cutlery
Hygiene
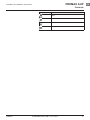
4.6.2 Function symbols
Symbol Function
Scroll menu
Accept value
Alter value
Info/Service
Login
back
Temperatures
Wash/rinse temperatures
Sound on/sound off
Timer
Saltdeciency
Chemicaldeciency

IO-0000000168-001-EN / 6. Jun. 2014 17HOBART
Installation and Operation Instructions PREMAX AUP
EN
Controls
Symbol Function
Fault
Fill fault
Drain fault
Heating element fault

IO-0000000168-001-EN / 6. Jun. 201418 HOBART
PREMAX AUP Installation and Operation Instructions
EN
Installation
5.1 Personnel qualication
Installationmustonlybecarriedoutbyqualiedpersonnel(see
section 2.2.2).
5.2 Special safety instructions
!
WARNING
Risk of electric shock, re hazard
Water(frostdamage,machineoverow)owingoverlivecompo-
nentscancauseinjuryfromelectricshockorre.
► Donotallowwatertoowunderlivecomponents.
► Make sure the machine is correctly stored (see frost damage
section 2.3).
► Makesurethatthemachinedoesnotoverowwhenbeing
lled.
!
CAUTION
Risk of being crushed or knocked
When being lifted or transported, the machine can overturn or fall
and cause injury.
► Observe the instructions on the packaging for storage, lifting or
transporting.
!
WARNING
Risk of explosion
Installing the machine in a potentially explosive location can cause
explosion and serious injury from ejected parts.
► Do not install machine in a potentially-explosive location.
NOTICE
Frost damage
Temperatures below 0°C during transport/storage cause function
impairments.
► Prior to installation, store the machine at room temperature
(min. 15°C) for 24h.
EX
5 Installation

IO-0000000168-001-EN / 6. Jun. 2014 19HOBART
Installation and Operation Instructions PREMAX AUP
EN
Installation
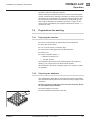
5.3 Transporting to the installation location
► Where possible transport packed on the pallet.
► Use suitable transport means (elevating truck, crane etc.).
► If using a forklift, shim the machine with wooden trusses.
5.4 Removing the packaging
!
CAUTION
Risk of electric shock, re hazard
When the machine is unpacked, the connection cable can become
damagedandcauseinjuryfromelectricshockorre.
► Do not damage the connection cable while unpacking the ma-
chine.
► Take cable measurement BGV A3.
► Remove packaging materials and accessories from the ma-
chine.
► Inspect the machine for possible transport damage.
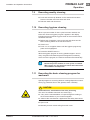
5.5 Installing the machine
!
WARNING
Risk of electric shock, re hazard
Water ingress can cause short circuit and mortal danger from elec-
tricshockandre.
► As a protection against penetrating water, the rear side of the
machine must be sealed.
► If this cannot be guaranteed, a back covering must be also
ordered.
► Seal the machine against the wall, or attach the optionally-avail-
able back covering.
► Cut-outs in the rear machine frame for supply lines etc., must
also be sealed (sealing kit 01-539610-001 optionally available).
► Align machine by turning the adjusting feet by using a spirit
level.
Installing the machine in the corner:
► Maintain a side wall clearance of 107 mm.
Installing the machine in a room:
► Attach the optionally-available back covering.

IO-0000000168-001-EN / 6. Jun. 201420 HOBART
PREMAX AUP Installation and Operation Instructions
EN
Installation
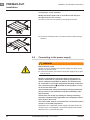
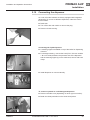
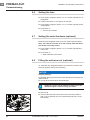
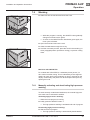
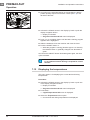
Converting to corner operation
Modify the basket guide rails in accordance with the pass-
through direction (see arrows):
► Remove the front side guides by loosening the screws.
► Re-mount the side guide in accordance with the pass-through
direction.
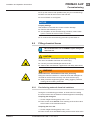
5.6 Connecting to the power supply
!
WARNING
Risk of electric shock
Failure to connect properly to the power supply can cause mortal
danger from electric shock.
► Have the machine connected to the power supply only by quali-
edpersonnel.
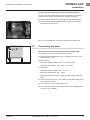
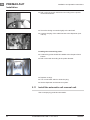
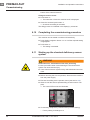
NOTE: To guarantee the electrical safety of the machine, it
must be connected to a protective earthing equipment con-
ductor installed as specied. In addition, the machine must
be connected on site to the equipotential bonding connection.
The connecting screw (
) provided for this purpose is locat-
ed next to the cable inlet.
These fundamental safety requirements and the professional
design of the on-site installation must be veried by a quali-
ed electrician.
Hobart does not accept any liability for damage caused by
improper installation! Any applicable local installation instruc-
tions must be observed!
The mains cable must be connected via a cut-out device (main
switch or accessible plug device).
Modicationtoanalternativepowersupplyispossibleasperthe
variants on the circuit diagram. Connection diagrams are located
adjacent to the connection terminals.
Page is loading ...
Page is loading ...
Page is loading ...
Page is loading ...
Page is loading ...
Page is loading ...
Page is loading ...
Page is loading ...
Page is loading ...
Page is loading ...
Page is loading ...
Page is loading ...
Page is loading ...
Page is loading ...
Page is loading ...
Page is loading ...
Page is loading ...
Page is loading ...
Page is loading ...
Page is loading ...
Page is loading ...
Page is loading ...
Page is loading ...
Page is loading ...
Page is loading ...
Page is loading ...
Page is loading ...
Page is loading ...
Page is loading ...
Page is loading ...
Page is loading ...
Page is loading ...
-
 1
1
-
 2
2
-
 3
3
-
 4
4
-
 5
5
-
 6
6
-
 7
7
-
 8
8
-
 9
9
-
 10
10
-
 11
11
-
 12
12
-
 13
13
-
 14
14
-
 15
15
-
 16
16
-
 17
17
-
 18
18
-
 19
19
-
 20
20
-
 21
21
-
 22
22
-
 23
23
-
 24
24
-
 25
25
-
 26
26
-
 27
27
-
 28
28
-
 29
29
-
 30
30
-
 31
31
-
 32
32
-
 33
33
-
 34
34
-
 35
35
-
 36
36
-
 37
37
-
 38
38
-
 39
39
-
 40
40
-
 41
41
-
 42
42
-
 43
43
-
 44
44
-
 45
45
-
 46
46
-
 47
47
-
 48
48
-
 49
49
-
 50
50
-
 51
51
-
 52
52


Hobart AUPL-10A Installation And Operation Instructions Manual
- Category
- Dishwashers
- Type
- Installation And Operation Instructions Manual
Ask a question and I''ll find the answer in the document
Finding information in a document is now easier with AI
Related papers
-
Hobart amx-10a Installation And Operation Instructions Manual
-
Hobart AUXXT Series Installation & Operation Manual
-
-
-
-
-
-
-
-
Other documents
-
Bartscher 110661 Operating instructions
-
Winterhalter UC Series Operating Instructions Manual
-
Metos HOOD 130S Owner's manual
-
Bartscher Deltamat TF 641 Owner's manual
-
Platinum AUPL-DW14I User manual
-
 EWS OS 3030 User manual
-
Meiko UPster ® H500 M2 Operating instructions
-
-
-
