Kreator KRT672002 Owner's manual

Type
Owner's manual

Kreator KRT672002 is a versatile workbench that combines adjustability, clamping functionality, and portability. It features a sturdy construction with a maximum load capacity ranging from 15 to 100 kg depending on the height setting. The height can be adjusted from 21 cm to 77 cm, allowing you to work comfortably in various positions. The quick-move clamping system enables you to secure workpieces easily and efficiently. Additionally, the foldable legs provide compact storage and easy transportation, making it suitable for both indoor and outdoor use.

Kreator KRT672002 is a versatile workbench that combines adjustability, clamping functionality, and portability. It features a sturdy construction with a maximum load capacity ranging from 15 to 100 kg depending on the height setting. The height can be adjusted from 21 cm to 77 cm, allowing you to work comfortably in various positions. The quick-move clamping system enables you to secure workpieces easily and efficiently. Additionally, the foldable legs provide compact storage and easy transportation, making it suitable for both indoor and outdoor use.

KRT672002 EN
Copyright © 2015 VARO P a g e | 1 www.varo.com
WORKBENCH
KRT672002
1 PACKAGE CONTENT LIST
Remove all packing materials
Remove remaining packaging and transit supports (if existing).
Check the completeness of the packing content.
Check the appliance, the power cord, the power plug and all accessories for transportation
damages.
Keep the packaging materials as far as possible till the end of the warranty period.
Dispose it into your local waste disposal system afterwards.
WARNING: Packing materials are no toys! Children must not play with
plastic bags! Danger of suffocation!
NOTE: When parts are missing or damaged, please contact your dealer.
2 SAFETY WARNINGS
Before each use, check that all moving parts have been secured and the foldable legs
frames are fully unfolded and secured. Always ensure that the workbench is stable.
Before each use check that all bolts and nuts are secured. Tighten these bolts and nuts if
necessary.
Do not exceed the maximum load.
They product may not be used as a ladder, stairs or a scaffold. Never stand on the
product or work pieces placed on it. Do not lean on the product when working.
Keep any part of the body, especially hands clear of the moving parts when folding or
unfolding the bench.
Use the product only as described in this instruction manual. Failure to follow instructions
could cause property damage and personal injury.
Only for use on firm, level surface
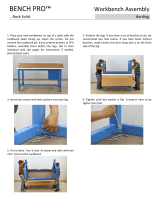
3 ASSEMBLY
STEP 1: Pull down both front legs until the spring lock locates. Repeat for the back legs.
Make sure the legs are locked by spring lock before use.
STEP 2: Lay the bench top (#1) onto the top of the elevating rod assembly. Ensure the
tops of the legs sits outside the frame of the bench top. Attach using M6x12 hex bolts
(#8), M6 safety hex nuts (#9) and ɸ6 washers (#10). When using set of M8 safety hex
nuts (#12), M8X35 hex bolts and ɸ8 washers, make sure that the nylon washer (#14) is
between the base frame and the worktop frame to allow smooth opening.
STEP 3: Attach the cross bar (#3) to the back of worktop through the pre-drilled holes,
using the M6x12 hex bolts (#8), M6 safety hex nuts (#9), ɸ6 washers (#10) and a 10mm
wrench.
STEP 4: Attach one of the adjuster handles (#4) onto an adjuster shaft using M5x20 (#6)
bolt and safety hex nut M5 (#7). Repeat for the remaining handles. The clamps (#5) can
be inserted into the top holes. Pull the clamp (#5) up and turn it around to adjust the angle
of the clamp, as required.
4 FUNCTIONS
4.1 Height adjustment
KRT672002 EN
Copyright © 2015 VARO P a g e | 2 www.varo.com
Loosen the worktop angle adjustment locks on both sides of the workbench (fig 1). With
one foot on the step plate, push the worktop angle adjustment locks (fig 2) simultaneously
while lifting the worktop to the required height (fig 3 & 4).
To fold legs inside base push in the spring lock of front leg, this enables both legs to be
folded in at the same time. Repeat the method for the back legs (fig 9, 10 & 11).
NOTE: Ensure the height fixing knobs are tight before using the workbench.
4.2 Quick move clamping
Under the back of the rear benchtop there are two levers. Pull both levers upward and
move the worktop assembly (fig 5).
To reduce a clamping size just pull the rear benchtop inward. Touching the levers is not
necessary at this stage (fig 6).
NOTE: Ensure the tilt adjustment knobs are tight before using the
workbench. Use the preset guide holes only.
4.3 Close the workbench
Loosen the worktop angle adjustment locks keep pushing the knobs on both sides of
workbench simultaneously (fig 7), slowly lowering the top down (fig 8).
Fold legs inside as mentioned in 4.1 Height adjustment.
5 TECHNICAL DATA
Model Nr.
KRT672002
Size
60,5 x 71,5 x 21 (77) cm
Max capacity at height:
21 cm
40 kg
39 cm
15 kg
47 cm
18 kg
60 cm
70 kg
65 cm
45 kg
77 cm
100 kg
  • Page 1 1
  • Page 2 2

Kreator KRT672002 Owner's manual

Type
Owner's manual

Kreator KRT672002 is a versatile workbench that combines adjustability, clamping functionality, and portability. It features a sturdy construction with a maximum load capacity ranging from 15 to 100 kg depending on the height setting. The height can be adjusted from 21 cm to 77 cm, allowing you to work comfortably in various positions. The quick-move clamping system enables you to secure workpieces easily and efficiently. Additionally, the foldable legs provide compact storage and easy transportation, making it suitable for both indoor and outdoor use.

Ask a question and I''ll find the answer in the document

Finding information in a document is now easier with AI