AWM-A46 Page 1 of 4
Installation Guide
AWM-A46
460 Arm
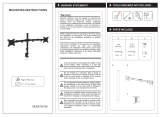
COMPONENT CHECKLIST
A
Monitor Arm
(x1)
B
VESA Head
(x1)
D
Screw
M4x25mm
(x4)
E
Screw
M4x16mm
(x4)
F
Screw
M4x12mm
(x4)
G
Spacer
(x4)
H
Security
screw
(x1)
I
4mm
allen key
(x1)
C
Post Clamp
(x1)
REQUIRED TOOLS
WEIGHT RANGE
Flat Monitors
0 - 12kg
(0 - 26.5lbs)
Curved Monitors
0 - 8kg
(0 - 17.6lbs)
• Phillips Head Screwdriver
Monitor weight should be within the
weight range of all modular elements
that make up the complete monitor
mounting solution.
IMPORTANT INFORMATION
! Please ensure this product is installed as per these installation instructions.
! The manufacturer accepts no responsibility for incorrect installation.
! This product is compatible with Atdec AWM Series products.
! Curved monitors, deep devices (such as all-in-one PCs) and offset VESA locations exert additional leverage that can exceed the
capacity of the mount even though the monitor weight may be within the stated range. Please contact Atdec if you would like further
information.

AWM-A46 Page 2 of 4
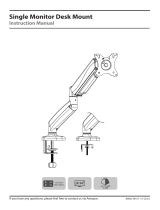
3. Place the rotation ring
in the desired postion
2. Set arm rotation to 180° (optional)
2.1 Remove plastic sleeve
from post clamp.
2.2 Remove rotation ring. 2.3 Place rotation ring in
desired position.
Note: rotation ring placement
depends on the position of the clamp
on the post. The tag on the ring
should always face toward the user.
1. Remove plastic sleeve
2. Remove rotation ring
1. Press
2. Lift
Note rotation is set to 360� by default.
180°
360°
OR
Default
Position
Flipped
Position
Tag
1. Fix clamp to Post or Wall Channel
1.1 Ensure knob is undone. 1.2 Slide post clamp into channel.
Push knob to
aid insertion
1.3 Hold clamp in desired position on
channel and turn knob to lock in place.
1. Ensure Knob is undone
Tip: push knob
to aid insertion
2. Slide post clamp into channel
3. Hold clamp in desired position on post and turn
knob to lock in place
3. Fit arm onto post clamp
Note: Check the
arm rotation is
smooth after
tightening.
3.1 Push arm onto shaft. 3.2 Ensure arm is fully pushed onto shaft. 3.3 Tighten joint screw.
1. Push arm onto clamp
2. Ensure arm is fully pushed onto clamp
3. Tighten set screw
Tip: Check the
arm rotation is
smooth after
tightening.

AWM-A46 Page 3 of 4
Tighten
Loosen
Tighten
Loosen
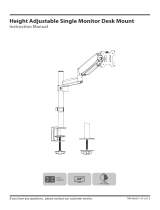
5. Mount monitor
Monitor arm
5.1 Insert VESA head into the monitor arm
5.3 Push the lever down to secure
it to the arm assembly
5.2 Ensure that the VESA head sits flush within
the monitor arm. There should be no gap
Gap No gap
6. Adjust tilt tension & Install security screw
6.1 Use the allen key to adjust the tilt tension until the monitor
holds in a vertical position at the end of the arm.
Note: Support
monitor while
adjusting.
6.2 OPTIONAL security screw
To install the optional security screw tilt the head upwards
4. Attach VESA head to monitor
100mm
75mm
100mm
75mm
Flush
Too long Too short
Spacer
5mm 12mm
4.2 Screw the VESA head onto monitor
Note spacers may be required for curved,
recessed or uneven monitor surfaces.
4.3 Ensure the correct screw length is used
to attach the monitor.
4.1 VESA mounting compatibility
100mm
75mm
100mm
75mm
Flush
Too long Too short
Spacer
5mm 12mm
Note: For other sizes, use a suitable
adaptor plate (sold separately).

AWM-A46 Page 4 of 4
atdec.com | atdec.co.uk | atdec.com.au
No portion of this document or any artwork contained herein should be reproduced in any way without
the express written consent of Atdec Pty Ltd. Due to continuing product development, the manufacturer
reserves the right to alter specifications without notice. ©20191024A
Note: The cable cover shown
does not come with all posts
7.4 To reposition the cable cover, pull it
straight up and out of the post and insert
it into any of the available channels
Cable cover
Cable
Cover
Desk
Clamp
7.1 Push the cable down into the cable clip
Note: Cable clips do not
come with all posts
7.6 Feed remaining cable into cover
7.5 Loop cable and insert into cable cover
7.2 Push cable clip into post channel
7. Post cable management
7.3 Recommended post cable cover
position for double or triple arm set-ups
Note
Ensure enough cable
slack is given to allow for
movement of the monitor
Push
6. Monitor arm cable management
6.1 Plug cables into the monitor and route
the cables down the arm using the cable
hooks and clips
Alternative cable
cover positions
/