Graco PD172427C User manual
- Category
- Baby furniture
- Type
- User manual
This manual is also suitable for
Page is loading ...

2
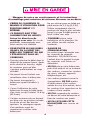
Failure to follow these warnings and the
assembly instructions could result in serious injury or death.
sPLEASE SAVE OWNER’S
MANUAL FOR FUTURE USE.
sTHIS PRODUCT REQUIRES
ADULT ASSEMBLY. Follow
assembly instructions
carefully. If you experience
any difficulties, please contact
the Customer Service
Department.
sTO PREVENT SERIOUS INJURY
OR DEATH FROM INFANTS
FALLING OR BEING
STRANGLED IN STRAPS:
s!LWAYSSECUREINFANTINTHE
RESTRAINTSYSTEMPROVIDED!FTER
fastening buckles, adjust belts to
get a snug fit around your infant.
s.EVERLEAVEINFANTUNATTENDED
INSWING
s.EVERCARRYSWINGWITHINFANT
in it.
s$ISCONTINUEUSEOFSWINGWHEN
infant attempts to climb out or
reaches 30 pounds
(13.6 kg).
s3OMENEWBORNSCANNOTSITIN
a reclined or upright position
and have special needs. Check
WITHYOURDOCTORABOUTWHEN
TOSTARTUSINGTHISSWING$O
NOTUSEWITHANINFANTTHAT
WEIGHSLESSTHANPOUNDS
KG5SEONLYINMOST
reclined seat position until
infant can hold head up
unassisted.
sALWAYSPLACESWINGONFLOOR
.EVERUSEONANYELEVATED
surface.
sSTRANGULATION HAZARD:
s#HILDCANSTRANGLEINLOOSE
RESTRAINTSTRAPS.%6%2LEAVE
CHILDINPRODUCTWHENSTRAPS
are loose or undone.
sDO NOTPLACESWINGINANY
LOCATIONWHERETHEREARECORDS
SUCHASWINDOWBLINDCORDS
drapes, phone cords, etc.
s3TRINGSCANCAUSE
strangulation. DO NOT place
ITEMSWITHASTRINGAROUND
your child’s neck, such as hood
strings or pacifier cords.
sDO NOT suspend strings over
THESWINGORATTACHSTRINGSTO
toys.
sDO NOT USE SWINGWITHOUT
the seat cover.

3
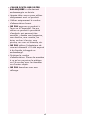
sDISCONTINUE USING YOUR
SWING should it become
damaged or broken.
s(EADSUPPORTFORUSEONLYWITH
this product.
s5SEONLYPOWERCORDPROVIDED
sDO NOT place product near
WATERANDMOISTURE$ONOTUSE
THEPRODUCTNEARPOSSIBLEWET
AREASSUCHASABATHTUBSHOWER
WASHBASINSINKLAUNDRYTUB
SWIMMINGPOOLWETBASEMENT
etc.
sDO NOT USETHE!#ADAPTORIFIT
has been exposed to liquids, has
been dropped, or is damaged.
s0ROTECTTHEPOWERCORD0LACEIT
SOITISNOTWALKEDONORPINCHED
by furniture or other items.
sDO NOTUSEWITHANEXTENSION
cord.
Page is loading ...
Page is loading ...
Page is loading ...
Page is loading ...
Page is loading ...

9
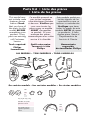
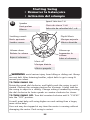
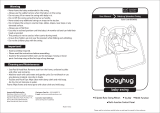
4HISEXPLODEDVIEWISPROVIDEDASAWAYTOHELPYOUSEETHEOVERALL
picture as you are assembling your product. It is not meant to replace
THESTEPBYSTEPINSTRUCTIONS
#ESCHÏMAÏCLATÏDONNEUNEVUEDENSEMBLEAFINDEFACILITERLE
MONTAGEDUPRODUIT)LNEREMPLACEPASLESDIRECTIVESDÏTAILLÏES
%STAPERSPECTIVASEOFRECECOMOUNAMANERADEAYUDARLOAVERLA
IMAGENCOMPLETAAMEDIDAQUEARMASUPRODUCTO.OTIENEPOR
objeto reemplazar las instrucciones paso por paso.

10
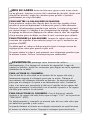
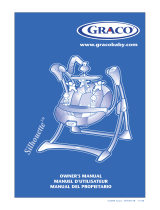
1
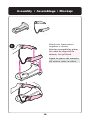
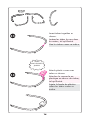
!TTACHSEATFRAMEPIECES
TOGETHERASSHOWN
Sujete las piezas del armazón
del asiento como se indica.
!TTACHERENSEMBLELESPIÒCES
du cadre du dispositif de
RETENUETELQUILLUSTRÏ
!SSEMBLY s!SSEMBLAGEs-ONTAJE
Page is loading ...
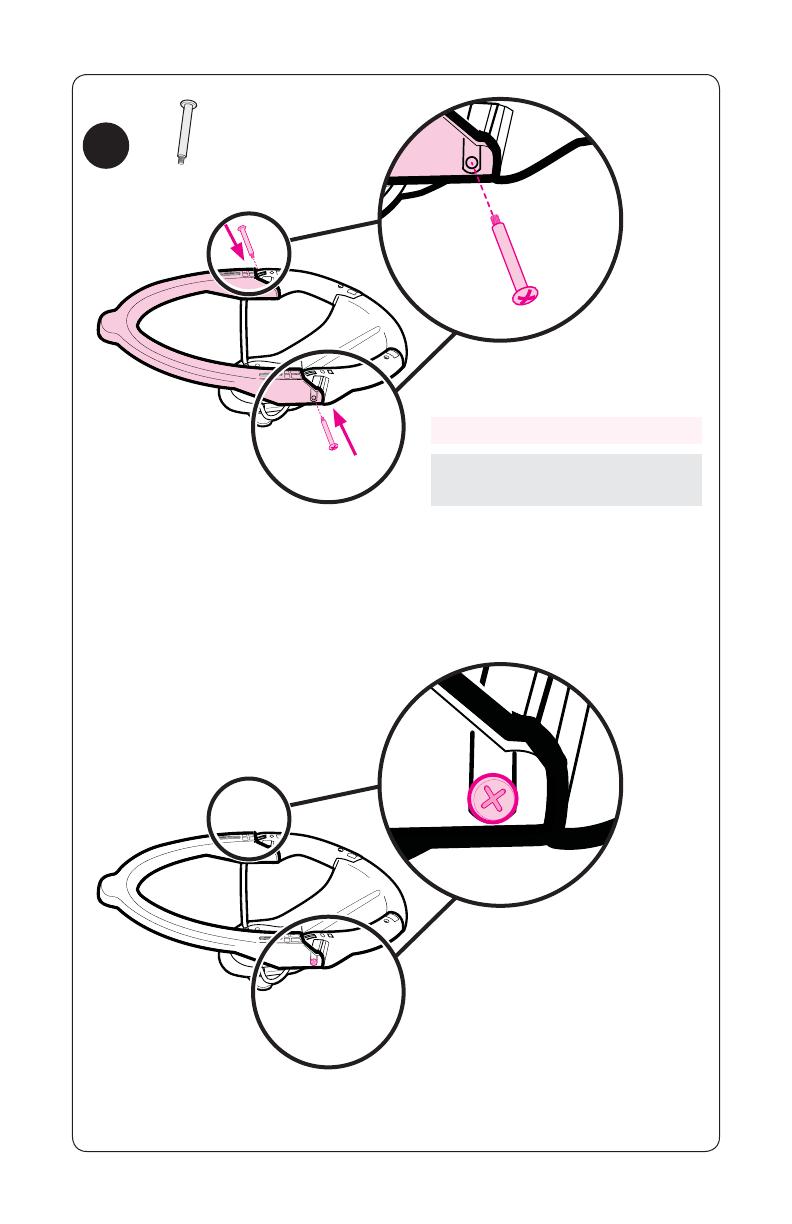
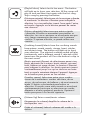
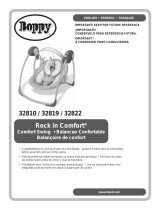
12
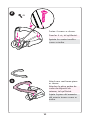
&ASTENSCREWSASSHOWN
!PRIETELOSDOSTORNILLOSCOMO
se indica.
&IXERLESVISTELQUILLUSTRÏ
4
2X
Page is loading ...
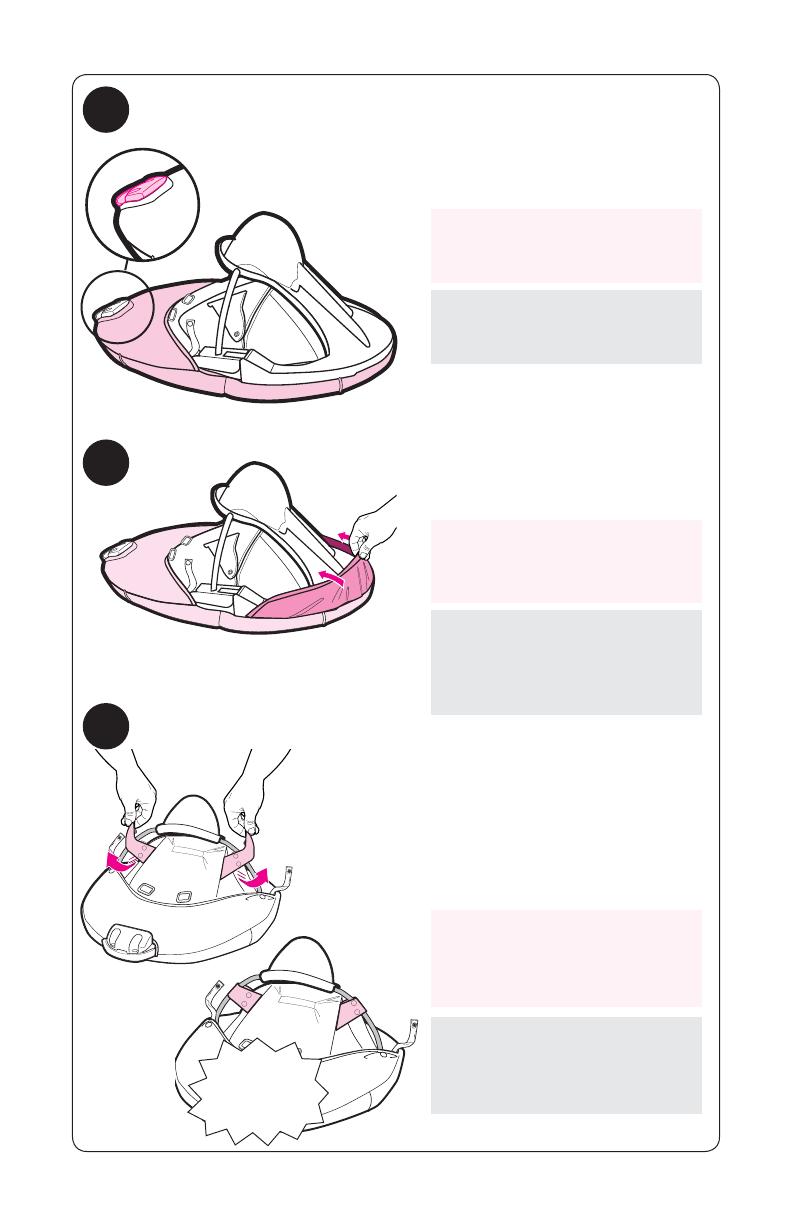
14
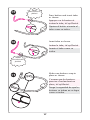
Pull the seat pad over the
FRONTOFSWINGSEATFRAMEAS
SHOWN
Pull flaps over the tubes and
snap the buttons to the
INSIDEOFTHEFLAPSASSHOWN
Pase la almohadilla del
asiento sobre el frente del
armazón del asiento del
columpio como se indica.
Ponga las aletas sobre los
tubos y trabe los botones en
el interior de las aletas como
se indica.
)NSÏRERLECOUSSINSURLE
devant du cadre de la
BALANOIRETELQUILLUSTRÏ
4IRERLESRABATSPARDESSUSLES
tubes et enclencher les
BOUTONSÌLINTÏRIEURDES
RABATSTELQUILLUSTRÏ
9
3.!0
%.#,%.#(%:
_25)$/
8
-AKESUREHANDLEGOES
THROUGHTHEHOLEASSHOWN
4ENGALASEGURIDADDEQUELA
manija pase por el agujero
como se indica.
3ASSURERQUELAPOIGNÏE
traverse l’ouverture, tel
QUILLUSTRÏ
10

15
11
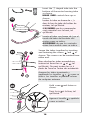
Pull side straps around the
seat tubes and fasten buttons
ASSHOWN
-AKESUREBOTHSTRAPSAND
flaps are properly fastened to
THESEATPADASSHOWN
4IRELASCORREASLATERALES
alrededor de los tubos del
asiento y trabe los botones
como se indica.
4ENGALASEGURIDADDEQUELAS
correas y las aletas están
debidamente sujetadas a la
almohadilla del asiento como
se indica.
4IRERLESCOURROIESLATÏRALES
autour de la tubulure des
sièges et attacher les
BOUTONSTELQUILLUSTRÏ
S’assurer que les courroies et
LESRABATSSONTBIENFIXÏSAU
coussin du siège, tel
QUILLUSTRÏ
3.!0
%.#,%.#(%:
_25)$/
12

16
13
14
Insert tubes together as
SHOWN
!TTACHPLASTICCOVEROVER
TUBESASSHOWN
5NALOSTUBOSCOMOSEINDICA
Sujete la funda de plástico
sobre los tubos como se
indica.
)NSÏRERLESTUBESLESUNSDANS
LESAUTRESTELQUILLUSTRÏ
!TTACHERLECOUVERCLEEN
plastique au dessus des tubes,
TELQUILLUSTRÏ
3.!0
%.#,%.#(%:
_25)$/

17
Press button and insert tube
ASSHOWN
)NSERTTUBEASSHOWN
-AKESUREBUTTONSSNAPIN
PLACEASSHOWN
Oprima el botón e inserte el
tubo como se indica.
Inserte el tubo como se
indica.
4ENGALASEGURIDADDEQUELOS
botones se traben en su lugar
como se indica.
!PPUYERSURLEBOUTONET
INSÏRERLETUBETELQUILLUSTRÏ
)NSÏRERLETUBETELQUILLUSTRÏ
3ASSURERQUELESBOUTONS
pression s’enclenchent en
PLACETELQUILLUSTRÏ
3.!0
%.#,%.#(%:
_25)$/
3.!0
%.#,%.#(%:
_25)$/
15
16
17
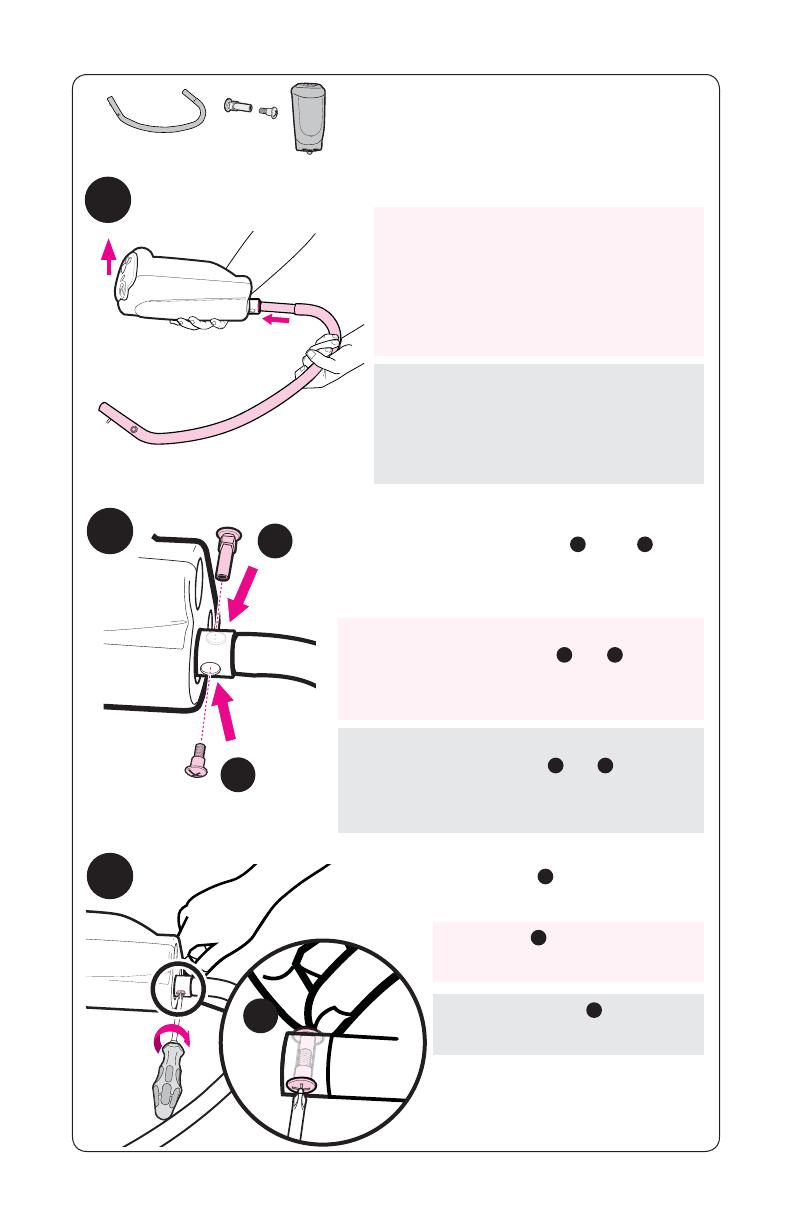
18
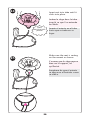
)NSERTTHE*SHAPEDTUBEINTOTHE
bottom of the motor housing tube
ASSHOWN
MAKE SURE controls face up as
SHOWN
)NSERTEELTUBOCONFORMADE*ENEL
fondo del tubo del bastidor del
motor como se indica.
ASEGÚRESE de que los controles
miran hacia arriba como se indica.
)NSÏRERLETUBEENFORMEDEi*w
dans le bas du tube du boîtier du
MOTEURTELQUILLUSTRÏ
S’ASSURER que les commandes
SONTORIENTÏESVERSLEHAUTTEL
QUILLUSTRÏ
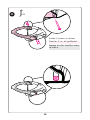
Secure the tubes together by inserting
ANDFASTENINGTHESCREWS
A
and
B
as
SHOWN4HESCREWSCANBEINSERTEDFROM
either end.
!SEGURELOSTUBOSINSERTANDOY
apretando los tornillos
A
y
B
como se
INDICA,OSTORNILLOSSEPUEDENCOLOCAR
de cualquier extremo.
Bien attacher les tubes ensemble en
INSÏRANTETFIXANTLESVIS
A
et
B
, tel
QUILLUSTRÏ/NPEUTINSÏRERLESVISÌ
PARTIRDELUNEOULAUTREDESEXTRÏMITÏS
(OLDSCREW
A
and fasten as
SHOWN
!GARREELTORNILLO
A
YAPRIÏTELO
como se indica.
4ENIRLAVIS
A
et la fixer, tel
QUILLUSTRÏ
19
A
B
18
A
20
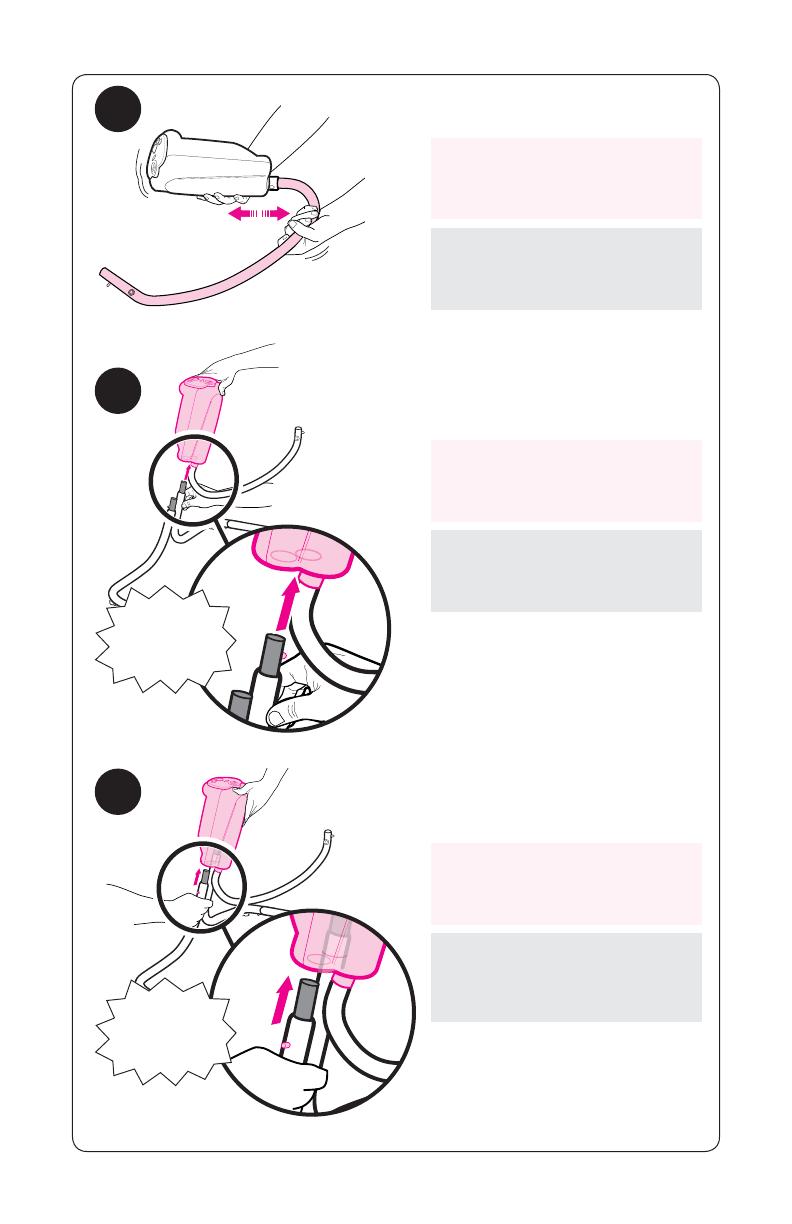
19
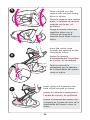
Insert the motor housing to
one of the frame tubes as
SHOWN
Insert the motor housing to
the second frame tube as
SHOWN
Pull on tube to make sure it is
FASTENEDTOMOTORASSHOWN
Inserte el bastidor del motor
en uno de los tubos del
armazón como se indica.
Inserte el bastidor del motor
en el segundo tubo como se
indica.
4IREDELTUBOPARAASEGURARSE
DEQUEESTÏSUJETADOALMOTOR
como se indica.
)NSÏRERLEBOITIERDUMOTEUR
dans l’un des tubes du cadre,
TELQUILLUSTRÏ
)NSÏRERLEBOITIERDUMOTEUR
dans l’autre tube du cadre,
TELQUILLUSTRÏ
4IRERSURLETUBEPOUR
s’assurer qu’il est solidement
FIXÏAUMOTEURTELQUILLUSTRÏ
22
23
3.!0
%.#,%.#(%:
_25)$/
3.!0
%.#,%.#(%:
_25)$/
21
Page is loading ...
21
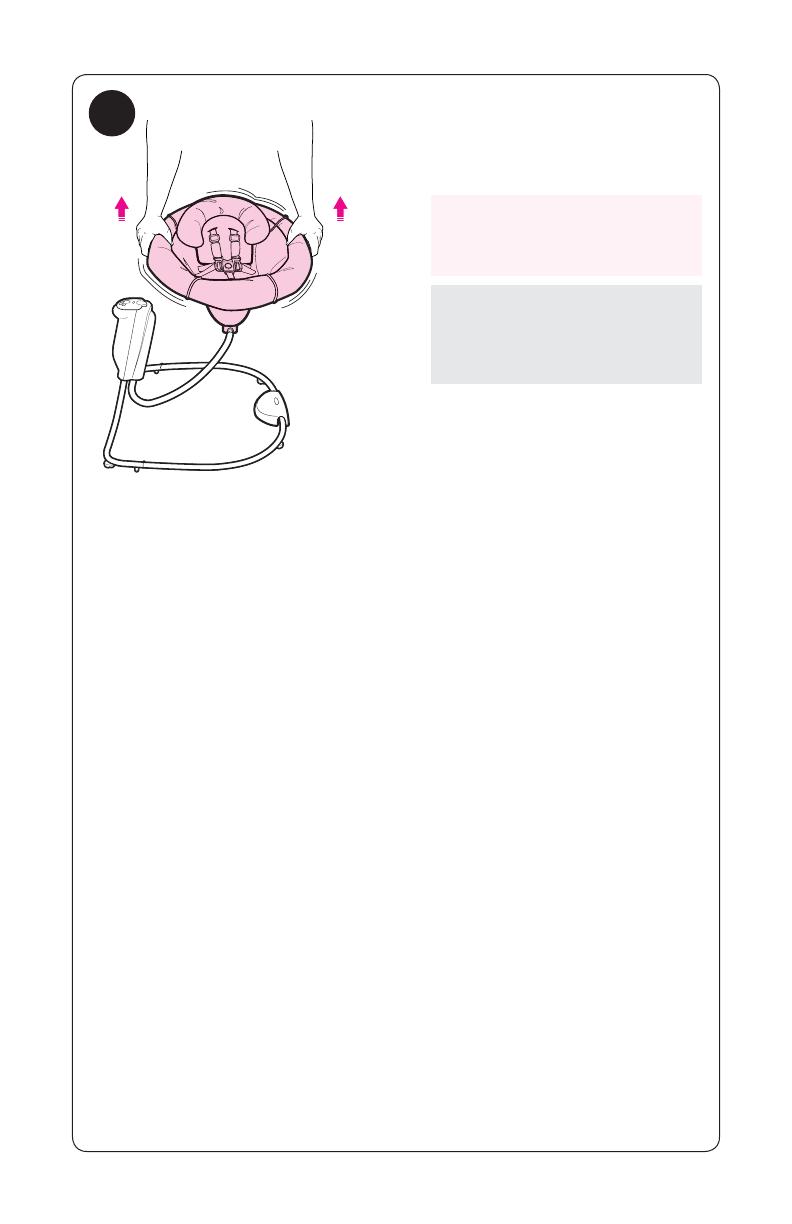
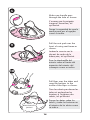
Pull up on the seat to make
sure it is properly attached to
THESWINGFRAME
4IREHACIAARRIBADELASIENTO
PARAASEGURARSEDEQUEESTÏ
debidamente sujetado al
armazón del columpio.
4IRERSURLESIÒGEPOUR
SASSURERQUILESTBIENANCRÏ
au cadre de la balançoire.
26
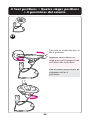
22
3EATPOSITIONS s1UATRESIÒGESPOSITIONS
sPOSICIØNESDELASIENTO
27
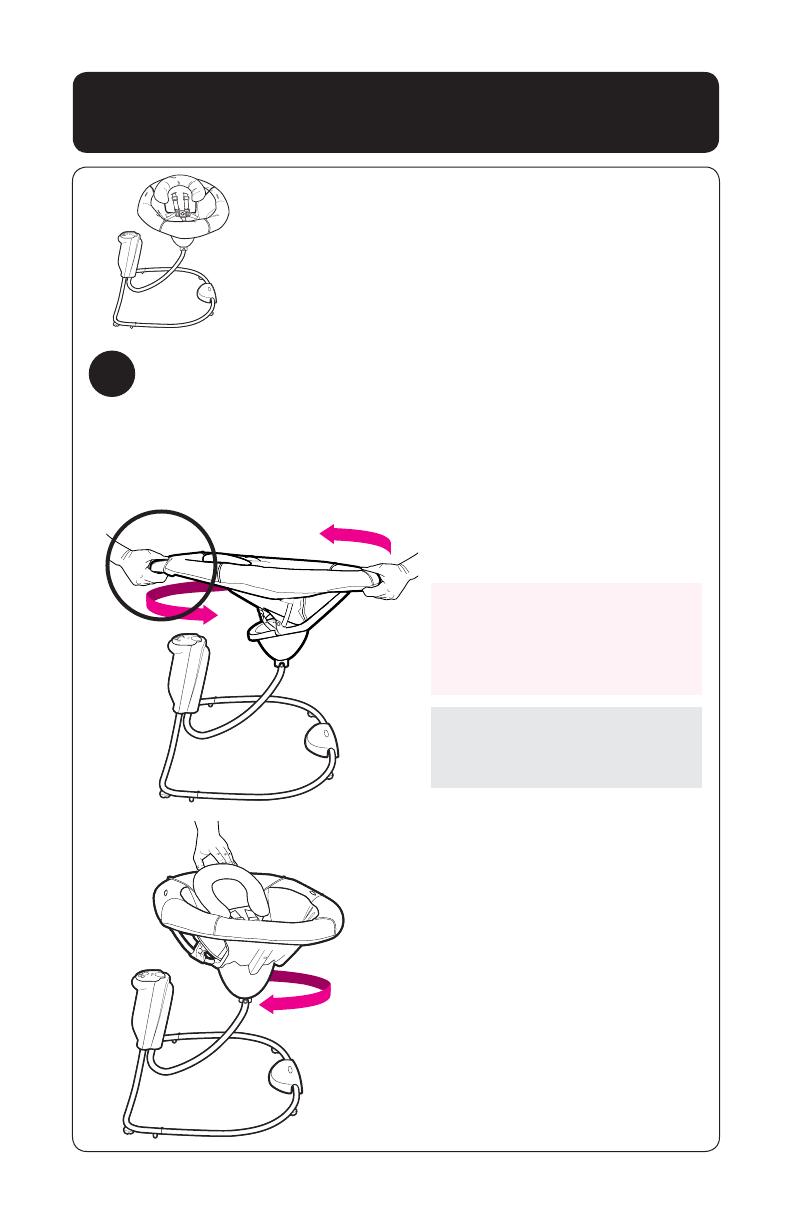
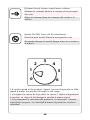
4URNSEATTOROTATEINTOANYOF
the 4 positions.
Gire el asiento para rotarlo en
cualquiera de las 4
posiciones.
Imprimer une rotation au
siège pour qu’il rejoigne l’une
ou l’autre des 4 positions.
23
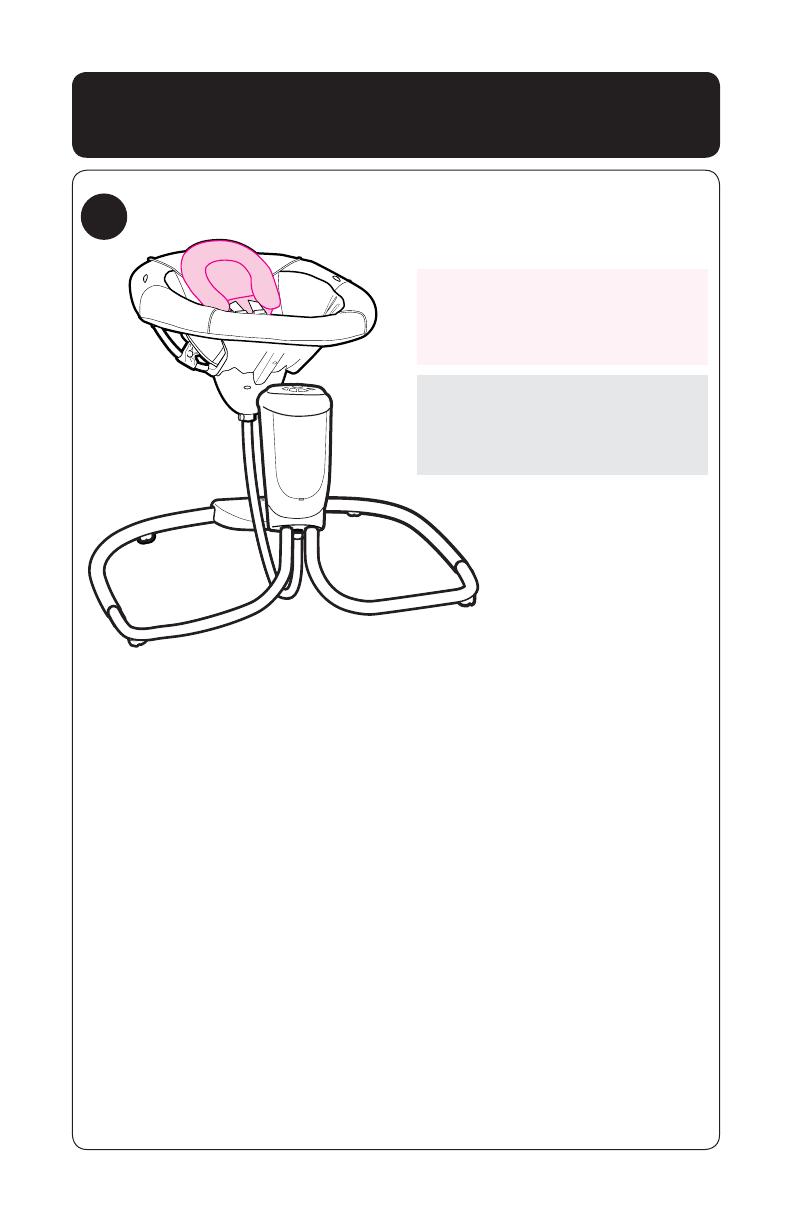
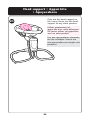
(EADSUPPORTs!PPUITÐTE
s!POYACABEZA
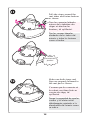
Only use this head support on
THISSWING.EVERUSETHISHEAD
support on any other product.
5TILISERUNIQUEMENTCET
APPUITÐTEAVECCETTEBALANOIRE
.EJAMAISUTILISERCETAPPUITÐTE
avec un autre produit.
5SEESTEAPOYACABEZASOLAMENTE
ENESTECOLUMPIO.UNCAUSE
este apoyacabeza en ningún otro
producto.
28
24
29
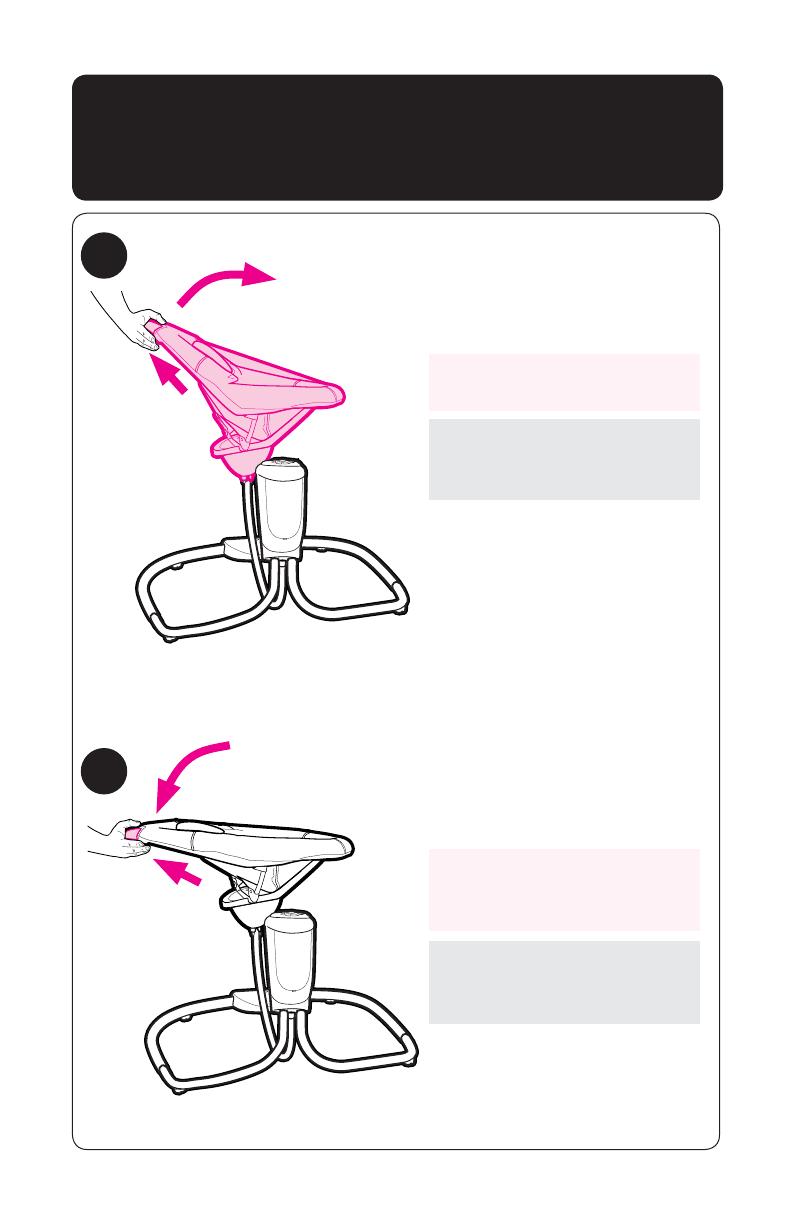
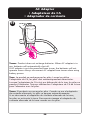
4ORECLINESQUEEZEHANDLEAT
TOPOFSEATANDPUSHDOWN
Para reclinarlo, apriete la
manija de arriba del asiento y
empuje hacia abajo.
Pour incliner, comprimer la
POIGNÏESITUÏEAUSOMMETDU
siège et pousser vers le bas.
To Adjust Recline (2 positions)
s 0OURRÏGLERLINCLINAISONPOSITIONS
s !JUSTARLAPOSICIØNRECLINABLEPOSICIONES
4ORAISESQUEEZEHANDLEAND
push seat up.
Para levantarla, apriete la
manija y empuje el asiento
hacia arriba.
Pour soulever, comprimer la
POIGNÏEETSOULEVERLESIÒGE
30
25
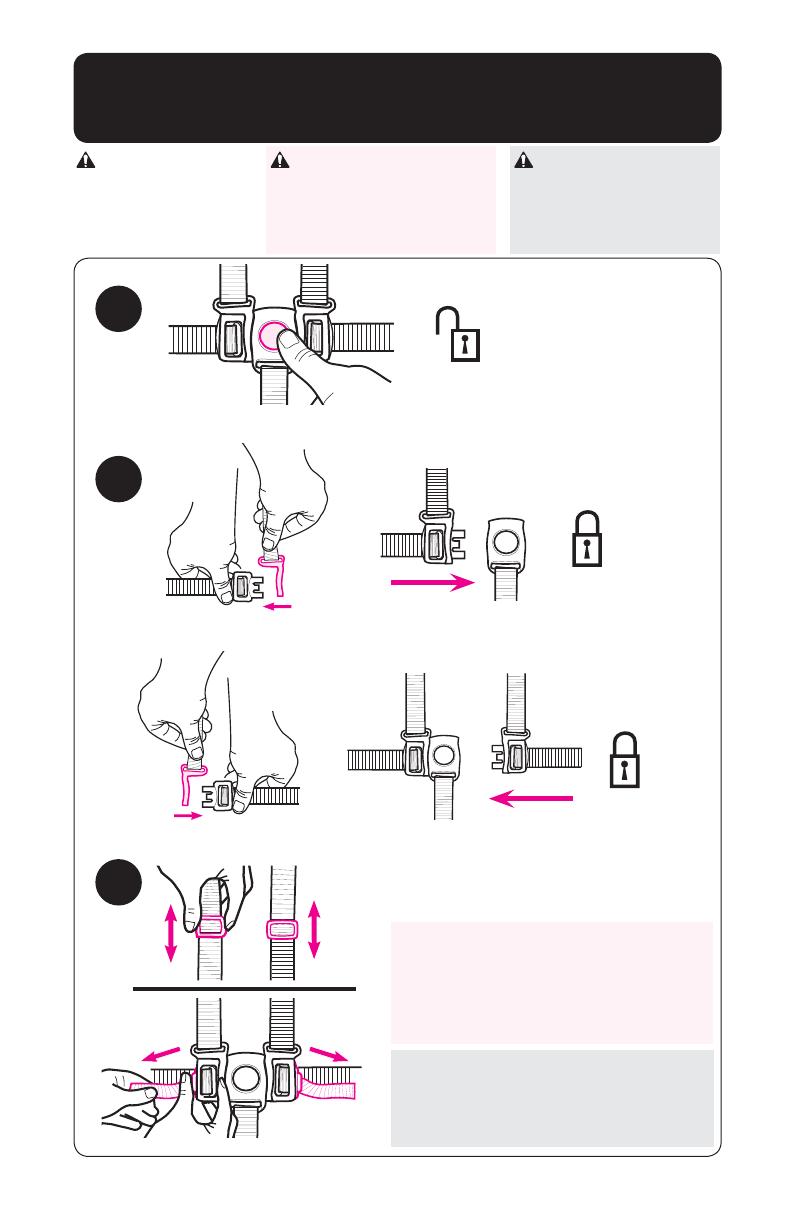
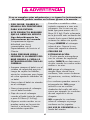
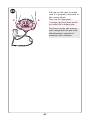
WARNING
Falling Hazard:
Always use the
seat belt.
ADVERTENCIA
Peligro de caida:
Use siempre el
cinturón de seguridad.
MISE EN GARDE
Danger de chute:
Toujours utiliser la
ceinture du siège.
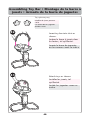
To Secure Infant % Attacher l’enfant
% Para asegurar al bebe
5SESLIDEADJUSTERATSHOULDERAND
WAISTFORTIGHTERADJUSTMENT4O
change shoulder harness slots, see
page 26.
5TILISEZLERÏGULATEURCOULISSANTÌ
LÏPAULEETÌLATAILLEPOURUN
AJUSTEMENTPLUSPRÏCIS0OUR
changer des fentes de harnais
DÏPAULEVOIRLAPAGE
.
5SEELAJUSTEDESLIZABLEENELHOMBRO
y la cintura para hacer ajustes más
apretado. Para cambiar ranuras del
ARNÏSDELHOMBROVEALAPÉGINA
31
32
33

26
,ESCOURROIESDOIVENTALLERDANSLESFENTES
DENIVEAUOUJUSTEAUDESSUSDESÏPAULES
Évitez de tordre les courroies.
4HEHARNESSSTRAPSMUSTGOINTOTHESLOT
THATISEVENWITHORSLIGHTLYABOVETHE
SHOULDERS!VOIDTWISTINGSTRAPS
,ASCORREASDELARNÏSDEBENPASARPORLAS
ranuras a la altura o apenas por encima
DELOSHOMBROS%VITEDOBLARLASCINTAS
34
35
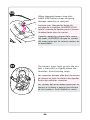
When changing harness strap slots,
-!+%352%HARNESSSTRAPSAREGOING
through same slots in seat pad.
,ORSQUEVOUSCHANGEZLESFENTESDU
PASSAGEDELACOURROIE!3352%:6/53
que la courroie du harnais passe à travers
la même fente dans le coussin.
Cuando cambia las ranuras de la correa
DELARNÏS!3%'Â2%3%DEQUELASCORREAS
DELARNÏSPASANPORLASMISMASRANURASEN
la almohadilla.

27
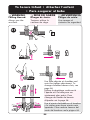
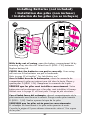
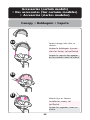
Installing Batteries (not included)
s)NSTALLATIONDESPILESNONINCLUSES
s)NSTALACIØNDELASPILASNOSEINCLUYEN
36
With baby out of swing, open the battery compartment lid by
INSERTINGAKEYINTOTHESLOT)NSERTFOUR$,26BATTERIES
2EPLACEBATTERYLID
CHECK that the batteries are put in correctly9OURSWING
WILLNOTRUNIFTHEBATTERIESAREPUTINBACKWARDS
Refer to page 29 of booklet”, For Safe Battery use”.
Con el bebé fuera del columpio, abra el compartimento de la
PILAINSERTANDOUNALLAVEENLARANURA0ONGACUATROPILASTAMA×O
$,266UELVAAPONERLATAPADELASPILAS
VERIFIQUE que las pilas están puestas correctamente.
%LCOLUMPIONOFUNCIONARÉSILASPILASESTÉNPUESTASALREVÏS
Consulte la página 33 para obtener información sobre el "Uso seguro
de las pilas".
Avec le bébé hors de la balançoire, ouvrir le couvercle du
COMPARTIMENTÌPILESENINSÏRANTUNECLEFDANSLAFENTE0LACEZY
QUATREPILES$,262EMPLACEZLECOUVERCLEDELAPILE
VÉRIFIEZ que les piles sont installées correctement.6OTRE
BALANOIRENEFONCTIONNERAPASSILESPILESSONTINSTALLÏESÌLENVERS
Référez-vous à la page 31 du livret pour "l'usage de pile sécuritaire ".
Page is loading ...

29
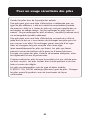
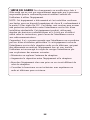
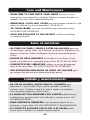
For Safe Battery Use
+EEPTHEBATTERIESOUTOFCHILDRENSREACH
!NYBATTERYMAYLEAKBATTERYACIDIFMIXEDWITHADIFFERENTBATTERY
TYPEIFINSERTEDINCORRECTLYPUTINBACKWARDSORIFALLBATTERIESARE
not replaced or recharged at the same time. Do not mix old and
NEWBATTERIES$ONOTMIXALKALINESTANDARDCARBONZINCOR
RECHARGEABLENICKELCADMIUMBATTERIES
!NYBATTERYMAYLEAKBATTERYACIDOREXPLODEIFDISPOSEDOFINFIRE
or an attempt is made to charge a battery not intended to be
RECHARGED.EVERRECHARGEACELLOFONETYPEINARECHARGERMADE
for a cell of another type.
$ISCARDLEAKYBATTERIESIMMEDIATELY,EAKYBATTERIESCANCAUSESKIN
burns or other personal injury. When discarding batteries, be sure
to dispose of them in the proper manner, according to your state
and local regulations.
!LWAYSREMOVEBATTERIESIFTHEPRODUCTISNOTGOINGTOBEUSEDFORA
month or more. Batteries left in the unit may leak and cause damage.
2ECOMMENDEDTYPEBATTERIESALKALINEDISPOSABLESSIZE
$,26.%6%2MIXBATTERYTYPES#HANGEBATTERIESWHEN
product ceases to operate satisfactorily.
30
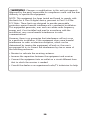
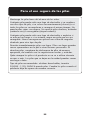
WARNING Changes or modifications to this unit not expressly
approved by the party responsible for compliance could void the user
authority to operate the equipment.
./4%4HISEQUIPMENTHASBEENTESTEDANDFOUNDTOCOMPLYWITH
THELIMITSFORA#LASS"DIGITALDEVICEPURSUANTTO0ARTOFTHE
&##2ULES4HESELIMITSAREDESIGNEDTOPROVIDEREASONABLE
protection against harmful interference in a residential installation.
4HISEQUIPMENTGENERATESUSESANDCANRADIATERADIOFREQUENCY
ENERGYANDIFNOTINSTALLEDANDUSEDINACCORDANCEWITHTHE
instructions, may cause harmful interference to radio
communications.
(OWEVERTHEREISNOGUARANTEETHATINTERFERENCEWILLNOTOCCUR
in a particular installation. If this equipment does cause harmful
INTERFERENCETORADIOORTELEVISIONRECEPTIONWHICHCANBE
determined by turning the equipment off and on, the user is
encouraged to try to correct the interference by one or more of
THEFOLLOWINGMEASURES
s2EORIENTORRELOCATETHERECEIVINGANTENNA
s)NCREASETHESEPARATIONBETWEENTHEEQUIPMENTANDRECEIVER
s#ONNECTTHEEQUIPMENTINTOANOUTLETONACIRCUITDIFFERENTFROM
THATTOWHICHTHERECEIVERISNEEDED
s#ONSULTTHEDEALERORANEXPERIENCEDRADIO46TECHNICIANFORHELP
Page is loading ...
Page is loading ...
Page is loading ...
Page is loading ...
Page is loading ...
Page is loading ...
Page is loading ...
Page is loading ...
Page is loading ...
Page is loading ...
Page is loading ...
Page is loading ...
Page is loading ...
Page is loading ...
Page is loading ...
Page is loading ...
Page is loading ...
Page is loading ...
-
 1
1
-
 2
2
-
 3
3
-
 4
4
-
 5
5
-
 6
6
-
 7
7
-
 8
8
-
 9
9
-
 10
10
-
 11
11
-
 12
12
-
 13
13
-
 14
14
-
 15
15
-
 16
16
-
 17
17
-
 18
18
-
 19
19
-
 20
20
-
 21
21
-
 22
22
-
 23
23
-
 24
24
-
 25
25
-
 26
26
-
 27
27
-
 28
28
-
 29
29
-
 30
30
-
 31
31
-
 32
32
-
 33
33
-
 34
34
-
 35
35
-
 36
36
-
 37
37
-
 38
38
-
 39
39
-
 40
40
-
 41
41
-
 42
42
-
 43
43
-
 44
44
-
 45
45
-
 46
46
-
 47
47
-
 48
48


Graco PD172427C User manual
- Category
- Baby furniture
- Type
- User manual
- This manual is also suitable for
Ask a question and I''ll find the answer in the document
Finding information in a document is now easier with AI
in other languages
- français: Graco PD172427C Manuel utilisateur
- español: Graco PD172427C Manual de usuario
Related papers
Other documents
-
Century 1470 User manual
-
 Babyhug Splendour Swing User manual
-
 Bebe Sounds Silhouette User manual
-
Raco Crushed Corners Covers Installation guide
-
 Boppy 32819 User manual
-
 Boppy 32822 Operating instructions
-
 Carter's Cozy comfort User manual
-
Cosco SW094 User manual
-
Evenflo Active User manual
-
Chicco Polly Swing Up Owner's manual


