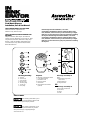
InSinkErator FOOD WASTE DISPOSER Installation, Care & Use Manual
- Category
- Dishwashers
- Type
- Installation, Care & Use Manual
InSinkErator FOOD WASTE DISPOSER is a powerful and efficient tool for disposing of food waste conveniently and hygienically. It features a durable construction with a stainless steel grind chamber and a heavy-duty motor for long-lasting performance. The disposer is equipped with a removable sound baffle to reduce noise and vibration, making it ideal for use in kitchens where noise reduction is a priority.
InSinkErator FOOD WASTE DISPOSER is a powerful and efficient tool for disposing of food waste conveniently and hygienically. It features a durable construction with a stainless steel grind chamber and a heavy-duty motor for long-lasting performance. The disposer is equipped with a removable sound baffle to reduce noise and vibration, making it ideal for use in kitchens where noise reduction is a priority.


-
 1
1
-
 2
2
-
 3
3
-
 4
4
-
 5
5
-
 6
6
-
 7
7


InSinkErator FOOD WASTE DISPOSER Installation, Care & Use Manual
- Category
- Dishwashers
- Type
- Installation, Care & Use Manual
InSinkErator FOOD WASTE DISPOSER is a powerful and efficient tool for disposing of food waste conveniently and hygienically. It features a durable construction with a stainless steel grind chamber and a heavy-duty motor for long-lasting performance. The disposer is equipped with a removable sound baffle to reduce noise and vibration, making it ideal for use in kitchens where noise reduction is a priority.
Ask a question and I''ll find the answer in the document
Finding information in a document is now easier with AI
Related papers
-
InSinkErator 66NEW User manual
-
InSinkErator STS-OOSN Installation guide
-
-
-
In-Sink-Erator Evolution Septic Assist User manual
-
-
InSinkErator Badger 9 User manual
-
-
InSinkErator Badger 500 Installation Care and Use Manual
-
Other documents
-
Kenmore 17560563 User manual
-
-
Sears 175605560 Owner's manual
-
-
Viking VCFW1000 Installation guide
-
-
KitchenAid KCDI250X User manual
-
-
Maytag DFC7500 Installation, Care & Use Manual
-