Frigidaire FFRE0533S1 Installation guide

Type
Installation guide

This manual is also suitable for

READ BEFORE INSTALLING UNIT
OPP Window Mounting (5,000~6,500 BTU)
1
Installation Instructions
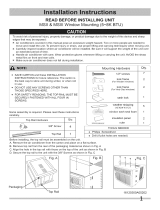
Before installing, the top rail must be assembled on the unit.
Top Rail Hardware
Qty.
4
1
3/8Ǝ Screw
Top Rail
Some assembly is required. Please read these instructions
carefully.
DO NOT USE ANY SCREWS OTHER THAN
THOSE SPECIFIED HERE.
NOTE:
SAVE CARTON and these INSTALLATION
INSTRUCTIONS for future reference. The carton is
the best way to store unit during winter, or when not
in use.
FOR SAFETY REASONS, THE TOP RAIL MUST BE
SECURELY FASTENED WITH ALL FOUR (4)
SCREWS.
A. Remove the air conditioner from the carton and place on a flat surface.
B. Remove top rail from the rear of the packaging material as shown in Fig. A
C. Align the hole in the top rail with those on the top of the unit as shown in Fig. B
D. Secure the top rail to the unit with the 3/8Ǝ Screws as shown in Fig. C
Fig. B
Packaging
Top Rail
Fig. A
16120300A04631
Fig. C
Pay attention to danger and safety notices.
To avoid risk of personal injury, property damage, or product damage due to the weight of this device and sharp edges that may
be exposed:
Air conditioners covered in this manual pose an excessive weight hazard. Two or more people are needed to move and install
the unit. Wear protective gloves whenever lifting or carrying the unit. AVOID the sharp metal fins of front and rear coils. To
prevent injury or strain, use proper lifting and carrying techniques when moving unit.
Carefully inspect location where air conditioner will be installed. Be sure it will support the weight of the unit overan extended
period of time.
Handle air conditioner with care.
Make sure air conditioner does not fall during installation.
Carefully read the installation manual before beginning.
Follow each step as shown.
Observe all local, state, and national electrical codes and by qualified, licensed, authorized personnel only.
INSTALLATION WARNINGS AND CAUTION
Drill (If pilot holes are needed)
7
1
Mounting Hardware
Qty.
2
s)
2
( or Wooden windows)
weather stripping
insulation panel
ruler
(10”X3/4”X1/12”)
5
window sash seal foam 1
2
1
1
2
3
4
5
6
7
8
9
10
1
1
12
1
2
3
4
5
How to Install
NOTE: Top Rail and Side Panels at each side are offset to provide the proper pitch to the rear of (5/16”).
This is necessary for proper condensed water utilization and drainage. If you are not using the Side Panels
for any reason, this pitch to the rear must be maintained!
Place unit on floor, a bench or a table. There is a Left and Right side Filler Panels - be sure to use the proper
panel for each side. When installed, the flange for securing the panel in place to the window sill will be facing
into the room.
A. Hold the side Panel in one hand and gently pull back the center to free the open end. See FIG. 1.
B. Slide the free end “T” section of the panel directly into the cabinet as shown in FIG. 2. Slide the panel down. Be
sure to leave enough space to slip the top and bottom of the frame into the rails on the cabinet.
LEFT + RIGHT FILLER PANEL ASSEMBLY
FIG. 2FIG. 1
C. Once the panel has been installed on the side of the cabinet, make sure it sits securely inside the frame channel by
making slight adjustments. Slide the top and bottom ends of the frame into the top and bottom rails of the cabinet. See
FIG. 3.
D. Slide the panel all the way in and repeat on the other side.
FIG. 3
2
Installation
Top Rail
Bottom Rail
T” section
Your air conditioner is designed to install in standard double hung windows with opening widths of 23 to 36 inches
(584 mm to 914 mm) (FIG. 4A FIG. 4B)
Lower sash must open sufficiently to allow a clear vertical opening of 13 inches (330 mm ). Side louvers and the rear of
the air conditioner must have clear air space to allow enough airflow through the condenser, for heat removal. The rear
of the unit must be outdoors, not inside a building or garage.
Fig. 4A
13Ǝ min
330 mm
Wooden Windows
Fig. 4B
13Ǝ min
330 mm
Vinyl-Clad Windows
INNER
WINDOW SILL
INNER
WINDOW SILL
INTERIOR
WALL
If the air conditoner is blocked by Storm Window, add wood as
shown in FIG. 5, or remove storm window before air conditioner
is installed.
If Storm Window Frame must remain, be sure the drain holes or
slots are not caulked or painted shut. Accumulated Rain Water
or Condensation must be allowed to drain out.
Storm Window:
FIG. 5
Board
thickness as
required, for
proper pitch to
rear, along
entire sill.
Fasten with
nails or screws.
Storm window
frame or other
obstruction.
SASH
1-1/2” min
(38 mm)
How to Install
Installation
Extend the side panels out against the window frame (FIG. 7A for wooden windows), (FIG. 7B for Vinyl-Clad
windows).
FIG. 7A
window
frame
Place the frame lock between the frame extensions and the window sill as shown (FIG. 8A for wooden
windows), (FIG. 8B for Vinyl-Clad windows).
FIG. 8A
A: For wooden windows:
Drive 1/2Ǝ (12.7 mm) locking screws through the frame lock and into the window sash (FIG. 9B). NOTE:
Before driving the screws, use a drill to drill 5 holes through the holes in the frame lock and frame extensions
into the windows sash as shown ( FIG. 9B).
B: For Vinyl-Clad windows:
FIG. 8B
3
FIG. 7B
Drive 1/2Ǝ (12.7 mm) locking screws through the frame lock and into the sill (FIG. 9A). NOTE:To prevent
window sill from splitting, drill 1/8Ǝ (3mm) pilot holes before driving screws. Drive 1/2Ǝ (12.7 mm) locking
screws through frame holes into window sash (FIG. 9B).
FIG. 9A
FIG. 9B
Drive locking screws:
wooden windows: Vinyl-Clad windows:
Keep a firm grip on the air conditioner, carefully place the unit into the window opening so the bottom of the air
conditioner frame is against the window sill (FIG. 6A & FIG. 6B). Carefully close the window behind the top rail
of the unit.
INSIDE OUTSIDE
FIG. 6B
Wooden Windows Vinyl-Clad Windows
INSIDE
OUTSIDE
FIG. 6A
4
Installation
FIG. 13
FIG. 14
FOAM SEAL
Cut foam window seal and insert it into the space between the upper and lower sashes (FIG. 14).
NOTE: It is difficult to lock the windows with the sash lock for Vinyl-Clad windows, so you can use lock by
(FIG. 13).
window itself.
FIG. 10
FIG. 11 FIG. 12
9
Measure the inner width
of the side curtain
1 2 3 4 5 6 7 8 9 10111213141516
1
2345
6
or
Measure the width of the inner side curtain with the provided ruler, as shown (FIG. 10). Mark a line on the
patterned side of the provided insulation panel according to the measured width, then cut out the insulation
panel along the line, as shown (FIG.11). Place the patterned side of the insulation panel to face inside your
room, then slide the insulation panel into the frame until the panel goes into the side curtain frame completely.
If the insulation panel does not slide in the frame smoothly, trim the insulation panel then try again, until the
insulation panel fits the frame, as shown (FIG.12). Repeat these instructions for the other side.
Installation
Removing the air conditioner From Window
Turn the air conditioner off, and disconnect power cord.
Remove sash seal from between windows, and unscrew sash lock.
Remove screws installed through frame and framelock.
Remove the insulation panel and close (slide) side panels into frame.
Keeping a firm grip on air conditioner, raise sash and
carefully remove.
Be careful not to spill any condensate water while lifting
unit from window. Store parts WITH air conditione
Weather stripping
r.
normal use, correct the slope otherwise.
FIG. 15A & FIG. 15B).
FIG. 15A
Wooden Window
EDISTUOEDISNI
INSIDE
about
H
H
Bottom Rail
Vinyl-Clad Window
Bottom Rail
OUTSIDE
H1
H
In order to minimize air leaks between the room air conditioner
and the window opening, suitable weather stripping(trim the
provided weather stripping into suitable size) should be applied
in case of any gaps found at the location as indicated by the
arrows in Fig. 16.
FIG. 15B
FIG. 16
5
10
11
  • Page 1 1
  • Page 2 2
  • Page 3 3
  • Page 4 4
  • Page 5 5

Frigidaire FFRE0533S1 Installation guide

Type
Installation guide
This manual is also suitable for

Ask a question and I''ll find the answer in the document

Finding information in a document is now easier with AI