Page is loading ...

8 a.m. - 6 p.m., EST, Monday - Friday
1-877-527-0313
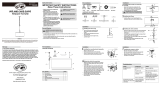
Installation
Installation
Part Description
Short straight rod (6 in.)
Long straight rod (12 in.)
B
A
C
Fabric shade assembly
Decorative frame
D
Canopy
G
F
E
H
Threaded rod assembly (6.1 in.)
Straight rod assembly (6 in.)
Diffuser
TOOLS REQUIRED
Hardware not shown to actual size.
HARDWARE INCLUDED
A
F
G
H
B
C
3
7
Attaching the canopy to the ceiling
Questions, problems, missing parts? Before returning to store,
HOMEDEPOT.COM
Safety Information
Contact the Customer Se
5-YEAR LIMITED WARRANTY
rvice Team at 1-877-527-0313 or visit www.homedepot.com.
Warranty
PACKAGE CONTENTS
Pre-Installation
Pre-Installation
A
CC
E
G
Quantity
1
1
2
1
1
1
1
1
NOTE:
D
DD
E
Retain this manual for future use.
□
□
□
Secure the straight rod assembly (E) to the fabric
shade assembly (G), using the hex nut to adjust as
needed.
Install the light bulbs (sold separately).
Installing the threaded rod
assembly and the bulb
□
□
Read all instructions prior to beginning the
installation process.
Make sure the power is turned off at the
electrical panel box before beginning your
installation. Turning the power off at the wall
shock.
or workmanship, the product must be returned, with a copy of the bill of sale as proof of purchase, to the
original place of purchase. The manufacturer will, at its option, repair, replace, or refund the purchase price
excludes liability for direct, incidental, or consequential damages. Some states do not allow exclusions
or limitations on an implied warranty, so the above exclusions and limitations may not apply. This warranty
IMPORTANT SAFETY INSTRUCTIONS
(Save These Instructions)
square x 2-1/8 in. deep metal octagon outlet box.
The box must be directly supported by the
building structure.
USE AND CARE GUIDE
PENDANT FIXTURE
We strive to continually create quality products designed to enhance your home. Visit us online to see our full line of
products available for your home improvement needs. Thank you for choosing Hampton Bay!
THANK YOU
Item #1000015209
Model #ES4764OB4-A
CAUTION: Keep the lamp away from
materials that may burn.
CAUTION: Turn off/unplug the light and
allow it to cool before replacing the bulb.
WARNING: Do not install this lighting
system in a wet location.
Troubleshooting
Care and Cleaning
Ladder Gloves
Safety goggles
□
removing the fuse at the fuse box.
□
□
CAUTION: Do not use chemical solvents or harsh
may occur.
Use a dry or slightly dampened, clean cloth (use clean water, never use a solvent) to wipe the
interior and exterior surfaces of the xture.
Phillips screwdriver Electrical tape
Wirestripper
5
Installing the mounting bracket assembly
CC
AA
DD
Make sure the power is off.
□
Pull the supply wires down out of the outlet box.
□
□
Attach the mounting bracket assembly (CC) to the existing
outlet box with the outlet box screws (AA) provided.
□
Outlet box
Installation
□
Raise the canopy (A) up to the outlet box.
□
□
Secure the canopy (A) to the mounting bracket
assembly (CC) using the decorative nuts (DD) provided.
Adjust the length of the mounting bracket assembly (CC)
studs and hex nuts if necessary.
□
All electrical connections must be in accordance
with local codes and the National Electrical Code.
If you are unfamiliar with methods of installing
electrical wiring, secure the services of a
1
A
Assembling the rods
□
2
Attaching the canopy to the straight rod
□
Screw the rod assembly into the canopy (A).
□
Screw all of the rods (B,C,D) together.
□
long straight rods (B).
G
B
D
C
4
EE
H
G
F
E
Installing the diffuser and the decorative
frame
Secure the diffuser (H) to the straight rod assembly (E)
using the diffuser nut (EE).
□
Place the decorative frame (F) over the fabric shade
assembly (G) and clip it in place.
□
6
Installation
Making the electrical connections
BB
CC
□
□
□
Wrap electrical tape (not included) around the wire
connectors (BB), and ensure they are secure.
Push all excess wire and wire connections back
into the outlet box.
□
Attach the ground wire from the outlet box to the ground
screw on the mounting bracket (CC), which is green and
marked "GND".
rchase. If within this period the product is found to be defective in material
Remove the pre-assembled decorative nuts (DD)
from the mounting bracket assembly (CC).
CAUTION: Refer to the re-lamping label located on the
AA
Outlet box screws
x 2
BB
Wire connectors
x 3
CC
Mounting bracket
assembly
x 1
DD
Decorative nut
x 2
EE
Diffuser nut
x 1
Problem Possible Cause Solution
The light bulb will not
illuminate.
The light bulb is burned
out.
Replace the light bulb.
The power is off.
Make sure the power supply is on.
There is a faulty wire
connection.
Check the wiring.
Contact a quali
ed and licensed
electrician if you are not comfortable
troubleshooting wiring problems.
There is a faulty switch.
Test or replace the switch.
There are crossed wires,
or the power wire is not
properly grounded.
Check the wire connections.
The fuse blows or the circuit
breaker trips when the light bulb
is illuminated.
to the negative wires from the supply circuit, the positive
from the supply circuit, and the ground wire (bare) from
using the wire connectors (BB).
call Hampton Bay Customer Service
Antes de regresar a la tienda, llama al servicio al cliente de Hampton Bay, de
Tubo recto corto (15.24 cm)
Tubo recto largo (30.48 cm)
B
A
C
Ensamblaje de la pantalla de tela
Armazón decorativo
D
Cubierta
G
F
E
H
Ensamblaje de tubo roscado (15.49 cm)
Ensamblaje de tubo recto (15.24 cm)
Difusor
A
F
G
H
B
C
3
A
CC
E
G
1
1
2
1
1
1
1
1
D
DD
E
Sujeta el ensamblaje del tubo recto (E) al ensamblaje
de la pantalla de tela (G) utilizando la tuerca
hexagonal para ajustar según sea necesario.
Instala las bombillas (vendidas por separado).
Cómo instalar el ensamblaje del tubo
roscado y la bombilla
□
□
1
A
Cómo ensamblar los tubos
□
Entrelaza los cables de la lámpara a través de la
cubierta (A).
2
□
Enrosca el ensamblaje del tubo en la cubierta (A).
□
Ajusta todos los tubos (B,C,D) juntos.
□
Entrelaza los cables de la lámpara a través
de los dos tubos rectos largos (B).
G
B
D
C
4
EE
H
G
F
E
Cómo instalar el difusor y al armazón
decorativo
Sujeta el difusor (H) al ensamblaje del tubo recto (E)
utilizando la tuerca del difusor (EE).
□
Coloca el armazón decorativo (F) en el ensamblaje
de la pantalla de tela (G) y conéctalo en su lugar.
□
BB
CC
Artículo#1000015209
Modelo núm.#ES4764OB4-A
GUÍA DE USO Y MANTENIMIENTO
LÁMPARA COLGANTE
continuamente crear productos de calidad diseñados para mejorar tu hogar. Visítanos por Internet para ver nuestra
línea completa de productos disponibles para las necesidades de mejoras de tu hogar.
¡Gracias por elegir Hampton Bay!
GRACIAS POR TU COMPRA
1-877-527-0313
¿Preguntas, problemas o piezas faltantes?
HOMEDEPOT.COM
Comuníquese con el equipo de servicio al cliente al 1-877-527-0313 o visite www.homedepot.com.
Garantía
8 a.m. a 6 p.m., hora estándar del Este, de lunes a viernes
Conserva este manual para uso en el futuro.
GARANTÍA LIMITADA DE 5 AÑOS
El fabricante garantiza que esta lámpara no presentará defectos materiales o de fabricación por un
período de cinco años a partir de la fecha de compra. Si este producto presenta defectos materiales o de
fabricación durante el período de garantía, debe devolverlo al lugar de compra con una copia del recibo de
compra como prueba. El fabricante, a su discreción, reparará, reemplazará o reembolsará el precio de
compra al comprador o consumidor original. Esta garantía no cubre las bombillas ni el daño de la lámpara
excluye la responsabilidad por daños directos, incidentales o consecuentes. Algunos estados no permiten
exclusiones o limitaciones en las garantías implícitas, por lo que las exclusiones o limitaciones que se
tenga derechos adicionales que varían según el estado.
Información de seguridad
□
□
□
Lee todas las instrucciones antes de comenzar
la instalación.
Asegúrate de que la corriente esté desconectada
en el panel de electricidad antes de comenzar la
instalación. Cortar el suministro de electricidad
evitar una descarga.
INSTRUCCIONES DE SEGURIDAD IMPORTANTES
(Guarda estas instrucciones)
Esta lámpara se debe montar en una caja eléctrica
octogonal de metal de 25.8 cm cuadrados y 5.11
cm de profundidad. La caja debe estar directamente
apoyada en la estructura de la vivienda.
PRECAUCIÓN: Mantén la bombilla
alejada de materiales potencialmente
PRECAUCIÓN: Apaga /desenchufa
la lámpara y deja que la bombilla se
enfríe antes de remplazarla.
ADVERTENCIA: No instales este sistema
de iluminación en un lugar húmedo.
Mantenimiento y limpieza
□
Para limpiar la lámpara, desconecta primero la electricidad apagando el cortacircuitos o quitando el
fusible correspondiente en la caja de fusibles.
□
□
PRECAUCIÓN: No uses solventes químicos ni abrasivos fuertes para
limpiar la lámpara o los componentes, porque se pueden dañar.
Usa un paño limpio, seco o ligeramente húmedo (usa sólo agua limpia, nunca un solvente) para
limpiar el interior y exterior de la lámpara.
Deja secar la lámpara completamente antes de restablecer la electricidad.
□
Todas las conexiones se deben hacer conforme
con el Código Nacional de Electricidad y con los
códigos de electricidad locales. Si no estás
familiarizado con los métodos de instalación del
cableado eléctrico, contrata los servicios de un
Solución de problemas
Problema Causa posible Solución
La bombilla no se enciende.
La bombilla se fundió.
Reemplaza la bombilla.
La electricidad está
apagada.
Asegúrate de que el suministro de
electricidad está encendido.
Hay una conexión
defectuosa del cable.
Revisa el cableado.
Comunícate con un electricista
satisfecho con la solución de
problemas del cableado.
Hay un interruptor
defectuoso.
Prueba o reemplaza el interruptor
Hay cables cruzados o el
cable de alimentación no
está haciendo tierra.
Revisa las conexiones de los cables.
El fusible se funde o el
cortacircuitos se activa en el
momento en que enciendes la
bombilla.
HERRAMIENTAS NECESARIAS
No se muestra el tamaño real de los herrajes.
HERRAJES INCLUIDOS
Preinstalación
NOTA:
Escalera Guantes
Gafas de
seguridad
Destornillador
Phillips
Cinta de
electricista
Pelacables
AA
Tornillos de la
caja eléctrica
x 2
BB
Conectores
de cable
x 3
CC
Soporte de montaje
x 1
DD
Tuerca decorativa
x 2
EE
Tuerca del difusor
x 1
Pieza Descripción
CONTENIDO DEL PAQUETE
Preinstalación
Cantidad
Instalación
Instalación
Instalación
Instalación
PRECAUCIÓN: Consulta la etiqueta para cambio
de bombilla que viene con la lámpara.
No excedas el vataje recomendado.
5
Cómo instalar el ensamblaje del soporte
de montaje
CC
AA
DD
Asegúrate de que la corriente esté apagada.
□
Saca los cables de suministro de electricidad de la
caja eléctrica.
□
□
Sujeta el ensamblaje del soporte de montaje (CC) a
la caja eléctrica usando los tornillos provistos (AA).
□
Caja eléctrica
Retira las tuercas decorativas preensambladas (DD)
del ensamblaje del soporte de montaje (CC).
6
Cómo hacer las conexiones eléctricas
□
□
□
Enrosca cinta de electricista (no incluida) alrededor de los
Empuja los cables excedentes y las conexiones de cables
hacia adentro de la caja eléctrica.
□
Conecta el cable a tierra de la lámpara al cable al tornillo
a tierra en el soporte de montaje (CC), el cual es verde y
Conecta los cables negativos (cable blanco) desde la
lámpara a los cables negativos desde el circuito de energía,
los cables positivos (cable negro) desde la lámpara a los
cables positivos desde el circuito de energía y el cable a
tierra (desnudo) desde la lámpara al cable a tierra desde
el circuito de energía utilizando los conectores de cables (BB).
7
□
Eleva la cubierta (A) hasta la caja de eléctrica.
□
□
Asegura la cubierta (A) al ensamblaje del soporte de
montaje (CC) con las tuercas decorativas (DD) provistas.
Ajusta el largo del ensamblaje del soporte de montaje
(CC), utiliza vigas y tuercas hexagonales en caso de
ser necesario.
/