
Pub. 988-0147-382
www.lei-extras.com
MapCreate 6
Custom Mapping Software for GPS
Installation and Operation
Instructions

Copyright © 2003 LEI Extras, Inc., a division of
Lowrance Electronics, Inc. All rights reserved.
MapCreate
is a trademark of Lowrance Electronics, Inc.
Points of Interest Data in this unit are by infoUSA,
copyright
2001-2003, All Rights Reserved. infoUSA is a
trademark of infoUSA, Inc.
eXitSource Database, copyright
2001-2003 Zenrin Co.
Ltd. Exit Authority
and eXitSource
are trademarks of
Zenrin Co. Ltd.
LEI Extras, Lowrance Electronics, or Eagle Electronics may find it
necessary to change or end their policies, regulations and special offers
at any time. They reserve the right to do so without notice. All features
and specifications subject to change without notice. All screens in this
manual are simulated.
For more Lowrance or Eagle accessories,
visit our web site:
www.lei-extras.com
For free owner's manuals and other information,
visit the manufacturers' web sites:
www.lowrance.com www.eaglesonar.com
LEI Extras Inc.
PO BOX 129
Catoosa, OK USA 74015
Printed in USA.

i
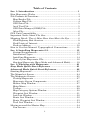
Table of Contents
Sec. 1: Introduction................................................................... 1
How Mapcreate Works ................................................................. 3
File Formats & Functions ............................................................ 4
Map Border File ........................................................................ 4
Custom Map File....................................................................... 4
GPS Data File ........................................................................... 5
Ascii Text File ........................................................................... 5
GPS Data Manger (GDM) File ................................................. 5
Atlas File ................................................................................... 6
GPS Unit Compatibility ............................................................... 6
Important Notes About File Size ................................................. 6
Mapping Detail: There's More Here than Meets the Eye. ............ 8
Find Highway Exit Services ..................................................... 9
Find Points of Interest.............................................................. 9
Find an Address ...................................................................... 10
How to Use this Manual: Typographical Conventions.............. 10
Sec. 2: Installing Mapcreate 6.2............................................ 13
System Requirements............................................................. 13
Installation Types ................................................................... 13
Installing Mapcreate............................................................... 14
Care of your Mapcreate CDs .................................................. 18
Starting Mapcreate (Easy Mode and Advanced Mode) ......... 19
Sec. 3: Working with Mapcreate ..........................................21
Easy Mode Quick Start Reference ........................................ 21
Advanced Mode Quick Start Reference............................... 22
Starting Mapcreate..................................................................... 23
The Mapselect Screen................................................................. 24
The Mapcreate Screen ................................................................ 25
Closing Mapcreate .................................................................. 27
Mapcreate Screen Components.............................................. 27
Master Map Window............................................................... 27
Main Menu .............................................................................. 29
Toolbar..................................................................................... 29
Map Category Options Window ............................................. 30
Waypoint List Window ........................................................... 31
Icon List Window .................................................................... 32
Route List Window.................................................................. 32
Route Waypoint List Window................................................. 33
Trail List Window ................................................................... 34
Moving around the Master Map................................................. 34
Pan Arrows.............................................................................. 34

ii
Center Master Map................................................................. 35
Zoom ........................................................................................ 35
Creating Rectangle Map Borders............................................... 36
Creating Corridor Map Borders ................................................. 37
Saving a Map Border File........................................................... 39
Creating a Custom Map File ...................................................... 40
Creating a Waypoint................................................................... 43
Creating an Icon ......................................................................... 45
Creating a Route ......................................................................... 47
Saving a GPS Data File.............................................................. 50
Creating a Corridor Map from a Route...................................... 51
Creating a Route from a Trail .................................................... 54
Appendix 1: Mapcreate Command List .............................. 57
Searching Help............................................................................ 58
Appendix 2: Map Category List............................................ 61
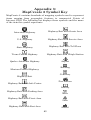
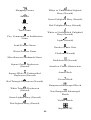
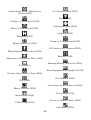
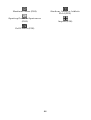
Appendix 3: Mapcreate 6 Symbol Key ................................ 63
Appendix 4: Considerations When Planning Highway Routes 67
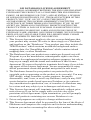
WARNING!
A CAREFUL NAVIGATOR NEVER RELIES ON ONLY ONE METHOD
TO OBTAIN POSITION INFORMATION.
CAUTION
When showing navigation data to a position (waypoint), a GPS unit will show
the shortest, most direct path to the waypoint. It provides navigation data to the
waypoint regardless of obstructions. Therefore, the prudent navigator will not
only take advantage of all available navigation tools when traveling to a way-
point, but will also visually check to make sure a clear, safe path to the waypoint
is always available.
WARNING!
When a GPS unit is used in a vehicle, the vehicle operator is solely re-
sponsible for operating the vehicle in a safe manner. Vehicle operators
must maintain full surveillance of all pertinent driving, boating or fly-
ing conditions at all times. An accident or collision resulting in dam-
age to property, personal injury or death could occur if the operator of
a GPS-equipped vehicle fails to pay full attention to travel conditions
and vehicle operation while the vehicle is in motion.

1
Section 1: Introduction
How this manual can get you into the field, fast!
Thanks for buying MapCreate 6.2! We know you're anxious to install
the program and make some maps, but we have one more favor to ask.
Before you grab that CD, please give us a moment to explain how our
manual can help you get the best performance from our software.
Our goal is to get you on the road or out to the woods and water fast,
with a minimum of fuss. We won't try to turn you into a computer
expert. Like you, we'd rather spend more time on the water or in the
woods, and less time reading a manual!
For First Time Users
If you are a first-time user, or if your computer skills are a bit rusty, we
strongly recommend you start with the program's easy mode, which
we call MapSelect. It's the quickest and easiest way to make pre-
defined maps with maximum detail for your GPS unit. In MapSelect
mode, all map borders are pre-drawn for you in approximately 8 MB
chunks. Just click the one you want and save it. To use the easy mode,
first install MapCreate 6.2 on your computer (install instructions begin
on page 13). Then, choose the MapSelect option when you start the
program. It's so simple, complete easy mode instructions are on the
one-page yellow insert included in this package. For your convenience,
the same instructions are repeated here in the manual, on page 21. If
you're in a big hurry or just making basic maps, MapSelect is all you
need…you can ignore most of the material in this manual. In fact, you
should stop reading here and just skip on over the Section 2,
Installation!
For Experienced Users
Our program's advanced mode, which we just call the MapCreate
option, is required for managing GPS data such as waypoints, routes,
trails and event marker icons. Unlike the easy mode, MapCreate does
not use pre-defined borders when it generates a custom map. It
includes option settings that allow complete control over a custom
map's file size, the amount and types of detail included, and the specific
area covered by the map.
You don't need to be a computer whiz to use these powerful tools, but
you should be comfortable with basic Microsoft
Windows computing
tasks. This manual contains all the background and tutorial
information you need to use all of the program's advanced features.

2
That covers a lot of ground, but, we designed this book so that you don't
have to read the whole thing from front to back for the information you
want. You can skip around, and we've made it easy to look up any tips
you may need from time to time. Here's how:
The manual has three main sections. This first section tells you the
basics you need to know to make MapCreate wake up and get to work.
Section two (on page 13) will help you get the program correctly installed on
your computer.
Section three (on page 21) is the heart of our book, the Quick Start
Reference. It contains easy-to-skim lessons on the program's main
operations. These segments show you how to make highly customized
maps and GPS information and get them into your GPS unit. It's all
you need to get on the road quickly.
After you've gained some experience with the program, you may want
to try some of the really advanced features. That brings us to the
Command Reference, which is available only in the MapCreate 6 Help
file on the CD-ROM. It contains — in alphabetical order — every
command function in MapCreate 6.
Each entry includes a "quick reference" box briefly telling what the
command does and how to run it from the menu, toolbar or keyboard.
Then, we've included more tips and tricks so you can take advantage of
all the extra power and performance MapCreate offers.
You can see an example of the online Command Reference format in
Appendix 1 at the back of this manual, on page 57. Appendix 1 contains
the entry on the Help Command, which explains how to use Help.
In addition to the Command Reference, the online Help includes all the
material from the manual's Quick Start Reference section. Just press
the F1 key to launch Help. You can find facts fast by electronically
searching the Help File for the word or phrase you want.
In our printed manual, we've included other general supplemental
material as appendices in the back of the book. Check out the Table of
Contents to see the topics contained in each appendix.
Once you have the software installed, browse through the quick start
lessons in Section 3 to get you going. Later, when you want to try
something new or you have a question about a particular function, skim
through the manual's table of contents or search the online Command
Reference to read what you need.

3
How MapCreate Works
You'll be making maps faster if you understand the hoops MapCreate
must jump through to cram a high detail map into your GPS unit.
First of all, those CDs you just purchased contain a whole bunch of raw
computerized cartography data. There are several hundred files of digital
mapping information containing lake shorelines, navigation aids, roads,
rivers and all the other information that goes into our high-detail maps.
It takes some fancy formatting to fit the whole world onto a couple of
compact discs. Your GPS unit can't read those raw files (called atlas
files). Even if it could, no GPS unit or MultiMedia Card (MMC) has
enough memory to hold that much information.
This is where MapCreate comes in. The program looks at all those raw
atlas files, shuffles the different types of information together, and then
places them onto your computer screen. That's what we call the Master
Map, the main window in the MapCreate interface. By changing
various options in MapCreate, you can control how much geographic
detail is displayed on-screen in the Master Map.
It's a pretty cool electronic map, but your GPS can't read it in this form,
either. This is where you come in. You move around the Master Map
and locate the area or areas you want to make a detailed map of. Then,
you grab the computer mouse and draw a map border around the
region you want. (There are two or three fun ways to do this…we'll
describe 'em in a few minutes.)
Now, this map border isn't really a map yet — it just defines or outlines
the area you want to include in the final GPS-friendly map. You can
save the boundary you have drawn as a Map Border File. MapCreate
uses the Map Border File like an electronic shopping list. The program
looks at your Map Border File, grabs the appropriate raw atlas
information, and then glues it all together as a custom map. Now you
can save this data as a Custom Map File, which you can copy onto an
MMC (or SDC) and load into your GPS unit.
GPS information — such as waypoints, routes or trails — is handled
differently. You can click the mouse to set a waypoint or plan a route,
then save that information as a GPS Data File. This file is ready to
load into your GPS unit. When your unit makes trails or waypoints in
the field, that information is also saved as a GPS Data File, which you
can then load back into your computer, open and save in MapCreate.
Remember, you must use the advanced mode of MapCreate to work
with GPS data.

4
File Formats & Functions
Well, now you know what makes MapCreate tick. You may be ready to
skip forward to where we explain how our text formatting makes the
manual easy to skim. If that's the case, move on to "How to Use This
Manual" on page 10. But, if you want to pick up an extra tip or two, look
over this segment describing the file formats MapCreate works with.
Map Border File
This file defines the boundary of the raw cartography data that is
extracted and converted to a GPS custom map. The file information is
displayed on the computer's Master Map screen as either a green
rectangle (rectangle map border) or a magenta polygon shape (corridor
map border.) The file extension is *.lmp, and the file is saved on your
computer hard drive. A Map Border File can contain one or more
different map border sets, and these border sets don't need to be next to
each other on the map.
For example, you can draw a rectangle border around one lake and
then draw a second corridor border around another lake several miles
away, and include both of those border sets into one Map Border File.
There is no limit (other than space on your hard disk, MMC or SDC) on
how many different border sets you can include in a Map Border File.
You can open and edit a Map Border File and then save the file with
the changes you made.
Custom Map File
This is the actual custom map format used by your GPS unit.
MapCreate takes the borders you drew and saved as a Map Border File,
extracts that area's information from the raw atlas data on the CD,
then converts it to a Custom Map File. We call this conversion process
"building the map." The file extension is *.lcm, and the file is saved
either to your hard drive or directly to your MMC or SDC. (Remember,
MMC or SDC cards are what your GPS uses to store information.) If
you save to your hard drive, you can drag and drop the file to your
MMC or SDC at your convenience, just as you handle other Windows
-
based computer files. (This assumes you are using a USB-compatible
MMC card reader, which acts like an external removable disk drive. If
you are using a parallel port MMC card reader, refer to its manual for
file transfer instructions.)
You cannot open and make changes to a Custom Map File once it has
been created. If you want to make changes to a custom map, return to
its original companion Map Border File, make changes there, then

5
create a fresh Custom Map File. You can delete the old one, or just save
the new custom map over the old one.
GPS Data File
This file format contains all the GPS navigation information (waypoints,
event marker icons, routes and trails) used by your GPS unit and
MapCreate. The file extension is *.usr (for User file) and the file is saved
either to your hard drive or directly to your MMC or SDC. As with other
Windows-based files, you can drag and drop these files from the hard
drive onto an MMC or SDC, which is then loaded into your GPS unit.
You can open and make changes in a GPS Data File once it has been
created. The contents can include any combination of waypoints, routes,
trails and event marker icons. The information shows up graphically on
the Master Map as symbols with names. The same information is also
available as text in a list window, such as the Waypoint List window.
Your GPS unit saves field-collected GPS information in the same format
so MapCreate can be used to save valuable travel or adventure data for a
later trip. This also makes it easy to exchange GPS data with friends
using Lowrance or Eagle GPS equipment.
ASCII Text File
This is a universal text file format compatible with word processors and
other software programs. MapCreate can exchange routes and
waypoint lists with other mapping programs by importing and
exporting GPS information as comma-delimited ASCII text files. ASCII
(pronounced "ask-ee") uses the *.txt file extension. You don't need to
work with these files, unless you plan to exchange routes and
waypoints between MapCreate and other mapping programs. For more
information on how to use this file type, see the online Command
Reference topics "Export GPS Data" and "Import GPS Data."
GPS Data Manger (GDM) File
This is an older file format used by MapCreate 5 and MapCreate 4 to
hold navigation data (waypoints and such). MapCreate 6 can open
these files, making the program backward compatible with versions 5
and 4. The GDM file extension is *.low. Although MapCreate 6 is
designed to load and read older GPS Data Files in the *.low format,
MapCreate 6.0 also allowed users to choose to save new files in the
older format (though the program could not actually save them). This
has been corrected in version 6.2. You can still open files in either
format, but you can now only save GPS Data Files in the newer *.usr
format. Please note that your MapCreate 6-compatible GPS unit can
only read *.usr files.

6
Atlas File
This is the "raw" file format for layer after layer of cartographic and
hydrographic data on our CDs. You never have to work with these files
directly. MapCreate pulls data from these files to display the Master
Map you see in the main window on your computer. The program
combines the information from a Map Border File with the Atlas Files
to make Custom Map Files for your GPS unit.
NOTE: MMC Card Formats
If you have an older MMC that has been formatted by a parallel
port Lowrance MMC Interface card reader, the card format may not
be compatible with your newer USB port MMC card reader. If
that's the case, you can preserve your historic GPS data by copying
it to your hard drive with your older parallel port reader. The older
MMC can then be reformatted so it will work with the newer USB
card reader. To reformat an MMC, refer to the instructions that
came with your USB MMC card reader or your sonar/GPS unit.
If you ever have to format your MMC card, you should know that
MapCreate, as well as Lowrance and Eagle GPS products, will only
read cards that are FAT formatted. MMC cards formatted using
FAT 32 or NTFS will not work with these products.
WARNING:
You should never format an MMC containing a
Navionics
chart. Formatting the MMC will permanently
erase the chart from the card.
GPS Unit Compatibility
MapCreate 6.2 is compatible with these Lowrance products:
iFINDER, GlobalMap
2400, GlobalMap
3000, GlobalMap
3200,
GlobalMap
4000M, GlobalMap
5000C, GlobalMap
6000C,
GlobalMap
7000C, LMS-240, LMS-320, LCX-15 series, LCX-16 series,
LCX-18C, LCX-19C, LCX-104C. If you purchased an LCX-15, LCX-16
or GlobalMap
3000 prior to March 2002, your unit will need a software
upgrade to work with MapCreate 6. The upgrade is available for free
download from the web site, www.lowrance.com. If you have questions,
call Lowrance customer service at 1-800-324-1356, toll free in the USA.
MapCreate 6.2 is compatible with these Eagle products: SeaCharter
320DF, FishElite 320, IntelliMap 320. If you have questions about your
Eagle GPS, call customer service at 1-800-324-1354, toll free in the USA.
Important Notes About File Size
The size of a Custom Map File is important. It must be small enough to
fit on the MMC (MultiMedia Card) that your GPS uses for data storage.

7
This solid-state, flash memory device is about the size of a postage
stamp. (SDC [Secure Digital] cards are also compatible with any
Lowrance or Eagle product that uses MMCs.)
The MMCs shipped with Lowrance and Eagle GPS units are 16 MB
size. If you're using a 16 MB MMC, your Custom Map File must be less
than 16 MB in order to fit on the card. (This space issue is the same as
floppy disks; you can't really fit a 1.44 MB file onto a 1.44 MB diskette
because some space is required for the disk's file allocation table. In the
case of a 16 MB MMC, actual maximum useable space is about 15.2
MB.)
MMCs and SDCs are used in a variety of other digital devices. Most
electronics or digital camera stores sell MMCs and SDCs, and at press
time they are available in 8 MB, 16 MB, 32 MB, 64 MB, 128 MB and
256 MB sizes. Cards with larger capacities may be available in the
future. MapCreate is a powerful tool for your GPS, because it allows
you to match your map's file size and detail level to your card's memory
capacity and your travel needs.
Other GPS units use direct serial cable connections to transfer high
detail maps from a computer to the GPS device. Lowrance and Eagle
switched from this traditional method to removable memory cards for
several reasons. A USB card reader can transfer a large custom map to
your unit 30 times faster than a serial cable connection. Removable
media means you don't need to have a computer and cable with you to
load a new map in the field. If the unit is mounted in a vehicle, there is
no need to dismount it and carry it to a computer. The effective
mapping memory capacity of your GPS unit is limited only by the
capacity and number of memory cards you want to carry with you. This
is a handy feature for long journeys or for users who can't lug a laptop
computer along.
Four factors control Custom Map File size: 1. map detail level option
settings, 2. the number of map feature categories turned on, 3. the amount
of developed or naturally occurring features in the area and 4. the amount
of territory, that is, the number of square miles or acres in the area.
Detail Level Options can be set high or medium. The higher the
detail, the bigger the file size.
There are dozens of Map Category Options that you can turn off and
on. They include natural features — such as rivers — and man-made
items such as roads, businesses or other Points of Interest. The more
categories and subcategories turned on, the bigger the file size.

8
The amount of development in an area is something you can't
control. For example, one square mile of city streets will make a larger
file than one square mile of wilderness with a few hiking trails.
The amount of territory you include in a map is a major factor. The
more square miles or acres you include, the bigger the file size.
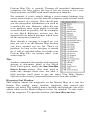
So, what does this all mean in real estate terms? The following table
shows a few examples of high- and medium-detail Custom Map File
sizes, and how long it took the computer to build them. These examples
were prepared on a Pentium
III with 512 MB of memory, using simple
rectangle map borders:
Custom Map File Size and Build Time Examples
Mapped
area
High
Detail
File Size
High Detail
Build Time
Medium
Detail File
Size
Medium
Detail Build
Time
Oklahoma
plus Texas
Panhandle
25.88 MB 4 min., 15 sec. 0.61 MB 4 seconds
Colorado 18.42 MB 3 min., 12 sec. 0.31 MB 4 seconds
Lake
Eufaula,
Okla.
1.49 MB 16 sec. 0.23 MB 3 seconds
Lake
Michigan
26.43 MB 4 min., 2 sec. 0.37 MB 3 seconds
Lake
Okeechobee,
Fla.
14.12 MB 2 min., 2 sec. 0.54 MB 5 seconds
Lake Mead,
Nev.
0.90 MB 14 sec. 0.12 MB 2 seconds
Atlanta, Ga.
area
7.77 MB 1 min., 5 sec. 0.27 MB 3 seconds
San Francisco,
Ca., area
8.63 MB 1 min., 4 sec. 0.21 MB 3 seconds
The lessons in the Quick Reference section were written using
MapCreate's default settings, with high detail and all categories turned
on. If your first maps don't fit your MMC or SDC, refer to the online
Command Reference section for more detailed instructions on
controlling file size.

9
Mapping Detail:
There's more here than meets the eye.
The Custom Map Files you make with MapCreate contain more mapping
detail than what is visible on your computer screen. Your MapCreate 6-
compatible GPS unit takes full advantage of this extra information.
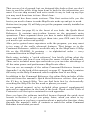
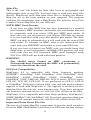
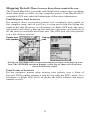
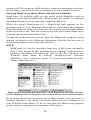
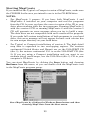
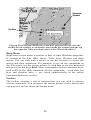
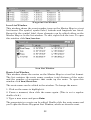
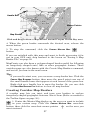
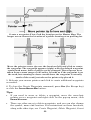
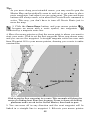
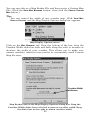
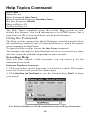
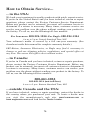
Find Highway Exit Services
For example, move your mouse pointer over a highway exit symbol on
the computer map, and all you'll see is a pop-up tool-tip box listing the
name of the exit. However, in a Lowrance or Eagle GPS unit, the same
exit symbol will show a pop-up box with the exit name and symbols of
all the services available near that exit. The GPS unit can also provide
you a list of those services.
At left, an iFINDER GPS screen showing an exit services pop-up icon
box. The iFINDER can then display a text list of those services near
the selected exit, right.
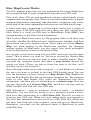
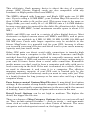
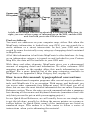
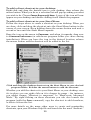
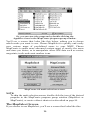
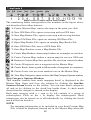
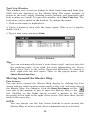
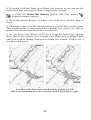
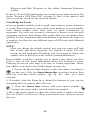
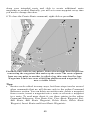
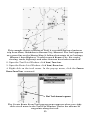
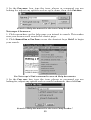
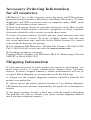
Find Points of Interest
On the computer master map, moving your pointer over a Point of
Interest (POI) symbol triggers a pop-up box with the POI's name. In a
Lowrance or Eagle GPS, you'll be shown the POI's address and phone
number as well.
Pop-up
box
Cursor over
exit symbol

10
At left, an iFINDER GPS screen showing a POI pop-up name box. At
right, you can call up a page of information on the POI, and the GPS
unit can lead you to the POI's location.
Find an Address
You won't see addresses on your computer map, either. But when the
MapCreate information is loaded into your GPS, you can search for a
street address or a street intersection. In fact, your GPS unit can
search by name for virtually every category of mapping detail contained
in MapCreate.
All of this information is built into MapCreate's atlas database. As long
as an information category is turned on and included in your Custom
Map File, the data will be available to your GPS unit.
With these and other elements, MapCreate gives you a phenomenal
amount of mapping detail and information. No other consumer GPS
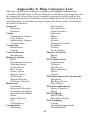
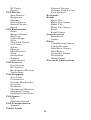
mapping product on the market offers this much information in one
package. For a more detailed list of the map categories available in
MapCreate, see Appendix 2, Map Category List, on page 55.
How to use this manual: typographical conventions
Most Windows-based computer programs offer several ways to perform a
task, and MapCreate 6 is no exception. With mouse and keyboard, you
can access some commands four different ways! We'll show you all of
them, but we save the most detailed information for our online Command
Reference section. There, the entry on each command includes a summary
box showing all the menus and keyboard shortcuts (sometimes that's the
only hint you need to get on with your mapping project.)
In our Quick Start Reference, we will usually focus on one simple way
to get the job done, usually by clicking the mouse pointer on a menu or
toolbar button. In Quick Start, many of the instructions are listed as
numbered steps. This makes it a little easier to follow a series of
instructions when you're skimming the material.
Cursor over
POI symbol
Pop-up
box

11
In the printed Quick Reference and the online Command Reference, the
actual command clicks and keystrokes appear as sans serif, boldface
type. So, if you're in a real hurry (or just need a reminder), you can
usually skim the instructions and pick out where to click by finding the
boldface commands. The paragraphs below explain how to interpret the
text formatting for those commands and other instructions. (If you're
already familiar with Windows or many other software manuals you
can probably skip forward to Section 2: Installation, on page 13.)
Mouse
The mouse controls the movement of a graphic symbol on your screen
called the mouse pointer, sometimes also referred to as a mouse cursor.
The mouse performs an action by moving the pointer over a menu, a
button or the map and then clicking the appropriate mouse button.
When the word "click" is used alone, it means "left-click," or to press and
release the left mouse button. When you need to use the right mouse
button, we will say so explicitly, such as "Right-click on the waypoint."
Sometimes a command requires more than one click. When we say
"double-click," it means to rapidly click the mouse button two times.
Keyboard
The keys on your keyboard may not be labeled exactly as they are in
this manual. All key names are shown in bold, sans serif type. For
example, the "Control" key is shown as
Ctrl
and the "Enter" key is
shown as
Enter
.
Keys are sometimes used in combinations. For example,
Ctrl+T
means to
hold down the
Ctrl
key while pressing the
T
key. The hot key sequence
Alt+T|W
indicates a two-step combination: hold down the
Alt
key while
pressing the
T
key, release, then press the
W
key.
"Arrow keys" is the collective name for the up arrow, down arrow, left
arrow and right arrow keys.
To choose a command from a menu, you can use the mouse or press a
key combination.
Instructions
Words in small capital letters, in a bold sans serif type, indicate that
you are to take an action of some kind with a command, menu, box or
other item. For example, "You can use the Create Route command to
plan a path to navigate with your GPS. To begin the route, choose
C
REATE
R
OUTE
."
When the phrase "choose command" is used in the online Command
Reference section, it means to run or execute the specified command.

12
For example, if the manual says "choose
C
REATE
W
AYPOINT
," it means to
run the Create Waypoint command. You can choose commands by
clicking the mouse pointer on the menus or toolbar buttons, or by
pressing the appropriate hot key or shortcut key on the keyboard.
Commands are sometimes described as menu sequences, to help you
find the command faster. For example, "to open the Trail List window,
click
V
IEW
|T
RAIL
L
IST
," means to mouse click on the main menu's View
command and then click the Trail List command on the submenu.
Specific text or numbers you must type are shown in bold, sans serif
type. For example, if the manual says "Enter a Zoom range of
650
miles," you would click in the Zoom Range Window, type the numbers
650, then press the
Enter
key.
Place holders for other items you must supply yourself, such as file
names, are italicized. For example, when the manual says "Enter a
name in the File Name text box," you would click in the text box, type
the name you want to use for the file, then press the
Enter
key.
This manual is written specifically for MapCreate 6.2, but for
simplicity, the program is often referred to as "MapCreate" or
"MapCreate 6."

13
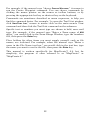
Section 2: Installing MapCreate 6.2
System Requirements
MapCreate 6 requires the following minimum system resources:
• IBM
compatible PC.
• Pentium
133 MHz or faster processor.
• 32 MB RAM
• 50 MB hard disc space.
• 256 color display.
• Microsoft
Windows
98 or later.
• CD-ROM drive.
MapCreate will run on a system with the above specifications, but the
program will work slowly. A faster processor and more RAM will
significantly improve program operation. You can also optimize
performance by installing as much of the program as possible to run
from your hard drive instead of the CD-ROM drive. (Do this by using
the Custom install mode, described below.)
Installation Types
There are three types of installations:
Typical - Installs nav aid data, the low detail background map
(Master Map) data and world-wide medium detail
map data. Takes approximately 70 MB of hard drive
space. Requires you to have the CD in the drive only
when working in high detail map mode for the
continental United States and Hawaii.
Compact - Installs the MapCreate program with Help only.
Requires you to have the CD in the drive whenever
you use the program. The compact install allows you
to conserve hard drive space.
Custom - Allows installation of the program and all map data
files on the hard drive. This takes approximately 1
gigabyte of hard disk space. You may run the
program without the CD in the drive. Caution: Be
patient if you choose custom install. It may take
several minutes for all the files to install to the hard
drive. You will also be prompted to remove disc 1 and
insert disc 2 to complete the installation.
NOTE:
If you already have MapCreate 6.0 or MapCreate 6.1 installed on
your computer, you must uninstall it before installing MapCreate
6.2. Some MapCreate 6.2 functionality will not be included and the

14
program will not operate correctly if you choose to modify an existing
installation. To uninstall MapCreate, use the standard Windows
A
DD
/R
EMOVE
P
ROGRAMS
function. (For more information on Windows
uninstall, open your Windows Help file and search for the phrase
"Removing Programs.")
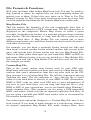
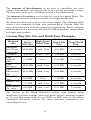
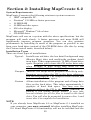
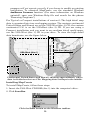
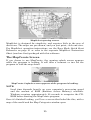
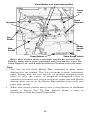
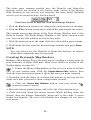
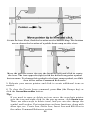
For Typical or Compact installations of version 6: The high detail map
data is organized into two overlapping regions. The western continental
United States and Hawaii are on the USA-West (disc 1) CD; the eastern
continental U.S. is on the USA-East (disc 2) CD. If you are using a
Compact installation and you want to see medium detail world maps,
use the USA-West (disc 1) CD in your drive. To view the high detail
data boundaries, see the figure below.
Continental United States and Hawaii showing approximately where
data is divided on the two CDs. Mapping data overlaps in the middle.
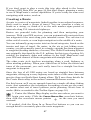
Installing MapCreate
To install MapCreate, follow these steps:
1. Insert the USA-West CD-ROM (disc 1) into the computer's drive.
2. Click
S
TART
|R
UN
.
Click the S
TART
button on the Windows taskbar.
USA-West (disc 1)
USA-East (disc 2)
Data overlap area

15
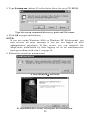
3. Type
D:\setup.exe
(where D: is the drive letter for your CD-ROM)
Type the setup command directory path and file name.
4. Click
OK
to begin installation.
NOTE:
If you are using Windows 2000 or Windows XP Professional, you
may receive an error message if you are not logged on with
administrator privileges. If this occurs, you can complete the
MapCreate installation by first logging on as an administrator,
then proceeding with step 1 on page 14.
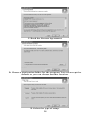
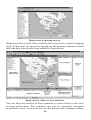
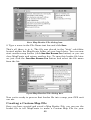
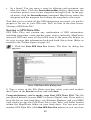
5. Follow the on-screen instructions:
A. InstallShield will load.
B. InstallShield is ready to prepare for installation.

16
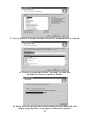
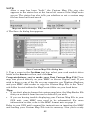
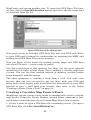
C. Read the License Agreement.
D. Choose a destination folder for the program. You can accept the
default or you can choose another location.
E. Select the type of setup.
Page is loading ...
Page is loading ...
Page is loading ...
Page is loading ...
Page is loading ...
Page is loading ...
Page is loading ...
Page is loading ...
Page is loading ...
Page is loading ...
Page is loading ...
Page is loading ...
Page is loading ...
Page is loading ...
Page is loading ...
Page is loading ...
Page is loading ...
Page is loading ...
Page is loading ...
Page is loading ...
Page is loading ...
Page is loading ...
Page is loading ...
Page is loading ...
Page is loading ...
Page is loading ...
Page is loading ...
Page is loading ...
Page is loading ...
Page is loading ...
Page is loading ...
Page is loading ...
Page is loading ...
Page is loading ...
Page is loading ...
Page is loading ...
Page is loading ...
Page is loading ...
Page is loading ...
Page is loading ...
Page is loading ...
Page is loading ...
Page is loading ...
Page is loading ...
Page is loading ...
Page is loading ...
Page is loading ...
Page is loading ...
Page is loading ...
Page is loading ...
Page is loading ...
Page is loading ...
Page is loading ...
Page is loading ...
Page is loading ...
Page is loading ...
Page is loading ...
Page is loading ...
Page is loading ...
Page is loading ...
-
 1
1
-
 2
2
-
 3
3
-
 4
4
-
 5
5
-
 6
6
-
 7
7
-
 8
8
-
 9
9
-
 10
10
-
 11
11
-
 12
12
-
 13
13
-
 14
14
-
 15
15
-
 16
16
-
 17
17
-
 18
18
-
 19
19
-
 20
20
-
 21
21
-
 22
22
-
 23
23
-
 24
24
-
 25
25
-
 26
26
-
 27
27
-
 28
28
-
 29
29
-
 30
30
-
 31
31
-
 32
32
-
 33
33
-
 34
34
-
 35
35
-
 36
36
-
 37
37
-
 38
38
-
 39
39
-
 40
40
-
 41
41
-
 42
42
-
 43
43
-
 44
44
-
 45
45
-
 46
46
-
 47
47
-
 48
48
-
 49
49
-
 50
50
-
 51
51
-
 52
52
-
 53
53
-
 54
54
-
 55
55
-
 56
56
-
 57
57
-
 58
58
-
 59
59
-
 60
60
-
 61
61
-
 62
62
-
 63
63
-
 64
64
-
 65
65
-
 66
66
-
 67
67
-
 68
68
-
 69
69
-
 70
70
-
 71
71
-
 72
72
-
 73
73
-
 74
74
-
 75
75
-
 76
76
-
 77
77
-
 78
78
-
 79
79
-
 80
80


LEI Electronics 6.2 User manual
- Type
- User manual
- This manual is also suitable for
Ask a question and I''ll find the answer in the document
Finding information in a document is now easier with AI
Other documents
-
Brunton MAPCREATE 6 User manual
-
Microdia RS-MMC Overview
-
Lowrance MAPCREATE 6.3 User manual
-
-
-
-
-
-
Lowrance electronic Baja 840C User manual
-