Page is loading ...

Page 1 of 15
SPEAKMAN
®
400 Anchor Mill Rd. New Castle, DE 19720 Phone: 800-537-2107 Fax: 800-977-2747
1/15/16 www.speakman.com 92-S-9100-9200-05
SPEAKMAN
®
S-9100-CA, S-9100-CA-E, S-9200-CA, S-9200-CA-E
Installation, Maintenance & Operation Instructions
SENSORFLO® BATTERY or AC POWERED SLIM DESIGN FAUCETS with DIFFERENT OPTIONS
DESCRIPTION
Speakman SENSORFLO® faucet featuring a Solenoid and Power pack that are readily serviceable from
under the counter. Integral Hot and Cold mechanical mixing valves, Hot and Cold water supply check valves,
standard inline filters, and a new Sensor Module design incorporated into solid brass Faucet body make it
ideal for public areas such as schools, hotels, laboratories, and hospitals.
Speakman SENSORFLO
®
Slim Design Faucets are available in several Faucet Spout shapes such as:
Gooseneck, Modern Tubular or Cast C-Spout, all with a Sensor Module installed inside.
The solid brass spout body contains the Sensor Module. The Solenoid and the Power Supply (Batteries or
AC/DC adapter) are located under the sink with easy accessibility. The Sensor module is powered by two (2)
3-volt DC lithium batteries or AC/DC adaptor with waterproof connectors housed in a separate Power
Module attached under counter, and mounted onto the Solenoid body. There is a low battery warning light
that pulsates before the batteries are depleted and keeps pulsating for at least 2 weeks after they are no
longer in service.
OPERATION
Speakman SENSORFLO
®
faucets are thoughtfully designed and engineered in accordance with the highest
quality and performance standards. It requires no handles to turn, lift or push. Built in vandal resistant
circuitry shuts off the water after continuous flow of approximately 60 seconds. This feature prevents
flooding. (The water is easily turned on again by placing one’s hands under the lavatory spout)
Water conserving vandal resistant recessed aerator reduces water flow to 2.2 GPM / 8.4 LPM to meet
requirements of ANSI A112.18.1M for flow rates. There is a inline filter on the Solenoid that is readily accessible
for maintenance purposes. ADA (American Disabilities Act) compliant. NOTE: Stainless steel hoses are
optional.
SPECIFICATIONS
INLET SUPPLY: 3/8” COMPRESSION WITH MALE THREADS for Cold and Hot Water
FLOW RATE: 2.2 GPM / 8.4 LPM
FINISH: BRASS CHROME PLATED
Options:
LT
Less Transformer (for use with multi-unit
transformers)
LF Vandal Resistant Laminar 1.5 GPM Flow Control
HS
3 Stainless Steel Hoses for use with Tee or
Mixer
ELF Vandal Resistant Laminar 1.2 GPM Flow Control
HTS 1 Stainless Steel Flexible Hose
T Tee with Checks
GB
Vandal Resistant 1.5 GPM Aerator Outlet
Device

Page 2 of 15
SPEAKMAN
®
400 Anchor Mill Rd. New Castle, DE 19720 Phone: 800-537-2107 Fax: 800-977-2747
1/15/16 www.speakman.com 92-S-9100-9200-05
All models of faucets are also available with the following combinations of options.
NO Deck Plate
4” Deck Plate
8” Deck Plate
UCM (under counter mixing valve with built-in backflow check valves)
TMV (thermostatic mixing valve for more consistent water temperature with check valves)
ACM (above counter mixer)
MO (manual override)
Three different shapes of Faucets, all made of solid polished chrome brass can be mounted onto a unique
Central Base with the Infrared Sensor Module. The Solenoid is attached to the central shank and has installed
on it the Power Module that can be either with batteries or AC adapter that plugs into a Transformer. Different
combinations could be made between UCM (or TMV), ACM and MO mounted directly onto Counter Top or
onto 4” or 8” Deck Plates.

Page 3 of 15
SPEAKMAN
®
400 Anchor Mill Rd. New Castle, DE 19720 Phone: 800-537-2107 Fax: 800-977-2747
1/15/16 www.speakman.com 92-S-9100-9200-05
INSTALLATION
INSTALLATION OF AERATOR
Install vandal resistant aerator into the outlet of
the faucet with the provided Speakman aerator
wrench
INSTALLATION OF POWER MODULE TO SOLENOID
If the Power Module (either battery or AC) is not
pre-installed onto Solenoid body, attach it as
shown with the #8 provided screws. (2)
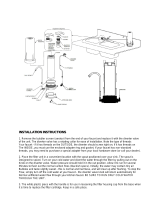
INSTALLATION OF FAUCET
Insert the faucet shank into a 1-1/8” hole with
connector wires going in first, taking care to not
pinch the wires.
If you are using a Deck Plate (either 4” or 8”), first
position the gasket and the Plate on the counter top.
Then insert Connector Wire thru hole followed by
Faucet Shank. Take extra precaution to not pinch
wires during installation.

Page 4 of 15
SPEAKMAN
®
400 Anchor Mill Rd. New Castle, DE 19720 Phone: 800-537-2107 Fax: 800-977-2747
1/15/16 www.speakman.com 92-S-9100-9200-05
Under sink, place rubber wire guard (with notch facing
forward) and pass the wires through notch. The wires
should be inside the channel of the rubber wire guard
to prevent pinching when tightening. Insert metal
washer and tighten the locknut to provide tension into
the rubber guard. While tightening make sure the
position of Faucet on top of counter is straight. Verify
that no connector wires are pinched.
Install the solenoid by engaging the thread by hand
first and continuing to tighten with an adjustable
wrench (you will need to hold Faucet
on top to prevent
rotation). Do not overtighten and don’t use any sealant.
DRY CONNECTION ONLY.
Connect the two faucet wires with the solenoid wires.
The connectors are color coded. If you have an AC/DC
unit, there is an additional wire with black connector
coming from the top of power module that needs to be
connected to the transformer provided.
(not shown)
NOTE: It is important to make yellow connection
first, followed by the red connection.
If the option has an UCM (under counter mixer),
connect it to the inlet of the solenoid: Start thread by
hand and then tighten using an adjustable wrench (do
not overtighten). DRY CONNECTION ONLY.

Page 5 of 15
SPEAKMAN
®
400 Anchor Mill Rd. New Castle, DE 19720 Phone: 800-537-2107 Fax: 800-977-2747
1/15/16 www.speakman.com 92-S-9100-9200-05
Install 3/8”compression fitting hoses to the UCM (under
counter mixing valve). The hot and cold sides are
marked H and C. Hand tighten connections and then
slightly tighten with an adjustable wrench.
DRY CONNECTION ONLY.
NOTE: During winter month it may be necessary to
reverse Hot and Cold connections to obtain warmer
temperature range of water.
After connecting to supply lines, turn on the water and
activate the faucet with your hands, checking for leaks.
Adjust water temperature by rotating the screw on the
UCM to your required temperature.
MAINTENANCE
Your SENSORFLO faucet is designed and engineered in accordance with the highest quality and
performance standards. With proper care it will provide years of trouble free service. Periodically the faucet
will require some minor maintenance to keep it performing at peak performance. Periodically check the
solenoid filter for debris. If debris is present clean the filter toughly. The polished chrome finish of your faucet
should be cleaned using mild soap and warm water. Dry immediately with a soft, clean cloth for best results.
REPLACEMENT OF SENSOR MODULE
If the Faucet is mounted onto Deck, first take it out
with proper care to not damage the connectors and
the wires. Take out the Gasket from under Base of
Faucet. Take the screw completely out of the back of
faucet.

Page 6 of 15
SPEAKMAN
®
400 Anchor Mill Rd. New Castle, DE 19720 Phone: 800-537-2107 Fax: 800-977-2747
1/15/16 www.speakman.com 92-S-9100-9200-05
After screw has been removed from the unit, pull up
faucet body top. There are 2 O-Rings on the shank
and one around the lenses of Sensor Module that
should be replaced if damaged.
Remove the 2 screws on the clamp. After removing,
pull up the Sensor Module from the central shank (do
not damage the O-Rings and the wire connectors).
Reassemble new Module with care not to cut wires
through the big holes into the Base, and then insert
the clamp with the Sensor over the shank. Tighten the
2 screws on clamp, making sure that the sensor sits on
the flat of shank and touches the bottom of base.
Grease the 2 O-Rings or change them if they are
damaged. Take care when inserting Faucet Spout over
the Sensor O-Ring and tighten the screw that was
removed in the back.
REPLACEMENT OF BATTERIES
To replace the batteries (if the unit purchased is a
battery powered unit) first start by unscrewing the
screw that is on the power module.

Page 7 of 15
SPEAKMAN
®
400 Anchor Mill Rd. New Castle, DE 19720 Phone: 800-537-2107 Fax: 800-977-2747
1/15/16 www.speakman.com 92-S-9100-9200-05
With the cover of the power module removed, remove
the dead batteries and replace them with new
batteries (ensure that the position of the new
batteries matches the marks + and - on the cover).
Replace the cover on Power Module.
ROUGH-IN DIMENSIONS

Page 8 of 15
SPEAKMAN
®
400 Anchor Mill Rd. New Castle, DE 19720 Phone: 800-537-2107 Fax: 800-977-2747
1/15/16 www.speakman.com 92-S-9100-9200-05
INSTALLATION OF OPTIONS
ACM (ABOVE COUNTER MIXER) INSTALLATION
1. With the Flange Nut, steel washer and rubber washer on the shank, install ACM from the bottom.
2. Tighten the top Flange Nut adjusting the proper height above counter.
3. Tighten then the bottom Flange Nut until the assembly is fixed in place.
4. Insert the Handle and tighten with the screw onto the shank.
5. Snap the screw cover onto Handle.
6. Attach the Hot and Cold hoses from supply line to ACM (see marks on body)
7. The side connection out of ACM body goes to the Solenoid delivering mixed water.
NOTE: In this case the ACM has only outlet for mixed water supply to Solenoid

Page 9 of 15
SPEAKMAN
®
400 Anchor Mill Rd. New Castle, DE 19720 Phone: 800-537-2107 Fax: 800-977-2747
1/15/16 www.speakman.com 92-S-9100-9200-05
MO (MANUAL OVERRIDE) INSTALLATION
1. Thread a Thin Nut onto the Faucet Shank. .
2. Insert Mount bracket over Faucet Shank. Secure into position with the Solenoid Nut. (dry connection only)
3. Lower the Thin Nut onto bracket
4. Slip compression spring onto MO spindle
5. With O-Ring attached to the Spacer, slip Spacer and Bearing Sleeve onto spindle
6. With the lock washer and screw inside the Handle, properly position Handle onto Spindle.
7. Push Handle down onto Spindle to compress the spring and tighten the screw.
8. Snap Index Button into Handle
9. The water supply splits into Tee, and one exit hose goes to Solenoid and the other hose goes to bottom of
Manual Override
10. Connect a by-pass hose between the side outlet port of the Manual Override unit to the Upper-Side port of
the Solenoid Assembly.
NOTE: Use a Tee to branch the water supply to both the Solenoid Assembly Inlet (Lower Port of Solenoid) and
the Manual Override Assembly Inlet (at base of Manual Override).

Page 10 of 15
SPEAKMAN
®
400 Anchor Mill Rd. New Castle, DE 19720 Phone: 800-537-2107 Fax: 800-977-2747
1/15/16 www.speakman.com 92-S-9100-9200-05
UCM (UNDER COUNTER MIXER) WITH MO (MANUAL OVERRIDE) INSTALLATION
1. Install the MO as described above.
2. Install the UCM fixed on the wall with the Clamp in the desired position.
3. The UCM it is marked with H and C for hot and cold supply lines. The mixed water exits on top into the Tee.
4. The water supply splits into the Tee: -one exit hose goes to Solenoid and the other hose goes to bottom of
MO.
5. Form the side of MO the by-pass hose goes to the upper side of Solenoid discharge for manually controlled
side
NOTE: For MO is used a Solenoid with a by-pass branch at its outlet. Use a Tee to split the supply water in 2
sides.

Page 11 of 15
SPEAKMAN
®
400 Anchor Mill Rd. New Castle, DE 19720 Phone: 800-537-2107 Fax: 800-977-2747
1/15/16 www.speakman.com 92-S-9100-9200-05
ACM (ABOVE COUNTER MIXER) WITH MO (MANUAL OVERRIDE) INSTALLATION
1. Install the MO and ACM as described above. (NOTE: In this case the ACM has an extra By-pass outlet: -in
total 2 branches of mixed water.)
2. There are two branches with mixed water: -one goes to Solenoid inlet, and the other goes to bottom of MO.
3. Form the side of MO the by-pass hose goes to the upper side of Solenoid discharge for manually controlled
side. (NOTE: For MO is used a Solenoid with a by-pass branch at its outlet.)

Page 12 of 15
SPEAKMAN
®
400 Anchor Mill Rd. New Castle, DE 19720 Phone: 800-537-2107 Fax: 800-977-2747
1/15/16 www.speakman.com 92-S-9100-9200-05
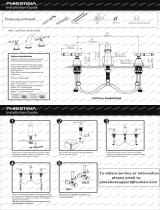
HOSE INSTALLATION BETWEEN MO (MANUAL OVERRIDE) AND ACM (ABOVE COUNTER MIXER) OR
UCM (UNDER COUNTER MIXER
For ease of installation attach hoses to ACM (above counter mixer) and MO (manual override) diverter
before installing under the sink.
1. Attach hot supply hose 1 to inlet ports of mixer (H port) 1 either ACM or UCM.
2. Attach cold supply hose 2 to inlet ports of mixer (C port) 2 either ACM or UCM.
3. Connect one end of diverter supply hose 3 to the Elbow outlet 3 on ACM or TEE outlet 3 on UCM.
Connect opposite end of hose 3 to the inlet port 3 of the MO Diverter valve.
4. Connect one end of the diverter discharge hose 4 to the outlet port 4 on the MO diverter valve.
Connect opposite end of hose 4 to by-pass port 4 of the Solenoid valve.
5. Connect one end of Solenoid supply hose 5 to the outlet port 5 on ACM or TEE outlet 5 on UCM.
Connect opposite end of hose 5 to the inlet port 5 of the Solenoid valve
.
MANUAL OVERRIDE
(MO)
ABOVE COUNTER MIXER
(ACM)
UNDER COUNTER MIXER
(UCM)

Page 13 of 15
SPEAKMAN
®
400 Anchor Mill Rd. New Castle, DE 19720 Phone: 800-537-2107 Fax: 800-977-2747
1/15/16 www.speakman.com 92-S-9100-9200-05
REPAIR PARTS
PART/GROUP
NUMBER
DESCRIPTION
REFER TO
INSTRUCTIONS
RPG05-0837-PC 13/16 -1.5 GPM Aerator repair group Item
RPG38-0128-PC 13/16 -0.5 GPM Boca repair group Item
A-EA12 A-EA12 Item
A-ELF A-ELF Item
RPG05-0851-PC 1.5 GPM Laminar Flow Outlet Item
RPG76-0033-LBL 6V Solenoid Assembly
RPG 76-0039 Solenoid Repair Kit for G76-0033-LBL Item
RPG 66-0044 Solenoid Filter Screen Item
RPG66-0168 Infrared Sensor Module (Vertical Style) Item
RPG66-0169 Battery Power Module Item
RPG76-0041 3 volt Lithium Batteries (2)
For Battery Module
only
RPG66-0169-AC AC Power Module Item
RPG66-0010 Transformer AC to 6V DC Item
RPG20-1845 UCM under counter mixer mounting hardware Item
RPG66-0111 Handle Assy for ACM replacement Item
RPG05-0836 Hardware bag group for Slim Design series Item
66-0163
Flex Hose 3/8 Compression female Stainless Steel
20”lg
Item
CARE AND CLEANING
Your SENSORFLO faucet is designed and engineered in accordance with the highest quality and
performance standards. With proper care it will provide years of hygienic and trouble free service.
Periodically the faucet will require some minor maintenance to keep it performing at peak performance.
The sensor module has a built-in low battery indicator light. This light will come on when the faucet has
approximately 10% of battery life. To replace the batteries follow the installation instructions above.
Periodically clean the Solenoid Filter.
The polished chrome finish of your faucet should be cleaned using mild soap and warm water.
Dry immediately with a soft, clean cloth for best results.
NEVER use abrasive cleaners, chemicals, alcohol or other solvents. They may damage the surfaces of
the non-chrome plated finishes.

Page 14 of 15
SPEAKMAN
®
400 Anchor Mill Rd. New Castle, DE 19720 Phone: 800-537-2107 Fax: 800-977-2747
1/15/16 www.speakman.com 92-S-9100-9200-05
TROUBLESHOOTING
Before calling Speakman Company for service, please run through the following checklist of troubleshooting
steps.
IF WATER FLOW FROM THE FAUCET DECREASES:
1. Make sure the supply stops are open.
2. Ensure both the hot and cold water Temperature Adjusters are not in the closed position (to open, screw
out the hot and cold water Temperature Adjusters (counter-clockwise direction)
3. Check that the In-line Filter in the Solenoid body is not blocked with debris. Remove slotted filter screw
from the Solenoid Body and rinse filter screen with clean water. Reassemble the filters, open stops, and
check water flow. Stops must be off when filters are removed.
4. Remove the Aerator from the spout using the outlet wrench. Operate the faucet with outlet device
removed. If water flow is acceptable, disassemble the outlet device and rinse components with clean
water.
5. If 1), 2), 3), or 4) do not resolve the problem; call Speakman Company Customer Service for assistance.
IF NO WATER FLOWS FROM THE FAUCET:
If you can hear clicking sound of solenoid opening, but no water flows
1. Check to see that the hot and cold water wall stops are completely open.
2. Check that the Yellow connector is connected to Solenoid, the Red to Power Module and Black to
transformer.
3. Activation light blinks continuously, even when faucet is not in use. This continuous blinking of the
activation light indicates that the batteries inside of the sensor module have low voltages and need to be
replaced.
4. Check to see that the In-Line Filter in the Solenoid is not blocked by debris (if it is, clean it).
If you do not hear a clicking sound from the solenoid and water does not flow
Disconnect the existing Sensor Module and connect a new module directly with Red and Yellow to the
Solenoid. Activate the new sensor module and check for water flow. If the water flows, disconnect the new
module and reconnect the old module and activate. If the old Sensor module still does not work, should be
replaced.
If Batteries have been replaced but Faucet still fails to operate
1. Check battery polarity and electrical connection. Make sure wire plugs are fully inserted into sockets.
2. If faucet does not operate, replace existing sensor module with one you know to be functioning.
3. If faucet operates, contact Speakman Company at 800-537-2107 for a replacement sensor module.
4. If faucet still does not operate, call Speakman Company at 800-537-2107 and ask for the Solenoid Repair
Kit, Part No. RPG76-0039, to be shipped to you. Once the kit is received, shut off the hot and cold water
supplies to the faucet. Remove sensor module bracket and sensor module. Next, remove the four (4)
screws that hold the coil plastic case to the solenoid body and follow the instructions supplied with the
kit. After replacing all parts supplied in the kit, reassemble the faucet, open stops, and test the faucet.
If the faucet activates but the water will not shut-off
Hold a hand in front of Sensor at about 6”-8” for more than 2min until the water flow stops. Once the water
stops, remove your hand and wait 10sec. Then place your hand in front of Sensor and it should operate
properly.
If the Faucet still does not shut-off, cover the front of the sink with a towel. This will eliminate potential of
reflections activating the Sensor.
If it is a new installation and still it is not working, change the Solenoid.
If it was used for a while and now is not working, rebuild it with the Repair Kit RPG76-0039.

Page 15 of 15
SPEAKMAN
®
400 Anchor Mill Rd. New Castle, DE 19720 Phone: 800-537-2107 Fax: 800-977-2747
1/15/16 www.speakman.com 92-S-9100-9200-05
QUESTIONS & ANSWERS
Q. How does the Sensorflo® faucet work?
A. It uses infrared technology. The sensor emits a non-visible beam of light. When an object enters the
detection area, the sensor signals the solenoid valve to open for water to flow. When an object leaves the
detection area, the sensor signals the valve to close.
Q. Is the Speakman Sensorflo® faucet sensor beam adjustable?
A. No, the Speakman Sensorflo® faucet sensor beam is not adjustable. It has been factory set to Speakman’s
specifications for these faucets.
Q. What about water conservation?
A. The Sensorflo® design directly addresses water conservation. Water savings of up to 85% are not unusual.
Additional energy savings are realized by conserving hot water.
Q. Can the water temperature of the Sensorflo® faucet be adjusted?
A. Yes, this faucet has hot and cold water mechanical mixing valves. If you need to meet ASSE 1070, you must
use our TMV (Thermostatic Mixing Valve) option.
Q. Does Sensorflo® reduce maintenance?
A. By elimination of on/off handles, control components are reduced and fittings stay cleaner longer. Only a
light rinsing and wiping is required to restore the beauty of the Sensorflo® faucets. Drip stains are eliminated.
Fingerprints and soap spots on sinks and fittings are avoided. Finishes last longer and wash areas stay cleaner.
Germs and bacteria are not transferred as easily making for a healthier environment.
Q. The chrome finish on my faucet seems to be deteriorating. What can I do to prevent this from happening?
A. Many commercial cleaning products contain harsh chemicals and abrasives. These products should not be
used on any chrome plated plumbing products. Please refer to the Care & Cleaning section of this manual for
Speakman Company’s recommendations.
Q. Do I require an electrical outlet under the sink for an –AC faucet?
A. No, but you will need a source of electricity, 110 VAC. For other optional installations, such as remote or hard
wired installations required by state and code regulations, a multi-unit transformer can be located elsewhere
and wired to each unit. Contact Speakman Customer Service for Multiple Unit Installations.
Q. Does the Sensorflo® system shut off immediately when an object leaves the sensing area?
A. A very short delay of approximately 0 to 1 second occurs before water is shut off.
Q. Is there a way to adjust the flow of water?
A. Yes, you can choose the option with a 0.5 GPM flow control instead of 1.5 GPM Aerator which comes
standard with each faucet. Also the temperature adjusters can also be used to control the flow of water.
Q. Is my faucet protected from power surges?
A. Yes, Sensorflo® has been designed to have built-in power surge protection.
Q. If we lose power, do I have to do something to get the faucet to operate again?
A. After a power outage, the faucet is automatically ready for operation as soon as the power comes back on.
Q. If I call a plumber to come and install this faucet, will they know enough to hook it up?
A. Our installation diagrams are easily followed.
/