Page is loading ...

Thank you for purchasing the BSG Leg Press attachment for the Powerline BSG10 Home Gym. Before installing the leg press, you
must rst determine which version of the BSG10 gym you have. There are two gym versions that differ only by one hole in the lower
foot plate bracket. If you have a hole in the lower foot plate bracket follow Case 1 instructions. If you do not have a hole in the lower
foot plate bracket follow Case 2 instructions. After completing Case 1 or Case 2 proceed to Step 2.
BSGLPX Installation Instructions
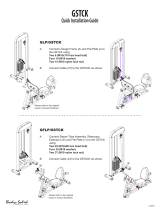
Case 1 Instructions - Lower Bracket Installation - Step 1
1. Locate Hole (X) on the lower foot plate bracket.
2. Slide Main Lower Bracket (A) over the end of the BSG10 Foot Plate Bracket (M).
3. Refer to Figure 1. The internal catch (L) must slide into the end of tube (M).
4. Align Hole (Y) with Hole (X) and install bolt (2), washers (4) and nylon lock nut (5) into Hole (Y) and tighten.
5. *Install Rubber Stopper (7) and nut (11) onto the top of Main Lower Bracket (A) and install plastic Endcap (8).
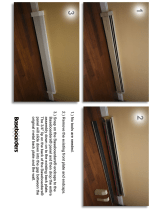
6. Remove the original plastic Endcap from the end of the BSG10 Leg Extension Frame.
7. Attach the Cable Connecting Bracket (C) to the top of the Leg Extension Frame so that the top ange covers the tube’s end.
8. Install bolt (3), washers (4) and nylon nut (5) into the holes on the front of the Cable Connecting Bracket (C) and tighten.
1
*Attention: Some parts have been pre-installed.
Hardware pack measurement not to scale.

Case 2 Instructions - Lower Bracket Installation - Step1
1. Slide the Main Lower Bracket (A) over the end of the BSG10 Foot Plate Bracket (M).
2. Refer to Figure 1 and notice that the Internal Catch (L) must slide into the end of tube (M).
3. Install bolt (2), washers (4) and nylon lock nut (5) into Hole (Z) and tighten.
4. *Install Rubber Stopper (7) and nut (11) onto the top of Main Lower Bracket (A) and install plastic Endcap (8).
5. Remove the plastic Endcap from the end of the BSG10 Leg Extension Frame.
6. AttachtheCableConnectingBrackettothetopoftheLegExtensionFramesothetopangecoversthetubeend.
7. Install bolt (3), washers (4) and nylon nut (5) into the holes on the front of the Cable Connecting Bracket and tighten.
2
*Attention: Some parts have been pre-installed.
Hardware pack measurement not to scale.

Leg Press Assembly Installation - Step 2
1. *Install plastic Endcaps (15) into the tube ends of the Leg Press Assembly (B). Install the plastic Endcaps (16) into the round
tube ends on the back sides of the upper foot plates.
2. Install the Leg Press Assembly into the Main Lower Bracket and secure with a Safety Pin (12).
3. Install the tension cable (65mm) along with the nylon pulley (3) into the bracket with bolt (1), washers (4), and nylon nut (5)
and tighten.
4. Attach Snap Links (6) to the cable ends (10) and (14). Secure the top Snap Link (13) into the hole at the top of the Leg Ex-
tension Bracket and the Lower Snap Link into the end of the existing Leg Extension cable.
3
*Attention: Some parts have been pre-installed.
Hardware pack measurement not to scale.

BSGLPX Hardware List
PART# QTY Description
1 1 M10x45 Hex Head Bolt
2 1 M10x75 Hex Head Bolt
3 1 M10x60 Hex Head Bolt
4 6 M10 Washer
5 3 M10 Nylon Nut
6 1 φ110φ10x22Pulley
7 1 φ38x28RubberStopper
8 1 45x45EndCap
11 1 M10 Nut
12 1 φ10x90SafetyShaftPin
13 2 φ8SnapLink
14 1 Cable
15 2 50x50Endcap
16 2 φ38Endcap
A 1 MainLowerBracket
B 1 LegPressAssembly
Part numbers are required when ordering parts.
4
/