
Installation and Care Guide
Guide d’installation et d’entretien
Guía de instalación y cuidado
Drop-In Acrylic Baths
Baignoires encastrées en acrylique
Bañeras acrílicas de sobreponer
K-1013, K-1107, K-1113,
K-1115, K-1123, K-1125,
K-1127, K-1130, K-1132,
K-1136, K-1137, K-1142,
K-1147, K-1149, K-1156,
K-1159, K-1163, K-1165,
K-1169, K-1183, K-1184,
K-1190, K-1193, K-1195,
K-1197, K-1199, K-1219,
K-1229, K-1242, K-1247,
K-1249, K-1259, K-1262,
K-1267, K-1377, K-1417,
K-1449, K-1454, K-1490-X,
K-1510-X, K-11343
M product numbers are for Mexico (i.e. K-12345M)
Los números de productos seguidos de M
corresponden a México (Ej. K-12345M)
USA: 1-800-4-KOHLER
Canada: 1-800-964-5590
México: 001-877-680-1310
kohler.com
©2007 Kohler Co.
1084212-2-B

Thank You For Choosing Kohler Company
Thank you for choosing Kohler Company. Your Kohler Company product reflects the
true passion for design, craftsmanship, artistry, and innovation Kohler Company stands
for. We are confident its dependability and beauty will surpass your highest expectations,
satisfying you for years to come.
All the information in this guide is based upon the latest product information available
at the time of publication. At Kohler Company, we strive to fulfill our mission of
improving the level of gracious living for each person who is touched by our products
and services. We reserve the right to make changes in product characteristics, packaging,
or availability at any time without notice.
Please take a few minutes to review this guide. If you encounter any installation or
performance problems, please call 1-800-4-KOHLER from within the USA, 1-800-964-5590
from within Canada, or 001-877-680-1310 from within Mexico.
Merci d’avoir choisi la compagnie Kohler
Merci d’avoir choisi la compagnie Kohler. Votre produit de la compagnie Kohler reflète la
véritable passion du design, d’artisanat, d’art et d’innovation représentant la compagnie
Kohler. Nous sommes confiants que sa fiabilité et beauté surpasseront vos exigences les
plus élevées, vous satisfaisant pendant les années à venir.
Toute l’information dans ce guide est basée sur la dernière disponible au moment de la
publication. A la compagnie Kohler, nous aspirons à remplir notre mission d’améliorer le
niveau de vie gracieux pour chaque individu affecté par nos produits et services. Nous
nous réservons le droit d’apporter toutes modifications aux caractéristiques, emballages
ou disponibilités des produits, et ceci à tout moment et sans préavis.
Veuillez prendre s’il vous plaît quelques minutes pour étudier ce guide. En cas de
problème d’installation ou de performance, veuillez composer le 1-800-4-KOHLER à
partir des É.U., le 1-800-964-5590 à partir du Canada, ou le 001-877-680-1310 à partir du
Mexique.
Gracias por elegir los productos Kohler
Gracias por elegir los productos de Kohler. Su producto de Kohler Company refleja la
verdadera pasión por el diseño, la mano de obra, la artesanía y la innovación que
forman parte de Kohler Company. Estamos seguros que su confiabilidad y belleza
excederán sus más altas expectativas, dándole satisfacción por años.
Toda la información que aparece en la guía está basada en la información más reciente
disponible al momento de publicación. En Kohler Company, nos esforzamos por alcanzar
nuestra misión de mejorar el nivel del buen vivir de quienes disfrutan de nuestros
productos y servicios. Nos reservamos el derecho de efectuar cambios en las
características, embalaje o disponibilidad del producto en cualquier momento, sin previo
aviso.
Dedique unos minutos para leer esta guía. Si tiene algún problema de instalación o
funcionamiento, llámenos al 1-800-4-KOHLER desde los EE.UU., 1-800-964-5590 desde
Canadá, ó 001-877-680-1310 desde México.
1084212-2-B 2 Kohler Co.

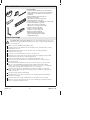
Tools/Outils/Herramientas
Before You Begin
CAUTION: Risk of property damage. Do not support the bath by the rim. The
bath must be supported by the leveling blocks only or bath base, depending upon
your bath model.
Observe all local plumbing and building codes.
Carefully plan moving the bath into the installation area. This bath will not easily
fit through doorways.
When planning the installation area, provide access to all final plumbing
connections for servicing.
To ensure a successful installation, the floor must be level.
Adequate floor support must be provided. Consult the roughing-in sheet packed
with the bath for specific floor loading requirements.
This bath is designed for drop-in or raised-deck installations only.
Do not select a rim-mount faucet for this bath. Instead, select a deck-mount or
wall-mount faucet.
If the finished wall material will come into contact with any top surface of the
bath, it is recommended that tiling-in bead be installed. The tiling-in bead
prevents water from seeping behind the wall and allows for an alcove installation
of many drop-in baths when a flanged version is not available.
The basin area requires no additional support when the subfloor is level and
square with the stud framing. Consider using shims for additional support if the
subfloor is uneven.
Provide properly dimensioned framing.
The illustrations shown may not represent your actual product. The installation
instructions still apply.
This bath conforms to ANSI standard Z124.1.2. All dimensions are nominal.
Kohler Co. reserves the right to make revisions in the design of products without
notice, as specified in the Price Book.
Plus:/Plus:/Más:
• Conventional woodworking tools and materials
Outils et matériels conventionnels de menuiserie
Herramientas y materiales convencionales de
carpintería
• Drop cloth/Bâche de protection/Lona
• Plastic liner (optional)
Revêtement en plastique (optionnel)
Cubierta de plástico (opcional)
• 2x4s or 2x6s/2 x 4 ou 2 x 6/Listones de 2x4 ó 2x6
• Construction adhesive (optional)
Adhésif de construction (optionnel)
Adhesivo de construcción (opcional)
• Cement or mortar (optional)
Ciment ou mortier (optionnel)
Cemento o mortero (opcional)
• Water-resistant wall material
Matériau hydrorésistant du mur
Material impermeable de la pared
• Rags/Chiffons/Trapos
Kohler Co. 3 1084212-2-B
Page is loading ...
Page is loading ...

1. Prepare the Site
Flooring
NOTICE: Adequate floor support must be provided. Consult the roughing-in
information packed with the bath for specific floor loading requirements.
Install adequate floor support.
NOTICE: To ensure a successful installation, it is critical that bath be installed on a
level subfloor.
Verify the subfloor is level. Adjust for level, if necessary.
Framing
CAUTION: Risk of property damage. Do not support the bath by the rim. The
bath must be supported by the leveling blocks only or bath base, depending upon
your bath model.
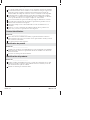
NOTICE: To ensure the bath does not rest on the rim, a 1/16″ (2 mm) gap must exist
between the framing and the underside of the rim. When constructing the framing,
take into account the gap and the thickness of the finished wall/deck material.
NOTICE: The bath is for drop-in or raised deck installations only. If a deck-mount
faucet will be installed, plan a space on the deck to accommodate the deck-mount
faucet.
Construct the framing according to the roughing-in information packed with the
bath. Ensure a 1/16″ (2 mm) gap will exist between the framing and the underside
of the rim.
Plumbing
NOTE: For through-the-floor drain installations: A drain hole will need to be cut to
accommodate the drain connections. For above-the-floor drain installations: A hole
will not need to be cut.
Position the plumbing according to the roughing-in sheet packed with the bath.
Cap the supplies and check for leaks.
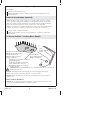
Provide a 1/16" (2 mm) gap between the bath rim
and the framing.
Fournir un espace de 1/16" (2 mm) entre le rebord
de la baignoire et le cadrage.
Provea una separación de 1/16" (2 mm) entre el
borde de la bañera y la estructura de postes de
madera.
1084212-2-B 6 Kohler Co.
Page is loading ...

Prepare el sitio (cont.)
AVISO: Para asegurar una instalación exitosa, es muy importante que la bañera se
instale en un subpiso a nivel.
Verifique que el subpiso esté a nivel. Ajuste a que quede a nivel, si es necesario.
Estructura de postes de madera
PRECAUCIÓN: Riesgo de daños a la propiedad. No apoye la bañera por los
bordes. La bañera tiene que quedar soportada sólo por los bloques niveladores o
la base de la bañera, dependiendo del modelo de su bañera.
AVISO: Para asegurar que la bañera no descanse en el borde, provea una separación
de 1/16″ (2 mm) entre el lado inferior del borde de la bañera y la estructura de
postes de madera. Al construir la estructura de postes de madera, tome en cuenta la
separación y el espesor del material de la pared/cubierta acabada.
AVISO: La bañera está diseñada sólo para instalación de sobreponer o sobre cubierta
elevada. Si va a instalar una grifería de montaje en cubierta, planifique un espacio en
la cubierta para la grifería de montaje en cubierta.
Construya una estructura de postes de madera conforme al diagrama de
instalación provisto con la bañera. Asegúrese de que exista una separación de
1/16″ (2 mm) entre la estructura de postes de madera y el lado inferior del borde.
Plomería
NOTA: Para instalaciones de desagüe bajo el nivel del piso: Necesitará hacer un
orificio para desagüe para realizar las conexiones del desagüe. Para instalaciones de
desagüe arriba del nivel del piso: No es necesario hacer el orificio.
Instale la tubería según el diagrama de instalación provisto con la bañera.
Tape los suministros y verifique que no haya fugas.
Fije el desagüe en la bañera según las instrucciones del fabricante del desagüe.
Aún no conecte la trampa.
Coloque una lona limpia en el fondo de la bañera. Esto asegurará a evitar que la
superficie de la bañera se raye durante la instalación.
2. Install the Tiling-In Bead (optional)
NOTICE: Tiling-in bead should be installed if the finished wall material will come
into contact with any top surface of the bath. The tiling-in bead prevents water from
seeping behind the wall and allows for an alcove installation of many drop-in baths
when a flanged version is not available.
NOTICE: If K-1179 tiling-in bead is used, the bottom edge of the tiling-in bead may
have to be trimmed. This will ensure a proper fit in the installation location.
Thoroughly clean the bath rim.
Install the tiling-in bead. Refer to the manufacturer’s instructions for proper
installation.
Installer la bande à carreler (optionnel)
NOTICE: Une bande à carreler devrait être installée si le matériau du mur fini sera
en contact avec toute surface supérieure de la baignoire. Le carrelage prévient l’eau
de s’infiltrer de derrière le mur et permet une installation en alcôve de plusieurs
baignoires encastrées lorsqu’une version à bride n’est pas disponible.
NOTICE: Si une bande à carreler K-1179 est utilisée, le rebord inférieur de cette
dernière devra être écourtée. Ceci assurera un bon ajustement dans l’emplacement
1084212-2-B 8 Kohler Co.

Installer la bande à carreler (optionnel) (cont.)
d’installation.
Nettoyer le rebord de baignoire.
Installer la bande à carreler. Se référer aux instructions du fabricant pour une
bonne installation.
Instale la tira selladora (opcional)
AVISO: Se debe instalar una tira selladora si la pared acabada entrará en contacto
con las superficies superiores de la bañera. La tira selladora evita que el agua entre
detrás de la pared y permite la instalación encajonada entre tres paredes de muchas
bañeras de sobreponer cuando la versión con reborde no está disponible.
AVISO: Si se utiliza la tira selladora K-1179, el filo inferior de la tira selladora puede
necesitar recortarse. Esto asegura que quede bien en el lugar de la instalación.
Limpie a fondo el borde de la bañera.
Instale la tira selladora. Para una correcta instalación, consulte las instrucciones
del fabricante.
3. Secure the Bath – Leveling Block Models
WARNING: Risk of personal injury. Do not lift the bath by the rim. Lift the bath
from the bottom only.
NOTICE: The bath must be secured using one of the following three methods:
cement or mortar bed, construction adhesive, or silicone sealant.
NOTICE: Ensure the subfloor is level before proceeding. If necessary, use shims to
achieve level.
Cement or Mortar Bed Method
NOTICE: Do not use gypsum cement or drywall compound, as these materials will
not provide a durable bond. Only use cement or mortar.
Leveling Blocks
Blocs de mise à niveau
Bloques niveladores
Rim
Rebord
Borde
Clear spaces for leveling blocks.
Dégager les espaces pour les
blocs de mise à niveau.
Limpie los espacios para los
bloques niveladores.
Spread a 2" (5.1 cm) layer of cement or
mortar bed material.
Étaler un lit de ciment ou de mortier,
d'une épaisseur de 2" (5,1 cm)
Extienda una capa de 2" (5,1 cm) de
cemento o mortero.
Kohler Co. 9 1084212-2-B

Secure the Bath – Leveling Block Models (cont.)
Spread a 2″ (5.1 cm) thick later of cement or mortar on the subfloor except where
the leveling blocks will be located.
Clear any cement or mortar away from the leveling block locations.
Place a plastic liner or similar material over the cement or mortar.
With help, carefully move the bath into the installation area.
Verify the leveling blocks are resting directly on the subfloor. Reposition as
needed.
Verify the bath is level across the top of the bath. If the bath is not level, shims
must be used under the leveling blocks.
Connect the drain tailpiece to the trap.
Construction Adhesive Method
Apply a generous amount of high-quality construction adhesive to the bottom of
the leveling blocks.
With help, carefully move the bath into the installation area.
Verify the leveling blocks are resting directly on the subfloor. Reposition or shim
as needed.
Verify the bath is level across the top of the bath. If the bath is not level, shims
must be used under the bath.
Connect the drain tailpiece to the trap.
Silicone Sealant Method
With help, carefully move the bath into the installation area.
Verify the leveling blocks are resting directly on the subfloor. Reposition or shim
as needed.
Verify the bath is level across the top of the bath. If the bath is not level, shims
must be used under the bath.
Connect the drain tailpiece to the trap.
Apply a continuous bead of silicone sealant around the entire rim of the bath.
Sécuriser la baignoire - modèles à blocs de mise à niveau
AVERTISSEMENT: Risque de blessures corporelles. Ne pas soulever la baignoire
par le rebord. Soulever la baignoire par la base uniquement.
NOTICE: La baignoire doit être sécurisée en utilisant une des trois méthodes
suivantes: ciment ou mortier, adhésif de construction, ou mastic à la silicone.
NOTICE: S’assurer que le plancher est nivelé avant de procéder. Si nécessaire, utiliser
des cales pour accomplir la mise à niveau.
Méthode de ciment ou de mortier
NOTICE: Ne pas utiliser de plâtre ou un mélange pour cloison sèche, car ces
matériaux ne fourniront pas un scellement durable. Utiliser uniquement du ciment ou
du mortier.
Étaler une couche de ciment ou mortier de 2″ (5,1 cm) sur le plancher.excepté où
les blocs de mise à niveau seront localisés.
Dégager tout ciment ou mortier des emplacements de blocs de mise à niveau.
Placer une couche en plastique ou matériau similaire sur le ciment ou le mortier.
1084212-2-B 10 Kohler Co.
Page is loading ...
Page is loading ...

4. Secure the Bath – Bath Base Models
WARNING: Risk of personal injury. Do not lift the bath by the rim. Lift the bath
from the bottom only.
NOTICE: The bath must be secured using one of the following two methods: cement
or mortar bed or construction adhesive.
NOTICE: Ensure the subfloor is level before proceeding. If necessary, use shims to
achieve level.
Cement or Mortar Bed Method
NOTICE: Do not use gypsum cement or drywall compound, as these materials will
not provide a durable bond. Only use cement or mortar.
Spread a 2″ (5.1 cm) thick later of cement or mortar on the subfloor.
Place a plastic liner or similar material over the cement or mortar.
With help, carefully move the bath into the installation area.
Verify the bath is level across the top of the bath. If the bath is not level, shims
must be used under the bath base.
Connect the tailpiece of the drain to the trap.
Remove the protective tape from the bath rim.
Apply a continuous bead of silicone sealant around the entire rim of the bath.
Construction Adhesive Method
Apply a generous amount of high-quality construction adhesive to the bottom of
the bath base.
With help, carefully move the bath into the installation area.
Verify the bath is level across the top of the bath. If the bath is not level, shims
must be used under the bath.
Connect the tailpiece of the drain to the trap.
Remove the protective tape from the bath rim.
Apply a continuous bead of silicone sealant around the entire rim of the bath.
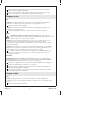
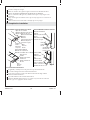
Apply construction adhesive to the
bath base.
Appliquer un adhésif de
construction à la base de la
baignoire.
Aplique adhesivo de construcción
a la base de la bañera.
Cement or Mortar
Ciment ou mortier
Cemento o mortero
Cement or Mortar Method
Méthode ciment ou mortier
Método de cemento o mortero
Construction Adhesive Method
Méthode adhésif de construction
Método de adhesivo de construcción
Kohler Co. 13 1084212-2-B
Page is loading ...

Fije la bañera - Modelos con base de bañera (cont.)
Con ayuda, mueva con cuidado la bañera al lugar de instalación.
Verifique que la bañera esté a nivel a través de la parte superior de la bañera. Si la
bañera no está a nivel, coloque cuñas debajo de la base de la bañera.
Conecte el tubo del desagüe a la trampa.
Retire la cinta protectora del borde de la bañera.
Aplique una tira continua de sellador de silicona alrededor de todo el borde de la
bañera.
Método de adhesivo de construcción
Aplique una cantidad abundante de adhesivo de construcción de alta calidad en la
parte inferior de la base de la bañera.
Con ayuda, mueva con cuidado la bañera al lugar de instalación.
Verifique que la bañera esté a nivel a través de la parte superior de la bañera. Si la
bañera no está a nivel, puede que necesite colocar cuñas debajo de la bañera.
Conecte el tubo del desagüe a la trampa.
Retire la cinta protectora del borde de la bañera.
Aplique una tira continua de sellador de silicona alrededor de todo el borde de la
bañera.
5. Install the Plumbing
CAUTION: Risk of property damage. A watertight seal must exist on all bath
drain connections. The watertight seal will prevent property damage.
Connect the trap to the drain.
Install the faucet valving according to the faucet manufacturer’s instructions. Do
not install the faucet trim at this time.
Open the hot and cold water supplies. Check all connections for leaks.
Run water into the bath. Check the drain connections for leaks.
Fill the bath to the overflow. Check for leaks.
Installer la plomberie
ATTENTION: Risque d’endommagement du matériel. Un joint étanche doit être
présent sur toutes les connexions de drain de baignoire. Le joint étanche doit
prévenir tout dommage.
Raccorder le siphon au drain.
Installer les valves du robinet conformément aux instructions du fabricant. Ne pas
installer la bague du robinet à ce moment.
Ouvrir les alimentations d’eau chaude et froide. Vérifier s’ilyadesfuites dans les
connexions.
Faire couler l’eau dans la baignoire. Vérifier s’ilyadesfuites.
Remplir la baignoire jusqu’au trop-plein. Vérifier s’ilyadesfuites.
Instale la plomería
PRECAUCIÓN: Riesgo de daños a la propiedad. Debe existir un sello hermético
en todas las conexiones del desagüe de la bañera. Este sello hermético evitará
daños a la propiedad.
Kohler Co. 15 1084212-2-B

Instale la plomería (cont.)
Conecte la trampa al desagüe.
Instale las válvulas de la grifería según las instrucciones del fabricante de la
grifería. No instale la guarnición de la grifería en este momento.
Abra los suministros del agua fría y caliente. Revise que no haya fugas en las
conexiones.
Haga circular agua en la bañera. Revise que no haya fugas en las conexiones de
desagüe.
Llene la bañera hasta el rebosadero. Verifique que no haya fugas.
6. Complete the Installation
For Finished Deck Installations
If applicable, carefully remove the protective tape from the bath rim.
Cover the framing with water-resistant deck material.
Using silicone sealant, seal the joints between the bath rim edges and the
water-resistant deck material.
Tape and mud the water-resistant deck material.
Install the finished deck material 1/16″ (2 mm) away from the rim. This will
create a groove to apply the silicone sealant.
Rim
Rebord
Borde
Rim
Rebord
Borde
Rim
Rebord
Borde
2x4 Studding
Montant 2x4
Postes de 2x4
Apply silicone sealant.
Appliquer du mastic à la silicone.
Aplique sellador de silicona.
Finished Deck Material
Matériau du comptoir fini
Material de acabado de la cubierta
Finished Wall/Mur fini/Pared acabada
Finished Deck/Comptoir fini/Cubierta acabada
Water-Resistant Wall
Material
Matériau
hydrorésistant du mur
Material de pared
resistente al agua
Water-Resistant Wall
Material
Matériau hydrorésistant
du mur
Material de pared
resistente al agua
Finished Wall
Material
Matériau mur
fini
Material de la
pared acabada
Silicone Sealant
Mastic à la silicone
Sellador de silicona
Framing
Cadre
Estructura
de postes
Apply silicone
sealant.
Appliquer du mastic
à la silicone.
Aplique sellador de
silicona.
1084212-2-B 16 Kohler Co.

Complete the Installation (cont.)
Apply a bead of silicone sealant in the groove between the finished deck and the
rim.
For Finished Wall Installations
If applicable, carefully remove the protective tape from the bath rim.
Cover the framing with water-resistant wall material.
Apply a bead of silicone sealant in the groove between the edge of the bath deck
and the water-resistant wall material.
Tape and mud the water-resistant wall material.
Install the finished wall material 1/4″ (6 mm) above the bath deck. This will create
a groove to apply the silicone sealant.
Apply a bead of silicone sealant in the groove between the finished wall and the
rim.
For All Installations
Install the faucet trim according to the manufacturer’s instructions.
Compléter l’installation
Pour des installations de comptoir fini
Si applicable, retirer délicatement la pellicule protectrice du rebord de la baignoire.
Recouvrir le cadre avec du matériau hydrorésistant.
En utilisant du mastic à la silicone, sceller les joints entre les rebords et le
matériau hydrorésistant du comptoir.
Appliquer le matériau hydrorésistant du comptoir.
Installer le matériau du comptoir fini 1/16″ (2 mm) à l’écart du rebord. Ceci va
créer une rainure pour appliquer du mastic à la silicone.
Appliquer du mastic à la silicone dans la rainure entre le comptoir fini et la
garniture.
Pour des installations de mur fini
Si applicable, retirer délicatement la pellicule protectrice du rebord de la baignoire.
Recouvrir le cadrage avec du matériau hydrorésistant.
Appliquer du mastic à la silicone dans la rainure entre le rebord du comptoir de
baignoire et le matériau hydrorésistant du mur.
Poser et appliquer le matériau hydrorésistant du mur.
Installer le matériau du mur fini de 1/4″ (6 mm) au-dessus du comptoir de
baignoire. Ceci va créer une rainure pour appliquer du mastic à la silicone.
Appliquer du mastic à la silicone dans la rainure entre le mur fini et le rebord.
Pour toutes les installations
Assembler la garniture de robinet conformément à la notice du fabricant.
Kohler Co. 17 1084212-2-B

Termine la instalación
Para instalaciones de cubierta acabada
Si aplica, con cuidado retire la cinta protectora del borde de la bañera.
Cubra la estructura con material de cubierta resistente al agua.
Utilizando sellador de silicona, selle las juntas entre los filos de los bordes de la
bañera y el material de cubierta resistente al agua.
Adhiera el material de cubierta resistente al agua con cinta y yeso.
Instale el material de acabado de la cubierta a 1/16″ (2 mm) del borde. Esto creará
una ranura para aplicar el sellador de silicona.
Aplique una tira de sellador de silicona en la ranura entre la cubierta acabada y el
borde.
Para instalaciones de pared acabada
Si aplica, con cuidado retire la cinta protectora del borde de la bañera.
Cubra la estructura de postes de madera con material de pared resistente al agua.
Aplique una tira de sellador de silicona en la ranura entre el filo de la cubierta de
la bañera y el material de la pared resistente al agua.
Adhiera el material de pared resistente al agua con cinta y yeso.
Instale el material de la pared acabada 1/4″ (6 mm) sobre la cubierta de la bañera.
Esto creará una ranura para aplicar el sellador de silicona.
Aplique una tira de sellador de silicona en la ranura entre la pared acabada y el
borde.
Para todas las instalaciones
Instale la guarnición de la grifería según las instrucciones del fabricante.
Care and Cleaning
For best results, keep the following in mind when caring for your KOHLER product:
•
Use a mild detergent such as liquid dishwashing soap and warm water for
cleaning. Do not use abrasive cleaners that may scratch or dull the surface.
•
Carefully read the cleaner product label to ensure the cleaner is safe for use on the
material.
•
Always test your cleaning solution on an inconspicuous area before applying to
the entire surface.
•
Do not allow cleaners to sit or soak on the surface.
•
Wipe surfaces clean and rinse completely with water immediately after cleaner
application. Rinse and dry any overspray that lands on nearby surfaces.
•
Use a soft, dampened sponge or cloth. Never use an abrasive material such as a
brush or scouring pad to clean surfaces.
For detailed cleaning information and products to consider, visit www.kohler.com/clean.
To order Care & Cleaning information, call 1-800-456-4537 and press 1 for Kohler
Products and then 3 for Literature.
1084212-2-B 18 Kohler Co.

Nettoyage et entretien
Pour de meilleurs résultats, prendre ce qui suit en considération lors de l’entretien de
votre produit KOHLER:
•
Utiliser un détergent doux tel que liquide pour vaisselle et de l’eau chaude pour
nettoyer. Ne pas utiliser de nettoyants abrasifs car ils pourraient rayer ou abîmer
la surface.
•
Lire attentivement l’étiquette du produit de nettoyage pour vérifier qu’il soit
adéquat à utiliser sur le matériau.
•
Toujours tester la solution de nettoyage sur une surface la moins évidente avant
de l’appliquer sur la totalité de la surface.
•
Ne pas permettre aux nettoyants de reposer sur la surface.
•
Essuyer les surfaces et rincer complètement avec de l’eau immédiatement après
l’application du nettoyant. Rincer et sécher tout éclaboussement sur les surfaces
avoisinantes.
•
Utiliser une éponge ou un chiffon doux et humide. Ne jamais utiliser de matériau
abrasif tel que brosse ou éponges à récurer pour nettoyer les surfaces.
Pour l’information détaillée de nettoyage et des produits à considérer, visiter
www.kohler.com/clean. Pour commander des informations d’entretien et de nettoyage,
composer le 1-800-456-4537 puis presser 1 pour les produits Kohler et 3 pour littérature.
Cuidado y limpieza
Para obtener los mejores resultados, tenga presente lo siguiente al limpiar su producto
KOHLER:
•
Para la limpieza, utilice solamente un detergente suave como el jabón líquido para
lavar platos y agua tibia. No utilice limpiadores abrasivos que puedan rayar u
opacar la superficie.
•
Lea atentamente la etiqueta del producto de limpieza para asegurar que no
presente riesgos al usarse en el material.
•
Siempre pruebe la solución de limpieza en un área oculta antes de aplicarla a toda
la superficie.
•
No deje por tiempo prolongado los limpiadores en la superficie.
•
Limpie con un trapo y enjuague completa e inmediatamente con agua después de
aplicar limpiadores. Enjuague y seque las superficies cercanas que se hayan
rociado.
•
Utilice una esponja o trapo suave y húmedo. Nunca utilice materiales abrasivos
como cepillos o estropajos de tallar para limpiar las superficies.
Para obtener información detallada de limpieza y los limpiadores a considerar, visite
www.kohler.com/clean. Para solicitar información sobre el cuidado y la limpieza, llame
al 1-800-456-4537 y presione 1 para productos Kohler y luego 3 para documentos.
One-Year Limited Warranty
KOHLER plumbing products are warranted to be free of defects in material and
workmanship for one year from date of installation.
Kohler Co. will, at its election, repair, replace or make appropriate adjustment where
Kohler Co. inspection discloses any such defects occurring in normal usage within one
(1) year after installation. Kohler Co. is not responsible for removal or installation costs.
Use of in-tank toilet cleaners will void the warranty.
To obtain warranty service contact Kohler Co. either through your Dealer, Plumbing
Contractor, Home Center or E-tailer, or by writing Kohler Co., Attn.: Customer Service
Department, 444 Highland Drive, Kohler, WI 53044, USA, or by calling 1-800-4-KOHLER
from within the USA, 1-800-964-5590 from within Canada and 001-877-680-1310 from
within Mexico.
Kohler Co. 19 1084212-2-B

One-Year Limited Warranty (cont.)
Implied warranties including that of merchantability and fitness for a particular
purpose are expressly limited in duration to the duration of this warranty. Kohler Co.
and/or seller disclaims any liability for special, incidental or consequential damages.
Some states/provinces do not allow limitations on how long an implied warranty lasts,
or the exclusion or limitation of special, incidental or consequential damages so these
limitations and exclusions may not apply to you. This warranty gives you specific legal
rights. You may also have other rights which vary from state/province to state/province.
This is Kohler Co.’s exclusive written warranty.
Garantie limitée d’un an
Les produits de plomberie KOHLER sont garantis contre tout défaut matériel et de
fabrication pour un an, à partir de la date de l’installation.
Kohler Co. jugera à sa discrétion, de la réparation, du remplacement ou du réglage
approprié et ceci après toute inspection faite par Kohler Co. de tous défauts dûs à une
utilisation normale et ceci pendant un (1) an à partir de la date d’installation. Kohler Co.
n’est pas responsable des coûts de démontage ou d’installation. L’utilisation de
nettoyants à l’intérieur du réservoir annulera la garantie.
Pour obtenir un service-garantie, contacter Kohler Co. par l’intermédiaire de votre
vendeur, plombier, centre de rénovation, revendeur par internet ou par écrit à Kohler Co.
à l’attention de: Département du service clientèle, 444 Highland Drive, Kohler, Wisconsin
53044, USA, ou en composant le 1-800-4-KOHLER à partir des É.U., le 1-800-964-5590 à
partir du Canada et le 001-877-680-1310 depuis le Mexique.
Les garanties implicites, y compris celles de qualité marchande et d’aptitude à un
emploi particulier, se limitent expressément à la durée de la présente garantie. Kohler
Co. et/ou le vendeur déclinent toutes responsabilités contre tous dommages
occasionnés, imprévisibles ou corrélatifs.
Certains états/provinces ne permettent pas la limitation sur la durée de la garantie, ou
l’exclusion ou la limitation spéciale, de dommages occasionnés, ou corrélatifs à un
accident, ainsi ces limitations ou exclusions pourraient ne pas s’appliquer dans votre cas.
Cette garantie vous donne des droits légaux spécifiques. Vous pouvez également avoir
d’autres droits qui varient d’un état/province à l’autre.
Ceci constitue la garantie écrite exclusive de Kohler Co.
Garantía limitada de un año
Se garantiza que los productos de plomería KOHLER están libres de defectos de material
y mano de obra por un año a partir de la fecha de instalación.
Kohler Co., a su criterio, reparará, reemplazará o realizará los ajustes pertinentes en los
casos en que la inspección realizada por Kohler Co. determine que dichos defectos
ocurrieron durante el uso normal en el transcurso de un (1) año a partir de la fecha de la
instalación. Kohler Co. no se hace responsable de los gastos de desinstalación o
instalación. El uso de limpiadores de inodoro que se colocan dentro del tanque anulará
la garantía.
Para obtener el servicio de garantía, comuníquese con Kohler Co. a través de su
distribuidor, contratista de plomería o distribuidor a través de Internet, o escriba
directamente a: Kohler Co., Attn.: Customer Service Department, 444 Highland Drive,
Kohler, WI 53044, USA, o llame al 1-800-4-KOHLER desde los Estados Unidos, al
1-800-964-5590 desde Canadá, o al 001-877-680-1310 desde México.
Toda garantía implícita en relación a productos de uso comercial, incluyendo la
1084212-2-B 20 Kohler Co.

Garantía limitada de un año (cont.)
comercialización e idoneidad del producto para un uso determinado, se limita
expresamente a la duración de la presente garantía. Kohler Co. y/o el vendedor no se
hacen responsables por concepto de daños particulares, incidentales o indirectos.
Algunos estados/provincias no permiten limitaciones en cuanto a la duración de una
garantía implícitaoalaexclusión o limitación de daños particulares, incidentales o
indirectos, por lo que estas limitaciones y exclusiones pueden no aplicar a su caso. Esta
garantía le otorga ciertos derechos legales específicos. Además, usted puede tener otros
derechos que varían de estado a estado y provincia a provincia.
El presente documento constituye la garantía exclusiva por escrito de Kohler Co.
One-Year Warranty
KOHLER CO.
It is recommended that at the time of purchase, you verify that all accessories and
components are complete in this package.
This Kohler product is warranted to be free of defects in material and workmanship for
one (1) year from the date of purchase as shown on the invoice or receipt.
1. Kohler Co. will only service its commercialized products through its authorized
distributors.
2. To obtain warranty service, please present the invoice and corresponding warranty.
3. Through its authorized distributors, Kohler Co. promises to repair the defective
product or provide a new replacement or an equivalent model (in those cases that the
model has been discontinued) when the product is beyond repair, without any charge to
the consumer.
4. The time of repair will not exceed six (6) weeks commencing on the date the product
is received.
5. It is recommended that the consumer save the invoice or receipt as additional
protection, as it may substitute the warranty in the case that there is a discrepancy in the
validity of the warranty.
EXCEPTIONS AND RESTRICTIONS
The Warranty will not be valid in the following cases:
1. When the product is not operated in accordance with the instructions concerning use
and operation set forth in the owner’s manual or installation instructions, and when the
recommendations and warnings included are not observed.
2. When the product has been modified or dismantled partially or totally; or has been
used in a negligent fashion and as a consequence has suffered damages attributable to
the consumer, individual, or hardware not authorized by Kohler Co.
3. This warranty does not cover the damages as a result of disaster such as fire or acts of
God, including flooding, earthquake, or electric storms, etc. To obtain a list of
distributors in your area where you can exercise your rights under this warranty, please
call 001-877-680-1310.
KOHLER CO., KOHLER, WI 53044 U.S.A.
IMPORTER:
Kohler Co. 21 1084212-2-B
Page is loading ...
Page is loading ...
Page is loading ...
-
 1
1
-
 2
2
-
 3
3
-
 4
4
-
 5
5
-
 6
6
-
 7
7
-
 8
8
-
 9
9
-
 10
10
-
 11
11
-
 12
12
-
 13
13
-
 14
14
-
 15
15
-
 16
16
-
 17
17
-
 18
18
-
 19
19
-
 20
20
-
 21
21
-
 22
22
-
 23
23
-
 24
24


Ask a question and I''ll find the answer in the document
Finding information in a document is now easier with AI
in other languages
- français: Kohler K-1123-58 Guide d'installation
- español: Kohler K-1123-58 Guía de instalación
Related papers
-
Kohler K-1161-F-96 Installation guide
-
Kohler 1284-96 User manual
-
Kohler 877-96 Installation guide
-
Kohler K-716-47 Installation guide
-
-
-
Kohler 710-W-0 Installation guide
-
Kohler K-1242-R-0 Installation guide
-
-
Other documents
-
Unbranded 71101129-0 Installation guide
-
Sterling 71110112-0 Installation guide
-
-
-
A&E 240208 Installation guide
-
-
Sterling Plumbing Hot Tub 7104 Series User manual
-
-
-