Page is loading ...

EverFresh
TM
Air Exchange
System
MODEL BAP336
Read instructions before operating.
Retain for future reference.
Instruction Leaflet
INFO-LINE
If after having read this leaflet, you have any
questions or comments on air cleaner,
call 1-800-253-2764 in North America.
8. If it is a black washable filter,
clean it as described in step 6.
9. Remove the rubber Vacuum
Plug from opening #5.
See Figure 25.
10. Using a vacuum with a hose
and a crevice tool, GENTLY
vacuum the dust from the core
by accessing openings #2 and
#5. See Figure 26.
CAUTION: Avoid applying
pressure or scraping the surface
of the core with the crevice
tool as this may damage the
core and decrease performance
of the Air Exchange System.
11. Replace the rubber Vacuum
Plug in opening #5. See Figure 25.
12. After the filters are completely dry replace the three black filters
over openings #2, #3, #4.
13. Insert a clean, dry black filter or a new white electrostatic filter
over opening #1.
14. Clean the rear grill with warm soapy water. (Not dish washer
safe). Dry with a soft cloth.
15. Remove dust from the front grill with a small soft brush or cloth.
16. Wipe down the rest of the unit with a clean, damp cloth.
WARNING: DO NOT IMMERSE THE AIR EXCHANGE
SYSTEM IN WATER.
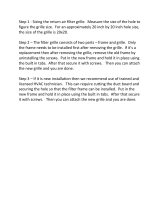
17. Reinstall the rear grill:
See Figure 27.
• Put the unit with the front grill
face down on the surface.
• Place the grill on the rear of the
unit with the thumb opening
toward the bottom (power
cord side) of the unit.
• Gently press down on the
edges of the grill until all edges
are securely latched.
18. Put the unit on the table in the
normal position and replace
the front grill. See Figure 28.
19. Slide the Air Exchange Unit
into the Window Sealing
Frame and push until it locks in
place.
20. Insert the electrical plug into the outlet and turn the unit on.
21. Reset the service indicator by inserting the tip of a paper
clip into the Service Reset Hole (5) and gently pressing the
button inside the hole.
22. The Service Indicator bar graph should reappear.
Replacement Filters
Order these filters by calling 1 (800) 253-2764
Problem Solution
System will not
operate
Decreased airflow
Drafts around
window
• Confirm that the unit is plugged into a
working electrical outlet.
• Confirm that the Damper Switch (1) is
in the ON position.
• Check to make sure the system is on
by pressing the Mode Button (2).
• Make sure that all bags have been
removed from the filters.
• It should be noted that the air entering
the room is designed to be at a low
flow rate to prevent drafts.
• Confirm that nothing is blocking the air
inlet and outlet.
• If “SERVICE” is displayed and the per-
formance bars are low, the filters need
to be cleaned. See Routine
Maintenance Instructions.
• Check the condition of the filters.
See Routine Maintenance Instructions.
• Check to make sure that the foam seal-
ing system is correctly installed.
• The leftover foam segments can be
used to seal any remaining openings.
Routine Maintenance
The Bionaire
®
Air Exchange System is easy to use and maintain.
It includes filters that remove dust from air that is circulated through
the system. These filters will need to be cleaned or replaced with
use. The Service Indicator bar graph on the display (6) shows when
service is needed. The Service Indicator bar graph decreases - and
when the bars disappear, the filters need to be cleaned. The aver-
age duration between cleanings is about three months.
WARNING: Do not attempt to repair or adjust any electrical or
mechanical functions on this unit. Doing so will void the warranty. This
unit contains no user serviceable parts. Only qualified personnel
should perform servicing—other than what is described in this manual.
About the Filters
There are three black washable filters
installed in the Air Exchange System.
Each has a single tab that locks
them into the unit. See Figure 18.
There is one two-tab filter installed
in the Air Exchange System. This
will either be a black washable filter
or a white disposable Electrostatic
filter. The Electrostatic filter removes
smaller particles from the circulating
air. See Figure 19.
PERFORMING MAINTENANCE
1. Confirm that the Service Indicator
bars (6) no longer illuminate and
the word "SERVICE" displays. This
signals that maintenance is
required.
2. Turn off and unplug the unit.
3. Remove the Air Exchange System
from the Window Sealing Frame: See
Figure 20.
• Grasp each side of the Air
Exchange System and
gently pull it toward you.
• Place the unit on a clean,
level surface.
4. Remove the front grill.
See Figure 21.
5. To remove the rear grill:
See Figure 22.
• Put the unit with the face
down on the surface.
• Place your thumb under
the opening in the rear grill
and pull up. One side of
the grill will lift up and you
will be able to slide the grill
out.
6. Remove the black filters from
openings #2, #3, and #4. Gently
wash these filters with mild soapy
water. Rinse in warm running
water. Shake off excess water
and allow to air dry completely.
See Figure 23.
7. Remove the filter from opening #1.
If it is a white electrostatic filter, dis-
card it and replace with a fresh fil-
ter. Call 1 (800) 253-2764 to order
replacement filters. See Figure 24.
Filter Part
Number
APF18
APF19
APF20
Quantity
Required
1 ea.
3 ea.
1 ea.
Description
Electrostatic Filter, 2-Tab - Optional
Washable Foam Filter 1-Tab
Washable Foam Filter 2-Tab
Service Instructions
If you need to exchange the unit within 30 days of purchase, please
return it in its original carton with the sales receipt to the store from
which it was purchased.
If you need to return the unit beyond 30 days after you purchased
it, review the warranty information provided with the unit and call
1-800-253-2764 for warranty service. You will be given a return
authorization number and instructions returning the unit from the
customer service representative.
WARRANTY
The Manufacturer warrants to the first retail purchaser, for FIVE ( 5 )
YEARS from the date of original purchase, either to repair or replace
at its option, without charge (parts and labor), any supplied or man-
ufactured part of this Air Exchange System which, upon inspection
by an authorized service center, proves to have failed in normal use
due to defects in material or workmanship, or at its option, to
replace the unit. Operation under conditions other than those rec-
ommended or at voltages other than the voltage indicated on the
unit, or any attempts by unauthorized personnel to service the unit
or modify it, will render the guarantee void. The Manufacturer shall
not be liable for any personal injury, property damage or any inci-
dental or consequential damages of any kind (including water dam-
age), resulting from defects, malfunctions, misuse, improper installa-
tion or alteration of the product.
THE MANUFACTURER EXPRESSLY DISCLAIMS ALL
RESPONSIBILITY FOR CONSEQUENTIAL DAMAGES OR
INCIDENTAL LOSSES CAUSED BY USE OF THIS PRODUCT.
The provisions of this Warranty are in addition to, and not a
modification of, or subtraction from the statutory warranties and
other rights and remedies contained in any applicable legislation
and to the extent that any such provision purports to disclaim,
exclude or limit any such statutory warranties or other rights or
remedies, such provisions shall be deemed to be amended to the
extent necessary to comply therewith.
For Warranty Service, please call 1-800-253-2764 in
North America.
KEEP THIS NUMBER FOR FUTURE REFERENCE.
A Bionaire
®
consumer service representative will help determine
which is the best procedure for your Air Exchange System to be
repaired.
If you have questions or comments, feel free to write us at:
Consumer Service Department
13120 Jurupa Avenue
Fontana, CA 92337
Bionaire
®
, the Bionaire logo
®
and EverFresh
TM
are trademarks of
JCS/THG, LLC.
O
n
O
f
f
Figure 28
Figure 25
Bionaire
®
JCS/THG, LLC
Consumer Service Department
13120 Jurupa Avenue
Fontana, CA 92337
BAP33605EM2/9100040002234 Printed In China
TROUBLESHOOTING
Figure 18
Figure 19
O
n
O
f
f
Figure 21
Figure 23
Opening # 2
Opening # 3
Opening # 5
Opening
# 4
Figure 24
Opening # 1
Figure 20
Figure 22
Figure 26
Figure 27
BAP33605EM2.qxd 10/14/05 9:27 AM Page 1

6.Next you must customize the Plastic Extender Panels so that
the Window Sealing Frame will fit securely in your window. Each
Plastic Extender Panel is divided into segments stamped with
measurements between 26 to 38 inches. These measurements
represent the total inside measurement, in inches, of various
sized windows. See Figure 7.
CAUTION: Once you have removed segments from the Plastic
Extender Panels, the frame will only fit in windows equal to or
less than the width you have selected.
7.Use the black marker to mark the number on each Plastic
Extender Panel that is closest to (but not greater than), the
measurement you recorded in Step 1. For example, if your win-
dow is 33 inches wide, mark the number 32. See Figure 8.
8.Snap off each segment of the front of the Plastic Extender Panel
with a higher number than you
marked. If you marked 32 in
step 8, you only will remove the
segments for 38, 36 and 34 and
three segments from the back of
the Plastic Extender Panel. Use
a forward and backward motion
to remove the excess sections
along the scored indications.
See Figure 9. Remove the same
number of segments from the
back of the Plastic Extender
Panel.
9.Repeat this process on the other
Plastic Extender Panel.
10.Install the Foam Insulation
Blocks into the Plastic Extender
Panels. Note that the Foam
Insulation Blocks are divided into
vertical segments of various
widths. The foam is installed
with these segments oriented
vertically. See Figure 10A. Insert
a Foam Insulation Block into the
right Plastic Extender Panel. For
proper fit, the foam should be
only slightly wider than the
Plastic Extender Panel. If the
foam is the exact size, rotate the
foam block to utilize the half-size
foam block on the opposite
side. Reinstall the foam into the
Plastic Extender Panel. See
Figure 10B.
PLEASE READ AND SAVE
THESE IMPORTANT SAFETY
INSTRUCTIONS
IMPORTANT SAFEGUARDS
When using electrical appliances, basic safety precautions should
always be followed to reduce the risk of fire, electric shock, and
injury to persons, including the following:
• Read all instructions before using the appliance.
• To avoid fire or shock hazard, plug the product directly into a
120V AC electrical outlet.
• Remove any plastic bags before use.
• Keep the cord out of heavy traffic areas. To avoid fire hazard,
NEVER put the cord under rugs, near heat registers, radiators,
stoves, or heaters.
• To protect against electrical hazards, DO NOT immerse in
water or other liquids. Do not use near water.
• Close supervision is necessary when any appliance is used by
or near children, or disabled persons.
• Avoid contact with moving parts.
• Always unplug the product before moving it, opening the grill,
changing the filters, cleaning, or whenever the product is not in
use. Be sure to pull by the plug and not the cord.
• NEVER drop or insert any object into any openings other than
instructed in this manual.
• DO NOT operate any appliance with a damaged cord or plug,
if motor fan fails to rotate, after the appliance malfunctions, or
if it has been dropped or damaged in any manner. Return
appliance to manufacturer for examination, electrical or
mechanical adjustment, or repair.
• Use appliance only for intended household use as described in
this manual. Any other use not recommended by the manufacturer
may cause fire, electric shock, or injury to persons. The use of
attachments not recommended or sold by JCS/THG,LLC may
cause hazards.
• NEVER block the air openings, grills/outlets or place objects
that would cause blockage of the air intake/exhaust openings.
• Keep unit away from heated surfaces and open flames.
• DO NOT attempt to repair or adjust any electrical or mechani-
cal functions on this unit. Doing so will void the warranty on
serviceable parts. All servicing should be performed by
qualified personnel only.
• WARNING: To reduce the risk of fire or electric shock, DO NOT
use this product with any solid-state speed control device.
• Install horizontally only in a double hung window as described
in this manual.
• All filter servicing should be performed from inside the room.
Outside filters should be serviced by first sliding the unit out of
the Window Sealing Frame and into the room.
• DO NOT use unit as a shelf or place anything on top of unit.
PLEASE READ AND SAVE
THESE IMPORTANT SAFETY
INSTRUCTIONS
CONSUMER SAFETY INFORMATION
THIS PRODUCT IS EQUIPPED WITH A 3-PRONG PLUG.
This product is for use on 120 volts.
The cord has a plug (A) as shown. Use an adapter (C) (not included)
for connecting three-blade grounding -type plugs to two-slot recep-
tacles (B). The green grounding lug extending from the adapter must
be connected to a permanent ground
such as a properly grounded outlet
box. The adapter should not be used
if a three-slot grounded receptacle is
available.
DO NOT DEFEAT THE SAFETY
PURPOSE OF THIS PLUG IN ANY
WAY.
CORD AND PLUG INSTALLATION SAFETY NSTRUCTIONS
The length of cord used on this appliance was selected to reduce
the hazards of becoming tangled in, or tripping over a longer cord. If
a longer cord is necessary, an approved extension cord may be
used. The electrical rating of the extension cord must be equal to or
greater than the rating of the product. Care must be taken to
arrange the extension cord so that it will not drape on obstacles
where it can be pulled on by children or accidentally tripped over.
Thank you for choosing The EverFresh™ Air Exchange
System. To ensure the best performance from your new
product, please read these instructions completely before
beginning installation and operation.
GENERAL INFORMATION
• The EverFresh™ Air Exchange System is designed to fit in
double hung windows only.
• The window opening can be between 26 inches and
38 inches wide.
• You will need an electrical outlet within five (5) feet of the
center of the window.
• You will need a black marker, scissors, a Phillips head
screwdriver, and a tape measure to install the unit.
UNPACKING
1. Carefully unpack the contents from the carton and remove the
Air Exchange System from the
plastic bag.
2. Place the Air Exchange System
on a clean surface, with the front
grill facing down and slide the
Window Sealing Frame off the
back of the unit. See Figure 1.
3. Remove the two Plastic Extender
Panels from the plastic bags and
then remove the Foam Insulation Blocks from inside the Plastic
Extender Panels.
4. Verify that you received all of the parts shown in Figure 2. If any
parts are missing, please contact our consumer service depart-
ment at 1-800-253-2764.
INSTALLATION
You must install the Window Sealing
Frame into the track for your lower
window sash before loading the Air
Exchange System into the Window
Sealing Frame.
1.Measure the frametrack for your
lower window sash, at its widest
point. See Figure 3.
Write your measurement
here:____________
You may close the window
temporarily.
2.If your window has a screen or
storm window, measure the dis-
tance between the front of the
window (the side facing inside) to
the screen or storm window. If
that measurement is less than
five (5) inches, you will need to
remove the screen or storm win-
dow before you can install the
Window Sealing Frame.
3.Place the Window Sealing Frame
on a flat surface, rim-side up,
with the locking clamp away from
you. See Figure 4.
4.Place the Plastic Extender Panel
stamped LEFT, on the left side of
the Window Sealing Frame and
the Plastic Extender Panel
stamped RIGHT on the right
side. See Figure 5.
5.Slide the Plastic Extender Panels
down into the guides on the
sides of the Window Sealing
Frame and press down gently
until the Plastic Extender Panels
click into place. See Figure 6.
11.Remove the excess foam segments at the seam. Save the extra
segments. They can be used to fill any gaps in the window seal.
12.Repeat the process for the other Plastic Extender Panel.
13.Hold the Window Sealing Frame
so the rim-side of the assembly
is facing outside and the locking
clamp is on top. See Figure 11.
14.Insert the right side of the
Window Sealing Frame into the
window frame and into the win-
dow track. See Figure 12.
15.Firmly push the left side of the
Window Sealing Frame into the
window frame and into the win-
dow track. See Figure 13. Then,
gently press the Window
Sealing Frame down so that it is
seated in the window.
16.Close the window. Make sure
the bottom edge of the window
sash is resting on the foam
strip, sealing any gaps around
the Window Sealing Frame.
17.Tighten the locking screw using
a Phillips head screwdriver. Be
careful to not over tighten. See
Figure 14.
18.Install the appropriate window
sill J- Hooks into the Window
Sealing Frame. (See the parts
list.) Slide the J-Hook until it is
firmly seated against the mold-
ing. See Figure 15.
NOTE: These hooks may not fit
some older window moldings.
19.Install the Sash Insulation Strip
as shown in Figure 16.
20.Before installing the Air
Exchange Unit, verify that:
a) All foam strips are in place
and that there are no visible
gaps.
b) The window sash is firmly
closed against the foam strip
on top of the Window Sealing
Frame.
c) The locking clamp tightly
grips the window sash.
d) The foam blocks are tightly sealed against the window frame.
e) If used, the window sill J-Hooks are secured to the window
sill.
f) Sash Insulation strip is in place.
g) Use the extra foam strips or segments to fill in any visible gaps.
21.Slide the Air Exchange Unit into the Window Sealing Frame and
push until it locks (clicks) into place.
22.For maximum efficiency, you will need to know the size of the
room in square feet. (Measure room length and width in feet and
multiply. Length X Width=Room Size in Sq. Ft.)
Write room size here: ________________SQ. FT
If additional Plastic Extender Panels and Foam blocks are
needed, contact Consumer Service 1- 800-253-2764.
OPERATION OF THE EVERFRESH
TM
AIR EXCHANGE
SYSTEM INSTRUCTIONS
To turn on the system:
1. Plug the power cord into a wall outlet.
2. Turn the Damper Switch (1) to the the “ON” position.
3. Press the Mode Button (2).
NOTE: When you use the unit for the first time, there may be a
slight residual odor from the manufacturing process. This will disap-
pear with use.
For best efficiency, we recommend that you program your system
to the size of your room.
4. Refer the room measurement you made in step 22 of the
Installation Instructions.
Your room is:
Small if it is 90 -159 sq. ft.
Medium if it is 160-249 sq. ft
Large if it is 250-399 sq. ft.
5. Press and hold the Mode button (2) and the Heat Balance but-
ton (3) for three seconds, until the word small flashes.
6. Release the Mode button (2) and press the Heat Balance button
(3) until the desired room size is displayed.
The unit has three motor speeds plus OFF: Normal, Low,
Turbo, OFF.
Press the mode button (2) repeatedly until the desired motor
speed is displayed. The Air Exchange System is equipped with a
Heat Balance setting. When this setting is on, the system
equalizes the outside air it draws in to the air temperature of the
room.
To Turn on the Heat Balance setting:
Press the Heat Balance button (3) once.
Figure 1
Figure 3
Figure 4 Locking Clamp
C, D
A
E2
E1
Figure 2
Figure 12
Figure 13
Figure 15
Window Sill
Insullation
Figure 16
Layout of controls and display
B
F
Small
Block
Large Blocks
(3)Turns Heat
Balance on/off
(6) Performance Bars
(5) Service Reset
(1) Damper Switch
Opens system to the out-
side
(2) Mode Button
Turn motor on/off
Select motor speed
(4) Display. Shows motor speed, number of air
exchanges/day, programmed room size, heat
balance on/off, and service indicator.
A. Air Exchange Unit
B. Window Sealing Frame
C. Left and Right Plastic Extender Panel
(with window width indicators)
D. Foam Insulation Blocks
E. Window Sill J hooks (two options for
best window sill fit)
1. Standard Window J Hook – for use
with most window types
2. Extended Window Sill J Hook – for
use with Andersen
®
type windows.
F. Sash Insulation
G. Extra Foam
Figure 5
Left Extender
Panel
Right Extender
Panel
Figure 8
Figure 10B
Back Side
Front Side
Window
Width
Indicator
Plastic Extender Segments
Figure 7
Figure 9
Figure 10A
Figure 11
Figure 14
Figure 6
G
Figure 17
BAP33605EM2.qxd 10/14/05 9:27 AM Page 2
/