Page is loading ...

FLOOR PUMP
INSTRUCTION MANUAL
GB IE NI
GULVPUMPE
BETJENINGSVEJLEDNING
DK
BE
POMPE À PIED
MODE D’EMPLOI
FR
BE
STAANDE LUCHTPOMP
GEBRUIKSAANWIJZING
NL
BE
FLOOR PUMP
GB/IE/NI Floor Pump
Instruction Manual 5
DK Gulvpumpe
Betjeningsvejledning 8
FR/BE Pompe à pied
Mode d’emploi 11
NL/BE Staande luchtpomp
Gebruiksaanwijzing 15
DE/AT/CH Standluftpumpe
Bedienungsanleitung 18
IAN 292829IAN 292829
GB IE NI
Before reading, please unfold the illustrations page and familiarise yourself with all device functions.
The illustration numbers appear in the corresponding position within the text.
DK
Klap før læsning siden med illustrationerne og bliv fortrolig med alle pumpens funktioner. Billednum-
rene er hver især placeret på det tilsvarende sted i teksten.
FR
BE
Avant la lecture, dépliez la page avec les illustrations et familiarisez-vous ensuite avec toutes les fonc-
tions de l’appareil. Les numéros des illustrations sont indiqués aux endroits appropriés dans le texte.
NL
BE
Klap voor het lezen de pagina met de afbeeldingen uit en maak u vervolgens vertrouwd met alle func-
ties van het apparaat. De nummers van de afbeeldingen zijn telkens op de overeenstemmende plaats
in de tekst terug te vinden.
DE AT CH
Klappen Sie vor dem Lesen die Seite mit den Abbildungen aus und machen Sie sich anschließend mit
allen Funktionen des Produkts vertraut. Die Bildnummern sind jeweils an der entsprechenden Stelle im
Text platziert.
i
DK
IE NIGB
STANDLUFTPUMPE
BEDIENUNGSANLEITUNG
DE AT CH
NL
MONZ HANDELSGESELLSCHAFT INTERNATIONAL MBH & CO. KG
Schöndorfer Str. 60–62
DE-54292 Trier
GERMANY
Serviceadresse:
MONZ SERVICE CENTER
Hotline: 00800 / 68546854
RO
+49 (0) 69-9999-2002-228
Last update ∙ Oplysningernes status ∙ Version des informations ∙
Stand van de informatie ∙ Stand der Informationen:
07/2017 - Ident-Nr.: PO30000261-26235

5
GB IE NI
FLOOR PUMP
Instruction Manual
Introduction ..............................................................5
Intended use .............................................................5
Package contents .....................................................5
Technical data ..........................................................5
Attention safety instructions .....................................5
Initial use of the floor pump ....................................6
Adapter.....................................................................6
Cleaning & care instructions ...................................6
Disposal ....................................................................7
Warranty ..................................................................7
Warranty terms ........................................................7
Distributor .................................................................7
Service address .......................................................7
Introduction:
Congratulations!
With your purchase you have chosen a high-
quality product. Make yourself familiar with the
product before starting to use it. Carefully read the
following instruction manual. Use the product only
as described and only for the specified areas of
application. Keep this instruction manual for future
reference. When transferring this product to third
parties, also include all documents.
Symbols in this instruction &
installation manual:
!
This symbol indicates a risk of injury.
!
This is how additional information is ear-
marked.
!
Intended use:
This floor pump is suitable for inflating all conven-
tional bicycle tyres. Other uses or modifications to
the product are considered non-intended usage
and can lead to risk of injury and damages. The
distributor bears no liability for damages result-
ing from non-intended usage. The product is not
intended for commercial use.
Package contents: (A1 / A2)
1 x floor pump
1 x metal adapter for balls,
2 x plastic adapters for air mattresses, inflatable
toys, etc.
1 x instruction manual
Technical data:
Type: Floor Pump
IN 292829
ITEM NO: 26235
Monz-Nr. PO30000261
Nominal pressure: 7 bar / 100 PSI
Maximum allowable pressure: 8 bar / 116 PSI
Displacement: 370 ml / 370 cm³
Pressure hose length: 100 cm
Production date: 2017
Warranty: 3 years
!
Attention safety instructions!
ATTENTION! RISK OF DEATH AND
INJURY.
Keep packaging material away from children.
There is a risk of suffocation and other injuries!
- You can inflate all bicycle tires up to the floor
pump’s indicated maximum allowable pressure
(max. 8 bar / 116 PSI) or to the tyre manufac-
turer’s indicated maximum tyre pressure. This
can usually be found on the tyre wall. The indi-
cated maximum values may not be exceeded at
any time.
Warning! Risk of injury through explosion
if maximum permitted pressure values are
exceeded.
- Defective or damaged air pumps may no
longer be used due to risk of injury. Defective
Floor pumps must be properly disposed of.
Repairs are not possible.
- Floor pumps with damaged connection parts
or other defects or damage may no longer be
used due to risk of injury. Defective floor pumps
must be disposed of correctly. Repair is not pos-
sible.
Warning! Damaged floor pump, hose,
adapter or faulty connectors cause risk of
explosion.
- Due to the high operating force and the risks
associated with this, the product is not suited for
use by children or persons with physical and/or
mental disabilities.

6 7
Warning! Please note that the pump
plunger and pump cylinder become very
hot over longer periods of pumping due to the
friction between them. For this reason, you
should only grasp the floor pump on the pump
handle after pumping in order to avoid burns.
- Due to the risk of injury, a defective or dam-
aged floor pump may never be used.
Warning! Some bicycle valves do not
allow pressure display. For your own safety,
please check the air pressure with a calibrated
manometer (i.e. at a fuel station).
Initial use of the floor pump:
(B1 / B4)
(B1) Place the floor pump on a level and stable
surface.
(B2) There must be no kinks in the pump hose.
(B3) During pumping, please always position
yourself with both feet on the foot plate of the
floor pump to ensure it won’t fall over.
(B4) Operate the pump handle in a smooth and
even manner and not too quickly.
!
(B5) There is a red pointer in the middle of
the manometer. This red pointer can serve as an
optical mark for the desired pressure.
Turn the red pointer to the desired pressure dis-
play for this purpose.
Please note that the set mark only serves as orien-
tation and does not influence the air pressure!
Adapter: (C1)
The floor pump has been provided with a
pump head with a reversible valve adapter. As
delivered, the pump head has been set to use the
SCHRADER (large opening) adapter. To switch
to using the DUNLOP/PRESTA adapter (smaller
opening), flip the lever (A) upwards horizontally.
Do NOT pull the lever. Unscrew the valve adapter
from the pump head. Turn the valve adapter so
that the larger opening will be screwed into the
pump head (b).
Note: screw the valve adapter slowly onto
the pump head to prevent it from tilting during
screwing.
Adapter: (C1)
(1) E.g. balls
(2) E.g. air mattresses
(3) E.g. inflatable boats
(4) To inflate inner tubes with schrader valves
e.g. mountain bikes, trolleys and trailers.
(5) To inflate inner tubes with blitz valves,
e.g. city/trekking bicycles
(6) For inflating inner tubes with a presta valve,
e.g. on racing bicycles and mountain bikes.
(7) Pump head (To lock in place, please fold
down the lever of the pump head.)
(Valves (4), (5), (6) not included)
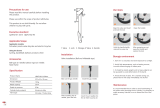
Inflating tyres with a schrader valve: (C2)
First remove the dust protection cap (1). Insert the
pump head with the large opening into the valve
(2). To lock in place, please fold down the lever of
the pump head (3).
Inflating tyres with a blitz valve: (C3)
First remove the dust protection cap (1). Insert the
pump head with the small opening into the valve
(2). To lock in place, please fold down the lever of
the pump head (3).
Inflating tyres with a presta valve: (C4)
First remove the dust protection cap (1). Detach
the valve nut (2a-2c). Insert the pump head with
the small opening into the valve (3). To lock in
place, please fold down the lever of the pump
head (4).
Inflating air mattresses, inflatable toys,
etc.: (C5)
First open the valve plug (1). Select the appropri-
ate plastic adapter and insert it into the large
opening of the pump head (2). To lock in place,
please fold down the lever of the pump head (3).
Now insert the plastic adapter into the object to
be inflated (4).
Inflating balls: (C6)
Insert the metal adapter in the large opening of
the pump head (1). To lock in place, please fold
down the lever of the pump head (2). Now insert
the metal adapter into the ball (3).
!
Cleaning & care instructions:
- clean with a damp cloth
- do not immerse in water
- regularly inspect the floor pump’s screw joints
for secure attachment before use
- the floor pump is maintenance-free.
- Store the floor pump in a cool, dry place pro-
tected from UV light.
Disposal:
Packaging is made of 100 % environmentally-
friendly materials that can be disposed of at
your local recycling point.
Please enquire with your community or mu-
nicipal administration regarding possibilities for
the disposal of the product.
Warranty:
Warranty of the Monz Handelsgesellschaft Inter-
national MBH & CO. KG.
Dear customer, this device comes with a three-
year warranty, valid from the date of purchase. In
case of defects of this product, you will have legal
rights towards the seller of this product. These
legal rights shall not be limited by our warranty as
set out below.
Warranty terms:
The warranty term starts on the date of purchase.
Please keep the original receipt in a safe place.
This document is required as proof of purchase.
If within a period of three years following the
date of purchase, this product displays material
or manufacturing defects, we shall - at our discre-
tion - repair or replace the product free of charge.
This warranty assumes that within a period of
three years the defective device and the proof of
purchase (receipt) are submitted and that a brief
written description of the defect, including when it
occurred, is provided.
If the defect is covered by our warranty, you shall
receive a repaired or a new product. The repair
or exchange of the product does not commence a
new warranty term.
Distributor:
MONZ Handelsgesellschaft
International mbH & Co. KG
Schöndorfer Str. 60–62
54292 Trier / Germany
Service address:
MONZ SERVICE CENTER
c/o Teknihall Elektronik GmbH
Breitefeld 15, 64839 Münster / Germany
Hotline: 00800 / 68546854 (free of charge,
mobile networks may vary)
E-Mail: [email protected]
E-Mail: [email protected]
Dated: 07/2017
Ident-Nr.: PO30000261-26235
/