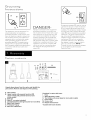
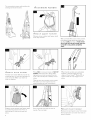
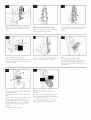
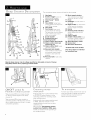
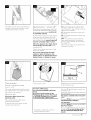
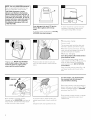
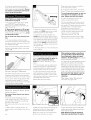
Hoover F6019900 is a wide-path cleaner with rotating brushes that deep-clean carpets by applying hot water and cleaning solution, and scrubbing the carpet fibers. This cleaner is equipped with a Deep Clean Surge feature and is effective for picking up hard, loose hair, clothing, sharp objects and pet hair. It is suitable for cleaning floors, carpeted stairs and upholstery. The Hoover F6019900 cleaner comes with a headlight for cleaning in dark areas, and it has an automatic shut-off feature for added safety.
Hoover F6019900 is a wide-path cleaner with rotating brushes that deep-clean carpets by applying hot water and cleaning solution, and scrubbing the carpet fibers. This cleaner is equipped with a Deep Clean Surge feature and is effective for picking up hard, loose hair, clothing, sharp objects and pet hair. It is suitable for cleaning floors, carpeted stairs and upholstery. The Hoover F6019900 cleaner comes with a headlight for cleaning in dark areas, and it has an automatic shut-off feature for added safety.


-
 1
1
-
 2
2
-
 3
3
-
 4
4
-
 5
5
-
 6
6
-
 7
7
-
 8
8
-
 9
9
-
 10
10
-
 11
11
-
 12
12
-
 13
13
-
 14
14
-
 15
15


Hoover F6019900 Owner's manual
- Category
- Scrubber
- Type
- Owner's manual
Hoover F6019900 is a wide-path cleaner with rotating brushes that deep-clean carpets by applying hot water and cleaning solution, and scrubbing the carpet fibers. This cleaner is equipped with a Deep Clean Surge feature and is effective for picking up hard, loose hair, clothing, sharp objects and pet hair. It is suitable for cleaning floors, carpeted stairs and upholstery. The Hoover F6019900 cleaner comes with a headlight for cleaning in dark areas, and it has an automatic shut-off feature for added safety.
Ask a question and I''ll find the answer in the document
Finding information in a document is now easier with AI
Related papers
-
Hoover F6035-900 Owner's manual
-
-
-
-
-
-
-
-
-
Other documents
-
HQ W7-60471 Datasheet
-
Classic Accessories 58972 Owner's manual
-
-
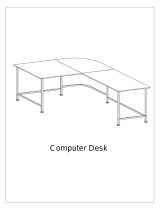 Lauraland L Shaped Desk 55", Corner Computer Desk, Laptop Study Table, Morden Workstation, Gaming Table, Oak Installation guide
-
-
Viper CEX410 Use And Maintenance
-
MasterCraft MD-20D Owner's manual
-
Maytag FLOOR-2-FLOOR User manual
-
Sunnydaze Decor DQ-P001A User manual
-
Campomatic RS600 Owner's manual
