Page is loading ...

ASSEMBLY & OPERATING INSTRUCTIONS
®
PICTURE HANGER
03762
THANK YOU for choosing a HARBOR FREIGHT TOOLS product. For future reference, please complete the
owner’s record below:
Model___________ Serial No._____________ Purchase Date_____________
Technical Specifications
Product Name: Laser Level, Picture Hanger Product Number: 03762
Dimensions: 3-3/8" W x 7-1/4" L Operating Voltage: DC 3 OV, two “AAA” Batteries
Operating Current: <40 MA Laser Beam Splitter: Vertical/ horizontal adjust
Line Adjustment: 90° Level Vial: One 0° horizontal (green/bubble)
Included: 1 “AAA” battery
WARNING: When using product, basic safety precautions should always be followed to reduce the risk
of personal injury and damage to equipment.
Read all instructions before using this product!
1. Keep work area clean. Cluttered areas invite injuries.
2. Observe work area conditions. Do not use this product in damp or wet locations. Don’t expose to rain.
Keep work area well lighted.
3. Store idle equipment. When not in use, products must be stored in a dry location to inhibit rust. Always
lock up products and keep out of reach of children.
4.
Use the right product for the job. There are certain applications for which this product was designed. It
will do the job better and more safely at the rate for which it was intended. Do not modify this product and
do not use this product for a purpose for which it was not intended.
5. Check for damaged parts. Before using any product, any part that appears damaged should be
carefully checked to determine that it will operate properly and perform its intended function. Check for
alignment and binding of moving parts; any broken parts or mounting fixtures; and any other condition
that may affect proper operation. Any part that is damaged should be properly repaired or replaced by
a qualified technician.
LASER LEVEL
#03762 Page 1
02/03 REV 02/05
Brought to You by Augusta Flint

#03762 Page 2
6. Replacement parts and accessories. When servicing, use only identical replacement parts. Use of
any other parts will void the warranty.
7. Do not operate product if under the influence of alcohol or drugs. Read warning labels on
prescriptions to determine if your judgment or reflexes are impaired while taking drugs. If there is any
doubt, do not operate the product.
Additional Warnings
1) Do not direct the light beam into the eyes of any person or animal as this may cause severe
injury to the eye. Do not look directly into the beam during operation.
2) Laser light when reflected off of a mirror like surface can cause serious damage and injury.
Warning: The warnings, cautions, and instructions discussed in this instruction manual cannot cover all
possible conditions and situations that may occur. It must be understood by the operator that
common sense and caution are factors which cannot be built into this product, but must be
supplied by the operator.
Operation
The Laser Level-Picture Hanger will help you to hang your pictures perfectly level. It can also be used to hang
shelves, wallpaper, or anything else that requires a straight and level line.
Step 1) Set the Level Laser on a flat surface. Make certain that the Laser is level by adjusting the height of the
Rubber Cushions (#8). Turn the Horizontal Adjust Wheel (#1) for each Rubber Cushion (#8). Adjust
each Rubber Cushion (#8) until the bubble in the Bubble Level is directly centered-see Figure 1. Move
the Top Cover (#2) and Laser up or down by turning the Up-Down Adjust Wheel (#6).
Step 2) Turn the Laser Level “ON” by pressing the “ON/OFF” button (#7). To change the angle of the laser line
from vertical to horizontal, turn the Vertical/ Horizontal Adjust Wheel (#5)-see Figure 1.
NOTE: The Laser Level also has a Flap that can be pulled out from the bottom to set the Laser Level-
Picture Hanger at an angle.
Replacing Batteries
Step 1) The Laser Level, Picture Hanger uses two (2) “AAA” batteries. Remove the Battery Cover located on
the bottom of the Laser Level. Remove the old batteries and insert two new batteries. Line the
batteries up the same way, so that positive and negative ends match the picture inside the battery
compartment. Replace the Battery Cover.
Unpacking
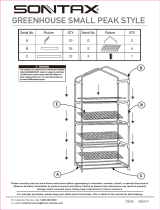
Parts List
Part # Description Qty Part # Description Qty
1 Horizontal Adjust Wheel 3 8 Rubber Cushion 3
2 Top Cover 1 9 Back Cover 1
4 Scale 1 10 Adjust Cover 1
5 Vertical/Horizontal 11 Laser Module
Adjust Wheel 1 Holder 1
6 Up-Down Adjust Wheel 1 12 Laser Beam 1
7 On/Off Button 1 13 Alignment parts 1
14 Horizontal Vial 1
Note: Some parts are listed and shown for illustration purposes only and are not available
individually as replacement parts.
FIGURE 1
Horizontal
Adjust Wheel (#1)
Bubble Level
On/Off (#7)
Vertical/Horizontal
Adjust Wheel (#5)
Rubber Cushion (#8)
When unpacking your Laser Level Picture Hanger, check to make sure the following parts are included. If any
parts are missing or broken, please call HARBOR FREIGHT TOOLS at 1-800-444-3353.
14
13
12
11
10
98
7
6
5,4 2
1
Brought to You by Augusta Flint
/