
HS-100.rev.04 1
POWER
CORD
LOOP
CEILING
SUSPENSION
CHAIN
4 FEET
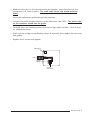
HS-100 Humidity Probe
INSTALLATION
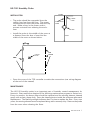
• The probe should be suspended from the
ceiling, four feet from the floor. The power
cord should not enter the probe from the top
end. Make a loop in the power cord to
prevent moisture from entering the enclo-
sure.
• Install the probe in the middle of the room at
a distance from the fans of one third the
width of the room as shown below.
AIR
INLETS
HUMIDITY
PROBE
1/3
FANS
• Open the cover of the TC5 controller to make the connections (see wiring diagram
at the end of the manual)
MAINTENANCE
The HS-100 humidity probe is an important part of humidity control management for
livestock. Best results are obtained if the following maintenance program is carried out.
Every six months, the bronze filter should be replaced and the sensing element cleaned
gently with a clean, damp cloth. Press the cleaning button inside the enclosure after each
replacement. The flashing red light indicates that it’s time to replace the filter. Every two
years, the sensing element must be replaced along with a memory chip. Remove the probe
from the room when cleaning the floors.

2 HS-100.rev.04
• Inspect the grommet on the plastic probe. If damaged, replace it.
• Clean the sensing element carefully using a clean, damp cloth. Do not use water
or other solvents.
• Push the replacement filter over the sensing element until firmly seated against the
ridge on the probe body.
• Locate the cleaning button between the two lights
1- AFTER 6 MONTHS OF OPERATION: Replace the filter (replacement part # 51-80070).
2- AFTER 12 MONTHS OF OPERATION: Replace the filter (replacement part # 51-80070).
3- AFTER 18 MONTHS OF OPERATION: Replace the filter (replacement part # 51-80070).
4- AFTER 24 MONTHS OF OPERATION: Replace the filter, the probe and the microchip
(replacement part # 51-10003).
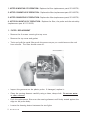
1. FILTER REPLACEMENT
• Remove the 4 screws securing the top cover
• Remove the top cover and gasket
• Twist and pull the metal filter much the same way as you would remove the cork
from a bottle. The filter should come off.

HS-100.rev.04 3
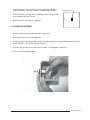
Clean Button
• Carefully press the cleaning button until the red light
starts to flash. Once it does so, release the button.
• Wait until the red light stops flashing (about 5 seconds),
then replace the top cover
• Replace the 4 screws and tighten.
2. PROBE REPLACEMENT
• Remove the 4 screws securing the top cover
• Remove the top cover and gasket
• Twist and pull the metal filter much the same way as you would remove the cork
from a bottle. The filter should come off.
• Inspect the grommet on the plastic probe. If damaged, replace it.
• Disconnect the probe cable.

4 HS-100.rev.04
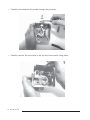
• Carefully remove the microchip in the top left hand corner using pliers.
• Carefully twist and pull the probe through the grommet.

HS-100.rev.04 5
• Make sure the pins on the new microchip are straight; insert the chip into the
socket until it is firmly in place. The small notch on the chip should be facing
down.
• Insert the replacement probe through the grommet.
• Connect the probe to the connector on the electronic card (JP6). The plastic ridge
on the connector should face the probe.
• Carefully press the cleaning button until the red light starts to flash. Once it does
so, release the button.
• Wait until the red light stops flashing (about 5 seconds), then replace the top cover
and gasket
• Replace the 4 screws and tighten.
Probe
Microchip
Probe
Connector
Plastic
Ridge

6 HS-100.rev.04
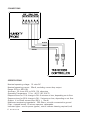
GREEN
RED
WHITE
BLACK
CONNECTIONS
SPECIFICATIONS
Nominal operating voltage: 12 volts DC
Nominal operating current: 35mA, excluding current loop output
Range: 35% to 95% RH
Accuracy: 3% from 40% to 90%, 5% otherwise
Operating Temperature: 10 to +40°C (50-104°F)
Response time for 10% change in RH: 4 minutes or less, depending on air flow
Response time for 80% change in RH: 9 minutes or less, depending on air flow
Output: 4 to 20mA current loop (50% = 12mA)
Maximum terminating impedance: 350 Ohms, one side connected to ground
Filter: sintered bronze, 20-micron aperture, replaceable
Indicator lights: one for power (green), one to indicate cleaning required (red)
-
 1
1
-
 2
2
-
 3
3
-
 4
4
-
 5
5
-
 6
6


Ask a question and I''ll find the answer in the document
Finding information in a document is now easier with AI
Other documents
-
State Industries 317913-000 User manual
-
State Water Heaters 317913-000 User manual
-
Sea Ray 2006 40 MOTOR YACHT Owner's manual
-
Alamo T 7740 User manual
-
Whirlpool 4322616 User manual
-
-
 Carver 3808 Owner's manual
-
 Carver 3808v1 Owner's manual
-
-
Omega K9-Mundial Owner's Manual & Installation Instructions

