Bugaboo gecko User manual

Type
User manual

Bugaboo Gecko is a versatile, functional, and comfortable stroller designed to meet the needs of your child from birth to toddlerhood. It features a reversible and reclinable seat, a height-adjustable handlebar, a spacious underseat storage bag, and a compact fold for easy transport and storage. The large foam-filled tires and advanced suspension system ensure a smooth ride for your child, even on rough terrain. The Bugaboo Gecko is also compatible with a variety of accessories, including a bassinet, car seat adapter, and rain cover, making it a great choice for parents on the go.

Bugaboo Gecko is a versatile, functional, and comfortable stroller designed to meet the needs of your child from birth to toddlerhood. It features a reversible and reclinable seat, a height-adjustable handlebar, a spacious underseat storage bag, and a compact fold for easy transport and storage. The large foam-filled tires and advanced suspension system ensure a smooth ride for your child, even on rough terrain. The Bugaboo Gecko is also compatible with a variety of accessories, including a bassinet, car seat adapter, and rain cover, making it a great choice for parents on the go.

IMPORTANT: KEEP FOR FUTURE REFERENCE
© Copyright 2007 Z10073 rv07 Bugaboo
®
International BV. The information contained herein is
subject to change without notice. Bugaboo
®
International BV shall not be liable for technical errors
or omissions contained herein.
The purchased product may differ from the product as described in this user guide.
Our most recent user guides can be requested at our Service departments (see ‘comments’) or
at www.bugaboo.com.
eng
1
english
Z10073 - UG_G UK rv07.indd 1 13/2/07 15:14:56
eng
2
Z10073 - UG_G UK rv07.indd 2 13/2/07 15:14:56
eng
3
content
before starting 4
1. basic steps 8
2.assembling the carrycot 16
3. assembling the seat 18
4. various uses of carrycot and seat 20
5. using the seat’s safety belts 21
6. fitting the underseat bag 23
7. going outdoors with the bugaboo gecko 24
8. protection against weather and wind 27
9. travelling and storage 32
10. maintenance and accessories 34
11. warranty 36
Z10073 - UG_G UK rv07.indd 3 13/2/07 15:14:56
™ ® BUGABOO and the Bugaboo logos, FROG, GECKO and CAMELEON are registered, pending or claimed trademarks of Bugaboo. The Bugaboo
strollers are patented. The Bugaboo strollers> models are protected.
eng
4
before starting
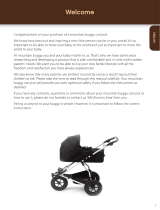
You have chosen the Bugaboo
®
Gecko. The Bugaboo Gecko is functional,
versatile and comfortable. You will increasingly discover how the Bugaboo
Geckos innovative design provides everything you could wish for from a
buggy. We wish you a great deal of pleasure with your Bugaboo Gecko. Please
remember to complete and return the warranty card as soon as possible, so that
you can be certain of receiving the best service and warranty from Bugaboo.
This can be done either by visiting our website or by returning the enclosed
prepaid warranty card.
important
- Read these instructions carefully before you use the product and keep them for future reference.
Your child’s safety may be affected if you do not follow these instructions.
- This user guide is for the Bugaboo Gecko, item code number 62100.
- You will find a sticker with the model number and serial number on the inside of the handle bar.
- Pram, pushchair and buggy comply with standard BS 7409 : 1996.
- For replacements, only use original parts that are supplied or approved by
Bugaboo International.
- Use original Bugaboo-accessories. The warranty does not cover damage to the Bugaboo Gecko
caused by overloading, incorrect folding or the use of non-original accessories. The warranty
conditions are stated in section 11 and provide further information.
- The Bugaboo Gecko is patented. The Bugaboo Gecko model is protected.
- This vehicle is intend for children from 0 years up to a weight of 17 kg/37.5 lbs
(around 4 years old).
- The Bugaboo Gecko carrycot is suitable for a baby aged 0 to around 6 months, up to
9 kg / 19.8 lbs in weight or 71 cm/28 inches in length.
- Only use products recommended by Bugaboo in combination with the Bugaboo Gecko.
- Parts of the Bugaboo Gecko may discolour in the sun.
- Avoid exposing the Bugaboo Gecko to extreme temperatures.
- Regularly check the Bugaboo Gecko’s touch fasteners and fasteners. Avoid unsafe situations.
safety
- The Bugaboo Gecko is not a car seat. Transport your child by car in an approved car seat.
Ask your supplier for details.
- Approved child seats can be readily fitted to the Bugaboo Gecko’s chassis using Bugaboo
adapters. See accessories (section 10).
- Do not allow children to play with the Bugaboo Gecko. They may be injured.
- Use the 5-point harness when the child is seated in the Bugaboo Gecko seat.
- Take your child out of the Bugaboo Gecko when going up or down stairs, escalators
or steep slopes.
- The Bugaboo Gecko is only intended for carrying one child.
- Always use the wrist strap that is attached to the handle bar.
- All fabric complies with Furniture and Furnishings Fire Safety Regulations.
Z10073 - UG_G UK rv07.indd 4 13/2/07 15:14:57
eng
5
WARNINGS
Do not stand on the axles between the wheels. This is unsafe and could
damage the Bugaboo Gecko.
Keep the Bugaboo Gecko away from open flames and other heat sources,
such as electrical or gas heaters, etc.
• Do not use the Bugaboo Gecko if any part is broken, torn or incomplete.
Every weight attached to the handlebar will have a negative impact on the
stability of the pushchair.
• This product is not suitable for running or skating.
• It may be dangerous to leave your child unattended.
• Ensure that all locking devices are engaged before use.
Check that the pram body or seat unit attachment devices are correctly engaged
before use.
• This seat is not suitable for children under 6 months (see label on seat).
• Do not add a mattress thicker than 30 mm.
Only use the frame of the Bugaboo Gecko with frame number 62101 on the
chassis with chassis number 62100, otherwise unsafe situations may occur. The
frame number is on the sticker that is attached to the inside of the frame. The
chassis number is on the sticker that is attached to the inside of the handlebar.
Do not change the position of the seat when the child is in the seat. Prevent the
child from falling and being injured.
• Never allow children to play around the carrycot without adult supervision.
• The carrycot is only suitable for children who cannot sit up on their own.
A CHILD’S SAFETY IS YOUR RESPONSIBILITY. Children should be harnessed in at all
times and should never be left unattended.
The child should be clear of moving parts while making adjustments. This vehicle
requires regular maintenance by the user.
Z10073 - UG_G UK rv07.indd 5 13/2/07 15:14:57
eng
6
check what you have received
Check the contents of the box against the list below. If anything is missing, please contact your
supplier.
the bugaboo gecko comprises the following parts:
1 chassis with handlebar, parking brake and wrist strap
2 swivel wheels
2 large wheels (with foam filled tyres)
1 frame (base for seat and carrycot)
1 underseat bag
1 carrycot with base plate
1 base mattress (foam mattress with nylon cover, mattress cover, aerated inlay)
1 apron
1 seat with safety belts
1 sun canopy
1 rain cover
1 mosquito net
1 user guide
1 bugaboo demonstration DVD
1 warranty card
WARNINGS
Infants and young children can suffocate and die if their faces are in or next to
a plastic bag. Discard the plastic bags immediately. Keep the plastic bags away
from children, infants, cribs, beds playpens or carriages.
Z10073 - UG_G UK rv07.indd 6 13/2/07 15:14:57
eng
7
step-by-step user guide
The Bugaboo Gecko is easy to assemble. It is advisable to repeat actions a couple of times when
indicated. The chassis is the main part of the Bugaboo Gecko. The frame fits onto the chassis and
is the base for the carrycot and seat.
Follow the step-by-step user guide to assemble the Bugaboo Gecko.
See the following sections:
1. basic steps
2. assembling the carrycot
3. assembling the seat
4. various uses of carrycot and seat
5. using the seat’s safety belts
6. fitting the underseat bag
7. going outdoors with the bugaboo gecko
8. protection against weather and wind
9. travelling and storage
10. maintenance and accessories
11. warranty
important
Always assemble the Bugaboo Gecko:
- without the child in the seat or carrycot (unless indicated otherwise);
- with the parking brake on (unless indicated otherwise).
Advice Follow the instructions in this user guide to assemble the Bugaboo Gecko. Assemble
step-by-step so that you become familiar with all of the Bugaboo Gecko’s parts and
possibilities.
Advice All parts fit together properly, so no force is necessary. If you find something difficult,
read the instructions again and try once more.
Z10073 - UG_G UK rv07.indd 7 13/2/07 15:14:57
d
a
eng
8
1. basic steps
This section explains how to assemble the Bugaboo Gecko. Each basic step in
the Bugaboo Geckos assembly is explained separately in the text boxes. It is
advisable to practice the basic steps.
chassis
The parts are attached to the chassis. The chassis comprises:
- axle for the large wheels;
- axle for the swivel wheels with holders;
- handlebar with frame bearers, parking brake and wrist strap.
You also need the following for the assembly:
- 2 swivel wheels;
- 2 large wheels
Frame completes the chassis for further assembly.
Advice Use the cardboard packaging as a mat during assembly.
step 1 folding out chassis and handlebar
a Place the chassis with the 4 points on the floor.
b. Stand with the handlebar in front of you.
c. Hold the handlebar lightly in your hands. Do not push.
d Pull the 2 white buttons on the inside of the handlebar
towards you.
Z10073 - UG_G UK rv07.indd 8 13/2/07 15:14:59
e
a
b
c
eng
9
e Move the handlebar upwards and away from you and
let go of the white buttons. You hear a ‘click’ when the
handlebar is upright.
swivel wheels
The swivel wheels provide optimum manoeuvrability.
step 2 placing the swivel wheels in the holders
a Without releasing it, move the handlebar to the floor.
The wheel axles are now facing upwards. It is easy to
install the wheels this way..
b Move the white sliding buttons upwards. These are the
swivel wheel locks.
c Stand with wheel axles in front of you. With the wheel
facing upward and the swivel wheel lock facing away
rom you, push the swivel wheel into the holder.
d. You will hear a ‘click’ for each wheel. The swivel wheels
are now attached.
Note Do not fit the swivel wheels on the wrong side of
the holder.
Z10073 - UG_G UK rv07.indd 9 13/2/07 15:15:02
b
a
a
eng
10
other functions
removing the swivel wheels from the holders
a. The swivel wheel has a round button, which protrudes through the holder.
The button has 2 sprung lips.
b Push on the 2 lips and remove the swivel wheel from
the holder.
c. Do the same on the other side.
swivel wheels active
a. Push down the swivel locks.
b. The swivel wheels are active.
c. The manoeuvrability is highest with this setting.
swivel wheels non-active
a. Push up the swivel locks.
b. The swivel wheels are non-active.
c. The Bugaboo Gecko now moves in a straight line.
large wheels
The 2 large wheels now have tyres filled with polyurethane foam. These provide enduring suspen-
sion on both sides without the risk of a puncture. This will therefore guarantee the driving comfort
for you and your child.
step 3 fitting the large wheels to the axle
a Push the large wheels into the wheel holders at the
ends of the long axle.
b. You will hear a ‘click’ for each wheel. The wheels are
now attached.
other functions
removing the large wheels from the axle
a Squeeze together the clamp tabs on the shaft at the
inside of the large wheel.
Z10073 - UG_G UK rv07.indd 10 13/2/07 15:15:05
b
b
c
eng
11
b Remove the wheel from the axle. Also remove the large
wheel on the other side.
Note The large wheels cannot be removed from the axle
if the Bugaboo Gecko’s parking brake is on.
unfolding the chassis
In order to fold out the chassis, it first has to be collapsed completely. To do so, please pull the
handlebar up. The large wheels are on the floor. Release the handlebar and click it in position
between the large wheels (the chassis is now folded up)
step 4 unfolding the chassis
a. Stand with the handlebar and large wheels in front of you.
b Release the handlebar, pull it up and towards you and
let go of the release catch, until it ‘clicks’ in the
fastened position.
c Push your foot against the axle of the swivel wheels.
d. The swivel wheels are released. The chassis is now
standing on 4 wheels.
Z10073 - UG_G UK rv07.indd 11 13/2/07 15:15:07
a
a
b
eng
12
parking brake
The parking brake is on the handlebar. It prevents the large wheels from turning. Always apply the
Bugaboo Gecko’s parking brake when the buggy is stationary, so that it cannot roll away. When
the handlebar is above the large wheels, the parking brake is on the right on the handlebar, with
the release button on the upper side.
step 5 applying the parking brake
a Push the parking brake’s handle downward.
b. When the handle will not move any further,
the Bugaboo Gecko’s parking brake is on.
Note You will be able to feel when the parking brake is
working properly. Do not force the parking brake.
other functions
releasing the parking brake
a Grip the handle tightly with one hand. Press the white,
round button on the handle with the other hand and
move the handle towards the handlebar.
b. The parking brake is now off.
Note If you press the white, round button on the handle
without holding the handle tightly, the parking brake
will be released suddenly. To avoid injury, do not place
your fingers between the handle and the handlebar.
Note Release the Bugaboo Gecko’s parking brake when
removing the large wheels from the axle.
adjusting the parking brake
a. Place the handlebar above the large wheels.
b Screw the brake cable adjuster upwards. The brake
cable is on the thin axle, next to the wheel on the right.
This reduces the braking force.
c. Screw the brake cable adjuster down to increase the
braking force.
Z10073 - UG_G UK rv07.indd 12 13/2/07 15:15:09
a
c
eng
13
WARNINGS
• Only apply the parking brake when the buggy is stationary.
frame
The frame is fastened to the chassis; the chassis is then secured. The carrycot or seat fabric is
attached to the frame. The frame has 2 frame supports, which ‘click’ onto the 2 frame bearers.
The round side of the frame is always the head end of the carrycot or seat.
step 6 fitting the frame on the chassis
Place the frame bearers in the upright position. Now fit the frame.
a Squeeze together the squeeze-fastener on the centre
shaft. This releases the frame bearers.
b. Place the frame bearers in the upright position.
c Let go of the squeeze-fastener. You will hear a ‘click’.
The frame bearers are now locked.
Z10073 - UG_G UK rv07.indd 13 13/2/07 15:15:11
b
c
eng
14
stap 7 fitting the frame on the chassis
a. Fit the frame supports on the frame bearers.
b Press the frame downwards until you hear a ‘click’ on
both sides. The frame is now attached to the chassis.
WARNINGS
Check that the frame is attached to the chassis. Pick up the frame. If the frame
releases one or both sides of the chassis, press the frame onto the chassis again
until you hear a ‘click’ on both sides.
other functions
placing the frame in different positions
a. Place the frame on the chassis.
b. Squeeze together the squeeze-fastener on the centre axle.
c Tilt the frame by lifting the top part.
Put the frame in one of the 3 positions.
Note Just the seat can be put in 3 frame positions.
The carrycot can only be used horizontally.
Z10073 - UG_G UK rv07.indd 14 13/2/07 15:15:13
1.
2.
b
c
b
eng
15
removing the frame from the chassis
a. Place the frame in the horizontal position.
b 1. Slide the secondary lock on the square, white button
on the frame support forward.
2. Simultaneously press the 2 square, white buttons on
the frame supports. This releases the frame.
c Pick up the frame.
d. Place the frame on the floor, on the frame supports.
Note The 2 square, white buttons are always used to
remove the frame, with the carrycot or the seat,
and to place it on the floor.
turning the frame around
You can turn around the frame to change the seat and carrycot options.
a. Remove the frame from the chassis.
b While holding the frame in the horizontal position,
turn it around.
c. Place it back on the chassis.
Note Always fit and remove the frame with the frame
bearers of the chassis in the vertical position.
practicing
Now you have assembled the chassis you can:
• fold out the chassis;
• release and move the handlebar;
• fit and remove the swivel wheels;
• activate and de-activate the swivelling action of the swivel wheels;
• fit and remove the large wheels;
• use the parking brake;
• fit, remove and turn the frame around;
• place the seat in different positions.
Z10073 - UG_G UK rv07.indd 15 13/2/07 15:15:18
c
d
a
eng
16
2. assembling the carrycot
The carrycot consists of the frame, the carrycot fabric, with base plate, mattress
and the apron. Touch fasteners ensure that the carrycot hangs stably in the frame.
step 1 attaching the carrycot fabric to the frame
The round side of the carrycot fabric fits in the round side of the frame.
a. Fit the frame (horizontally) onto the chassis.
b. Unfasten the touch fasteners.
c Fasten the 12 touch fasteners to the frame, in the
order 1 to 6.
d Place the 2 waist belts in the pockets near the frame
supports on the sides of the carrycot.
Note Make sure the plastic wires at the top and bottom
stay in their bags.
step 2 fitting the mattress
a Place the round side of the mattress against the round
side of the carrycot, with the cover opening pointing
downwards.
Z10073 - UG_G UK rv07.indd 16 13/2/07 15:15:21
a
eng
17
step 3 fitting the apron
The apron protects the child against the cold and is fitted to the foot end of the carrycot.
a Zip the apron onto the carrycot. First make sure that the
runners at the end on the left are next to each other.
b. If you use the sun canopy, pull the apron’s small elastic
bands over the buttons of the sun canopy’s clamps.
Note See section 8 on fitting the sun canopy.
You can leave the apron on the carrycot when fitting
the sun canopy, rain cover and mosquito net.
Z10073 - UG_G UK rv07.indd 17 13/2/07 15:15:22
b
c
d
eng
18
3. assembling the seat
The seat comprises the seat fabric, which is pulled over the frame. The seat
fabric is fitted with seat pad supports, foot support and seat pad. The seat has
2 shoulder belts, 1 crotch belt and 1 tensioning belt with metal O-rings.
The seat cover has slots for the safety belts on the left and right. Two lap belts
are attached to the frame.
step 1 placing the seat fabric on the frame
a. Place the frame on the floor.
b Slide the rounded upper side of the seat fabric over the
round side of the frame, with the Bugaboo logo facing
forward. Pull on the seat fabric so that it fits tightly.
c Fit the steel seat pad support into the round hole on the
inside of the frame. Do the same on the other side.
d Place one O-ring of the tensioning belt over the
protruding pin on the side of the frame.
e. Place the frame on that side to fasten the O-ring on the
other side.
f. Lean on the frame and push it inwards a little.
Take hold of the tensioning belt and pull the other
metal O-ring over the protruding pin.
Z10073 - UG_G UK rv07.indd 18 13/2/07 15:15:24
g
i
h
j
eng
19
g Attach the ends of the stretch belt underneath the seat.
You should hear a ‘click’. Stretch the belt until it is tight.
h Now give shape to the seat by folding the seat
pad inwards.
i Now pull the waist belts through the cut-aways in the
side of the seat fabric.
j Attach the 2 touch fasteners at the foot end to the
underneath of the frame.
Note Assemble the seat before fitting it onto the chassis.
The seat cannot be placed on the frame before
assembly.
Note Ensure that the seat fasteners, touch fasteners and
tensioning belt are fastened properly.
Z10073 - UG_G UK rv07.indd 19 13/2/07 15:15:26
eng
20
4. various uses of carrycot and seat
You can use the carrycot from the child’s birth until the child is aged around 6
months. It is only intended to be used for children who cannot sit or get up onto
their hands and knees unaided. Do not use the carrycot for children who are
longer than 71 cm/28 inches or heavier than 9 kg/19.8 lbs. You can use the seat
for children older than 6 months who do not weigh more than 17 kg/37.5 lbs.
carrycot
The child is able to lie down completely. This means the spinal column is not placed under any
stress and the child can stretch his/her legs. For use as a pram, only place the carrycot horizontally
on the chassis. The carrycot can be turned around easily. This enables you to see into the carrycot
and the child can look at you. The carrycot can also be used without the chassis, provided it is
placed on a horizontal, stable and dry surface.This carrycot is only to be used in combination with
a bugaboo undercarriage with item code 62100.
note Make sure that the depth from the top of the matress to the top of the side of the carrycot, or
at any position within 300 mm from the harness attachmentspoints should not be reduced to
less than 140 mm when the mattress is in position.
note Mattresses purchased seperately should conform to BS1877 :Part 10.
WARNINGS
Use the carrycot only if installed on the chassis or when placed on a horizontal,
stable and dry surface.
Only use the carrycot in the horizontal position. In any other position, the child
may slide or fall out of the carrycot.
• Before using the carrycot, make sure all touch fasteners and fasteners are secure.
• NEVER use the carrycot as a car bed. Avoid injurious or fatal accidents.
• NEVER use the carrycot fabric when it is not attached to the frame.
seat
You can set the seat to one of three positions. This is only possible if the seat is on the chassis.
The 3 positions are:
1. sitting 2. reclining 3. lying
The seat can be turned around easily. That is how you change the direction your child is facing.
This seat is only to be used in combination with a bugaboo undercarriage with item code 62100.
Note The child’s posture (angle between the back support and seat pad) remains the same in
the 3 positions.
WARNINGS
• Do not use the seat as a freestanding seat on the floor.
Only use the seat when it has been fitted to the chassis and when it is on a flat,
firm surface.
Z10073 - UG_G UK rv07.indd 20 13/2/07 15:15:26
  • Page 1 1
  • Page 2 2
  • Page 3 3
  • Page 4 4
  • Page 5 5
  • Page 6 6
  • Page 7 7
  • Page 8 8
  • Page 9 9
  • Page 10 10
  • Page 11 11
  • Page 12 12
  • Page 13 13
  • Page 14 14
  • Page 15 15
  • Page 16 16
  • Page 17 17
  • Page 18 18
  • Page 19 19
  • Page 20 20
  • Page 21 21
  • Page 22 22
  • Page 23 23
  • Page 24 24
  • Page 25 25
  • Page 26 26
  • Page 27 27
  • Page 28 28
  • Page 29 29
  • Page 30 30
  • Page 31 31
  • Page 32 32
  • Page 33 33
  • Page 34 34
  • Page 35 35
  • Page 36 36

Bugaboo gecko User manual

Type
User manual

Bugaboo Gecko is a versatile, functional, and comfortable stroller designed to meet the needs of your child from birth to toddlerhood. It features a reversible and reclinable seat, a height-adjustable handlebar, a spacious underseat storage bag, and a compact fold for easy transport and storage. The large foam-filled tires and advanced suspension system ensure a smooth ride for your child, even on rough terrain. The Bugaboo Gecko is also compatible with a variety of accessories, including a bassinet, car seat adapter, and rain cover, making it a great choice for parents on the go.

Ask a question and I''ll find the answer in the document

Finding information in a document is now easier with AI