Page is loading ...

User's Manual
Manual de Usuario
JUBI 12A DSP
JUBI 15A DSP

ENGLISH ........................................I
ESPAÑOL .....................................II
APPENDIX ....................................III
V1.1 5/15/2017
JUBI 12A DSP
JUBI 15A DSP
English Español
DSP CONTROLLED ACTIVE LOUDSPEAKERS
ALTAVOCES ACTIVOS CONTROLADOS POR DSP

INTRODUCTION.................................................................1
FEATURES..............................................................................1
APPLICATION........................................................................1
BLUETOOTH CONNECTIVITY...............................................1
SYSTEM OVERVIEW.............................................................2
DSP OVERVIEW......................................................................3
DSP PARAMETERS................................................................6
SPECIFICATIONS................................................................7
APPENDIX
DIMENSIONS......................................................................1
CONTENTS
USER'S MANUAL
Phonic reserves the right to improve or alter any information within this
document without prior notice.
English

1. Read these instructions before operating this
apparatus.
2. Keep these instructions for future reference.
3. Heed all warnings to ensure safe operation.
4. Follow all instructions provided in this document.
5. Do not use this apparatus near water or in locations
where condensation may occur.
6. Clean only with dry cloth. Do not use aerosol or liquid
cleaners. Unplug this apparatus before cleaning.
7. Do not block any of the ventilation openings. Install
in accordance with the manufacturer
’
s instructions.
8. Do not install near any heat sources such as radiators,
heat registers, stoves, or other apparatus (including
.
9. Do not defeat the safety purpose of the polarized or
grounding-type plug. A polarized plug has two blades
with one wider than the other. A grounding type plug
has two blades and a third grounding prong. The wide
blade or the third prong is provided for your safety. If
the provided plug does not into your outlet, consult
an electrician for replacement of the obsolete outlet.
10. Protect the power cord from being walked on or
pinched particularly at plug, convenience receptacles,
and the point where they exit from the apparatus.
11. Only use attachments/accessories by the
manufacturer.
12. Use only with a cart, stand, tripod, bracket, or
table by the manufacturer, or sold with
the apparatus. When a cart is used, use caution
when moving the cart/apparatus
combination to avoid injury from tip-
over.
13. Unplug this apparatus during lighting
storms or when unused for long
periods of time.
14. Refer all servicing to service personnel.
Servicing is required when the apparatus has been
damaged in any way, such as power-supply cord or
plug is damaged, liquid has been spilled or objects
have fallen into the apparatus, the apparatus has
been exposed to rain or moisture, does not operate
normally, or has been dropped.
IMPORTANT SAFETY INSTRUCTIONS
CAUTION: TO REDUCE THE RISK OF ELECTRIC SHOCK,
DO NOT REMOVE COVER (OR BACK)
NO USER SERVICEABLE PARTS INSIDE
REFER SERVICING TO QUALIFIED PERSONNEL
The lightning flash with arrowhead symbol, within an
equilateral triangle, is intended to alert the user to the
presence of uninsulated
“
dangerous voltage
”
within the
product
’
magnitude to constitute a risk of electric shock to persons.
The exclamation point within an equilateral triangle is in-
tended to alert the user to the presence of important operat-
ing and maintenance (servicing) instructions in the literature
accompanying the appliance.
WARNING: To reduce the risk of or electric shock, do
not expose this apparatus to rain or moisture.
CAUTION: Use of controls or
adjustments or performance
of procedures other than those may result in
hazardous radiation exposure.
The apparatus shall not be exposed to dripping or splashingand that no objects with liquids, such as vases,
shall be placed on the apparatus. The MAINS plug is used as thedisconnect device,the disconnect device shall
remain readily operable.
Warning: the user shall not place this apparatus in the area during theoperation so that the mains switch
can be easily accessible.
CAUTION
RISK OF ELECTRIC SHOCK
DO NOT OPEN
English

1JUBI 12A DSP / JUBI 15A DSP
English
INTRODUCTION
Congratulations on your purchase of the Phonic Jubi
12A DSP or Jubi 15A DSP active loudspeakers. The
Jubi’s 700 Watt (continuous) amplier uses both Class
D and AB technology to produce up to a shattering 126
dB maximum SPL. This provides sucient power for
a wide range of venues, large and small. Jubi’s stylish
polymer enclosure also improves acoustical accuracy by
minimizing distortion and diraction. Finally, reliability and
durability was the paramount factor throughout the Jubi
DSP’s development. With 700 Watts of ground shaking
power, a 2-channel on-board mixer, custom engineered
transducers, and great versatility, the Jubi active
loudspeakers simply excel.
Woofers and Tweeters Engineered Right
Unlike many other speaker manufactures that use pre-
assembled OEM woofers and tweeters, Jubi transducers
are designed from scratch, in-house, by Phonic.
Everything, from the cone pulp formula and the curvature
of the tweeter’s titanium membrane to the characteristic of
the magnetic eld, is uniquely Phonic, uniquely Jubi. Jubi
DSP’s state-of-the-art 12” or 15” woofer has a distinctly
high BL force factor and a long-throw extension which
produce marvelously deep and dened bass traditionally
unattainable in small enclosures. The 1” compression
tweeter and 95 degree conical horn complete the Jubi
DSP’s vivid, transparent sound signature.
Advanced Electronics. Advanced Reliability
With over 35 years of experience, Phonic has few
equals when it comes to advanced electrical engineering
technology. With the Jubi series, this cumulated expertise
is on display. Core features include:
● Time alignment and phase correction: In listening
tests, many notice that the Jubi seems more “real”
or more “live” than other speakers. This is because
Phonic’s active electronics ensure that sounds from
the Jubi hit listeners’ ears at the precise moments the
original recording intended.
● High Dampening Factor and Woofer Stabilization:
The Jubi has a high amplifier dampening factor to
ensure that the woofer reaches optimal excursion.
Additionally, Phonic engineers added circuitry to
manage the speaker’s electrical feedback, in effect,
stabilizing woofer movement. The high amplifier
dampening factor and stabilization circuitry give the
Jubi its spectacular bass depth and clarity.
● Transducer Protection: Active electronics oversee
tweeter and woofer excursion, preventing audio
artifacts, distortion, and speaker damage.
● 4th order, phase-accurate, Linkwitz-Riley crossover
● Thermal protection: Precautionary feature that cuts o
the Jubi in case of overheating.
With experience and technology comes excellent
performance and reliability. But you can never be too
careful. As of the launch date, the Jubi DSP has logged
more than 1000 hours of real world and lab tests,
guaranteeing a remarkable level of reliability. From heated
ovens, freezing subzero rooms, high humidity chambers,
to electrical voltage spikes, the Jubi has endured it all.
FEATURES
● Remarkable sound, remarkable power, and remarkable
style in a lightweight, durable enclosure
● 700 Watts of continuous power using Class AB and D
technologies for high and low frequencies, respectively
● 126 dB maximum sound pressure level
● 12" or 15" woofer matched with 1" compression tweeter
● Internal DSP with an array of signal processors
● Flat frequency response between 53/56Hz and 20kHz
● 2 channel onboard mixer: two mic/line inputs through
combo jacks plus a mini-stereo AUX input connector
● Send speaker's main signal o to additional speakers
or ampliers through a balanced XLR output connector
● 35mm pole mount for extended audience reach
● Impact resistant polymer enclosure with internal
bracings
● Tour grade steel grille (1.2 mm)
APPLICATION
35mm mounting point
BLUETOOTH CONNECTIVITY
1. Enter the BT menu in the DSP software and set to “on”.
2. Enter your cell phone or tablet’s Bluetooth setup
options to nd the “Phonic.BT” as an available device.
3. If requested, the password for the Jubi DSP’s Bluetooth
function is 0000. Many modern smartphones will enter
this as the default password.
4. Audio signals received through Bluetooth will be routed
to the “BT in” channel found within the DSP software.
5. To reset the connection, turn your smartphone or
tablet’s Bluetooth connection o and then on again.
6. To avoid phone calls and push notications interrupting
your audio, we advise turning your phone to “ight
mode”. This may disable Bluetooth initially, but you can
typically re-activate it while remaining in ight mode.
7. When a Bluetooth connection is not established to the
Jubi DSP, the Bluetooth will appear as “BT unpair” in
the software.
1. Read these instructions before operating this
apparatus.
2. Keep these instructions for future reference.
3. Heed all warnings to ensure safe operation.
4. Follow all instructions provided in this document.
5. Do not use this apparatus near water or in locations
where condensation may occur.
6. Clean only with dry cloth. Do not use aerosol or liquid
cleaners. Unplug this apparatus before cleaning.
7. Do not block any of the ventilation openings. Install
in accordance with the manufacturer
’
s instructions.
8. Do not install near any heat sources such as radiators,
heat registers, stoves, or other apparatus (including
.
9. Do not defeat the safety purpose of the polarized or
grounding-type plug. A polarized plug has two blades
with one wider than the other. A grounding type plug
has two blades and a third grounding prong. The wide
blade or the third prong is provided for your safety. If
the provided plug does not into your outlet, consult
an electrician for replacement of the obsolete outlet.
10. Protect the power cord from being walked on or
pinched particularly at plug, convenience receptacles,
and the point where they exit from the apparatus.
11. Only use attachments/accessories by the
manufacturer.
12. Use only with a cart, stand, tripod, bracket, or
table by the manufacturer, or sold with
the apparatus. When a cart is used, use caution
when moving the cart/apparatus
combination to avoid injury from tip-
over.
13. Unplug this apparatus during lighting
storms or when unused for long
periods of time.
14. Refer all servicing to service personnel.
Servicing is required when the apparatus has been
damaged in any way, such as power-supply cord or
plug is damaged, liquid has been spilled or objects
have fallen into the apparatus, the apparatus has
been exposed to rain or moisture, does not operate
normally, or has been dropped.
IMPORTANT SAFETY INSTRUCTIONS
CAUTION: TO REDUCE THE RISK OF ELECTRIC SHOCK,
DO NOT REMOVE COVER (OR BACK)
NO USER SERVICEABLE PARTS INSIDE
REFER SERVICING TO QUALIFIED PERSONNEL
The lightning flash with arrowhead symbol, within an
equilateral triangle, is intended to alert the user to the
presence of uninsulated
“
dangerous voltage
”
within the
product
’
magnitude to constitute a risk of electric shock to persons.
The exclamation point within an equilateral triangle is in-
tended to alert the user to the presence of important operat-
ing and maintenance (servicing) instructions in the literature
accompanying the appliance.
WARNING: To reduce the risk of or electric shock, do
not expose this apparatus to rain or moisture.
CAUTION: Use of controls or
adjustments or performance
of procedures other than those may result in
hazardous radiation exposure.
The apparatus shall not be exposed to dripping or splashingand that no objects with liquids, such as vases,
shall be placed on the apparatus. The MAINS plug is used as thedisconnect device,the disconnect device shall
remain readily operable.
Warning: the user shall not place this apparatus in the area during theoperation so that the mains switch
can be easily accessible.
CAUTION
RISK OF ELECTRIC SHOCK
DO NOT OPEN

2 JUBI 12A DSP / JUBI 15A DSP
English
SYSTEM OVERVIEW
1. DSP Display
This screen will display the functions of the internal DSP.
Use the DSP MENU control to adjust these functions.
2. DSP MENU Control
This control is used to control the digital signal processor.
Turn to the left or right to scroll through menus and adjust
parameters. Push the button in to select the parameter
you wish to adjust and again to conrm. Push and hold
the button to return to the main menu.
3. Mic/Line Gain Controls
These controls allows you to adjust the incoming signals
from the Mic/Line Combo input jacks. Setting them to the
left-most position (-∞ dB) will completely cut the incom-
ing signal, whereas the right-most position (MAX) will add
10dB of boost to the signal. Each input also has a volume
control available within the DSP software.
4. Combo (XLR / ¼”) Input Jacks
These inputs are design to accept mic and line level sig-
nals through these combination jacks. They accept either
XLR or ¼” phone jacks (balanced or unbalanced). The
level of this input’s signal is aected by the corresponding
mic/line gain control.
5. AUX In
This 1/8” mini-stereo jack is for connection of auxiliary
devices to the Jubi DSP. This may include a CD or MP3
player through use of a mini-stereo connector or y-cable.
The volume of this input can be adjusted through the Jubi
DSP’s software.
6. Link/Mix Output
The XLR line output will send the Jubi’s main mix, allow-
ing the signals to be employed by additional speakers or
other devices. Do not under any circumstances connect
this output connector to the input of the same unit. This
will cause an audio loop at frequencies and levels that will
be extremely unpleasant.
This output can be used in conjunction with subwoofers
by simply utilizing the subwoofer low-pass lter function
activated within the software.
7. Master Volume
This rotary control will adjust the nal output level of the
Jubi DSP loudspeaker. The Jubi DSP also features an
AMP out volume control within the DSP software.
8. Bluetooth Link Indicator
This LED indicator will light up whenever a connection
is established between another Bluetooth device and the
Jubi. The Jubi DSP’s Bluetooth can be found on your
phone or tablet as “Phonic.BT” and the password is 0000.
When Bluetooth is unpaired, the word “unpaired” will
appear on screen beside the BT name.
9. AC Power Connector
Connect the included AC power cable to this connector
and into a suitable power source allowing the unit to be
powered. This connector also contains the Jubi’s fuse. If
the fuse blows, please replace it with an identical fuse as
listed directly above the AC connector.
10. Power Switch
This switch will turn the Jubi DSP speaker on and o.
1
2
3
4
5
6
9
7
8
10

3JUBI 12A DSP / JUBI 15A DSP
English
DSP OVERVIEW
Each channel has its own set of options available through
the DSP. These are all visible through the LCD display
and controlled by the DSP MENU control. For a full list of
available functions, check the DSP PARAMETERS chart.
Push the DSP MENU control to select the option you wish
to adjust, turn the control left or right to adjust the param-
eter, and push again to conrm. Push and hold the DSP
MENU control to return to the main menu.
ON/OFF
This option can turn the corresponding channel ON and
OFF. This can be found on all input and output channels.
On the BTin function, this will also activate Bluetooth.
VOLUME
The volume of the currently selected channel (CH1, CH2,
BT in, AUX in, MIX out, AMP out) can be adjusted here. The
volume can be adjusted anywhere between -50 and +6 dB.
HPF (High Pass Filter)
Activating a high pass lter on channels 1 and 2 will help
to remove stage rumble and other low-frequency back-
ground noise often picked up by microphones. The HPF
features an on/o option. Directly below this is a frequency
option where the high pass lter’s cut-o frequency can
be adjusted between 50 and 250Hz. This feature is not
available on the Bluetooth or AUX channels.
BASS
Adjust low-frequency audio for any of the input channels
(CH1, CH2, BT and AUX) using the BASS control. The
level of bass can be adjusted between -12 and +12 dB.
The bass control provides a shelving curve for the low-
frequency audio below 250 Hz.
MID LEVEL
The level of the Jubi DSP’s mid EQ allows for anywhere
between -12 and +12dB of cut or boost to be applied to
the signal. The mid EQ is only found on the CH1 and CH2
inputs.
MID FREQUENCY
Unlike the treble and bass controls, the mid frequency
control oers a bell-curve for equalization. The Jubi
DSP’s mid EQ center-frequency can be adjusted by the
user. This option allows the center-frequency to be ad-
justed between 0.5 and 5 kHz.
TREBLE
The treble of each input channel (CH1, CH2, BT in, AUX
in) can be adjusted through this option. The Jubi DSP al-
lows for anywhere between -12 and +12 dB of cut/boost
to be applied to high-frequency signals. This treble control
oers shelving boost/cut for signals over 2.5kHz.
EFXsend
Adjust the level of the EFXsend to send the corresponding
channel (CH1, CH2, BT in or AUX in) to the internal
REVERB processor. The EFXsend on each channel can
be adjusted between -50 and 0 dB. Turning the control
past the -50dB will turn the EFXsend o.

4 JUBI 12A DSP / JUBI 15A DSP
English
REVERB ON/OFF
Turn the reverb eect on and o here.
REVERB VOLUME
The reverb volume can be adjusted here. The reverb’s
volume can be adjusted between -50 and 0 dB. Turning
the volume below -50 will turn the reverb o. The reverb
eect is sent directly to the MIX and AMP output signals.
Users can opt to provide a mix of reverb signal and unpro-
cessed signal by balancing the Reverb volume and the
main input volumes.
REVERB TIME
The time parameter of the reverb eect can be adjusted
here. The reverb time can be adjusted between 100 mil-
liseconds and 10 seconds.
REVERB TYPE
The Jubi DSP has Room, Hall and Plate Reverb eects
all available. Select the type of reverb you wish to use in
this submenu.
GEQ ON/OFF
Activate and deactivate the Graphic Equalizer here. The
Jubi DSP’s GEQ is applied to the AMP output signal.
GEQ1 through GEQ7
Each of the bands on the Jubi DSP’s GEQ are represent-
ed by their own page in the software. The center-frequen-
cy of each of the bands will appear on screen. Users can
adjust the amount of cut/boost between -12 and +12 dB
for each independent band.
MIX out SUBWOOFER
The subwoofer low-pass lter of the MIX out can be turned
on and o using the on/o feature, while the cut-o frequen-
cy can be adjusted between 50 and 350 Hz. Frequencies
above the cut-o frequency will be removed from the mix
output sent through the XLR jack on the rear of the Jubi DSP.
Activating the subwoofer will deactivate the delay function.
MIX out DELAY
An output delay can be applied to the Jubi DSP’s MIX out
and AMP out. Adding a delay to output channels can help
to compensate for distance between speakers in large
multi-speaker setups. Applying a delay time of one milli-
second for every foot that the speaker is away from the
stage is the general rule of thumb in this application (or 3
milliseconds per meter). The Jubi DSP’s delay time can be
adjusted between 1 millisecond and 650 milliseconds. The
delay function is not available if the Subwoofer is active.
The AMP out menu features many of the features previously
listed (including the volume & delay) plus the following:
AMP out LIMITER
The main amplier output features a limiter circuit that will
cut o excessive signals to help protect your speakers and
help make better use of your amplier. Users can adjust
the limiter’s response time between fast, mid, and slow. A
fast limiter will limit all signals, while a slow response time
will allow punchy signals to still make it through the limiter.
AMP out CROSSOVER
The Jubi DSP’s crossover frequency can be adjusted by the
user. The crossover point can be adjusted between 1 and
8 kHz).

5JUBI 12A DSP / JUBI 15A DSP
English
Out of the box, the AMP out crossover point will be set
to 1.6kHz, as we nd this is an optimal position for best
response. It should be noted that initializing the unit will
return the crossover point to the internal default position
of 2.9kHz. Phonic recommends users manually adjust
the crossover point back to 1.6kHz for best results.
AMP SHUTDOWN
The amp shutdown time is selectable between 1 minute
and 90 minutes. This will determine the length of time
the system will wait without a signal before the amp au-
tomatically shuts down. An input signal (above -56dB)
will activate the amplier once again.
SCENES
Within the SYSTEM menu you will nd 4 independent
“Scene” storage slots. Select the Scenes to ‘Save’ or
‘Load” the corresponding scene slot. This option also
features an “Esc” option in the event you don’t wish to
store or recall.
INITIALIZE
Within the SYSTEM menu, select “Initialize” followed by
“Yes” to restore the Jubi DSP to factory default settings.
Please note that initializing the unit will return the default
crossover point to 2.9kHz. We recommend adjusting
this to 1.6kHz for best results.
BACKLIGHT
The backlight of the Jubi DSP’s screen can be adjusted
within the SYSTEM menu. Dimming the light will stop
the screen from distracting the audience.
MONITOR
When not editing functions, users can bring up any of the
monitoring screens. These give real-time information on
system performance, including input levels, output levels
or internal amp temperature.
PROTECTION
The internal amplier oers numerous protection circuits
that ensure your Jubi DSP works eciently. When the
protection circuitry kicks in, a warning will appear on
screen.
A Peak warning will appear on screen (as “PK.”) in the
event that the channel you are currently viewing is re-
ceiving an excessive signal. This applies to any of the
inputs (CH1, CH2, BT in, AUX in) or outputs (MIX out
and AMP out). In the event that a peak warning appears
on screen, Phonic suggests reducing the level of the in-
coming signal(s), reducing the gain or simply lowering
the level of the channel, depending of the cause of the
peak.
When the internal temperature reaches 70 degrees Cel-
sius (158 degrees Fahrenheit), the output level will be
cut by 6 dB to help compensate. When the unit reaches
80 degrees Celsius (176 degrees Fahrenheit), the amp
will shut down. Normal operation will resume when the
temperature is reduced once again.
MAIN MENUS
The below 10 options make up the main menu of the Jubi
DSP. For detailed information on each of these menus
and their subsequent options, please consult the DSP
Parameters table on the next page.

6 JUBI 12A DSP / JUBI 15A DSP
English
DSP PARAMETERS
Parameter Details
1. CH1
On/O On/O
Volume
OFF, -50 to -20dB in 1 dB steps, -20 to -10dB in 0.5dB steps,
-10 to +6dB in 0.2 dB steps
HPF ON/OFF, 50 to 250 Hz in 50Hz steps
Bass (250Hz Shelf) -12 to +12 dB in 0.5dB steps
Mid -12 to +12 dB in 0.5dB steps, 0.5 to 5 kHz in 0.1kHz steps
Treble (2.5Hz Shelf) -12 to +12 dB in 0.5dB steps
EFXsend
OFF, -50 to -20dB in 1 dB steps, -20 to -10dB in 0.5dB steps,
-10 to +0dB in 0.2 dB steps
2. CH2
On/O On/O
Volume
OFF, -50 to -20dB in 1 dB steps, -20 to -10dB in 0.5dB steps,
-10 to +6dB in 0.2 dB steps
HPF ON/OFF, 50 to 250 Hz in 50Hz steps
Bass (250Hz Shelf) -12 to +12 dB in 0.5dB steps
Mid -12 to +12 dB in 0.5dB steps, 0.5 to 5 kHz in 0.1kHz steps
Treble (2.5Hz Shelf) -12 to +12 dB in 0.5dB steps
EFXsend
OFF, -50 to -20dB in 1 dB steps, -20 to -10dB in 0.5dB steps,
-10 to +0dB in 0.2 dB steps
4. AUX in
On/O On/O
Volume
OFF, -50 to -20dB in 1 dB steps, -20 to -10dB in 0.5dB steps,
-10 to +6dB in 0.2 dB steps
Bass (250Hz Shelf) -12 to +12 dB in 0.5dB steps
Treble (2.5Hz Shelf) -12 to +12 dB in 0.5dB steps
EFXsend
OFF, -50 to -20dB in 1 dB steps, -20 to -10dB in 0.5dB steps,
-10 to +0dB in 0.2 dB steps
3. Bluetooth
On/O On/O
Volume
OFF, -50 to -20dB in 1 dB steps, -20 to -10dB in 0.5dB steps,
-10 to +6dB in 0.2 dB steps
Bass (250Hz Shelf) -12 to +12 dB in 0.5dB steps
Treble (2.5Hz Shelf) -12 to +12 dB in 0.5dB steps
EFXsend
OFF, -50 to -20dB in 1 dB steps, -20 to -10dB in 0.5dB steps,
-10 to +0dB in 0.2 dB steps
5. EFX
On/O On/O
Volume
OFF, -50 to -20dB in 1 dB steps, -20 to -10dB in 0.5dB steps,
-10 to +0dB in 0.2 dB steps
Time 100 mSec to 10 Sec in 100 mSec steps
Type Room, Hall, Plate
6. GEQ
On/O On/O
GEQ1 to GEQ7 (60Hz, 120Hz, 360Hz,
1kHz, 2.5kHz, 7kHz, 16kHz)
-12 to +12 dB in 0.5dB steps
7.
MIX out
On/O On/O
Volume
OFF, -50 to -20dB in 1 dB steps, -20 to -10dB in 0.5dB steps,
-10 to +6dB in 0.2 dB steps
Subwoofer On/O, LPF: 50 to 350Hz in 50Hz steps
Delay
On/O, 0 to 50mS in 1mS steps, 50 to 100mS in 2mS steps,
100 to 200mS in 5mS steps, 200 to 650mS in 10mS steps
8.
AMP out
On/O On/O
Volume
OFF, -50 to -20dB in 1 dB steps, -20 to -10dB in 0.5dB steps,
-10 to +6dB in 0.2 dB steps
Limit Slow, Mid, Fast
Delay
On/O, 0 to 50mS in 1mS steps, 50 to 100mS in 2mS steps,
100 to 200mS in 5mS steps, 200 to 650mS in 10mS steps
Amp Shutdown 1 minute to 90 minutes
Xover (Frequency) 1 to 8kHz in 0.1kHz steps (default: 2.9kHz, recommended: 1.6kHz)
9.
System
Scene 1 - 4 Save, Load, Esc
Initialize Restore Factory Defaults (Yes or No?)
BL (Back Light) 1 to 10 (dim to bright), screen o
10.
Monitor
CH1, CH2, BT, AUX, AMPout, MIXout Monitors current signal level
Temperature Monitors internal system temperature

7JUBI 12A DSP / JUBI 15A DSP
English
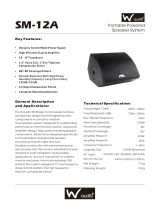
SPECIFICATIONS
Jubi 12A DSP Jubi 15A DSP
Amp Type
Tweter: Class AB
Woofer: Class D
Tweter: Class AB
Woofer: Class D
Continuous Power 700 Watts 700 Watts
Peak Power 1400 Watts 1400 Watts
Minimum THD 0.01% 0.01%
Maximum SPL 126 dB 126 dB
Frequency Response 56 Hz - 20 kHz 53 Hz - 20 kHz
LF Size 12'' 15''
LF-Magnet Material Ferrite Ferrite
LF-VC Diameter 2.6 inch 2.6 inch
HF-Diaphragm Size & Material 1'' Titanium 1'' Titanium
HF-Magnet Material Ferrite Ferrite
Horn Coverage Pattern 60 x 100 degree 60 x 100 degree
Input Connectors Combo (XLR & ¼" TRS), Mini-Stereo Combo (XLR & ¼" TRS), Mini-Stereo
Output Connectors XLR XLR
Enclosure Material Polymer Polymer
Grille Gauge 1.2 mm 1.2 mm
Handles 2 on sides 2 on sides
Monitor Position Yes - Two sides Yes - Two sides
Mounting Stand mounting with 35mm pole socket Stand mounting with 35mm pole socket
Dimensions (HxWxD)
559 x 370 x 277 mm
(22" x 14.56" x 10.9")
680 x 410 x 330 mm
(26.8" x 16.1" x 13")
Net Weight 14.5 kg (32 lbs) 20.2 kg (44.5 lbs)

SERVICE AND REPAIR
For replacement parts, service and repairs please contact the Phonic distributor in your
country. Phonic does not release service manuals to consumers, and advice users to not
attempt any self repairs, as doing so voids all warranties. You can locate a dealer near you at
http://www.phonic.com/where-to-buy/.
WARRANTY INFORMATION
Phonic stands behind every product we make with a no-hassles warranty. Warranty coverage
may be extended, depending on your region. Phonic Corporation warrants this product for a
minimum of one year from the original date of purchase against defects in material and
workmanship under use as instructed by the user’s manual. Phonic, at its option, shall repair
or replace the defective unit covered by this warranty. Please retain the dated sales receipt as
evidence of the date of purchase. You will need it for any warranty service. No returns or repairs
will be accepted without a proper RMA number (return merchandise authorization). In order to
keep this warranty in effect, the product must have been handled and used as prescribed in the
instructions accompanying this warranty. Any tampering of the product or attempts of self repair
voids all warranty. This warranty does not cover any damage due to accident, misuse, abuse,
or negligence. This warranty is valid only if the product was purchased new from an authorized
Phonic dealer/distributor. For complete warranty policy information, please visit
http://www.phonic.com/warranty/.
CUSTOMER SERVICE AND TECHNICAL SUPPORT
We encourage you to visit our online help at http://support.phonic.com/. There you can find
answers to frequently asked questions, tech tips, driver downloads, returns instruction and other
helpful information. We make every effort to answer your questions as soon as possible.
http://www.phonic.com
English

9JUBI 12A DSP / JUBI 15A DSP
Español
INTRODUCCIÓN.............................................................................1
CARACTERISTICAS...................................................................1
SOLICITUD...............................................................................1
RESUMEN DEL SISTEMA.....................................................2
PANORAMA GENERAL DEL DSP...................................................3
CONECTIVIDAD BLUETOOTH.......................................................5
PARAMETROS DSP...................................................................6
ESPECIFICACIONES...........................................................................7
APÉNDICE
DIMENSIONES.................................................................................1
CONTENIDO
MANUAL DEL USUARIO
Phonic se reserva el derecho de mejorar o alterar cualquier información
dentro de este documento, sin previo aviso.

JUBI 12A DSP / JUBI 15A DSP
10
Español

1JUBI 12A DSP / JUBI 15A DSP
Español
INTRODUCCIÓN
Felicitaciones por la compra de los altavoces activos
Phonic Jubi 12A DSP o 15A DSP de Jubi (continuous)
de 700 vatios utiliza tecnología de clase D para producir
un aplastante 126dB SPL máximo, proporcionando
suciente energía para una amplia gama de tipos y
tamaños de conciertos.. Un diseño ligero y montajes
en poste robustos hacen que el Jubi sea el más versátil
altavoz activo, portátil actual. Los ingenieros de Phonic
diseñaron un woofer de alta factor potencia BL y un tweeter
de compresión de 1” para lograr un entorno acústico
asombrosamente amplio y lograr una transparencia
de sonido característica a Jubi. Un recinto de polímero
cuidadosamente elaborado con curvaturas verticales para
mejorar la precisión acústica, reduciendo al mínimo la
difracción interna. Por último, la abilidad y la durabilidad
fueron el factor primordial en todo el desarrollo del altavoz
Jubi. Con de 700 vatios de potencia, un mezclador de 2
canales a bordo, transductores diseñados a la medida, y
una increíble versatilidad, el Jubi 12A DSP y 15A DSP de
Phonic son altavoces a tener en cuenta.
El Woofers y tweeters diseñados como se debe
A diferencia de muchos fabricantes de altavoces que
utilizan woofers y tweeters OEM premontados, los
transductores de Jubi están diseñados desde cero - hecho
a medida para el recinto único de Jubi. Todo, desde la
pulpa de cono, a la curvatura de la membrana de titanio
del altavoz, a las características del campo magnético,
es exclusivamente de Phonic, exclusivamente de Jubi.
El woofers de estado-del-arte de 12” o 15” tiene un alto
factor de fuerza BL y una extensión de largo alcance que
producen graves maravillosamente profundas y un denido
tradicionalmente inalcanzables en recintos pequeños.
El tweeter 1“ de compresión de titanio puro y un cuerno
cónico de 95 grado completa el diseño perfecto en el cual
resultara el sonido transparente y cristalino de Jubi.
Electrónica avanzada. Fiabilidad avanzada
Con más de 35 años de experiencia, Phonic tiene
pocos iguales en lo que respecta a la tecnología de
ingeniería eléctrica avanzada. Con la serie Jubi DSP
esta experiencia acumulada está en exhibición. Las
características principales incluyen:
● Tiempo de alineación y de corrección de fase: En
pruebas de audición, a muchos le parecen que los
altavozes de la serie Jubi son más “real” o más “en
vivo” que otros oradores. Esto se debe a la electrónica
activa de Phonic que asegurar que los sonidos de
la Jubi alcanzan los oídos de los oyentes en los
momentos precisos en lo cual la grabación original lo
preavisaba.
● Alto Factor de amortiguación y estabilización
Woofer: Los altavozes Jubi tienen altos factores de
amortiguación del amplicador para asegurar que
los woofers lleguen a una excursión óptima. Además,
los ingenieros de Phonic han añadido circuitos para
gestionar la realimentación eléctrica teniendo por
efecto de estabilizar eA movimiento woofer. El factor
amplicador de alta amortiguación y circuitos de
estabilización dan a la Jubi su profundidad y claridad
espectacular.
● Protección del transductor: Electrónica activa
supervisan tweeter y woofer de excursión, previniendo
defectos de audio, la distorsión y daños en los
altavoces.
● Quarto orden, precisión de fase, Linkwitz-Riley.
● Protección térmica: función de precaución que corta el
Jubi en caso de sobrecalentamiento.
Con la experiencia y la tecnología viene una abilidad
excepcional. Pero nunca se puede ser demasiado
cuidadoso! A partir de la fecha de lanzamiento, los
altavoces Jubi han registrado más de 1000 horas de
prueba en circunstancias reales y análisis de laboratorio,
lo que garantiza un notable nivel de abilidad. Desde
hornos calientes, a salas de congelación bajo cero, a
las cámaras de alta humedad, a los picos de tensión
eléctrica, el Jubi lo ha soportado todo.
CARACTERÍSTICAS
● Sonido y potencia increíble y un estilo único en un
recinto ligero y durable
● 700 vatios de potencia (continuous) utilizando tanto la
clase AB y las tecnologías de D
● Niveles de presión sonora máxima de 126 dB
● Woofer de 12’’ o 15” emparejado con un tweeters de
compresión
● DSP interno con una matriz de procesadores de señal
● Respuesta de frecuencia plana entre 53/56Hz y 20kHz
● 2 canales mic/línea de mezcla: consiste en dos tomas
combo mic/línea más un conector de entrada AUX
mini-estéreo
● Envió de señal principal a altavoces o amplicadores
adicionales a través de un conector de salida XLR
balanceada
● Montaje de 35 mm en poste para llegar a una audiencia
ampliada
● Recinto polímero resistente a impactos con refuerzos
internos incluidos
● Rejilla de acero (1,2 mm) parte frontal (protección
adicional del cono del altavoz)
APLICACIONES
Barra de montaje de 35mm

JUBI 12A DSP / JUBI 15A DSP
2
Español
RESUMEN DEL SISTEMA
1. Pantalla DSP
Esta pantalla mostrará las funciones del internas del DSP.
Utilice el control DSP MENU para ajustar estas funciones.
2. Control del Menú DSP
Este control se utiliza para controlar el procesador de se-
ñal digital. Gire a la izquierda o a la derecha para despla-
zarse por los menús y ajustar los parámetros. Presione el
botón para seleccionar el parámetro que desea ajustar y
otra vez para conrmar. Mantenga pulsado el botón para
volver al menú principal.
3. Controles de Incremento (Gain) de Mic/Line
Estos controles le permiten ajustar las señales entrantes
de las tomas de entrada Mic / Line Combo. Si ajustado
en la posición más a la izquierda posible (-∞ dB) cor-
tará completamente la señal entrante, mientras que la
posición más a la derecha posible (MAX) añadirá 10dB
de impulso a la señal. Cada entrada también tiene un
control de volumen disponible en el software DSP.
4. Conectores de Entrada Combinados (XLR / ¼”)
Estas entradas están diseñadas para aceptar un micró-
fono y señales de nivel de línea a través de estos conec-
tores combinados. Aceptan conectores XLR o de 6.35mm
(1/4”) (balanceados o no balanceados). El nivel de la se-
ñal de esta entrada está afectada por el control Gain mic/
línea correspondiente.
5. AUX In
Este conector mini-estéreo de 3.17mm (1/8”) es para la
conexión de dispositivos auxiliares al Jubi DSP. Esto puede
incluir un reproductor de CD o MP3 mediante el uso de un
conector mini-estéreo o cable-y. El volumen de esta entrada
se puede ajustar a través del software del Jubi DSP.
6. Salida de Enlace / Mezcla
La salida de línea XLR enviará la mezcla principal de
Jubi, permitiendo que las señales sean utilizadas por al-
tavoces adicionales u otros dispositivos. No conecte en
ningún caso este conector de salida a la entrada de la
misma unidad. Esto causará un bucle de audio en fre-
cuencias y niveles que serán extremadamente desagrad-
ables. Esta salida se puede utilizar junto con subwoofers
simplemente utilizando la función de baja frecuencia de
subwoofer que se puede activar en el software.
7. Volumen Maestro
Este control giratorio ajustará el nivel de salida nal del al-
tavoz Jubi DSP. El Jubi DSP también cuenta con un control
de volumen de salida AMP dentro del software DSP.
8. Bluetooth On /O e Indicador de Enlace
Este indicador LED se encenderá siempre que se es-
tablezca una conexión entre otro dispositivo Bluetooth y
el Jubi. El Bluetooth del DSP de Jubi se puede encontrar
en su teléfono o tableta como “Phonic.BT” y la contrase-
ña es 0000.
9. Conector de Alimentación de CA
Conecte el cable de alimentación de CA incluido, a este
puerto esto permitirá que la unidad se pueda alimentar.
Este conector también contiene el fusible de Jubi. Si el
fusible se funde, reemplácelo por un fusible idéntico, se
indica que fusible se debe usar directamente encima del
conector de CA.
10. Interruptor de Encendido
Este interruptor activará y desactivará el altavoz Jubi DSP.
1
2
3
4
5
6
9
7
8
10

3JUBI 12A DSP / JUBI 15A DSP
Español
VISTA GENERAL DEL DSP
Cada canal tiene su propio conjunto de opciones dis-
ponibles a través del DSP. Todos ellos son visibles a
través de la pantalla LCD y controlados por el DSP
MENU. Utilice el control del DSP MENU para seleccio-
nar la opción que desee ajustar, gire el control hacia la
izquierda o hacia la derecha para ajustar el parámetro
y pulse de nuevo para conrmar. Presione y mantenga
presionado el control DSP MENU para regresar al menú
principal.
ON/OFF
Esta opción puede activar y desactivar el canal corre-
spondiente. Esta tecla se puede encontrar en todos los
canales de entrada y salida. En la función BTin, esto tam-
bién activará el Bluetooth.
VOLUMEN
Aquí se puede ajustar el volumen del canal actualmente se-
leccionado (CH1, CH2, BT in, AUX in, MIX out, AMP out). El
volumen se puede ajustar en cualquier lugar entre -50 y +6 dB.
HPF (Filtro de Paso Alto)
La activación de un ltro de paso alto en los canales 1 y
2 ayudará a eliminar los ruidos de fondo de baja frecuen-
cia frecuentemente captados por los micrófonos. El HPF
cuenta con una opción on/o. Directamente debajo de esto
se encuentra una selección de frecuencia que permite aju-
star el ltro de paso alto entre 50 y 250 Hz. Esta función no
está disponible en los canales Bluetooth o AUX.
BAJO (BASS)
Ajuste el audio de baja frecuencia para cualquiera de los
canales de entrada (CH1, CH2, BT y AUX) usando el control
BASS. El nivel de graves se puede ajustar entre -12 y +12
dB. El control de graves proporciona una curva de ajuste
para el audio de baja frecuencia por debajo de 250 Hz.
NIVEL MEDIO (MID LEVEL)
El Control de nivel del EQ medio del Jubi DSP permite que
se aplique a la señal entre -12 y +12dB de corte o impulso.
El EQ medio sólo se encuentra en las entradas CH1 y CH2.
FRECUENCIA MEDIA (MID FREQUENCY)
A diferencia de los controles de agudos y bajos, el control
de frecuencia media ofrece una curva en forma de cam-
pana para proporcionar una ecualización. El control de fre-
cuencia media EQ del Jubi DSP puede ser ajustado por el
usuario. Esta opción permite ajustar la frecuencia central
entre 0,5 y 5 kHz.
AGUDOS (TREBLE)
Los agudos de cada canal de entrada (CH1, CH2, BT in,
AUX in) se pueden ajustar a través de esta opción. El con
este control el Jubi DSP puede ajustar el audio entre -12
y +12 dB de corte/impulso para ser aplicado a señales de
alta frecuencia. Este control de agudos permite aumentar
o disminuir las señales de más de 2.5 kHz.
Envío EFX (EFXsend)
Ajuste el nivel del envío EFX para enviar el canal corre-
spondiente (CH1, CH2, BT in o AUX in) al procesador RE-
VERB interno. El envío de EFX en cada canal se puede
ajustar entre -50 y 0 dB. Si gira el control más allá de los
50dB, se activará el envío de EFX.

JUBI 12A DSP / JUBI 15A DSP
4
Español
REVERB ON / OFF
Encienda y apague el efecto reverbero.
VOLUMEN DE REVERB
El volumen de reverberación se puede ajustar aquí. El
volumen de la reverberación puede ajustarse entre -50 y 0
dB. Al girar el volumen por debajo de -50 se activará la re-
verb o . El reverbero se envía directamente a las señales
de salida MIX y AMP. Los usuarios pueden optar por pro-
porcionar una mezcla de señal de reverberación y señal
sin procesar equilibrando el volumen de reverberación y
los volúmenes de entrada principales.
TIEMPO REVERB
El parámetro de tiempo de la reverberación puede
ajustarse aquí. El tiempo de reverberación se puede aju-
star entre 100 milisegundos y 10 segundos.
TIPO REVERB
El Jubi DSP dispone de diferentes efectos reverberación
disponibles. Seleccione el tipo de reverb que desea utilizar
en este submenú.
GEQ ON / OFF
Active y desactive el ecualizador gráco aquí. El GEQ de
Jubi DSP se aplica a la señal de salida AMP.
GEQ1 a GEQ7
Cada una de las bandas en el GEQ de Jubi DSP está
representada por su propia página en el software. La fre-
cuencia central de cada una de las bandas aparecerá en la
pantalla. Los usuarios pueden ajustar la cantidad de corte
/ impulso entre -12 y +12 dB para cada banda de forma
independiente.
MEZCLAR SUBWOOFER
El ltro de paso bajo del subwoofer de la salida MIX pu-
ede ser encendido y apagado utilizando la función on/o,
mientras que la frecuencia de corte puede ser ajustada
entre 50 y 350 Hz. Todas las frecuencias por encima de
la frecuencia de corte se eliminarán de la salida de mezcla
enviada a través de la toma XLR en la parte posterior del
Jubi DSP. La activación del subwoofer desactivará la fun-
ción de retardo.
AJUSTE DE RETARDO DE LA SEÑAL
Se puede aplicar un retardo de salida al Jubi DSP. La
adición de un retardo a los canales de salida puede ayudar
a compensar la distancia entre los altavoces en las cong-
uraciones de gran tamaño. Durante los ajustes piense en
aplicar un tiempo de retardo de unos 3 milisegundos para
cada metro por regla general (o 1 milisegundos por pie). El
tiempo de retardo del DSP de Jubi puede ajustarse entre 1
milisegundo y 650 milisegundos. La función de retardo no
está disponible si el Subwoofer está activo.
El menú de salida de AMP incluye muchas de las funcio-
nes mencionadas anteriormente (incluyendo el volumen
y el retardo de la señal), además de lo siguiente:
AMP out LIMITER (LIMITADOR DE SALIDA DEL AMP.
PRINCIPAL)
La salida del amplicador principal cuenta con un circuito lim-
itador que cortará las señales excesivas para ayudar a prote-
ger sus altavoces y ayudar a hacer un mejor uso de su ampli-
cador. Los usuarios pueden ajustar el tiempo de respuesta
del limitador entre rápido, medio y lento. Un limitador rápido
limitará todas las señales, mientras que un tiempo de respu-
esta lento permitirá que unas señales que sobresalen de la
norma aun puedan pasar a través del limitador.

5JUBI 12A DSP / JUBI 15A DSP
Español
AMP CROSSOVER DE SALIDA
La frecuencia de crossover del Jubi DSP puede ser
ajustada por el usuario. El punto de cruce puede ajustarse
entre 1 y 8 kHz).
El punto de cruce de salida de AMP se establecerá
en 1.6kHz, ya que hemos averiguado que este erá el
ajuste óptimo para la mayoría de los propósitos. Debe
tenerse en cuenta que inicializar la unidad hará que la
unidad vuelva al punto de cruce interno predeterminado
de 2.9kHz. Phonic recomienda que los usuarios ajusten
manualmente el punto de crossover de nuevo a 1.6kHz
para obtener los mejores resultados.
APAGADO DEL AMP
El tiempo de apagado del amplicador se puede seleccio-
nar entre 1 minuto y 90 minutos. Esto determinará el tiem-
po que el sistema esperará antes de apagarse cuando ese
se encuentre sin señal. Una señal de entrada (por encima
de -56dB) activará el amplicador una vez más.
AJUSTE DE ESCENAS
Dentro del menú SYSTEM/SISTEMA podrá encontrar 4
ranuras independientes de almacenamiento “para ajustes
preestablecidos/Scenes”. Seleccione la ranura que corre-
sponde a sus necesidades para “Save” (Guardar o “Load”
(Cargar). Esta opción también incluye una opción “Esc” en
caso de que no desee almacenar o recuperar.
INICIALIZAR
En el menú SYSTEM/SISTEMA, seleccione “Inicializar/Ini-
tialize” seguido de “Sí/Yes” para restaurar el Jubi DSP a la
conguración predeterminada de fábrica. Tenga en cuenta
que inicializar la unidad devolverá el punto de crossover
predeterminado a 2.9kHz. Recomendamos ajustar este
valor a 1.6kHz para obtener los mejores resultados.
RETROILUMINACIÓN DE LA PANTALLA
La retroiluminación de la pantalla del Jubi DSP se puede
ajustar dentro del menú SYSTEM/SISTEMA. Oscurecer la
luz impedirá que la pantalla distraiga al público.
MONITOREAR EN PANTALLA
Cuando no edita funciones, los usuarios pueden conectar
una pantalla para nes de monitorización. Éstos propor-
cionan información en tiempo real sobre el rendimiento del
sistema, incluidos los niveles de entrada, los niveles de
salida o la temperatura interna del amplicador.
PROTECCIÓN
El amplicador interno ofrece numerosos circuitos de pro-
tección que garantizan que su Jubi DSP funcione ecaz-
mente. Cuando se inicia el circuito de protección, aparecerá
una advertencia en la pantalla. Una advertencia de niveles
de picos aparecerá en la pantalla (como “PK.”) En el caso
de que el canal que está viendo está recibiendo una señal
excesiva. Esto se aplica a cualquiera de las entradas (CH1,
CH2, BT in, AUX in) o salidas (MIX out y AMP out). En el
caso de que aparezca un pico de advertencia en la pantalla,
Phonic sugiere reducir el nivel de la (s) señal (es) entrante,
ajustando la perilla de Gain o simplemente bajando el nivel
del canal, dependiendo de la causa del pico.
Cuando la temperatura interna alcanza 70 grados centígra-
dos (158 grados Fahrenheit), el nivel de la salida se cor-
tara por 6 dB para ayudar a compensar. Cuando la unidad
alcanza los 80 grados Celsius (176 grados Fahrenheit), el
amplicador se apagará. La unidad será operacional cu-
ando la temperatura se reduzca a un nivel normal.
MENÚS PRINCIPALES
Las siguientes 10 opciones forman el menú principal del
Jubi DSP. Para obtener una información más detallada
sobre cada uno de estos menús y sus opciones, con-
sulte la tabla Parámetros DSP en la página siguiente.
CONEXIÓN BLUETOOTH
1. Entrar en el menú BT en el software DSP y ajustar en
“on”.
2. Entre en la conguración Bluetooth de su teléfono
celular o tableta para encontrar el “Phonic.BT” como
dispositivo disponible.
3. Si se le solicita, la contraseña para la conexión
Bluetooth de Jubi DSP es 0000. Muchos smartphones
modernos entrarán esta contraseña predeterminada
de forma automática.
4. Las señales de audio recibidas a través de Bluetooth
serán encaminadas al canal “BT in” que se encuentra
dentro del software DSP.
5. Para restablecer la conexión, active su Smartphone
o La conexión Bluetooth de la tableta y luego vuelva
a encenderla.
6. Para evitar las llamadas telefónicas y noticaciones
diversas que podrían interrumpir su audio, le
recomendamos que ponga el teléfono en modo vuelo”.
Esto puede que también desactive el Bluetooth de
su teléfono pero podrán siempre reactivarlo mientras
permanecen en modo de vuelo.
7. Cuando no se establece una conexión Bluetooth a la
Jubi DSP, el Bluetooth aparecerá como “BT unpair”
en El software.

JUBI 12A DSP / JUBI 15A DSP
6
Español
ESPECIFICACIONES
Parameter Details
1. CH1
Encendido/apagado (ON/OFF) Encendido/apagado (ON/OFF)
Volumen
OFF, -50 a -20dB en pasos de 1 dB, -20 a -10dB en pasos de 0,5dB,
-10 a + 6dB en pasos de 0,2 dB
HPF ON / OFF, 50 a 250 Hz en pasos de 50 Hz
Bajo (curva de 250 Hz) -12 a +12 dB en pasos de 0,5dB
Medio -12 a +12 dB en pasos de 0,5dB, 0,5 a 5 kHz en pasos de 0,1kHz
Treble (curva de 2,5 Hz) -12 a +12 dB en pasos de 0,5dB
Envío EFX
OFF, -50 a -20dB en pasos de 1 dB, -20 a -10dB en pasos de 0,5dB,
-10 a + 0dB en pasos de 0,2 dB
2. CH2
Encendido/apagado (ON/OFF) Encendido/apagado (ON/OFF)
Volumen
OFF, -50 a -20dB en pasos de 1 dB, -20 a -10dB en pasos de 0,5dB,
-10 a + 6dB en pasos de 0,2 dB
HPF ON / OFF, 50 a 250 Hz en pasos de 50 Hz
Bajo (curva de 250 Hz) -12 a +12 dB en pasos de 0,5dB
Medio -12 a +12 dB en pasos de 0,5dB, 0,5 a 5 kHz en pasos de 0,1kHz
Treble (curva de 2,5 Hz) -12 a +12 dB en pasos de 0,5dB
Envío EFX
OFF, -50 a -20dB en pasos de 1 dB, -20 a -10dB en pasos de 0,5dB,
-10 a +0dB en pasos de 0,2 dB
3.
Entrada
AUX
(AUX in)
Encendido/apagado (ON/OFF) Encendido/apagado (ON/OFF)
Volumen
OFF, -50 a -20dB en pasos de 1 dB, -20 a -10dB en pasos de 0,5dB,
-10 a + 6dB en pasos de 0,2 dB
Bajo (curva de 250 Hz) -12 a +12 dB en pasos de 0,5dB
Treble (curva de 2,5 Hz) -12 a +12 dB en pasos de 0,5dB
Envío EFX
OFF, -50 a -20dB en pasos de 1 dB, -20 a -10dB en pasos de 0,5dB,
-10 a + 0dB en pasos de 0,2 dB
4.
Entrada
Blue-
tooth
Encendido/apagado (ON/OFF) Encendido/apagado (ON/OFF)
Volumen
OFF, -50 a -20dB en pasos de 1 dB, -20 a -10dB en pasos de 0,5dB,
-10 a + 6dB en pasos de 0,2 dB
Bajo (estante de 250 Hz) -12 a +12 dB en pasos de 0,5dB
Agudos (estante de 2,5 Hz) -12 a +12 dB en pasos de 0,5dB
Envío EFX
OFF, -50 a -20dB en pasos de 1 dB, -20 a -10dB en pasos de 0,5dB,
-10 a +0dB en pasos de 0,2 dB
5. EFX
Encendido/apagado (ON/OFF) Encendido/apagado (ON/OFF)
Volumen
OFF, -50 a -20dB en pasos de 1 dB, -20 a -10dB en pasos de 0,5dB,
-10 a + 0dB en pasos de 0,2 dB
Hora 100 mSec a 10 seg en pasos de 100 mSec
Tipo Habitación, Hall, Plato
6. GEQ
Encendido/apagado (ON/OFF) Encendido/apagado (ON/OFF)
GEQ1 a GEQ7 (60Hz, 120Hz, 360Hz,
1kHz, 2.5kHz, 7kHz, 16kHz)
-12 a +12 dB en pasos de 0,5dB
7.
Salida
del MIX
(MIX out)
Encendido apagado Encendido apagado
Volumen
OFF, -50 a -20dB en pasos de 1 dB, -20 a -10dB en pasos de 0,5dB,
-10 a + 6dB en pasos de 0,2 dB
Subwoofer Encendido / Apagado, LPF: 50 a 350 Hz en pasos de 50 Hz
Retrasar
Encendido / Apagado, 0 a 50mS en pasos de 1mS, 50 a 100mS en pasos
de 2mS, 100 a 200mS en pasos de 5mS, 200 a 650mS en pasos de 10mS
8.
Salida
AMP
(AMP out)
Encendido/apagado (ON/OFF) Encendido/apagado (ON/OFF)
Volumen
OFF, -50 a -20dB en pasos de 1 dB, -20 a -10dB en pasos de 0,5dB,
-10 a + 6dB en pasos de 0,2 dB
Límite Lento, medio, rápido
Retrasar
Encendido / Apagado, 0 a 50mS en pasos de 1mS, 50 a 100mS en pasos
de 2mS, 100 a 200mS en pasos de 5mS, 200 a 650mS en pasos de 10mS
Apagado del Amplicador 1 minuto a 90 minutos
Xover (Frecuencia) 1 a 8kHz en pasos de 0.1kHz (por defecto: 2.9kHz, recomendado: 1.6kHz)
9.
Sistema
(System)
Escena 1 - 4 Guardar, Cargar, Esc
Inicializar Restaurar valores predeterminados de fábrica (Sí o No?)
BL (luz trasera) 1 a 10 (débil a brillante)
10.
Monitor
CH1, CH2, BT, AUX, AMPout, MIXout Supervisa el nivel de señal actual
Temperatura Monitorea la temperatura interna del sistema
/