Gorenje HZF3369E Owner's manual

Category
Fridge-freezers
Type
Owner's manual

This manual is also suitable for

GB
DETAILED
INSTRUCTIONS FOR
USE OF UPRIGHT
REFRIGERATOR AND
FREEZER
www.gorenje.comwww.gorenje.com
2
458851
We thank you for the
confidence you have shown by purchasing
our appliance.
We wish you find a lot of pleasure in its use.
The appliance is intended solely for
household use.
Refrigerator freezer (hereinafter: the
appliance) consists of two parts: the upper
part is the refrigerator and the lower part is
the freezer.
The refrigerator is intended for storing
fresh food at temperatures above 0°C.
The freezer is intended for freezing fresh
food and for long-term storage of frozen
food (up to one year, depending on the
type of food).
3
TABLE OF CONTENTS
458851
INTRODUCTION
APPLIANCE
DESCRIPTION
DEFROSTING
AND CLEANING
THE APPLIANCE
OTHER
STORING AND
FREEZING FOOD
4 IMPORTANT NOTES AND WARNINGS
7 ADVICE FOR SAVING POWER WITH REFRIGERATION
APPLIANCES
8 APPLIANCE DESCRIPTION
9 INSTALLATION AND CONNECTION
12 CHANGING THE DIRECTION OF DOOR OPENING
14 OPERATING THE APPLIANCE
25 APPLIANCE INTERIOR EQUIPMENT
30 RECOMMENDED DISTRIBUTION OF FOOD IN THE APPLIANCE
31 STORING FOOD IN THE REFRIGERATOR
32 STORING FOOD IN THE FRESHACTIVE DRAWER
33 STORING FOOD IN THE ZEROZONE DRAWER
34 STORING FOOD IN THE ZEROZONE COMPARTMENT
36 FREEZING AND STORING FROZEN FOOD
36 Freezing process
37 Important warnings on freezing fresh food
37 Storage of industrially frozen food
38 Frozen food storage time
38 Defrosting frozen food
39 DEFROSTING THE APPLIANCE
40 CLEANING THE APPLIANCE
41 TROUBLESHOOTING
43 INFORMATION ABOUT APPLIANCE NOISE
4
IMPORTANT
NOTES AND WARNINGS
458851
This appliance can be used by children aged from 8
years and above and persons with reduced physical,
sensory or metal capabilities or lack of experience
and knowledge if they have been given supervision or
instruction concerning use of the appliance in a safe
way and understand the hazards involved.
Children shall not play with the appliance.
Cleaning and user maintenance shall not be made by
children without supervision.
Before connecting the appliance to the power mains,
please read carefully the instructions for use which
describe the appliance and its correct and safe use. The
instructions apply for several appliance types/models;
thus, settings or equipment may be described herein
which is not available in your appliance. The instruction
manual includes the NO FROST version/model of
the freezer which is fitted with a fan and in which the
defrosting process is automatic.
Remove the packaging intended for protecting the
appliance or particular parts during transport.
Spacers are fitted on the
corners of the doors.
Remove them and insert
the supplied plugs into
their slots (only in some
models).
5
458851
Before connecting the appliance to the power
mains, let the appliance rest in a vertical position for
approximately 2 hours. This will reduce the possibility
of operation faults due to the effect of transport on the
cooling system.
The appliance must be connected to the power
mains and grounded in compliance with the effective
standards and regulations.
The appliance may not be used outdoors and it may
not be exposed to rain.
Do not store explosive substances such as aerosol cans
with a flammable propellant in this appliance.
Before cleaning the appliance, unplug the appliance
from the power mains (unplug the power cord from the
wall outlet).
If the power cord is damaged, it must be replaced by a
service technician or other adequately trained person.
If the appliance will be out of use for a prolonged
period of time, switch it off using the relevant button,
and unplug the appliance from the power mains. Empty
the appliance, defrost it, clean it, and leave the door
ajar.
If LED lighting does not work, call a service technician.
Do not attempt a repair of the LED lighting yourself, as
there is danger of contact with high voltage!
6
458851
If the VitaLED lighting does not work, call a service
technician.
To protect the environment, take the obsolete appliance
to an authorized home appliance collection center.
Packaging is made of environmentally friendly materials
that can be recycled, disposed of, or destroyed without
any hazard to the environment.
Rating plate can be found in the appliance interior. If
the language on the rating plate is not the language of
your choice or the language of your country, replace it
with the one supplied.
WARNING! Keep ventilation openings, in the appliance
enclosure or in the built-in structure, clear of obstruction.
WARNING! Do not use mechanical devices or other
means to accelerate the defrosting process, other than
those recommended by the manufacturer.
WARNING! Do not damage the refrigerant circuit.
WARNING! Do not use electrical appliances inside the
food storage compartments of the appliance, unless
they are of the type recommended by the manufacturer.
The symbol on the product or its packaging indicates that the product should not
be treated as normal household waste. The product should be taken to an
authorized collection center for waste electric and electronic equipment
processing. Correct disposal of the product will help prevent any negative effects
on the environment and health of people which could occur in case of incorrect product
removal. For detailed information on removal and processing of the product, please
contact the relevant municipal body in charge of waste management, your waste
disposal service, or the store where you bought the product.
7
ADVICE FOR SAVING POWER
WITH REFRIGERATION
APPLIANCES
458851
• Install the appliance as specifi ed in the instruction manual.
• Do not open the door more often than necessary.
• Occasionally make sure air circulation underneath the appliance is unobstructed.
• Condenser unit on the rear wall should be kept clean (see chapter Cleaning the
appliance).
• If the gasket is damaged or does not provide a perfect seal for other reasons, have it
replaced as soon as possible.
• Store the food in tightly sealed containers or appropriate packaging.
• Before placing the food in the appliance, cool it to room temperature.
• Defrost frozen food in the refrigerator compartment.
• Remove the drawers from the freezer compartment as described in the instruction
manual, in order to make use of the entire interior.
• Defrost your conventional freezer when an approximately 3-5 milimeter layer of of frost
or ice has built up on the refrigerated surfaces.
• Make sure the layout of shelves in the compartment is uniform and that the food
is placed so that the air can freely circulate in the appliance interior (observe the
recommended placement of food as described in the instructions).
• In appliances with a fan, do not block the fan slots.
• If you do not need the fan or the ionizer, switch them o to reduce power consumption.
8
APPLIANCE DESCRIPTION
458851
• Appliance interior equipment may change according to the appliance model.
• The drawers are protected against pulling out. To remove a drawer from the appliance,
open it, then lift the front part and pull it out.
** Freezer/ZeroZone is an adjustable area that can be used either as a freezing
compartment or a ZeroZone. When the appliance is switched on for the fi rst time, this
compartment will function as a freezer.
* Only in some models
A
B
1
2
5
8
9
10
11
12
4
3
6
7
13
13
A Refrigerator
1 Control unit
2 Led lighting of refrigerator
interior
3 IonAir air ionizer (+ on/off
switch)
4 Bottle rack
5 Pull-out glass shelf (height
adjustable)
6 FreshActive/ZeroZone
drawer*
7 VitaLED light*
8 CrispActive/CrispZone fruit
and vegetables drawer with
humidity control
9 SimpleSlide height-
adjustable door bin
10 Bottle bin
B Freezer / ZeroZone**
11 Freezer drawers / ZeroZone
area
12 Glass shelves
13
Foot*
9
INSTALLATION AND
CONNECTION
458851
SELECTING THE ROOM
• Install the appliance in a dry and well ventilated room. The appliance will operate
correctly if the environment temperature is in the interval specifi ed in the table. The
appliance class is indicated on the rating plate / label with the basic information on the
appliance.
Class Temperature
SN (subnormal) from +10°C to +32°C
N (normal) from +16°C to +32°C
ST (subtropical) from +16°C to +38°C
T (tropical) from +16°C to +43°C
Warning: Make sure the room where the appliance is installed is large enough. There
should be at least 1 m
3
of space per 8 grams of refrigerant. Amount of refrigerant is stated
on the rating plate in the appliance interior.
INSTALLING THE APPLIANCE
Appliance installation should be carried
out by at least two persons to avoid any
physical injury or damage to the appliance.
• The appliance must stand level or tilted
slightly to the back, stable on a solid
base. At the front, the appliance is fi tted
with two adjustable legs that can be used
to level the appliance. At the rear side,
casters allow for easier installation of the
appliance (only with some models).
There should be a clearance of at least 5 cm
between the appliance and any cupboard
installed above it, in order to allow adequate
cooling of the condenser unit.
• The appliance is supplied with two
spacers which should be installed on
the lower part of the housing to prevent
from pushing the appliance too close to
the wall. Appliance may also be installed
without the spacers; however, this may
increase power consumption.
• Do not expose the appliance to direct
sunlight and do not place it near any
source of heat. If this cannot be avoided,
install an insulation panel.
max
30 mm
> 90°
10
458851
• The appliance may stand alone or it may be placed ext to a cupboard or a wall. Consider
the clearance required to fully open the door in order to allow pulling out the drawers
and shelves (see installation diagram).
1249 mm
688 mm
640 mm
600 mm
644 mm
max 90°
1
201 mm
11
458851
CONNECTING THE APPLIANCE
• Connect the appliance to the power mains using a connection cable. The wall outlet
should be fi tted with a ground contact (safety socket). Nominal voltage and frequency
are indicated on the rating plate/label with basic information on the appliance.
• The appliance must be connected to the power mains and grounded in compliance
with the e ective standards and regulations. The appliance will withstand short-term
deviations from the nominal voltage, but not more than +/- 6%.
Note: When placing the appliances side by side, the anti-dew (anti-condensation) set has to be
purchased and installed!
Code for ordering the set:
Dry room (relative humidity below
60%)
Appliances with a
height of 1850 mm
Appliances with a
height of 2000 mm
METAL PLATE (INOX) 576604 576606
PLASTIC PLATE
WHITE 672114 672118
GREY 672115 672117
BLACK 672116 672120
Humid room (relative humidity
over 60%)*
Appliances with a
height of 1850 mm
Appliances with a
height of 2000 mm
METAL PLATE (INOX) 558776* 558855*
* For safety reasons, the appliance should only be installed by an authorized service
technician!
12
CHANGING THE DIRECTION OF
DOOR OPENING
458851
Tools required: socket wrench No. 8, Phillips screwdriver, torx 25, flat screwdriver
The procedure to change the direction of door opening should be carried out by at least
two persons.
1. Remove the upper hinge cover (A) and the cover from the connector (B1).
2. Unplug the connector (C), unscrew the upper hinge (D) and remove the upper door (E).
3. Remove the side panels (F) and (G), then unscrew and remove the middle panel (H).
4. Move the upper hinge (A) and the connector and cable to the opposite side. Replace
all three panels (F), (G), and (H). Make sure the cable runs through the grooves in the
panels like it did before disassembly.
5. Then remove the covering plugs (I), unscrew the mid hinge (J) and remove the lower
door (K) from the lower hinge (L).
6. Tilt the appliance backwards, undo the lower hinge (L) and the foot (M) and install them
on the opposite side. Make sure the washer is installed like it was before disassembly.
7. Move the door bearings (N) and retainers (S) to the opposite side.
8. Place the Mid hinge (J) on the lower door (K) and place the lower door on the lower
hinge (L). Fasten the mid hinge (the door should be open while you do this). Do not
forget to place the washers (O) and covering plugs (I) as they were placed before the
disassembly.
9. Place the upper door (E) on the middle hinge (J). Remove the covering plugs (P) and
(B2). Reconnect the connector (C) and fasten the upper hinge.
10. Install the over of the upper hinge (A), connector cap (B1), and covering caps (P) and
(B2).
11. Changing the side of the handle (R): remove the plugs/caps, undo the screws and
fasten the handle on the opposite side.
Place the plugs/caps on the opposite side.
Note: Step 11 (handle replacement) can be skipped on appliances with integrated
handle.
13
458851
1
2
3
D
4
J
K
5
L
M
M
6
7
J
K
O
I
8
I
N
10
9
11
E
C
P
D
B2
B2
B1
A
P
I
R
E
D
C
D
GH
F
N
S
14
OPERATING THE APPLIANCE
458851
CONTROL UNIT 1
A Appliance on key and refrigerator
compartment o key
B Acoustic alarm o key
C Super cool on/o key
D Refrigerator compartment temperature
keys
E Refrigerator temperature display
F Freezer compartment on key and
appliance o key
G ECO function on/o key
H Super freeze on/o key
I Freezer compartment temperature keys
J Freezer compartment temperature
display
A
B
C
E
D
J
I
H
G
F
15
458851
SWITCHING THE APPLIANCE ON/OFF
Switching the appliance on: Switch on the
appliance by briefly pressing the key A.
With this model, it is possible to only switch
on the freezer compartment while the
refrigerator compartment is switched off.
This setting can be made in two ways:
- briefly press the F key to switch on the
freezer compartment only; or
- first briefly press the A key to switch on
the entire appliance. Then, press and hold
(for three seconds) the A key to switch
off the refrigerator compartment.
When the A key is pressed again, the
refrigerator compartment will be switched
back on.
Switching off the appliance: To switch off
the appliance, press and hold (for three
seconds) the key F (caution: appliance
will remain powered, i.e. there will still be
electric current in the appliance).
ADJUSTING THE TEMPERATURE
• To set the temperature in the refrigerator compartment use the keys D:
lower temperature ; higher temperature.
• Temperature in the refrigerator compartment can be set from +1°C to +9°C.
• After one of the D keys is pressed, the most recent temperature setting will fl ash on
the display E. Use the D keys to set the desired temperature. Three seconds after the
last key was pressed, the most recent temperature setting is stored for the refrigerator
compartment.
• Recommended setting is 4°C.
16
458851
To set the temperature in the freezer
compartment use the keys I:
lower temperature ;
higher temperature.
• Temperature in the freezer compartment
can be set from -24°C to -16°C.
After one of the I keys is pressed, the most
recent temperature setting will fl ash on the
display J. Use the I keys to set the desired
temperature. Three seconds after the last key
was pressed, the most recent temperature
setting is stored for the freezer compartment.
• Recommended setting is -18°C.
FREEZER BOOST FUNCTION (SUPER FREEZE)
• Use this setting after switching on
the appliance for the fi rst time, before
cleaning, or 24 hours before inserting a
large amount of food.
Switching on the freezer boost (super
freeze) function: Press the H key. FF will
appear on the display J.
If the freezer boost is not deactivated
manually, it will be automatically switched
off after approximately 2 days. Then the
temperature of the freezer compartment
returns to the most recently set value.
EXTREME FREEZING (UPPER DRAWER OF THE FREEZER
COMPARTMENT)
In order to quickly freeze fresh food, use the
XtremeFreeze function that is only active in
the upper drawer of the freezer compartment.
It involves intensive blowing of cool air in
that part of the appliance. Faster freezing will
retain more vitamins, minerals, and nutrients
in the food for a longer period of time.
Switching on the freezer boost
(XtremeFreeze) function: Press the H key
an hold it for at least 3 seconds. EF will
appear on the display J.
17
458851
• With this setting, the compressor will operate continuously and the temperature in the
freezer compartment will drop considerably.
• If the setting is not deactivated manually (by pressing the »H« key), it will be deactivated
automatically after approximately one day. Freezer compartment temperature will return
to the most recent setting.
• Use this setting for freezing smaller amounts of food (up to 2 kilograms) in the upper
drawer. When freezing a large amount of food, the setting should be activated 12 hours
before the food is placed in the freezer.
• Use this setting after switching on the appliance for the fi rst time, before cleaning, or
before inserting a large amount of food.
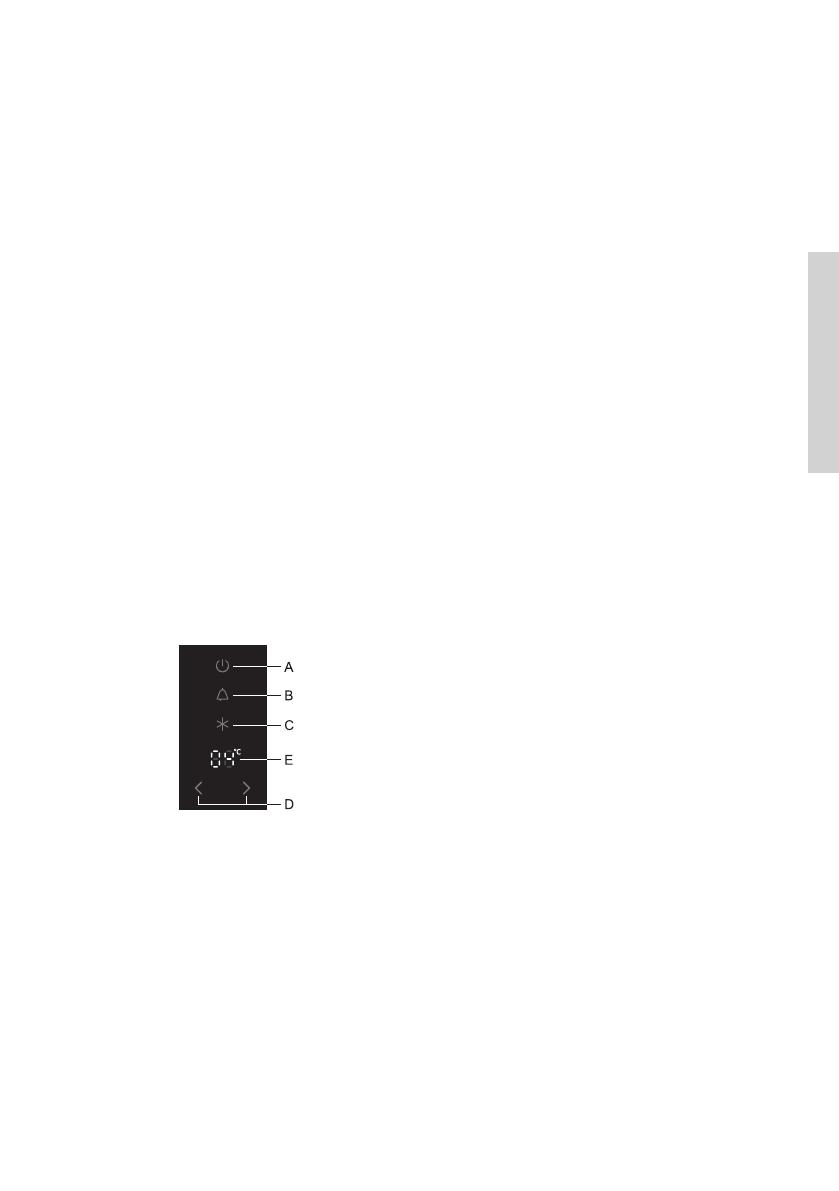
Switching on the refrigerator boost (super cool) function: Press the C key.
If the function is not deactivated manually, it will be deactivated automatically after
approximately six hours. Refrigerator compartment temperature will return to the most
recent setting.
REFRIGERATOR BOOST (SUPER COOLING)
(REFRIGERATOR COMPARTMENT)
HIGH TEMPERATURE ALARM
If the temperature inside the appliance is
too high, acoustic alarm will be activated
(intermittent tone) and the B key will flash.
• Acknowledge and turn o the acoustic
alarm by pressing the B key.
• The acoustic alarm will be activated
every 24 hours if the temperature in the
appliance is not low enough and there is
danger of food spoilage. The alarm will be
switched o automatically as soon as the
temperature in the freezer drops to a level
that no longer presents spoilage hazard.
• When the appliance is switched on for the fi rst time, there is a 24-hour delay in
temperature alarm operation since the appliance will not have reached the adequate
temperature. Thus, unnecessary activation of alarm is prevented.
Open refrigerator door alarm: if the refrigerator or freezer compartment door is open for
more than 2 minutes, acoustic alarm will be activated and the B key will flash. When the door is
closed, the alarm will be deactivated. It can also be switched off by pressing the B key.
18
458851
ECO FUNCTION
To activate the Eco function, press the G
key. With this function activated, appliance
will operate with optimum settings.
SAFETY BLOCK (CHILD SAFETY LOCK)
Use this function if you do not wish to
manually adjust the appliance settings.
To activate, press and hold the B key (for
three seconds); LL will appear on the
display E.
This will lock all keys except B.
To deactivate the safety lock, press the B
key and hold it for three seconds.
19
458851
A Appliance on key and refrigerator
compartment o key
B VitaLED light on/o key
C Super cool on/o key
D Refrigerator compartment temperature
keys
E Refrigerator temperature display
F Freezer compartment on key and
appliance o key
G Freezer/ZeroZone switch key
H Super freeze on/o key
I Freezer compartment temperature
keys**
J Freezer compartment temperature
display**
CONTROL UNIT 2
A
B
C
E
D
J
I
H
G
F
20
458851
SWITCHING THE APPLIANCE ON/OFF
Switching the appliance on: Switch on the
appliance by briefly pressing the key A.
With this model, it is possible to only switch
on the freezer compartment while the
refrigerator compartment is switched off.
This setting can be made in two ways:
- briefly press the F key to switch on the
freezer compartment only; or
- first briefly press the A key to switch
on the entire appliance. Then, press
and hold (for three seconds) the
A key to switch off the refrigerator
compartment.
When the A key is pressed again, the
refrigerator compartment will be switched
back on.
Switching off the appliance: To switch off
the appliance, press and hold (for three
seconds) the key F (caution: appliance
will remain powered, i.e. there will still be
electric current in the appliance).
  • Page 1 1
  • Page 2 2
  • Page 3 3
  • Page 4 4
  • Page 5 5
  • Page 6 6
  • Page 7 7
  • Page 8 8
  • Page 9 9
  • Page 10 10
  • Page 11 11
  • Page 12 12
  • Page 13 13
  • Page 14 14
  • Page 15 15
  • Page 16 16
  • Page 17 17
  • Page 18 18
  • Page 19 19
  • Page 20 20
  • Page 21 21
  • Page 22 22
  • Page 23 23
  • Page 24 24
  • Page 25 25
  • Page 26 26
  • Page 27 27
  • Page 28 28
  • Page 29 29
  • Page 30 30
  • Page 31 31
  • Page 32 32
  • Page 33 33
  • Page 34 34
  • Page 35 35
  • Page 36 36
  • Page 37 37
  • Page 38 38
  • Page 39 39
  • Page 40 40
  • Page 41 41
  • Page 42 42
  • Page 43 43
  • Page 44 44

Gorenje HZF3369E Owner's manual

Category
Fridge-freezers
Type
Owner's manual
This manual is also suitable for

Ask a question and I''ll find the answer in the document

Finding information in a document is now easier with AI