
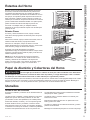
Write the model and serial
numbers here:
Model # ____________________
Serial # ____________________
You can find them on a label on
the side trim or on the front of the
(lower) oven behind the oven door.
GE is a trademark of the General Electric Company. Manufactured under trademark license.
ESPAÑOL
Para consultar una version en
español de este manual de
instrucciones, visite nuestro sitio de
internet GEAppliances.com.
OWNER’S MANUAL
WALL OVEN
Built-In Electric
49-80721 Rev. 2 08-19 GEA
JK3000 - 27" Single Wall Oven
JT3000 - 30" Single Wall Oven
JK3500 - 27" Double Wall Oven
JT3500 - 30" Double Wall Oven
SAFETY INFORMATION ..........3
USING THE OVEN
Single Wall Oven .......................6
Double Wall Oven ......................7
Special Features ........................8
Oven Racks ............................9
Aluminum Foil and Oven Liners ...........9
Cookware ..............................9
Cooking Modes ........................10
Cooking Guide ........................ 11
CARE AND CLEANING
Oven .................................12
Oven Light ............................13
Oven Door ............................14
TROUBLESHOOTING TIPS .......15
LIMITED WARRANTY ............18
ACCESSORIES ....................19
CONSUMER SUPPORT ...........20

2 49-80721 Rev. 2
THANK YOU FOR MAKING GE APPLIANCES A PART OF YOUR HOME.
Whether you grew up with GE Appliances, or this is your first, we’re happy to have you in the family.
We take pride in the craftsmanship, innovation and design that goes into every GE Appliances
product, and we think you will too. Among other things, registration of your appliance ensures that we
can deliver important product information and warranty details when you need them.
Register your GE appliance now online. Helpful websites and phone numbers are available in the
Consumer Support section of this Owner’s Manual. You may also mail in the pre-printed registration
card included in the packing material.

49-80721 Rev. 2 3
READ AND SAVE THESE INSTRUCTIONS
IMPORTANT SAFETY INFORMATION
READ ALL INSTRUCTIONS BEFORE USING THE APPLIANCE
SAFETY INFORMATION
WARNING
GENERAL SAFETY INSTRUCTIONS
Ŷ 8VHWKLVDSSOLDQFHRQO\IRULWVLQWHQGHGSXUSRVHDV
described in this Owner’s Manual.
Ŷ%HVXUH\RXUDSSOLDQFHLVSURSHUO\LQVWDOOHGDQG
grounded by a qualified installer in accordance with
the provided installation instructions.
Ŷ'RQRWDWWHPSWWRUHSDLURUUHSODFHDQ\SDUWRI\RXU
oven unless it is specifically recommended in this
manual. All other servicing should be performed by a
qualified technician.
Ŷ%HIRUHSHUIRUPLQJDQ\VHUYLFHGLVFRQQHFWWKH
power supply at the household distribution panel by
removing the fuse or switching off the circuit breaker.
Ŷ'RQRWOHDYHFKLOGUHQDORQH²FKLOGUHQVKRXOGQRW
be left alone or unattended in an area where an
appliance is in use. They should never be allowed to
climb, sit or stand on any part of the appliance.
Ŷ
CAUTION
'RQRWVWRUHLWHPVRILQWHUHVW
to children in cabinets above an oven - children
climbing on the oven to reach items could be
seriously injured.
Ŷ8VHRQO\GU\SRWKROGHUV²PRLVWRUGDPSSRWKROGHUV
RQKRWVXUIDFHVPD\UHVXOWLQEXUQVIURPVWHDP'R
QRWOHWSRWKROGHUVWRXFKKRWKHDWLQJHOHPHQWV'R
not use a towel or other bulky cloth in place of pot
holders.
Ŷ 1HYHUXVH\RXUDSSOLDQFHIRUZDUPLQJRUKHDWLQJ
the room.
Ŷ 'RQRWWRXFKWKHKHDWLQJHOHPHQWVRUWKHLQWHULRU
surface of the oven. These surfaces may be hot
enough to burn even though they are dark in color.
'XULQJDQGDIWHUXVHGRQRWWRXFKRUOHWFORWKLQJRU
other flammable materials contact any interior area of
the oven; allow sufficient time for cooling first. Other
surfaces of the appliance may become hot enough to
cause burns. Potentially hot surfaces include the oven
vent opening, surfaces near the opening and crevices
around the oven door.
Ŷ 'RQRWKHDWXQRSHQHGIRRGFRQWDLQHUV3UHVVXUH
could build up and the container could burst,
causing an injury.
Ŷ 'RQRWXVHDQ\W\SHRIIRLORUOLQHUWRFRYHUWKH
oven bottom or anywhere in the oven, except as
described in this manual. Oven liners can trap heat
or melt, resulting in damage to the product and risk
of shock, smoke or fire.
Ŷ $YRLGVFUDWFKLQJRULPSDFWLQJJODVVGRRUVRUFRQWURO
SDQHOV'RLQJVRPD\OHDGWRJODVVEUHDNDJH'R
not cook on a product with broken glass. Shock, fire
or cuts may occur.
Ŷ &RRNPHDWDQGSRXOWU\WKRURXJKO\²PHDWWRDWOHDVW
an internal temperature of 160°F and poultry to at
least an internal temperature of 180°F. Cooking
to these temperatures usually protects against
foodborne illness.
WARNING
Read all safety instructions before using the product. Failure to follow these instructions may result
in fire, electrical shock, serious injury or death.
WARNING
KEEP FLAMMABLE MATERIALS AWAY FROM THE OVEN
Failure to do so may result in fire or personal injury.
Ŷ 'RQRWVWRUHRUXVHIODPPDEOHPDWHULDOVLQRUQHDU
an oven, including paper, plastic, pot holders,
linens, wall coverings, curtains, drapes and gasoline
or other flammable vapors and liquids.
Ŷ 1HYHUZHDUORRVHILWWLQJRUKDQJLQJJDUPHQWVZKLOH
using the appliance. These garments may ignite if
they contact hot surfaces, causing severe burns.
Ŷ 'RQRWOHWFRRNLQJJUHDVHRURWKHUIODPPDEOH
materials accumulate in or near the oven. Grease in
the oven or near the oven may ignite.

4 49-80721 Rev. 2
SAFETY INFORMATION
READ AND SAVE THESE INSTRUCTIONS
WARNING
IN THE EVENT OF A FIRE, TAKE THE FOLLOWING
STEPS TO PREVENT INJURY AND FIRE SPREADING
Ŷ 'RQRWXVHZDWHURQJUHDVHILUHV1HYHUSLFNXSD
flaming pan.
Ŷ ,IWKHUHLVDILUHLQWKHRYHQGXULQJEDNLQJVPRWKHU
the fire by closing the oven door and turning the
oven off or by using a multi-purpose dry chemical or
foam-type fire extinguisher.
Ŷ ,IWKHUHLVDILUHLQWKHRYHQGXULQJVHOIFOHDQWXUQ
the oven off and wait for the fire to go out. 'RQRW
force the door open,QWURGXFWLRQRIIUHVKDLUDW
self-clean temperatures may lead to a burst of flame
from the oven. Failure to follow this instruction may
result in severe burns.
IMPORTANT SAFETY INFORMATION
READ ALL INSTRUCTIONS BEFORE USING THE APPLIANCE
WARNING
OVEN SAFETY INSTRUCTIONS
Ŷ 6WDQGDZD\IURPWKHRYHQZKHQRSHQLQJWKHRYHQ
door. Hot air or steam which escapes can cause
burns to hands, face and/or eyes.
Ŷ .HHSWKHRYHQYHQWXQREVWUXFWHG
Ŷ .HHSWKHRYHQIUHHIURPJUHDVHEXLOGXS*UHDVHLQ
the oven may ignite.
Ŷ 3ODFHRYHQUDFNVLQGHVLUHGORFDWLRQZKLOHRYHQLV
FRRO,IUDFNPXVWEHPRYHGZKLOHRYHQLVKRWGRQRW
let pot holder contact hot heating element in oven.
Ŷ :KHQXVLQJFRRNLQJRUURDVWLQJEDJVLQWKHRYHQ
follow the manufacturer’s directions.
Ŷ 3XOOLQJRXWWKHVWDQGDUGUDFNVWRWKHLUVWRSORFNV
or the extension rack to its fully open position is
DFRQYHQLHQFHLQOLIWLQJKHDY\IRRGV,WLVDOVRD
precaution against burns from touching hot surfaces
of the door or oven walls.
Ŷ 'RQRWOHDYHLWHPVVXFKDVSDSHUFRRNLQJXWHQVLOV
RUIRRGLQWKHRYHQZKHQQRWLQXVH,WHPVVWRUHGLQ
an oven can ignite.
Ŷ 1HYHUSODFHFRRNLQJXWHQVLOVSL]]DRUEDNLQJVWRQHV
or any type of foil or liner on the oven floor. These
items can trap heat or melt, resulting in damage to
the product and risk of shock, smoke or fire.
WARNING
SELF-CLEANING OVEN SAFETY INSTRUCTIONS
The self-cleaning feature operates the oven at temperatures high enough to burn away food soils in the oven.
Follow these instructions for safe operation.
Ŷ 'RQRWWRXFKRYHQVXUIDFHVGXULQJVHOIFOHDQ
RSHUDWLRQ.HHSFKLOGUHQDZD\IURPWKHRYHQGXULQJ
self-cleaning. Failure to follow these instructions
may cause burns.
Ŷ %HIRUHVHOIFOHDQLQJWKHRYHQUHPRYHVKLQ\VLOYHU
colored oven racks (on some models), the probe,
any aluminum foil, and any broiler pan, grid, and
other cookware. Only porcelain coated oven racks
may be left in the oven.
Ŷ %HIRUHRSHUDWLQJWKHVHOIFOHDQF\FOHZLSHJUHDVH
and food soils from the oven. Excessive amount
of grease may ignite, leading to smoke damage to
your home.

49-80721 Rev. 2 5
SAFETY INFORMATION
READ AND SAVE THESE INSTRUCTIONS
IMPORTANT SAFETY INFORMATION
READ ALL INSTRUCTIONS BEFORE USING THE APPLIANCE
WARNING
SELF-CLEANING OVEN SAFETY INSTRUCTIONS (Cont.)
Ŷ ,IWKHVHOIFOHDQLQJPRGHPDOIXQFWLRQVWXUQWKH
oven off and disconnect the power supply. Have it
serviced by a qualified technician.
Ŷ 'RQRWFOHDQWKHGRRUJDVNHW7KHGRRUJDVNHWLV
essential for a good seal. Care should be taken not
to rub, damage or move the gasket.
Ŷ 'RQRWXVHRYHQFOHDQHUV1RFRPPHUFLDORYHQ
cleaner or oven liner protective coating of any kind
should be used in or around any part of the oven.
How to Remove Protective Shipping Film and Packaging Tape
Carefully grasp a corner of the protective shipping film
with your fingers and slowly peel it from the appliance
VXUIDFH'RQRWXVHDQ\VKDUSLWHPVWRUHPRYHWKHILOP
Remove all of the film before using the appliance for the
first time.
To assure no damage is done to the finish of the
product, the safest way to remove the adhesive from
packaging tape on new appliances is an application of
a household liquid dishwashing detergent. Apply with a
soft cloth and allow to soak.
NOTE:7KHDGKHVLYHPXVWEHUHPRYHGIURPDOOSDUWV,W
cannot be removed if it is baked on.

6 49-80721 Rev. 2
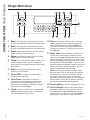
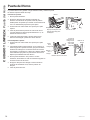
Single Wall Oven
USING THE OVEN: Oven Controls
1. Bake: Touch this pad to select the bake function.
See the Cooking Modes section for more information.
2. Broil: Touch this pad to select the broil function.
See the Cooking Modes section for more information.
3. Proof: Helps yeast bread rise. See the Cooking
Modes section for more information.
4. Warm:.HHSVKRWIRRGZDUP6HHWKH&RRNLQJ
Modes section for more information.
5. Clean: Your oven has two cleaning modes: Self
Clean and Steam Clean. See the Cleaning the
Oven section for important information about using
these modes.
6. Start: Must be pressed to start any cooking,
cleaning, or timed function.
7. Cancel/Off: Cancels ALL oven operations
except the clock and timer.
8. Cook Time: Counts down cooking time
and turns off the oven when the cooking time is
complete. Press the Cook Time pad, use the
number pads to program a cooking time in hours
and minutes, then press Start.
9. Clock: Sets the oven clock time. Press the Set
Clock pad and the number pads to program the
clock. Press Start to save the time.
10. Timer: Works as a countdown timer. Press the
Timer pad and the number pads to program the
time in hours and minutes. Press the Start pad.
The oven will continue to operate when the timer
countdown is complete. To turn the timer off press
the Timer pad
11. Delay Time:'HOD\VZKHQWKHRYHQZLOOWXUQRQ
8VHWKLVWRVHWDWLPHZKHQ\RXZDQWWKHRYHQWR
start. Press the Delay Time pad and use the number
pads to program the time of day for the oven to turn
on then press Start. Press the desired cooking mode
and temperature then press Start. A cook time may
also be programmed if desired. Follow the directions
under Cook Time for setting this feature. This can
RQO\EHXVHGZLWK%DNHDQG6HOI&OHDQ
NOTE: When using the delay time feature, foods
WKDWVSRLOHDVLO\²VXFKDVPLONHJJVILVKVWXIILQJV
SRXOWU\DQGSRUN²VKRXOGQRWEHDOORZHGWRVLWIRU
more than 1 hour before or after cooking. Room
temperature promotes the growth of harmful bacteria.
%HVXUHWKDWWKHRYHQOLJKWLVRIIEHFDXVHKHDWIURP
the bulb will speed harmful bacteria growth.
12. Oven Light(s): Turns the oven light(s) on or off.
13. Lock Controls: Locks out the control so that
pressing the pads does not activate the controls.
Press and hold the Lock Controls pad for three
seconds to lock or unlock the control. Cancel/Off is
always active, even when the control is locked.
12
13
11
12
10
687
5943

49-80721 Rev. 2 7
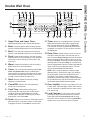
Double Wall Oven
USING THE OVEN: Oven Controls
1. Upper Oven and Lower Oven:
'HVLJQDWHVZKLFKRYHQWKHFRQWUROVZLOORSHUDWH
2. Bake: Touch this pad to select the bake function.
See the Cooking Modes section for more information.
3. Broil: Touch this pad to select the broil function.
See the Cooking Modes section for more information.
4. Proof: Helps yeast bread rise. See the Cooking
0RGHVVHFWLRQIRUPRUHLQIRUPDWLRQ1RWHWKDWSURRI
cannot be run when running a clean mode in the
lower oven.
5. Warm:.HHSVKRWIRRGZDUP6HHWKH&RRNLQJ
Modes section for more information.
6. Clean: Your oven has two cleaning modes: Self
Clean and Steam Clean. See the Cleaning the
Oven section for important information about using
WKHVHPRGHV1RWHWKDWSURRIFDQQRWEHUXQZKHQ
running a clean mode in the lower oven.
7. Start: Must be pressed to start any cooking,
cleaning, or timed function.
8. Cancel/Off: Cancels ALL oven operations
except the clock and timer.
9. Cook Time: Counts down cooking time
and turns off the oven when the cooking time is
complete. Press the Cook Time pad, use the
number pads to program a cooking time in hours
and minutes, then press Start.
10. Clock: Sets the oven clock time. Press the 9 and 0
SDGVDQGKROGIRUVHFRQGV8VHWKHQXPEHUSDGV
to program the clock. Press Start to save the time.
11. Timer: Works as a countdown timer. Press the
Timer pad and the number pads to program the
time in hours and minutes. Press the Start pad.
The oven will continue to operate when the timer
countdown is complete. To turn the timer off press
the Timer pad.
12. Delay Time:'HOD\VZKHQWKHRYHQZLOOWXUQRQ
8VHWKLVWRVHWDWLPHZKHQ\RXZDQWWKHRYHQWR
start. Press the Delay Time pad and use the number
pads to program the time of day for the oven to turn
on then press Start. Press the desired cooking mode
and temperature then press Start. A cook time may
also be programmed if desired. Follow the directions
under Cook Time for setting this feature. This can
RQO\EHXVHGZLWK%DNHDQG6HOI&OHDQ
NOTE: When using the delay time feature, foods
WKDWVSRLOHDVLO\²VXFKDVPLONHJJVILVKVWXIILQJV
SRXOWU\DQGSRUN²VKRXOGQRWEHDOORZHGWRVLWIRU
more than 1 hour before or after cooking. Room
temperature promotes the growth of harmful bacteria.
%HVXUHWKDWWKHRYHQOLJKWLVRIIEHFDXVHKHDWIURP
the bulb will speed harmful bacteria growth.
13. Oven Light(s): Turns the oven light(s) on or off
LQERWKRYHQV1RWHWKDWOLJKWVLQERWKRYHQVZLOOQRW
turn on if the door is opened while the other oven is
in a clean mode.
14. Lock Controls: Locks out the control so that
pressing the pads does not activate the controls.
Press and hold the Lock Controls pad for three
seconds to lock or unlock the control. Cancel/Off is
always active, even when the control is locked.
122
5
4 5
33
14 12111012
13
77188
9966

8 49-80721 Rev. 2
Special Features
USING THE OVEN: Special Features
There are several different special features on your wall oven. To change the settings of these special features,
press the Bake and Broil pads at the same time and hold for three seconds. "SF" will appear in the display. Select
the feature you want to change. When the change has been made, press the Start key to save the change and
return to the time of day.
Adjust the Oven Temperature
This feature allows the oven baking temperature to be
DGMXVWHGXSWR)KRWWHURUGRZQWR)FRROHU8VHWKLV
feature if you believe your oven temperature is too hot or
too cold and wish to change it. For double oven models,
the upper and lower ovens are adjusted separately.
Press the Bake pad to select the oven to be adjusted.
Press the Bake pad again to enter the temperature
adjustment mode. A number between 35 and - 35
ZLOOGLVSOD\8VHWKHQXPEHUSDGVWRVHWWKHGHVLUHG
temperature adjustment and use the Bake pad to
change between negative and positive.
Press the Start pad to save the temperature adjustment.
End of Timer Signals
This is the tone that signals the end of a timer. The tone
can be continuous (Con bEEP) or one repeating beep
(bEEP). A continuous setting will continue to sound a tone
until a button on the control is pressed. Press the Broil pad
to view the current setting and then to change the setting.
Fahrenheit or Celsius Temperature Display
The oven control is set to use Fahrenheit temperatures
(F), but you can change it to use Celsius temperatures
(C). Press the Broil and Cook Time pads at the same
time to view the current setting, press again to change
the setting.
Clock Display
This feature specifies how the time of day will be
displayed or if no time of day will be displayed. You can
select a standard 12-hour clock (12 H), 24-hour military
time display (24 H), or no clock displayed (oFF). Press
the Bake and Broil Hi/Lo pads at the same time and
hold for three seconds until “SF” appears in the display.
Press the Clock pad on single wall ovens or 0 and 9
pads at the same time for double wall ovens to view the
current setting, press again to change the setting. Press
the Start pad to save.
Sound Volume
This feature allows the oven tone volume to be adjusted
EHWZHHQKLJK+,E((3+,PHGLXP6WGE((36WGORZ
(Lo bEEP Lo) and off (oFF bEEP oFF). Press the Cook
Time pad to view the current setting or to change the
setting. The control will sound the oven tone at the new
volume level each time the sound level is changed.
12-hour auto shut-off and Sabbath
Options for this feature are “12 SHdn”, “no SHdn” and
“SAbbAtH”.
12-hour auto shut-off turns off the oven after 12 hours of
continuous operations.
Sabbath mode disables the oven lights (the oven light
will not turn on when the door is opened), all sounds (the
FRQWUROZLOOQRWEHHSZKHQDEXWWRQLVSUHVVHG%URLO:DUP
3URRI&RRN7LPH7LPHU&ORFNDQG'HOD\7LPHIXQFWLRQV
6DEEDWKPRGHFDQRQO\EHXVHGZLWK%DNH7KLVIHDWXUH
FRQIRUPVWRWKH6WDU.-HZLVK6DEEDWKUHTXLUHPHQWV
Press and hold the Bake and Broil pads for 3 seconds
to enter special features.
Press the Delay Time pad to view the current setting
and then to change the setting.
To use Sabbath mode, select “SAbbAtH” and press Start.
A ] will appear in the display and the clock will not display.
1RWHWKDWLI\RXKDYHDGRXEOHZDOORYHQZKHQ\RX
place the control into Sabbath mode, both ovens are
now in Sabbath mode and available for cooking.
Once in Sabbath mode, at any time you can press Bake,
use the number pads to enter a temperature between
170F and 550F, and press Start1RVRXQGZLOOEHJLYHQ
when the keys are pressed. At a random time between
30 seconds and 1 minute, ][, will appear in the display
indicating the oven is running.
1RWHWKDWERWKRYHQVRIDGRXEOHZDOORYHQFDQEH
used in Sabbath mode. Each oven can be programmed
to a different temperature and each oven must be
programmed separately.
,I\RXQHHGWRDGMXVWWKHWHPSHUDWXUHSUHVVBake, use
the number pads to enter a new temperature between
170F and 550F, and press Start.
To turn the oven off, press Cancel/Off at any time. The
oven will immediately turn off and ][ will change to ]
indicating that the oven has turned off.
1RWHWKDWHDFKRYHQRIDGRXEOHZDOORYHQPXVWEH
turned off separately.
To exit Sabbath mode, make sure that the oven is turned
off. Press and hold the Bake and Broil pads for 3 seconds
to enter special features then press Delay Time until either
“12 Shdn” or “no Shdn” is in the display and press Start.
NOTE:,ISRZHURXWDJHRFFXUVGXULQJ6DEEDWKPRGHWKH
unit will remain in Sabbath mode but off when power is
restored.
,I\RXZLVKWRXVHWKH&RRN7LPHIHDWXUHWREDNHLQWKH
oven and then have the oven automatically turn off, you
will need to press the Cook Time button, enter a cooking
time duration, and press Start. Then enter special
features to start Sabbath mode as detailed above.

49-80721 Rev. 2 9
Your oven has six rack positions. Recommended rack
positions for various types of foods are provided in the
Cooking Guide. Adjusting rack position is one way to
impact cooking results. For example, if you would prefer
darker tops on cakes, muffins, or cookies, try moving
IRRGRQHUDFNSRVLWLRQKLJKHU,I\RXILQGIRRGVDUHWRR
brown on top try moving them down next time.
When baking with multiple pans and on multiple racks,
ensure there is sufficient space between pans to allow
air to flow.
Flat Racks
When placing and removing cookware, pull the rack out
to the bump (stop position) on the rack support.
To remove a rack, pull it toward you, tilt the front end up
and pull it out.
To replace, place the curved end of the rack (stop-locks)
onto the oven supports, tilt up the front of the rack and
push the rack in.
Racks may become difficult to slide, especially after
a self-clean. Put some vegetable oil on a soft cloth or
paper towel and rub onto the left and right edges.
NOTE:8VLQJRWKHUFRRNLQJRLOVZLOOFDXVHDGLVFRORULQJ
or a rust like color residue on the racks and cavity sides.
To clean this residue, use a soap and water or a vinegar
and water solution. Rinse with clean water and dry with
a soft cloth.
CAUTION
Do not use any type of foil or oven liner to cover the oven bottom. These items can trap heat
or melt, resulting in damage to the product and risk of shock, smoke or fire. Damage from improper use of
these items is not covered by the product warranty.
)RLOPD\EHXVHGWRFDWFKVSLOOVE\SODFLQJDVKHHWRQDORZHUUDFNVHYHUDOLQFKHVEHORZWKHIRRG'RQRWXVHPRUH
IRLOWKDQQHFHVVDU\DQGQHYHUHQWLUHO\FRYHUDQRYHQUDFNZLWKDOXPLQXPIRLO.HHSIRLODWOHDVW´IURPRYHQZDOOV
to prevent poor heat circulation.
Cookware Guidelines
7KHPDWHULDOILQLVKDQGVL]HRIFRRNZDUHDIIHFWEDNLQJ
performance.
'DUNFRDWHGDQGGXOOSDQVDEVRUEKHDWPRUHUHDGLO\
than light, shiny pans. Pans that absorb heat more
readily can result in a browner, crisper, and thicker crust.
,IXVLQJGDUNDQGFRDWHGFRRNZDUHFKHFNIRRGHDUOLHU
WKDQPLQLPXPFRRNWLPH,IXQGHVLUDEOHUHVXOWVDUH
obtained with this type of cookware consider reducing
oven temperature by 25º F next time.
Shiny pans can produce more evenly cooked baked
goods such as cakes and cookies.
Glass and ceramic pans heat slowly but retain heat well.
These types of pans work well for dishes such as pies
and custards.
Air insulated pans heat slowly and can reduce bottom
browning.
.HHSFRRNZDUHFOHDQWRSURPRWHHYHQKHDWLQJ
Oven Racks
Aluminum Foil and Oven Liners
Cookware
USING THE OVEN: Oven Racks / Aluminum Foil and Oven Liners / Cookware

10 49-80721 Rev. 2
Your new oven has a variety of cooking modes to help you get the best results. These modes are described below.
Refer to the Cooking Guide section for recommendations for specific foods. Remember, your new oven may perform
differently than the oven it is replacing.
Bake
The bake mode is for baking and roasting. This mode
uses heat primarily from the lower element but also from
the upper element to cook food. When preparing baked
goods such as cakes, cookies, and pastries always
preheat the oven first. Follow recipe recommendations
IRUIRRGSODFHPHQW,IQRJXLGHOLQHVDUHSURYLGHGFHQWHU
food in the oven. To use this mode press the Bake pad,
enter a temperature, and then press Start.
Proof
Proof mode is designed for rising (fermenting and
proofing) bread doughs. Press the Proof pad and then
press Start. Cover dough well to prevent drying out.
%UHDGZLOOULVHPRUHUDSLGO\WKDQDWURRPWHPSHUDWXUH
1RWHWKDWIRUGRXEOHZDOORYHQVSURRIFDQQRWEHUXQ
when running a clean mode in the lower oven.
Warm
Warm mode is designed to keep hot foods hot for up to
3 hours. To use this mode, press the Warm pad then
press Start. Cover foods that need to remain moist and
do not cover foods that should be crisp. Preheating is
QRWUHTXLUHG'RQRWXVHZDUPWRKHDWFROGIRRGRWKHU
WKDQFULVSLQJFUDFNHUVFKLSVRUGU\FHUHDO,WLVDOVR
recommended that food not be kept warm for more
than 2 hours.
Broiling Modes
Always broil with the door closed. The broil element in
this oven is very powerful. Monitor food closely while
EURLOLQJ8VHFDXWLRQZKHQEURLOLQJRQXSSHUUDFN
positions as placing food closer to the broil element
increases smoking, spattering, and the possibility of fats
igniting. For best performance center food below the
broil heating element. Broiling on rack position 6 is
not recommended.
Try broiling foods that you would normally grill. Adjust
rack positions to adjust the intensity of the heat to the
food. Place foods closer to the broil element when a
seared surface and rare interior is desired. Thicker
foods and foods that need to be cooked through should
be broiled on a rack position farther from the broiler or
E\XVLQJ%URLO/R
Broil Hi
7KH%URLO+LPRGHXVHVLQWHQVHKHDWIURPWKHXSSHU
HOHPHQWWRVHDUIRRGV8VH%URLO+LIRUWKLQQHUFXWVRI
meat and/or foods you prefer less done on the interior.
To use this mode press the Broil pad once and then
press Start,WLVQRWQHFHVVDU\WRSUHKHDWZKHQXVLQJ
this mode.
Broil Lo
7KH%URLO/RPRGHXVHVOHVVLQWHQVHKHDWIURPWKHXSSHU
element to cook food thoroughly while also producing
VXUIDFHEURZQLQJ8VH%URLO/RIRUWKLFNHUFXWVRIPHDW
and/or foods that you would like cooked all the way
through. To use this mode press the Broil pad twice and
then press Start,WLVQRWQHFHVVDU\WRSUHKHDWZKHQ
using this mode.
Cooking Modes
USING THE OVEN: Cooking Modes

49-80721 Rev. 2 11
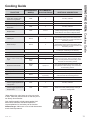
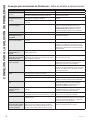
FOOD TYPE
RECOMMENDED
MODE(S)
RECOMMENDED
RACK POSITION(S) ADDITIONAL SUGGESTIONS
Baked Goods
Layer cakes, sheet cakes,
bundt cakes, muffins, quick
breads on a Single Rack
%DNH 3 8VHVKLQ\FRRNZDUH
Layer cakes* on Multiple Racks %DNH 2 and 4 Ensure adequate airflow (see illustration below).
Chiffon cakes (angel food) %DNH 1 8VHVKLQ\FRRNZDUH
Cookies, biscuits, scones on a
Single Rack
%DNH 3 8VHVKLQ\FRRNZDUH
Cookies, biscuits, scones on
Multiple Racks
%DNH 2 and 4
For foods like sugar cookies, switch food location
partially through cooking for more even cooking
results between racks. Ensure adequate airflow.
Beef & Pork
Hamburgers %URLO+L 5
8VHDEURLOSDQPRYHIRRGGRZQIRUPRUH
doneness/less searing. Watch food closely when
broiling. For best performance center food below the
broil heating element.
Steaks & Chops %URLO+L 5
8VHDEURLOSDQPRYHIRRGGRZQIRUPRUH
doneness/less searing. Watch food closely when
broiling. For best performance center food below the
broil heating element.
Roasts %DNH 2 or 3
Leave uncovered, use a low sided pan such
as a broil pan. Preheating is not necessary.
Poultry
Whole chicken %DNH 2 or 3 8VHDORZVLGHGSDQVXFKDVDEURLOSDQ
%RQHLQFKLFNHQEUHDVWVOHJV
thighs
%URLO+L 1 ,IEUHDGHGRUFRDWHGLQVDXFHDYRLG%URLO+LPRGHV
%URLOVNLQVLGHGRZQILUVW:DWFKIRRGFORVHO\ZKHQ
broiling. For best performance when broiling, center
food below the broil heating element.
%URLO/R
%DNH
3
%RQHOHVVFKLFNHQEUHDVWV
%URLO/R
%DNH
1 (broil) or 3
Move food down for more doneness/less searing and
up for greater searing/browning when broiling. For
best performance when broiling, center food below
the broil heating element.
Whole turkey %DNH 1 or 2 8VHDORZVLGHGSDQVXFKDVDEURLOSDQ
7XUNH\%UHDVW %DNH 2 or 3 8VHDORZVLGHGSDQVXFKDVDEURLOSDQ
Fish %URLO/R
5 (1/2 thick or less)
4 (>1/2 inch)
Watch food closely when broiling. For best performance
center food below the broil heating element.
Casseroles %DNH 3
Frozen Convenience Foods
3L]]DIUHQFKIULHVWDWRUWRWV
FKLFNHQQXJJHWVDSSHWL]HUVRQ
a Single Rack
%DNH 3 8VHVKLQ\FRRNZDUH
3L]]DIUHQFKIULHVWDWRUWRWV
FKLFNHQQXJJHWVDSSHWL]HUVRQ
Multiple Racks
%DNH 2 and 4
8VHVKLQ\FRRNZDUH
Switch food location partially through cooking for
more even cooking results.
*When baking four cake layers at a time, use racks
2 and 4. Place the pans as shown so that one pan is
not directly above another.
Cook food thoroughly to help protect against food
borne illness. Minimum safe food temperature
recommendations for food safety can be found at
IsItDoneYet.gov. Make sure to use a food thermometer
to take food temperatures.
USING THE OVEN: Cooking Guide
Cooking Guide

12 49-80721 Rev. 2
%HVXUHHOHFWULFDOSRZHULVRIIDQGDOOVXUIDFHVDUHFRROEHIRUHFOHDQLQJDQ\SDUWRIWKHRYHQ
Control Panel
,W¶VDJRRGLGHDWRZLSHWKHFRQWUROSDQHODIWHUHDFKXVH
Clean with mild soap and water or vinegar and water,
rinse with clean water and polish dry with a soft cloth.
'RQRWXVHDEUDVLYHFOHDQVHUVVWURQJOLTXLGFOHDQVHUV
plastic scouring pads or oven cleaners on the control
SDQHO²WKH\ZLOOGDPDJHWKHILQLVK
Oven Exterior
'RQRWXVHRYHQFOHDQHUVDEUDVLYHFOHDQVHUVVWURQJ
liquid cleansers, steel wool, plastic scouring pads, or
cleaning powders on the interior or exterior of the oven.
Clean with a mild soap and water or vinegar and water
solution. Rinse with clean water and dry with a soft cloth.
When cleaning surfaces, make sure that they are at
room temperature and not in direct sunlight.
,IVWDLQRQWKHGRRUYHQWWULPLVSHUVLVWHQWXVHDPLOG
abrasive cleaner and a sponge-scrubber for best results.
Spillage of marinades, fruit juices, tomato sauces and
basting liquids containing acids may cause discoloration
and should be wiped up immediately. Let hot surfaces
cool, then clean and rinse.
Stainless Steel Surfaces (on some models)
'RQRWXVHDVWHHOZRROSDGLWZLOOVFUDWFKWKHVXUIDFH
To clean the stainless steel surface, use warm sudsy
water or a stainless steel cleaner or polish. Always wipe
the surface in the direction of the grain. Follow the cleaner
instructions for cleaning the stainless steel surface.
To inquire about purchasing cleaning products including
stainless steel appliance cleaner or polish, see the
Accessories and Consumer Support sections at the end
of this manual.
Oven Interior
The interior of your new oven can be cleaned manually
or by using the Steam Clean or Self Clean modes.
Spillage of marinades, fruit juices, tomato sauces and
basting liquids containing acids may cause discoloration
and should be wiped up immediately. Let hot surfaces
cool, then clean and rinse.
Manual Cleaning
'RQRWXVHRYHQFOHDQHUVDEUDVLYHFOHDQHUVVWURQJ
liquid cleansers, steel wool, scouring pads, or cleaning
powders on the interior of the oven. Clean with a mild
soap and water or vinegar and water solution. Rinse with
clean water and dry with a soft cloth. When cleaning
surfaces, make sure that they are at room temperature.
Steam Clean Mode
Steam clean is intended to clean small spills using water
and a lower cleaning temperature than Self-Clean.
To use the Steam Clean feature, wipe grease and soils
from the oven. Pour one cup of water into the bottom of
the oven. Close the door. Press the Clean pad twice
and then press Start. The oven door will lock. You can
not open the door during the 30 minute steam clean as
this will decrease the steam clean performance. At the
end of the steam clean cycle the door will unlock. Wipe
out any excess water and any remaining soil.
Self Clean Mode
5HDG6HOI&OHDQLQJ2YHQ6DIHW\,QVWUXFWLRQVDWWKH
beginning of this manual before using Self Clean Mode.
Self clean uses very high temperatures to clean the
oven interior. The oven door will lock when using this
IHDWXUH%HIRUHRSHUDWLQJWKHVHOIFOHDQF\FOHZLSHXS
grease and soils from the oven. Remove all items from
the oven other than enameled (dark color) racks. Shiny
or silver racks and any cookware or other items should
all be removed from the oven before initiating a self-clean
cycle. Close the door. Press the Clean pad once and a
default self-clean time is displayed. The clean time can
be changed to any time between 3:00 and 5:00 hours
by using the number pads to enter a different time and
pressing Start. For heavily soiled ovens, the maximum
KRXUFOHDQWLPHLVUHFRPPHQGHG,I\RXZLVKWR
use the default time, press the Start pad immediately
after pressing the Clean pad. The oven will turn off
automatically when the self-clean cycle is complete. The
door will stay locked until the oven has cooled down. After
the oven has cooled down wipe any ash out of the oven.
IMPORTANT: The health of some birds is extremely
sensitive to the fumes given off during the self-cleaning cycle
of any range. Move birds to another well-ventilated room.
Flat Racks
Flat racks can be left in the cavity during self-clean
(if enameled racks, not shiny) or can be washed with
warm, soapy water.
Racks may be more difficult to slide, especially after a
self-clean. Put some vegetable oil on a soft cloth or paper
towel and rub onto the left and right edges.
NOTE:8VLQJRWKHUFRRNLQJRLOVZLOOFDXVHDGLVFRORULQJ
or a rust like color residue on the racks and cavity sides.
To clean this residue, use a soap and water or a vinegar
and water solution. Rinse with clean water and dry with
a soft cloth.
CARE AND CLEANING: Oven
Oven

49-80721 Rev. 2 13
CARE AND CLEANING: Oven Light
WARNING
SHOCK OR BURN HAZARD:%HIRUHUHSODFLQJRYHQOLJKWEXOEGLVFRQQHFWWKHHOHFWULFDOSRZHUWRWKH
oven at the main fuse or circuit breaker panel. Failure to do so may result in electric shock or burn.
CAUTION
BURN HAZARD: The glass cover and bulb should be removed when cool. Touching hot glass with
bare hands or a damp cloth can cause burns.
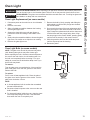
Oven Light Replacement (on some models)
'LVFRQQHFWSRZHUDWWKHPDLQIXVHRUFLUFXLWEUHDNHU
panel.
2. Remove oven racks.
3. Slide a flat blade screwdriver between the housing
and the glass light cover.
4. Support the glass light cover with two fingers to
prevent the cover from falling to the bottom of the
oven.
5. Gently twist the screwdriver blade to loosen the glass
OLJKWFRYHU%HFDUHIXOQRWWRFKLSWKHRYHQFRDWLQJ
6. Remove the glass light cover.
7. Remove the bulb by firmly grasping and sliding the
bulb straight out until the two prongs have cleared
the ceramic holder.
'RQRWWRXFKWKHJODVVRIWKHQHZUHSODFHPHQWEXOE
ZLWK\RXUILQJHUV,WZLOOFDXVHWKHEXOEWRIDLOZKHQLW
lights. Grasp the replacement bulb with a clean towel
or facial tissue with the prongs facing down. Align
the two prongs in the ceramic holder, pressing gently
until the bulb is securely in the ceramic socket.
9. Slide the protective lens into the holder and push
until the clips snap into the housing.
10. Reconnect power.
Oven Light Bulb (on some models)
NOTE: The glass cover should be removed only when
cold. Wearing latex gloves may offer a better grip.
%HIRUHUHSODFLQJWKHEXOEGLVFRQQHFWHOHFWULFDOSRZHUWR
the oven at the main fuse or circuit breaker panel. Let
the bulb cool completely before removing it. For your
VDIHW\GRQRWWRXFKDKRWEXOEZLWKDGDPSFORWK,I\RX
do the bulb may break.
To remove:
Turn the glass cover counterclockwise 1/4 turn until the
tabs of the glass cover clear the grooves of the socket.
Remove the bulb.
To replace:
Put in a new 40-watt appliance bulb. Place the tabs of
the glass cover into the grooves of the socket. Turn the
glass cover clockwise 1/4 turn.
NOTE:
Ŷ A 40-watt appliance bulb is smaller than a standard
40-watt household bulb.
Ŷ 5HFRQQHFWHOHFWULFDOSRZHUWRWKHRYHQRQFHWKHQHZ
bulb is installed.
Ŷ )RULPSURYHGOLJKWLQJLQVLGHWKHRYHQFOHDQWKHJODVV
cover frequently using a wet cloth. This should be
done when the oven is completely cool.
Oven Light
%XOE
Socket
Tab
Max
length
3
1
»2”
Glass cover

14 49-80721 Rev. 2
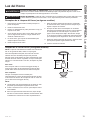
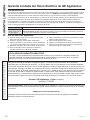
CARE AND CLEANING: 2YHQ 'RRU
7KHORZHUGRRULVYHU\KHDY\%HFDUHIXOZKHQUHPRYLQJDQGOLIWLQJWKHGRRU
'RQRWOLIWWKHGRRUE\WKHKDQGOH
To remove the door:
1. Fully open the door.
2. Pull the hinge locks down toward the door frame,
to the unlocked position. A tool, such as a small
flat-blade screwdriver, may be required.
3. Firmly grasp both sides of the door at the top.
4. Close door to the door removal position. The door
should be open approximately 3" with no obstruction
above the door.
5. Lift door up and out until both hinge arms are clear of
the slots.
To replace the door:
1. Firmly grasp both sides of the door at the top.
2. Starting on the left side, with the door at the same
angle as the removal position, seat the indentation of
the hinge arm into the bottom edge of the hinge slot.
The notch in the hinge arm must be fully seated into
the bottom of the slot. Repeat for right side.
)XOO\RSHQWKHGRRU,IWKHGRRUZLOOQRWIXOO\ RSHQWKH
indentation is not seated correctly in the bottom edge
of the slot.
4. Push the hinge locks up against the front frame of the
oven cavity, to the locked position.
5. Close the oven door.
Removal position
Hinge lock
Slot
Pull hinge locks down to unlock
Push hinge locks up to lock
Hinge
lock
Hinge
arm
,QGHQWDWLRQ
%RWWRP
edge of
slot
Hinge arm
Oven Door

49-80721 Rev. 2 15
Problem Possible Cause What To Do
My new oven doesn't
cook like my old one. Is
something wrong with the
temperature settings?
Your new oven has a different cooking
system from your old oven and therefore
may cook differently than your old oven.
For the first few uses, follow your recipe times
DQGWHPSHUDWXUHVFDUHIXOO\,I\RXVWLOOWKLQN\RXU
new oven is too hot or too cold, you can adjust the
temperature yourself to meet your specific cooking
preference.
Food does not bake
properly
Oven controls improperly set. See the Cooking Modes section.
Rack position is incorrect or rack is not level.
See the Cooking Modes section and Cooking Guide.
,QFRUUHFWFRRNZDUHRUFRRNZDUHRI
LPSURSHUVL]HEHLQJXVHG
See the Cookware section.
Oven temperature needs adjustment. See the Special Features section.
,QJUHGLHQWVXEVWLWXWLRQ Substituting ingredients can change the recipe
outcome.
Food does not broil
properly
Oven controls improperly set. Make sure you select the appropriate broil mode.
,PSURSHUUDFNSRVLWLRQEHLQJXVHG See Cooking Guide for rack location suggestions.
Food being cooked in a hot pan. Make sure cookware is cool.
Cookware not suited for broiling. 8VHDSDQVSHFLILFDOO\GHVLJQHGIRUEURLOLQJ
Aluminum foil used on the broiling pan and
grid has not been fitted properly and slit as
recommended.
,IXVLQJDOXPLQXPIRLOFRQIRUPWRSDQVOLWV
,QVRPHDUHDVWKHSRZHUYROWDJHPD\EH
low.
Preheat the broil element for 10 minutes.
Oven temperature too hot
or too cold
Oven temperature needs adjustment. See the Special Features section.
Oven does not work or
appears not to work
A fuse in your home may be blown or the
circuit breaker tripped.
Replace the fuse or reset the circuit breaker.
Oven controls improperly set. 6HHWKH8VLQJWKH2YHQVHFWLRQ
Oven is in Sabbath Mode. Verify, that the oven is not in Sabbath Mode. See
the Special Features section.
“Crackling” or “popping”
sound
This is the sound of the metal heating
and cooling during both the cooking and
cleaning functions.
This is normal.
Why is my range making
a "clicking" noise when
using my oven?
Your range has been designed to maintain a
tighter control over your oven's temperature.
You may hear your oven's heating elements
"click" on and off more frequently than in
older ovens to achieve better results during
baking, broiling, and self-clean cycles.
This is normal.
Clock and timer do not
work
A fuse in your home may be blown or the
circuit breaker tripped.
Replace the fuse or reset the circuit breaker.
Sometimes the oven takes
longer to preheat to the
same temperature
Cookware or food in oven The cookware or food in the oven will cause the
oven to take longer to preheat. Remove items to
reduce preheat time.
1XPEHURIUDFNVLQRYHQ Adding more racks to the oven will cause the oven
to take longer to preheat. Remove some racks.
Save time and money! Review the charts on the following pages first and you may not need to call for service.
TROUBLESHOOTING TIPS
Troubleshooting tips ... %HIRUH\RXFDOOIRUVHUYLFH

16 49-80721 Rev. 2
Problem Possible Cause What To Do
Oven light does not work Light bulb is loose or defective. Tighten or replace bulb.
Pad operating light is broken. Call for service.
Oven will not self-clean The temperature is too high to set a
self-clean operation.
Allow the oven to cool and reset the controls.
Oven controls improperly set. See the Cleaning the Oven section.
Excessive smoking
during clean cycle
Excessive soil or grease.. Press the Cancel/Off pad. Open the windows to
rid the room of smoke. Wait until the LOCKED light
goes off. Wipe up the excess soil and reset the
clean cycle.
Excessive smoking
during broiling
Food too close to burner element. Lower the rack position of the food.
Oven door will not open
after a clean cycle
Oven too hot. Allow the oven to cool below locking temperature.
Oven not clean after a
clean cycle
Oven controls improperly set. See the Cleaning the Oven section.
Oven was heavily soiled. Clean up heavy spillovers before starting the clean
cycle. Heavily soiled ovens may need to self-clean
again or for a longer period of time.
"LOCK DOOR" flashes in
the display
The self-clean cycle has been selected but
the door is not closed.
Close the oven door.
LOCKED light is on when
you want to cook
The oven door is locked because the
temperature inside the oven has not
dropped below the locking temperature.
Press the Cancel/Off pad. Allow the oven to cool.
“F— and a number or
letter” flash in the display
You have a function error code. Press the Cancel/Off pad. Allow the oven to cool
for one hour. Put the oven back into operation.
,IWKHIXQFWLRQFRGHUHSHDWV 'LVFRQQHFWDOOSRZHUWRWKHRYHQIRUDWOHDVW
VHFRQGVDQGWKHQUHFRQQHFWSRZHU,IWKHIXQFWLRQ
error code repeats, call for service.
Display goes blank A fuse in your home may be blown or the
circuit breaker tripped.
Replace the fuse or reset the circuit breaker.
The clock is turned off. See the Special features section.
Oven is in Sabbath Mode. Verify that the oven is not in Sabbath Mode.
See the Special Features section.
Power outage, clock
flashes
Power outage or surge 5HVHWWKHFORFN,IWKHRYHQZDVLQXVH\RXPXVW
reset it by pressing the Cancel/Off pad, setting the
clock and resetting any cooking function.
“Burning” or “oily” odor
emitting from the vent
This is normal in a new oven and will
disappear in time.
To speed the process, set a self-clean cycle for a
minimum of 3 hours. See the Cleaning the Oven
section. This is temporary.
Strong odor An odor from the insulation around the
inside of the oven is normal for the first few
times the oven is used.
This is temporary and will go away after several
uses or a self-clean cycle.
Fan noise A cooling fan may automatically turn on. This is normal. The cooling fan will turn on to cool
LQWHUQDOSDUWV,WPD\UXQIRUXSWRKRXUVDIWHU
the oven is turned off.
My oven door glass
appears to be "tinted" or
have a "rainbow" color. Is
this defective?
1R7KHLQQHURYHQJODVVLVFRDWHGZLWK
a heat barrier to reflect the heat back into
the oven to prevent heat loss and keep the
outer door cool while baking.
7KLVLVQRUPDO8QGHUFHUWDLQOLJKWRUDQJOHV\RX
may see this tint or rainbow color.
TROUBLESHOOTING TIPS
Troubleshooting tips ... %HIRUH\RXFDOOIRUVHUYLFH

49-80721 Rev. 2 17
Notes

18 49-80721 Rev. 2
Staple your receipt here. Proof of the original purchase
date is needed to obtain service under the warranty.
GEAppliances.com
$OOZDUUDQW\VHUYLFHLVSURYLGHGE\RXU)DFWRU\6HUYLFH&HQWHUVRUDQDXWKRUL]HG&XVWRPHU&DUH
®
technician. To
schedule service online, visit us at GEAppliances.com/service_and_support/, or call GE Appliances at 800.GE.CARES
(800.432.2737). Please have your serial number and your model number available when calling for service.
Servicing your appliance may require the use of the onboard data port for diagnostics. This gives a GE Appliances factory
service technician the ability to quickly diagnose any issues with your appliance and helps GE Appliances improve its
SURGXFWVE\SURYLGLQJ*($SSOLDQFHVZLWKLQIRUPDWLRQRQ\RXUDSSOLDQFH,I\RXGRQRWZDQW\RXUDSSOLDQFHGDWDWREH
sent to GE Appliances, please advise your technician not to submit the data to GE Appliances at the time of service.
What GE Appliances will not cover:
Ŷ Service trips to your home to teach you how to use
the product.
Ŷ ,PSURSHULQVWDOODWLRQGHOLYHU\RUPDLQWHQDQFH
Ŷ )DLOXUHRIWKHSURGXFWLILWLVDEXVHGPLVXVHG
modified or used for other than the intended purpose
or used commercially.
Ŷ 5HSODFHPHQWRIKRXVHIXVHVRUUHVHWWLQJRIFLUFXLW
breakers.
Ŷ 'DPDJHWRWKHSURGXFWFDXVHGE\DFFLGHQWILUH
floods or acts of God.
Ŷ ,QFLGHQWDORUFRQVHTXHQWLDOGDPDJHFDXVHGE\
possible defects with this appliance.
Ŷ 'DPDJHFDXVHGDIWHUGHOLYHU\
Ŷ 3URGXFWQRWDFFHVVLEOHWRSURYLGHUHTXLUHGVHUYLFH
Ŷ 6HUYLFHWRUHSDLURUUHSODFHOLJKWEXOEVH[FHSWIRU
/('ODPSV
LIMITED WARRANTY
GE Appliances Electric Oven Limited Warranty
EXCLUSION OF IMPLIED WARRANTIES
Your sole and exclusive remedy is product repair as provided in this Limited Warranty. Any implied warranties,
including the implied warranties of merchantability or fitness for a particular purpose, are limited to one year or
the shortest period allowed by law.
This limited warranty is extended to the original purchaser and any succeeding owner for products purchased for
KRPHXVHZLWKLQWKH86$,IWKHSURGXFWLVORFDWHGLQDQDUHDZKHUHVHUYLFHE\D*($SSOLDQFHV$XWKRUL]HG6HUYLFHU
LVQRWDYDLODEOH\RXPD\EHUHVSRQVLEOHIRUDWULSFKDUJHRU\RXPD\EHUHTXLUHGWREULQJWKHSURGXFWWRDQ$XWKRUL]HG
*($SSOLDQFHV6HUYLFHORFDWLRQIRUVHUYLFH,Q$ODVNDWKHOLPLWHGZDUUDQW\H[FOXGHVWKHFRVWRIVKLSSLQJRUVHUYLFH
calls to your home.
Some states do not allow the exclusion or limitation of incidental or consequential damages. This limited warranty
gives you specific legal rights, and you may also have other rights which vary from state to state. To know what your
legal rights are, consult your local or state consumer affairs office or your state’s Attorney General.
Warrantor: GE Appliances, a Haier company
/RXLVYLOOH.<
Extended Warranties: Purchase a GE Appliances extended warranty and learn about special discounts that are
available while your warranty is still in effect. You can purchase it online anytime at
GEAppliances.com/extended-warranty
or call 800.626.2224 during normal business hours. GE Appliances Service will still be there after your warranty expires.
For the period of GE Appliances will replace
One year
From the date
of the original
purchase
Any partRIWKHRYHQZKLFKIDLOVGXHWRDGHIHFWLQPDWHULDOVRUZRUNPDQVKLS'XULQJWKLV
limited one-year warranty, GE Appliances will provide, free of charge, all labor and in-home
service to replace the defective part.

49-80721 Rev. 2 19
Accessories
6PDOO%URLOHU3DQô´[ó´[ò³
/DUJH%URLOHU3DQô´[ó´[ò³
;/%URLOHU3DQ´[ó´[³
Parts
Oven racks
Oven elements
Light bulbs
Cleaning Supplies
CitruShine™ Stainless Steel Wipes
&HUDPD%U\WH6WDLQOHVV6WHHO$SSOLDQFH&OHDQHU
Graphite Lubricant
*The large broiler pan does not fit in 20”/24” ranges.
** The XL broiler pan does not fit in 24” wall ovens, 27” drop ins
or 20”/24” ranges
ACCESSORIES
Accessories
Looking For Something More?
GE Appliances offers a variety of accessories to
improve your cooking and maintenance experiences!
Refer to the Consumer Support page for phone numbers
and website information.
The following products and more are available:

20 49-80721 Rev. 2
3ULQWHGLQWKH8QLWHG6WDWHV
Consumer Support
CONSUMER SUPPORT
GE Appliances Website
Have a question or need assistance with your appliance? Try the GE Appliances Website 24 hours a day, any day
of the year! You can also shop for more great GE Appliances products and take advantage of all our on-line support
VHUYLFHVGHVLJQHGIRU\RXUFRQYHQLHQFH,QWKH86GEAppliances.com
Register Your Appliance
Register your new appliance on-line at your convenience! Timely product registration will allow for enhanced
communication and prompt service under the terms of your warranty, should the need arise. You may also mail in
WKHSUHSULQWHGUHJLVWUDWLRQFDUGLQFOXGHGLQWKHSDFNLQJPDWHULDO,QWKH86GEAppliances.com/register
Schedule Service
Expert GE Appliances repair service is only one step away from your door. Get on-line and schedule your service at
\RXUFRQYHQLHQFHDQ\GD\RIWKH\HDU,QWKH86GEAppliances.com/service
or call 800.432.2737 during normal business hours.
Extended Warranties
Purchase a GE Appliances extended warranty and learn about special discounts that are available while your
warranty is still in effect. You can purchase it on-line anytime. GE Appliances Services will still be there after your
ZDUUDQW\H[SLUHV,QWKH86GEAppliances.com/extended-warranty
or call 800.626.2224 during normal business hours.
Remote Connectivity
For assistance with wireless network connectivity (for models with remote enable),
visit our website at GEAppliances.com/connect RUFDOOLQWKH86
Parts and Accessories
,QGLYLGXDOVTXDOLILHGWRVHUYLFHWKHLURZQDSSOLDQFHVFDQKDYHSDUWVRUDFFHVVRULHVVHQWGLUHFWO\WRWKHLUKRPHV
9,6$0DVWHU&DUGDQG'LVFRYHUFDUGVDUHDFFHSWHG2UGHURQOLQHWRGD\KRXUVHYHU\GD\
,QWKH86GEApplianceparts.com or by phone at 877.959.8688 during normal business hours.
Instructions contained in this manual cover procedures to be performed by any user. Other servicing
generally should be referred to qualified service personnel. Caution must be exercised, since improper
servicing may cause unsafe operation.
Contact Us
,I\RXDUHQRWVDWLVILHGZLWKWKHVHUYLFH\RXUHFHLYHIURP*($SSOLDQFHVFRQWDFWXVRQRXU:HEVLWHZLWKDOOWKH
details including your phone number, or write to:
,QWKH86*HQHUDO0DQDJHU&XVWRPHU5HODWLRQV_*($SSOLDQFHV$SSOLDQFH3DUN_/RXLVYLOOH.<
GEAppliances.com/contact
Page is loading ...
Page is loading ...
Page is loading ...
Page is loading ...
Page is loading ...
Page is loading ...
Page is loading ...
Page is loading ...
Page is loading ...
Page is loading ...
Page is loading ...
Page is loading ...
Page is loading ...
Page is loading ...
Page is loading ...
Page is loading ...
Page is loading ...
Page is loading ...
Page is loading ...
Page is loading ...
-
 1
1
-
 2
2
-
 3
3
-
 4
4
-
 5
5
-
 6
6
-
 7
7
-
 8
8
-
 9
9
-
 10
10
-
 11
11
-
 12
12
-
 13
13
-
 14
14
-
 15
15
-
 16
16
-
 17
17
-
 18
18
-
 19
19
-
 20
20
-
 21
21
-
 22
22
-
 23
23
-
 24
24
-
 25
25
-
 26
26
-
 27
27
-
 28
28
-
 29
29
-
 30
30
-
 31
31
-
 32
32
-
 33
33
-
 34
34
-
 35
35
-
 36
36
-
 37
37
-
 38
38
-
 39
39
-
 40
40


Ask a question and I''ll find the answer in the document
Finding information in a document is now easier with AI
in other languages
Related papers
Other documents
-
 Cafe CT9800SHSS Owner's manual
-
 GE Monogram ZET1SHSS Owner's manual
-
Yes CT9050SHSS Owner's manual
-
 GE Monogram ZET9550SHSS Owner's manual
-
GEAppliances PT9550 Owner's manual
-
GE Profile PT9051SLSS Owner's manual
-
GE Monogram ZET2FLSS Owner's manual
-
 Cafe CT9070SHSS User guide
-
-
Parmco PPOV-6S-DT-3 Installation guide


