Page is loading ...

MODEL #7200
PATENTS PENDING
“ROLL-GUARD” A-FRAME LADDER
FOR RIGID-FRAMED POOLS ONLY
ASSEMBLY AND INSTALLATION MANUAL
Proudly Made in U.S.A. by
SAVE THESE INSTRUCTIONS
DEALER/INSTALLER: GIVE TO HOMEOWNER
65799-Confer-Model7200USr4.ps 3/23/09 2:46 PM Page 1

Handrails
Right Bridge Left Bridge
Deck
Hardware Bag
4 - Plug 2 - 1/4" Flat Washer
6 - #10 x 1-1/4" Self Tapping Screw 2 - 1/4" Hex Nut
2 - 1/4 - 20 x 3-1/2" Bolt 1 - Padlock
1 - Instruction sheet
Tools Needed for Assembly
1 - Rubber Mallet
1 - Cordless Drill w/Phillips Driver
1 - Garden Hose
1 - 1/4" Drill Bit
1 - Phillips Screwdriver
1 - Pliers
Helpful Hints:
1). Assemble the ladder by laying it down on a smooth flat surface.
2). All ten treads are the same, but must be installed tab marked minus [-] into tread lock
opening marked minus [-] and tab marked plus [+] into tread lock opening marked
plus [+] on the rails. TREADS MUST NOT BLOCK THE ROLL-GUARD TRACKS
LOCATED ON THE INSIDE AND OUTSIDE RAILS.
3). The roll-guard locking assembly is pre-installed on the left bridge.
4). Slide the roll-guard into track, grab handle first.
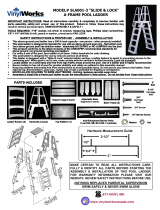
Model #7200 “ROLL-GUARD” A-FRAME LADDER
For Rigid-Framed Above Ground Pools
ASSEMBLY INSTRUCTIONS - PLEASE READ BEFORE ATTEMPTING ASSEMBLY
Parts List
4 - Handrail 1 - Roll Guard
1 - Deck 1 - Outside Left Rail (OL)
1 - Left Bridge with lock assembly 1 - Outside Right Rail (OR)
1 - Right Bridge 1 - Inside Left Rail (IL)
2 - Adjustable Brace 1 - Inside Right (IR)
10 - Ladder Tread
If missing parts call - Toll free U.S./Canada - 866-396-2968 or www.conferladders.com
Adjustable
Brace
Outside
Right Rail
(OR)
Roll-guard
Outside
Left Rail
(OL)
Inside
Right Rail
(IR)
Inside Left Rail (IL)
Treads
65799-Confer-Model7200USr4.ps 3/23/09 2:46 PM Page 2

STEP 1:
INSIDE LADDER
Tools needed: rubber mallet
Parts needed: 1- Inside left rail (marked “IL” at the top)
1- Inside right rail (marked “IR” at the top)
4- Ladder treads
#1: Lay “IL” rail on flat surface.
#6: Lay “IR” rail on flat surface. #7: Lift/rotate and align tread tabs
to fit into rail openings..
#9:
Do Not
Install bottom tread
until Step 4!
#8:Tap all 4 treads down
until seated..
#2: Correct, tap down
until seated, note track is
not blocked..
Incorrect, do not
block track.
#3-5: Install 3 more treads, for a total of 4, see above pictures.
65799-Confer-Model7200USr4.ps 3/23/09 2:46 PM Page 3

STEP 2:
OUTSIDE LADDER
Tools needed: rubber mallet
Parts needed: 1- Outside left rail (marked “OL” at the top)
1- Outside right rail (marked “OR” at the top)
5- Ladder treads
#9: Install
bottom tread. #10: Outside
ladder finished!
#7: Lift/rotate and align tread tabs
to fit into rail openings.. #8:Tap all 4 treads down
until seated..
#2: Correct, tap down
until seated, note track is
not blocked..
#1: Lay “OL” rail on flat surface.
#3-5: Install 3 more treads, for a total of 4, see above pictures.
#6: Lay “OR” rail on flat surface.
Incorrect, do not
block track.
65799-Confer-Model7200USr4.ps 3/23/09 2:46 PM Page 4

STEP 3:
HANDRAILS/DECK
Tools needed: rubber mallet, cordless drill w/Phillips driver
Parts needed: 1- Deck
4- Handrails
1- Left bridge with lock assembly
1- Right bridge
2- #10 x 1-1/4” self tapping screws
#1-3: Push handrails up through bottom of deck leaving about 3” exposed.
#4: Align the inside/outside
rails with deck/handrail. #5-6: Partially slide deck down locking handrails onto
ladder sections.
#7-8: Install right and left ladder bridges.
#10: Overlap the flat
sections at top of the
handrails and connect
using 1-#10 x 1-1/4”
self tapping screw.
Repeat for other
handrail.
#9: Finish tapping deck all
the way down until engaged
on to bridge.
65799-Confer-Model7200USr4.ps 3/23/09 2:46 PM Page 5

STEP 4:
INSTALLING ROLL-GUARD
Tools needed: rubber mallet
Parts needed: 1- Roll-guard
1- Ladder tread
#1: With the ladder laying on
it’s side, slide the roll-guard into
track, grab handle first.
#2-6: Slide roll-guard around to other side of ladder.
#4 #5 #6
#7-8: Install bottom tread. IMPORTANT: this bottom tread
MUST be installed to block the track, roll-guard must not
come in contact with pool liner.
#9: Using a sharp
knife carefully cut
off the plastic tabs.
#10: Roll-guard finished!
65799-Confer-Model7200USr4.ps 3/23/09 2:46 PM Page 6

STEP 5:
PLACING LADDER IN POOL
Tools needed: garden hose, cordless drill w/Phillips driver
1/4” drill bit, Phillips screwdriver, pliers
Parts needed: 4- cap plugs
2- adjustable braces
2- 1/4-20 x 3-1/2” bolts, washers and hex nuts
1- Padlock
CHOOSE A LOCATION THAT IS LEVEL AND IN FULL VIEW. POOL MUST HAVE
COMPETENT ADULT SUPERVISION AT ALL TIMES WHEN IN USE.
#1: With roll-guard in closed
position, carefully lift the
inside ladder section over
the pool wall.
#2: Using garden hose, fill
all 4 rails with water through
the openings and cap when
full. As the rails are being
filled, the ladder will start
to sink.
#3:Tilt the ladder from “side
to side” to get all the air out
of treads. As the treads fill
with water, the ladder will
continue to sink, this may
take several minutes.
#4: With ladder in place and
sitting on pool bottom, place
one of the adjustable braces
on the side of ladder so it is
resting on the pool top seat.
Secure the adjustable brace
to the ladder rails using 2-
#10 x 1-1/4” self tapping
screws. Repeat for the
second brace.
#5: Using the braces as
locators, drill two 1/4” holes
through the pool top seat
being careful not to damage
pool wall or liner. Fasten
ladder to the pool using
2-1/4-20 x 3-1/2” screws,
washers, and hex nuts.
#6:The ladder is in the
closed position when the
roll-guard is pulled down
covering the outside ladder
treads.To lock, push in the
roll guard locking tab located
on the left bridge.When
properly locked, the roll-guard
will not lift up. Install the
padlock through the locking
tab hole.
WHEN POOL IS NOT IN
USE THE ROLL-GUARD
MUST BE IN CLOSED
POSITION AND LOCKED.
#7:To open pool ladder,
remove the lock and pull
locking tab out.Lift up on the
roll-guard and slide around to
the inside of pool ladder, push
locking tab back in and lock.
WHEN POOL IS
IN USE,THE
ROLL-GUARD
MUST REMAIN
ON INSIDE OF
POOL AND
LOCKED.THE
ROLL GUARD
WILL PREVENT SWIMMING
THROUGH INSIDE LADDER
TREADS.
Fill rails with water
using garden hose
Optional lock
location
(if needed).
65799-Confer-Model7200USr4.ps 3/23/09 2:46 PM Page 7

97 Witmer Road
North Tonawanda, New York 14120-2421
Toll Free U.S./CANADA 866-396-2968
716-283-1826/ FAX 716-283-3249
www.conferladders.com
Printed in U.S.A.
PROUDLY MADE IN THE U.S.A. by:
CP-7200 Rev 03/09
CONFER PLASTICS, INC.
LIMITED, PRO-RATED WARRANTY
Confer Plastics, Inc. warrants their swimming pool ladders to be free from defects in workmanship for one year from
date of purchase. After the first year the cost to replace a part is as follows:
MODEL #7200
2nd Year - 20%
3rd Year - 40%
4th Year - 60%
5th Year - 80%
Plus shipping/handling
Enclose proof-of-purchase (receipts, etc.) showing date purchased, your name, address, and daytime phone number. You
will be notified of cost to replace part.
This warranty gives you specific legal rights, and you may also have other rights which may vary from state to state.
DO NOT RETURN DEFECTIVE PART TO DEALER
The defective part should be returned, postpaid, to:
Confer Plastics, Inc.
97 Witmer Road
North Tonawanda, N.Y. 14120-2421
of current parts
list price
IMPORTANT
FOR YOUR SAFETY
* Check the contents of the carton with the Parts list
for this ladder.
* If any parts are missing call Toll Free U.S./Canada -
866-396-2968 or visit our web site at:
www.conferladders.com
*DO NOT attempt to assemble or install the ladder
if there are ANY shortages of parts or hardware.
* For proper assembly and installation follow all
instructions in the sequence shown.
* Before using the product, after assembly and
installation, go over the instructions and procedures
again to make sure nothing has been overlooked.
* Be sure and safe. The manufacturer IS NOT
responsible for improper assembly, installation
and use.
SAFETY RULES
* Locate ladder on a solid base.
* One person on the ladder at a time.
* Ladder MUST be installed per manufacturer’s
instructions.
* DANGER: No Jumping or Diving from ladder.
* Face ladder when entering and leaving pool.
* To prevent entrapment or drowning — DO NOT
swim through, behind or around ladder.
* Ladder to be used as a swimming pool ladder only.
* Weight limit - 300 lbs maximum
*Warning: Exceeding the maximum weight
restriction may cause the ladder to fail.
* When ladder is not in use pull down roll guard to
cover outside ladder treads and lock using padlock.
* Consult your local Building Department before
installation of your pool and equipment.
*DANGER:
Use a cordless drill for assembly
and installation. NEVER use an electric drill in
or around the pool.
MAINTENANCE:
Your new pool ladder was designed to be virtually maintenance free. Just hose off once
a week with clean water. Check the padlock for proper operation and lubricate if necessary.
WINTERIZING:
Unfasten the ladder from pool top seat and remove from the water. Remove the plugs and
lay ladder on its side to drain. It will take several minutes for the water to drain out of the ladder rails and treads.
A small amount of water left in ladder will not cause any damage. Replace the plugs so they won’t get lost.
65799-Confer-Model7200USr4.ps 3/23/09 2:46 PM Page 8
/