Page is loading ...

ATP fluorescence detector manual
ATP-100E
1.Operating principles
3.Display
1 2 3
4
2.Page instructions
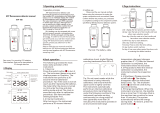
ATP METER
ATP -100E
SELECT SET
ENTER
TEST
POWER TIME
1.operation principle
ATP bioluminescence detector uses
biochemical luminescence technology to turn
the invisible ATP concentration into visible light
output, so as to indirectly display the number
of microorganisms with quantitative results.
The value is between 0 and 9999, expressed
in relative light unit RLUs. Although RLU is
not an actual unit of light intensity, it can
provide a realistic detection method for ATP
biochemical luminescence detection. So
1RLU is equal to 1fmol of ATP
The host The battery cable
Rear cover
Data interface
Down key
up key
Identify key
power
set
Liquid crystal display
select key
time key
ATP METER
ATP -100E
SELECT SET
ENTER
TEST
POWER TIME
2. before use
Please read the user manual carefully
before using the instrument to master the
system composition and use method. Please
confirm whether the product you purchased
is complete according to the component content
specified by ATP fluorescence detection system.
LCD : display the test process and test results.
Up key: view the last set of test results and have
other menu selection results.
Down key: View the next set of test results and
have other menu selection results.
Confirm key: key to start detection.
select key: Enter limit setting.
Time key: Press to enter the time setting.
On key: button switch machine.
Set key: it has some other special functions, such
as entering the delete interface.
Rear cover: For mounting 2*5 batteries.
Data interface: Data can be transmitted to
PC through data line.
ATP METER
ATP -100E
SELECT SET
ENTER
TEST
POWER TIME
RLU readings can be compared with a user
set limit range to provide a comprehensive
result limit, namely pass A warning
Or not . In order to ensure that you can
get timely and accurate test results when
using ATP bioluminescence detection
system, please pay attention to the
following:
Please read the user manual carefully
before use. ATP bioluminescence detector
must be used together with ATP fluorescence
sampling stick.
03 200
99
004 1
Limlt
No.
Limit number
238
Lid PASS CAUTION FAIL BUSY
6
CAL RLU
Test
No.
MEMO DEL
0 1 / 0 7 / 2 0 2 3
Lid PASS CAUTION FAIL BUSY
CAL RLUMEMO DEL
8:40
LoBAT
2386
DATE
Detection number
measuring result
Detection upper limit
Memory
Delete Calibration
Unit of measurement
Expressed in terms
of relative light intensity
Detection lower limit
Number of detection groups
TIME
Battery marker
4.Basic operation
The following provides the most
basic daily operation of the
instrument:
Press the switch button to turn it
on. The instrument beeps once and
displays power on Graphics. The
instrument then performs a 30-
second internal calibration
procedure. Tip: If the clock is not set
(such as after replacing the battery),
the meter After the device is turned
on, first enter the time and date
setting mode and set The clock is
executed only after its calibration
procedure. See time and date
SettingsChapter Five.
4.2 Internal Calibration :
After turning on, the instrument
performs a 30-second internal
4.1 Boot Up:
POWER
calibration check, digital Display
counting backwards from 30 to 0:
Tip: Do not insert swabs while the
instrument is being internally
calibrated, and ensure that the
upper cover is tightly covered.
The instrument automatically
performs an internal calibration
procedure (CAL mark flashing)
under the following conditions:The
instrument has been working
continuously for a long period of
time (generally more than 30
minutes);The instrument operates in
an environment with large
30
busy
CAL
03 200
99
004 1
Limlt
No.
4.3 Preparations:After the internal
calibration is completed, the
instrument enters the inspection
state:
4.4 Shutdown :Please press the
on/off button . The display
disappears after the instrument
beeps once. Tip: The shutdown
button cannot be used during
specimen testing.
4.5 Energy Saving Mode When the
instrument is turned on, the standby
time is more than 10 minutes (that is,
the machine has no action for more
than 10 minutes).The system
automatically enters the energy
saving state. To restore, press the
power button .
temperature changes (changes
greater than 5 ° C).After the internal
calibration is completed, the
instrument enters the test state
POWER
POWER
POWER
56 7
PASSCAUTION
FAIL

5. Clock setting and adjustment
In the screen to be checked, if you
press , you can display the current
time and date:
To adjust the time and date press ,
then press the Up and Down keys
to change the flashing number, press
. to confirm the number. Tip: Press
the key at any time to abort the
setting, the time and date do not
change. When the battery is first
installed or replaced, the instrument
automatically enters clock setting
mode. After the clock is set, the
03 200
99
004 1
Limlt
No.
01/07/2023
8:40
TIME
This instrument can store up to 100
limit serial numbers (0-99)The
measurement results of each limit
number have a pair of high and low
limitsRange of values.
instrument continues its internal
calibration. If the time setting is not
correct (size month, leap year setting
error), press the key after the
instrument will beep once to indicate
the time setting error, and start the
setting again.
TIME
SELECT
ENTER
TEST
ENTER
TEST
6. Set the upper and lower limits of test results
03 200
99
004 1
Limlt
No.
0130
CAUTION
Test
No.
RLU
Note: The so-called limit number
refers to the specific health
requirements of different test objects.
How to choose the high of different
test objects Please contact the local
health and epidemic prevention
department or set the limit according
to the testing requirements.
6.1 Change the serial number :
When the test is ready, press key to
change the limit number, press up
key and down key to change
the blinking limit number, and then
press key to determine.Tip: During
the setting process, press the key
again to exit the setting, and the limit
number remains unchanged.
Press key first, then press key
and key to change the blinking limit
number, press key to confirm the
required limit number, and then press
up key or down key to select the
upper limit value, press key to
confirm; Then choose the lower
6.2 Changed limit range
SET
ENTER
TEST
SET
limit Value, then press to save the
new value. Tip: When changing the
upper and lower limits, press to exit
the setting mode, and the limit serial
number and range remain
unchanged.
almost complete.
Turn on, and after internal calibration
is complete, measure the new
specimen The preparations are
7.1 Measurement
The screen displays the limit number,
the high and low limit, and the
number of stored test data (eg. 4,
indicating that the instrument is
SELECT
SELECT
SET
ENTER
TEST
ENTER
TEST
7.Specimen testing and test results
03 200
99
004 1
Limlt
No.
4.press the key and wait 15
seconds to display the reading 5,
when the detection, the screen will
display a new detection number,
while the timer for 15 seconds
countdown.
2. Ensure that the surface of the test
is clean and dry
currentlyA total of 4 test results are
stored).Tip: When the storage result
reaches more than 95% of the
memory, the memory identifier will
flash. When the memory is
completely full,No more tests can be
done unless the memory is cleared or
transferred to the computer.Follow
these steps to measure:
3. open the hatch cover, insert the
test into the instrument, cover the
upper cover
1. Take out the test
ENTER
TEST
03 200
99
004 1
Limlt
No.
004 1
15
BUSY
Test
No.
Tip: Keep the instrument upright and
steady during the test to ensure that
the liquid in the swab is at the bottom
of the swab. After the measurement
is completed, the detector will display
the new detection data and
automatically compare the data with
the limit range The indicator is
displayed through the display screen,
and the top cover indicator flashes to
prompt the removal of the sample.
Press the button again,
instrument Will enter the inspection
state, can proceed to the next
inspection.
ENTER
TEST
The meanings of each logo are as
follows:-- -- -- -- -- -- -- -- -- -- -- -- --
Detection data ≤ Lower
limitDetection data > Low limit ≤ high
limitDetection data > High limit
– -- -- -- -- -- -- -- -- -- -- – –
Tip: After the measurement is
completed, be sure to remove the
swab to prevent the liquid in the swab
from leaking and damaging the
instrument
7.2 Viewing Existing Test
ResultsStorage instructions:
03 200
99
004 1
Limlt
No.
0130
Test
No.
RLU
Lid CAUTION
034 1
15
BUSY
Test
No.
034 2
15
BUSY
Test
No.
Note: The 1 after the TestNo three
digits is the number of the first group,
001 through 999. The 2 after the
three digits indicates the number of
the second group, 000 to 999. 034 2
can be regarded as the 1034th
number.When the instrument is ready
to be tested, press up and Down
to view the previously stored test
results.
03 200
99
004 1
Limlt
No.
03 200
99
004 1
Limlt
No.
013 0
Test
No.
RLU
MEMO
CAUTION
910118
13 14 1512

When the display displays the stored
detection result, the memory
identifier appears and the detection
number value flashes. Key is used
to search for the storage result
backward, and key is used to
search for the storage result forward.
To see the time and date when the
detection number was detected,
press .To exit the viewing mode,
press .
7.3 Clearing a Storage Result Record
After entering the view mode, you
can delete all test results, hold down
the key for more than two seconds,
and display the number of all test
TIME
POWER
03 200
99
004 1
Limlt
No.
013 0
Test
No.
RLU
CAUTION
013 0
RLU
CAUTION
MEMO MEMO
0 1 / 0 7 / 2 0 2 3
8:40
004 2
DEL
results. Delete it? Blink: Hold down
the key for more than two seconds
to clear all data; Press any other key
to cancel.
SELECT
ENTER
TEST
-16
-6
8.Technical parameters
Precision 1X10 mol ATP(standard)
Detection limit ≤1.0 CFU/ml
Detection range 0RLU~9999 RLU (Relative luminous unit)
Fecal coliform ≥1×10 CFU
Testing time 1 second-60 second
Testing interference ±2﹪or±2 RLUs
background value ≤2RLU
Check out the mode RLU or Coliform screening
Limit number can be set More than1000
Storage size More than3000
Size(W×H×D) 199mm×76mm×37mm
Weight (battery included) 265 g
Operating temperature range 0℃~ 40℃
Relative humidity range 20﹪-85﹪
Continuous degree 600
Power Supply 2x1.5V AA(UM-3) battery
Standard Accessories
Optiopnal Accessories
Main Unit
Carrying Case(B04)
Test Swabs
RS-232C Data Cable
with Software
9.ATP Test swab instructions
9.1AtP test Notes for swab test
◆ Open the test tube and take out the
swab for sampling;
◆ Do not touch the swab or test stick;
◆ After the detection tube is removed
from the refrigerator, it should be
placed for about 5 minutes before
detection to restore it to room
temperature;
17 1816
◆ The swab sample can be placed for
about 4 hours under the condition of
avoiding light ,
◆ After the sample has reacted with the
solution in the swab, place it in the
fluormeter and read it within 2 minutes.
◆ The swab solution has been diluted
and is safe for use on food surfaces.
Note: Store away from light before use.
ATP swabs and ATP fluorescence detectors
were used to detect cleanliness and total
bacterial count of public places, indoor
dining utensils, desktops, operators' hand
surfaces, medical and health industry
operating tables and medical scopes. It is
the product for HCCP monitoring in food
industry
1. This reagent should be matched with ATP
fluorescence detector.
2. Luciferase was found in ATP swabs, and
repeated freezing and thawing would
lead to its gradual inactivation. In order
9.2ATP test swab test operation
to achieve better use effect, the number
of freezing and thawing should not exceed
3 times, and need to avoid light storage.
3. Disposable gloves should be worn during
the experiment to avoid contamination by
exogenous ATP.
4. Do not touch the swab or swab during the
sampling process and ensure that the swab
is in direct contact with the surface of the
object being tested.
5. After the sample reacts with the solution
in the swab, place it in the fluorometer
and read it within 2 minutes.
6. The smear area for standard operation is
10x10 cm². For irregular tables, it is
important to ensure that each test is
performed continuously and consistently
at each control point. The control point
should consider the different special
structure of the table and set their own
standards, such as table smoothness,
instrument joints, sunken areas, whether
there are cracks in tableware (easy to
hidedirt), etc
7. It detects the cleanliness of the surface
of objects with low visual resolution.
Therefore, if there is visible dirt at the
control point under test, or the swab
head becomes obviously black after
application, the subsequent operation
can be stopped to avoid waste of the swab.
8. If there is excess liquid on the surface of
the object to be tested, wait for the
surface liquid to dry slightly before
testing, so as not to dilute the reagent.
(No need to be dry)
9. If you need to test the liquid, you can
use the sampler to absorb drops and
add two drops of sample in the test
tube, put the test specimen shaking,
and mix with the luminescent reagent.
(Do not wipe the liquid directly)
10.Code error
In operation, the instrument itself has a variety
of self-checks, once there is a problem, will
display an error code:
Error code
Possible causes
E1 Out of
operating
temperature
range
√The operating temperature of the
instrument exceeds the normal range
√The instrument is stored outside the
operating temperature range adjust
the instrument to the normal
temperature range before use
×Equipment damaged or wrong
E2 Failure to
self-calibrate
√Unstable instrument environment
√The protective mouth is dirty or
severely cracked
× Protective port is damaged
× Equipment is damaged or wrong
E3 Can't store
√ The device has no power or loose
battery
× The memory function of the device
is damaged or faulty
Tip: most of the problems are temporary, press
THE OK button or take out the battery more than
10 seconds and then put back in can be solved. If
the fault persists, contact technical support
engineers.
11.Instrument buzzer
The instrument emits various beeps during
normal use:
Types of buzzes
Possible causes
Short high
Start or shut down the test
specimen and PC
connected to
record the clearance results
Long high
Instrument self-calibration is
completed, specimen testing
is completed, and result records
are cleared
Long bass
Enter invalid date Enter invalid
value of the limit
12.Fault preview
The detector failure is generally due to the battery,
such as can not open, shut down, abnormal
shutdown, most of the reasons for the battery is
dead, loose battery caused by the battery is still
unable to work normally, please contact the
manufacturer.
The following table lists some typical cases and
their possible causes.
√ Indicates that users can solve the problem by
themselves.
X indicates a problem that may require technical
assistance. Please contact the manufacturer.
21 22 2320
19
170mm reference
106mm reference
9mm
reference
11.7mm reference
Swab reference diagram

11. Use technology training
2. Daily cleaning
The environment, the type of product
produced will vary, but the method of
setting such testing standards is the
same.
It is important to set pass and fail
criteria for real-time ATP detection
programs, and these criteria are based
on production
There are two ways to set ATP test
standards: 1.Clean thoroughly;
Or easy to clean smooth surfaces,
while daily cleaning is suitable for
Thorough cleaning is usually suitable
for equipment surfaces with high
cleanliness requirements
How to build a perfect ATP detection
program:
11.1 How Can I Set ATP Detection
Standards?
Step 1 Clean thoroughly
coarse
Rough and difficult to clean surfaces.
ATP detector was used to detect
each critical control point
(Take 1-5 repeated tests)
Calculate and set the test criteria in the
following way
Pass <=MeanRLU
Caution >=MeanRLU<Mean+3 (s.d)
Fail >=MeanRLU +3 (s.d)
2.Daily cleaning
Analyze and identify hazard control points
Clean the surface thoroughly for optimum cleanliness
Analyze and identify hazard control points
Clean the surface thoroughly for optimum cleanliness
ATP detector was used to detect
each critical control point, and
20-50 data were obtained by
continuous testing for several days
Calculate and set the test criteria in the
following way
Pass <=MeanRLU
Caution >=MeanRLU<Mean+3 (s.d)
Fail >=MeanRLU +3 (s.d)
"Warning" data plays a very important
role in providing users with analysis
and early warning. Of course, users
can also set all data above the
qualified line as unqualified without
setting the warning area
The ATP-100E also provides users with
common detection standards, which
may not be applicable to the target
surface you are examining. To set your
own detection standards, please refer
to 1); 2).
3. Universal ATP-100E detection standard
ATP-100E Test criteria for easy to clean surfaces
Pass Caution Fail
RLU
ATP-100E
20 20-60 60
* Difficult to clean surfaces including
grooves, cracks, notched surfaces such
as conveyor belts, nozzles, circular
rings, rubber pipes, walls, etc
* Easy to clean surface including
stainless steel surface or smooth
surface without groove, such as sink,
washing bucket, blade, table top, trash
can, etc
ATP-100EE Test criteria for difficult to clean
surfaces
Pass Caution Fail
RLU
ATP-100E
30 30-100 100
situation
The cause of the problem
Abnormal
shutdown
√ If the instrument is not used for
more than 10 minutes, it will
automatically shut down and enter
the standby state
Press the keyboard
and there is no
response
√ Some keys are only effective after a certain
program is selected
× the instrument is damaged or wrong
Test result readings
always show RLU or
always lower than
expected
√Improper swab use, √Swab expired,
√Shut down and restart
√Operating instruments in an unstable
environment,
√ The protection mouth is dirty and can
be seriously cracked
× Equipment is damaged or wrong
The USB
interface
does not
work
√ The interface is improperly inserted
× The PC serial interface or system
software fails
× Equipment is damaged or wrong
× The cable or interface is damaged
√ The PC software is incorrectly installed
or selected
If the user has the standard plate
count standard for the total number of
colonies in the control site, the ATP
test result can be referenced with it.
But please pay attention to ATP comes
from microorganisms or organic
residues, so it can only be said that the
level of ATP is closely related to the
number of microorganisms There was
a close correlation between the results
of ATP detection and plate count.
* note:
11.2 Sample for Detecting a Surface:
A) Regular surface smear the area
under test with a swab tip (30-45 °
Angle, 10× 10 CM surface)
Rules of the surface
B) Irregular surface When the surface
area of 10×10CM cannot be obtained,
adequate area should be applied as far
as possible.
irregular surface
11.3ATP-100E handheld portable
fluorescence detector and detection
reagent
Mode of use:
A) Detection time:
3) However, some CIP procedures
require ATP detection after the
disinfectant is used. In this case, the
2) In general, ATP detection should be
performed before the use of
disinfectants.
1) ATP detection surface should be dry
surface.
11.4 Setting the Detection Frequency
and Interval
29 30 3128
25 26 2724

E
Step
Step 2.
Step 4.
Step 3.
Step5. Put in ATP fluorescence detector
for detection
1.
Swab samples as shown
Power On Self Test
Dissolve lyophilized
powder
Daub sampling
Elution sample
Can effectively save the use of
disinfectant.
2) Detection scheme (for reference
only)
disinfection contact time of the
disinfectant is 5-15 minutes.According
to the disinfection specifications, wait
for the disinfectant to dry before
conducting surface sampling.
B) Sampling and testing frequency:
★ Note: it can be sterilized by high
pressure steam with ATP detection.
According to the financial situation,
select the appropriate number of
sampling points and recommend the
following strategies:
1) ATP detection should be used as a
sampling and preliminary screening
method. (Suspicious results can be
further sampled for standard plate
counting)
● Each workshop to establish 5-10
testing points.
● Each detection point 1 to 2 times a
week.
● Regularly summarize and report the
results in chart form to provide short-
term evaluation for control measures.
● Provide quarterly or annual reports
to analyze longer term data.
11.5 Make corrective measures
according to ATP quick test results
testing result
The detected value is lower than the
Pass value Clean the qualified
The detected value is between the Pass
value and Fail value, which requires
Caution.
Pay special attention to
this area when cleaning
next time
The detected value is higher than the
Fail value To clean
result judgment
Among them, food-borne poisoning
caused by bacterial contamination of
food and drinking water is the most
common, and its harm scope is the
most extensive.
12. Questions and answers on food
safety and health testing
12.1 What factors may affect food
safety and hygiene?
There are four major factors:
biological (such as the total number of
bacteria exceeding the standard,
pathogenic bacteria pollution, etc.),
chemical (pesticide residues, toxic
additives, etc.), physical (radiation
pollution, etc.) and transgenic
products (harmful genetic effects,
etc.).
12.2 What methods are commonly
used at home and abroad to detect the
total number of bacteria in food,
health and epidemic prevention?
Real-time detection data can be
obtained within 1-5 minutes.
Both methods can be used to detect
the total number of bacteria in
samples and provide relevant health
and epidemic prevention data. The
main difference is in the "timeliness",
the conventional method at least 1-2
days to get results, quick test method
can be in
"Conventional method" and "ATP
fluorescence fast detection method".
The conventional method is the
method still used by the Ministry of
Health. Therefore, it is also known as
the "national standard method",
namely the (bacterial) viable cell dish
counting method.
12.3 What are the common points
and main differences between the
conventional method and the fast ATP
fluorescence detection method?
E
12.4 Why is there such a big
difference in "timeliness" between the
two methods?
Because they are based on different
basic principles. In the "conventional
method", the previously invisible
bacterial cells in the sample are
diluted and coated and incubated on
nutrient AGAR medium at 37°C for 48
hours. In this way, a living bacterial cell
forms hundreds of millions of visually
visible bacterial clusters (colonies)
after multiple divisions and
propagations, and then the results are
obtained by counting. That is, colony
forming unit /ml (g) [CFU/ml (g)]. "ATP
fluorescence fast detection method" is
based on the principle that
entomtinase can catalyze ATP of
bacterial cells to emit fluorescence,
and the fluorescence detector can
measure the fluorescence value
quickly and accurately. Therefore, the
more bacterial cells in the sample, the
greater the amount of ATP, and the
stronger the fluorescence. In this way,
the detection of fluorescence value
(RLU) can determine the cell number
of bacteria [CFU/ml (g)] without the
interference of non-bacterial ATP in
the sample.
12.5 Which of the two detection
methods is more accurate? Two test
parties
Are the data consistent with the
method?
Before answer this question, let's
remember two basic concepts:
microbiology bacteria or microbes on
human life, production of advantage,
such as for antibiotic production) or
37 38 3936
33 34 3532

harmful effects (e.g., contaminated
food, cause disease) is not a single or a
few bacterial cells, but hundreds of
thousands of per unit volume, the
effect of millions of cells in the group.
Second, under the right conditions,
bacteria can divide and reproduce
every 20 to 30 minutes. In the case of
E. coli, 100,000 cells per milliliter
became 6.4 million cells per milliliter
after two hours. The correct answer,
therefore, is that both methods meet
the needs of total bacterial detection
and health monitoring at a given time,
but with significant differences in
timeliness. Quick inspection method is
more conducive to ensure the overall
improvement of food safety level. It is
a common practice in developed
countries to establish an effective
range of food safety and health
12.6 What experiences and measures
are worth learning from abroad in
terms of food safety?
Since the 1990s, according to the
principle of firefly luminescence, the
United States, the United Kingdom,
Japan and other countries have
developed and promoted the use of
ATP fluorescence fast detection
equipment for detecting the total
number of bacteria in food or for
health and epidemic prevention
monitoring. These devices not only
provide real-time detection data, but
also are accurate, portable and easy to
standards (such as pass, warning and
fail) that can be cross-referenced
between the conventional method and
the ATP fluorescence fast detection
method.
use. It not only makes up for the poor
timeliness of the "conventional
method", but also plays an early
warning role. It effectively ensures the
improvement of the overall level of
food safety, and also promotes the
birth of food hygiene concepts such as
HACCP.
Before the establishment and
popularization of ATP fluorescence
rapid detection technology, the
hygiene level of production line and
food contact surface can only be
assessed by visual inspection or plate
counting before delivery or after
12.7 What is the relationship between
"ATP fluorescence quick detection
method" and the implementation of
HACCP warning and traceability
management system for food safety?
13. Comprehensive diagram of ATP
rapid detection
sensitivity of these two methods is
insufficient, or the time to obtain
results is too long to meet the actual
needs of production. In other words,
HACCP and food safety traceability
and early warning system can only be
implemented if ATP fluorescence fast
detection method is adopted.
Select key points: for example,
5 points per workshop
A key B key C key D key E key
Test cycle: random test twice a
week for each test point
Monday
Wednesday
Cleaning procedures
pass warring
The monthly ATP
test budget of each
workshop is less
than 1000 yuan
A key B key C key D key E key
Tuesday
Thursday
Wednesday
Friday
Thursday
Saturday
Friday
Sunday
No visible dirt
verify
Continue with the
following work
Observe the cleaning
effect with naked eyes
ATP-100E fluorescence
detector
fail
Continue or rewash
and review
Visible dirt
Re-cleansing
Re-evaluate the
cleaning staff's
cleaning and
corrective actions
4544
41 42 4340
/