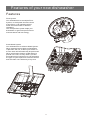
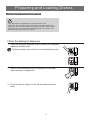
The BEVoi DISHV18BEESS dishwasher offers efficient cleaning with its Smart Wash System, which automatically adjusts the cycle based on the load size and soil level. It features multiple filter systems to separate soiled and clean water, optimizing performance and saving water and energy. With a capacity of 10 place settings, it's perfect for small households. Its wash cycle options include Heavy, Normal, ECO, Glass, and Rapid, allowing you to choose the right setting for your dishes. Additional options like Heated Dry and Sanitize ensure sparkling clean and dry dishes.
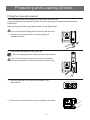
The BEVoi DISHV18BEESS dishwasher offers efficient cleaning with its Smart Wash System, which automatically adjusts the cycle based on the load size and soil level. It features multiple filter systems to separate soiled and clean water, optimizing performance and saving water and energy. With a capacity of 10 place settings, it's perfect for small households. Its wash cycle options include Heavy, Normal, ECO, Glass, and Rapid, allowing you to choose the right setting for your dishes. Additional options like Heated Dry and Sanitize ensure sparkling clean and dry dishes.


-
 1
1
-
 2
2
-
 3
3
-
 4
4
-
 5
5
-
 6
6
-
 7
7
-
 8
8
-
 9
9
-
 10
10
-
 11
11
-
 12
12
-
 13
13
-
 14
14
-
 15
15
-
 16
16
-
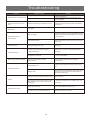 17
17
-
 18
18


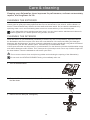
The BEVoi DISHV18BEESS dishwasher offers efficient cleaning with its Smart Wash System, which automatically adjusts the cycle based on the load size and soil level. It features multiple filter systems to separate soiled and clean water, optimizing performance and saving water and energy. With a capacity of 10 place settings, it's perfect for small households. Its wash cycle options include Heavy, Normal, ECO, Glass, and Rapid, allowing you to choose the right setting for your dishes. Additional options like Heated Dry and Sanitize ensure sparkling clean and dry dishes.
Ask a question and I''ll find the answer in the document
Finding information in a document is now easier with AI
Other documents
-
Bertazzoni DW18PR DL 77635d374804436f0b112c732546
-
Kucht 1402661 User manual
-
Sunpentown SD-9254WA User manual
-
-
Forno FDWBI8067-24S Owner's manual
-
Frigidaire 1627530 Owner's manual
-
Frigidaire FFBD1831US Owner's manual
-
Kenmore 58714642J01B Owner's manual
-
Electrolux EIDW1815US Owner's manual
-
IKEA 404621690A Owner's manual