
DIGITAL NAVIGATION SYSTEM
User's Manual
DIGITAL NAVIGATION SYSTEM
User's Manual
1WENB07

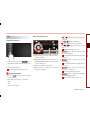
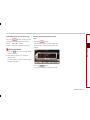
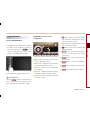
Thank you for purchasing this Audio
Navigation System.
This user's manual explains how to use the
Kia Motor Audio Navigation System.
Before using the product, read the
contents of this user's manual carefully
and use this product safely.
●
The screens shown in this manual may
differ with the actual screens of the
product.
●
The design and specification of this
product may change without prior
notification for product improvement.
●
When transferring the vehicle to
another individual, include this user's
manual so that the next driver can
continue its use.
iPod®
iPod® is a registered trademark of Apple
Inc.
Bluetooth®
The Bluetooth® word mark and logos are
registered tra demarks owned by
Bluetooth SIG, Inc. and any use of such
marks by Kia is under license.
A Bluetooth® enabled cell phone is requi-
red to use Bluetooth® wireless technology.
Preface
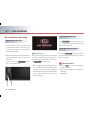
All Map Database cannot be copied without permission.
This is protected by U.S. copyright laws. All rights not expressly granted are reserved.
You may not otherwise reproduce, modify, and distribute the content without M&Soft, Inc's prior written consent.
1WMS7C0001

PART 1
PRE-OVERVIEW
Introduction
1-2
Important information about this
manual
1-2
Precaution for safe usage
1-2
Controller and functions
1-3
Control panel
1-3
Steering wheel remote controller
1-6
Basic operation and setting
1-6
Turning the power ON
1-6
Turning the power OFF
1-6
Turning the audio ON/OFF
1-6
Adjusting audio volume
1-6
How to operate the screen menu
1-7
How to operate menu by voice command
1-9
Audio sound setting
1-10
Display setting
1-11
Setting Picture Frame
1-12
Viewing Current Time
1-13
Setting the Clock
1-13
PART 2
AUDIO SYSTEM
Operating the radio
2-2
FM/AM Radio
2-2
SIRIUS Radio
2-6
Operating the CDP
2-11
About CDP
2-11
Inserting/Ejecting Disc
2-14
CD
2-15
MP3
2-18
Operating the external devices
2-23
iPod
2-23
USB
2-28
AUX
2-31
PART 3
NAVIGATION SYSTEM
Limitations of the navigation
system
3-2
GPS signal reception state
3-2
Vehicle position display
3-3
Route guidance
3-4
Route Re-calculation
3-4
Starting navigation system
3-5
Map Functions
3-5
Current position map screen
(without route)
3-5
Switching map mode
(North up/Heading up)
3-6
Viewing GPS signal state
3-7
Changing the map scale
3-8
Displaying / Hiding POI icons
on the map
3-9
Displaying / Hiding Q.POI icons
3-9
Displaying /Hiding icons other than
Q.POI icons
3-9
Making a call to POI
3-10
Scrolling map
3-11
Tables of contents

Setting a Destination
3-12
Destination menu screen and functions
3-12
Searching a Destination
3-13
Searching an Address
3-13
Searching a Previous Destination
3-17
Searching an Intersection
3-17
Searching a POI
3-20
Searching from Address book
3-24
Searching for Emergency facilities
3-25
Searching your Home
3-25
Searching favorite places
3-26
Searching from MAP
3-26
Searching POI by local POI list
3-26
Operating after searching a
destination
3-27
Changing destination position
3-27
Setting as Destination/waypoint
3-27
Adding to address book
3-27
Operating after setting
a destination
3-28
Starting Route Guidance
3-28
Route guidance screen
3-28
Selecting other route
3-29
Route guidance
3-30
Route menu screen and functions
3-30
Finishing route guidance
(Delete Destination)
3-30
Route overview(View Entire Route)
3-31
Changing Route option
3-32
Editing waypoints
3-32
Adding waypoints
3-32
Deleting waypoints
3-34
Re-ordering waypoints
3-34
Setting detour distance
3-35
Setting avoid streets on route
3-35
Setup and Information
3-36
Setup menu screen and functions
3-36
Main setting
3-36
Setting keyboard for inputting
letter
3-36
Setting voice command feedback
ON/OFF
3-37
Setting Language
3-37
Initializing system
3-37
Navigation setting
3-38
Setting units (mile/km)
3-38
Setting arrival time and distance
display
3-38
Registering avoid area
3-38
Editing avoid area
3-40
Deleting avoid area
3-41
Deleting all avoid areas
3-41
Setting Q.POI icons
3-42
Setting estimate travel time
3-42
My places setting
3-43
Registering new address in
address book
3-43
Editing an address of
address book
3-45
Deleting an address of address
book
3-46
Deleting an address book
3-47
Registering home address
3-48
Deleting home address
3-48
Registering favorite place
3-49
Deleting favorite place
3-50
Voice guidance volume setting
3-51
Voice guidance volume control
3-51
Adaptive volume control ON/OFF
3-52
Traffic Setup
3-52
Traffic Information
3-52
Help
3-54
Tables of contents

PART 4
VOICE COMMAND SYSTEM
Operating voice command
4-2
Condition for voice command system
4-2
Basic operation for voice
command control
4-2
Voice command help
4-3
Setting up the voice command sys-
tem
4-4
Setting voice Prompt ON/OFF
4-4
Speaker adaptation
4-4
Voice command list
4-6
Command list of Help
4-6
Command list of Audio system
4-7
Command list of Phone
4-13
Command list of Navigation system
4-14
Searching a destination by
voice command
4-19
PART 5
BLUETOOTH® WIRELESS
TECHNOLOGY HANDSFREE
Before using the Bluetooth® wireless
technology Handsfree
5-2
What is Bluetooth® wireless technology ?
5-2
Functions supported by Bluetooth® wireless
technology Handsfree
5-2
Converting Bluetooth® wireless
technology Handsfree mode
5-2
Converting from Audio/Navigation mode to
Bluetooth® wireless technology Handsfree
mode
5-2
Converting from Bluetooth® wireless
technology Handsfree mode to Audio/
Navigation mode
5-3
Pairing and connecting a Bluetooth®
wireless technology phone
5-4
Pairing a mobile phone
5-4
Deleting a paired phone
5-6
Connecting a mobile phone
5-7
Disconnecting a mobile phone
5-8
Bluetooth® wireless technology
Handsfree screen layout
5-9
Bluetooth® wireless technology Handsfree
screen and functions
5-9
When there is no mobile phone
connected
5-9
When a mobile phone is connected
5-9
When receiving an incoming call
5-10
When already on a call
5-10
When there is a call waiting
5-10
Making a call
5-11
Making a call by dialing a phone
number
5-11
Making a call from Speed Dial
5-11
Making a call by redialing
5-12
Answering a call
5-13
Answering an incoming call
5-13
Rejecting an incoming
5-13
Operating menus during a call
5-14
Switching call to the mobile phone
5-14
Activating Call waiting
5-14
Ending a call
5-15

Tables of contents
Phone Book
5-16
Making a call from the Phone book
5-16
Searching the Phone Book
5-17
Searching by name
5-17
Searching by number
5-18
Call History List
5-19
Making a call from Call history
5-19
Sorting call history
5-19
Phone Music
5-21
Before playing Phone Music
5-21
Starting Phone Music
5-21
Phone Music screen layout
5-22
Selecting Phone Music files
5-23
Bluetooth® wireless technology settings
5-24
Pairing and connecting a mobile phone
5-24
Setting mobile phone auto connect
priority
5-24
Setting Handsfree volume
5-25
Setting Audio streaming
5-26
Advanced settings
5-26
Searching and modifying
my device properties
5-27
Changing passkey
5-28
Deleting all paired phones
5-28
Initializing Bluetooth
® wireless technology
handsfree
5-29
Important information
5-30
About pairing mobile phones
5-30
About making/answering phone calls
5-31
About Bluetooth® wireless technology device
environment
5-31
PART 6
APPENDIX
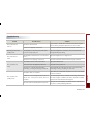
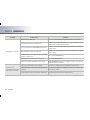
Troubleshooting guide
6-2
Before thinking the product has
malfunctioned
6-2
Troubleshooting
6-3
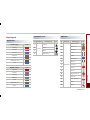
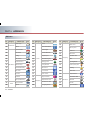
Map legend
6-5
Road color
6-5
Landmark icons
6-8
POI icons
6-5
INDEX
6-8

PRE-OVERVIEW 1-1
PRE-OVERVIEW
PART 1 PRE-OVERVIEW
PART 1
PRE-OVERVIEW
Introduction
1-2
Important information about this
manual
1-2
Precaution for safe usage
1-2
Controller and functions
1-3
Control panel
1-3
Steering wheel remote controller
1-5
Basic operation and setting
1-6
Turning the power ON
1-6
Turning the power OFF
1-6
Turning the audio ON/OFF
1-6
Adjusting audio volume
1-7
How to operate the screen menu
1-7
Operating typical screen menu
1-7
Inputting letters by using screen
keyboard
1-7
Displaying the list
1-8
Selecting an item in a list
1-8
Sorting items from the list
1-8
How to operate a menu by
voice command
1-9
Condition for voice recognition
system
1-9
Giving voice command
1-9
Audio sound setting
1-10
FAD/BAL
1-10
BASS/MID/TREB
1-10
Auto volume control ON/OFF
1-10
Touch screen beep ON/OFF
1-10
Display setting
1-11
Display mode
1-11
Brightness
1-11
Display OFF
1-11
Display ON
1-11
Setting Picture Frame
1-12
Display Picture Frame
1-12
Viewing Current Time
1-13
Setting the Clock
1-13

1-2 PRE-OVERVIEW
PART 1 PRE-OVERVIEW
Introduction
Important information about this
manual
This user manual contains instructions related
to safety. Closely observe and comply with all
of the safety instructions found within this
manual.
WARNING !
Disobeying the warnings listed within this
user's manual may cause fatal or serious inju-
ries. Warnings indicate matters which may
directly lead to accidents.
CAUTION!
Disobeying the cautions listed within this user
manual may lead to accidents or cause injury.
Cautions indicate matters which may lead to
vehicle damage or malfunction.
INFORMATION
Information which the user must be aware or
allows for more convenient use of the device.
Precaution for safe usage
WARNING !
●
Driving while distracted can result in a loss of
vehicle control, that may lead to an accident,
severe personal injury, and death. The driver’s
primary responsibility is in the safe and legal
operation of a vehicle, and use of any hand-
held devices, other equipment, or vehicle
systems which take the driver’s eyes, atten-
tion and focus away from the safe operation
of a vehicle or which are not permissible by
law should never be used during operation
of the vehicle.
●
Do not operate the Audio Navigation system
while driving.
●
Do not disassemble, assemble, or modify the
Audio Navigation system.
●
Do not watch the screen for prolonged
periods of time while driving.
●
Set the volume to a level which allows the
driver to be aware of external conditions.
CAUTION!
●
Do not operate the Audio Navigation sys-
tem for prolonged periods of time with the
vehicle ignition in ACC. Such operations
may lead to battery discharge.
●
Be cautious not to spill water or introduce
foreign objects into the device.
●
Do not cause severe shock to the device.
Direct pressure onto the front side of the
monitor may cause damage to the LCD or
touch panel.
●
In case of product malfunction, please
contact your place of purchase or service
center.
●
When cleaning the touch screen, make sure
to turn off the device and use a dry and
smooth cloth. Never use tough materials, che-
mical cloths, or solvents (alcohol, ammonia,
benzene, thinners, etc.) as such materials may
damage the device panel or cause color and
quality deterioration.
Reference Page
This indicates the title and page that you
should refer to.
This indicates a key on the control panel.
Voice Command
This indicates an operation by voice com-
mand.

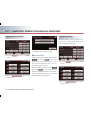
PRE-OVERVIEW 1-3
PRE-OVERVIEW
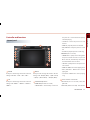
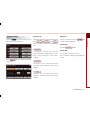
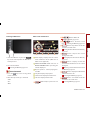
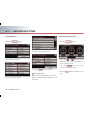
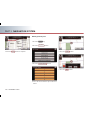
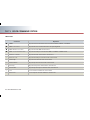
1
FM/AM
Each press will change the bands in the fol-
lowing order: FM1
→
FM2
→
AM
→
FM1 ...
2
SAT
Each press will change the bands in the fol-
lowing order: SIRIUS1
→
SIRIUS2
→
SIRIUS3
→
SIRIUS1 ...
3
MEDIA
Each press will change the bands in the fol-
lowing order: DISC(CD, MP3)
→
(USB or iPod)
→
(AUX)
→
(Phone Music)
→
DISC(CD, MP3)...
4
SEEK/TRACK Up/Down
●
SHORT KEY(less than 0.8 second)
• FM/AM Mode : automatically searches for
the previous or next broadcast frequency
and starts playing.
• SAT Mode : receives the previous or next
channel.
• CD Mode : plays the previous or next track.
• MP3, USB Mode : Plays the previous or next
file.
• iPod Mode : plays the previous or next song.
●
LONG KEY(over 0.8 second)
• FM/AM Mode : quickly moves through the
frequencies while the button is pressed.
Once released, automatically searches for
broadcasts which can be received.
• SAT Mode : quickly moves to the previous or
next channel.
• CD Mode : REW/FF the current playing track.
• MP3, USB Mode : REW/FF the current
playing file.
• iPod Mode : REW/FF the current playing
song.
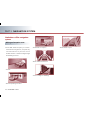
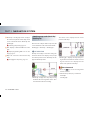
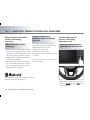
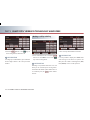
5
Power / Volume control knob
●
Push knob (over 0.8 second) : turns the
power off.
●
Push knob (under 0.8 second) : each time the
5 11
1 6
2 7
3 8
9
10
4
13
12
14 15
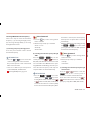
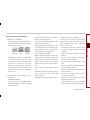
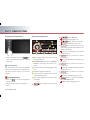
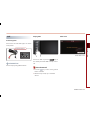
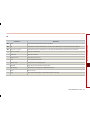
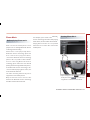
Controller and functions
Control panel

1-4 PRE-OVERVIEW
PART 1 PRE-OVERVIEW
knob is pressed, the Audio is turned on and off.
●
Tune knob : the range of volume adjustment
is between 0 ~ 35.
6
MAP VOICE
Displays the map screen for the current posi-
tion.
7
DEST
Displays the Destination menu screen.
8
ROUTE
Displays the Route menu screen.
9
SETUP
Displays the Setup menu screen.
10
PHONE
Displays the Bluetooth handsfree screen.
11
TUNE
●
FM/AM Mode : push the keys to search for
the desired frequency. Press the key to
receive the selected frequency.
●
SAT Mode : push the keys to search for the
desired channel. Press the knob to receive
the selected channel.
●
CD Mode : push the keys to search for the
desired track. Press the key to play the
selected track.
●
MP3, USB Mode : push the keys to search
for the desired file. Press the key to play
the selected file.
●
iPod Mode : push the keys to search for the
desired song. Press the key to play the
selected song.
12
DISC eject
Ejects the inserted disc.
13
CLOCK
●
Short Key (under 0.8 second)
• When the screen is turned on : displays
the current time in the center of the
screen.
• When the screen is turned off : turns the
full clock screen on and off.
●
Long Key (over 0.8 second)
• Displays the clock setting screen.
14
DISC insert indicator LED
Displays that a DISC has been inserted.
15
RESET
Resets the system - if software locks-up.
INFORMATION
If pressing the
POWER/VOL
knob for over 0.8
second and the system does not shut down,
carefully use a straightened paper clip at the
access hole shown next to the right DISC indi-
cator LED to reset the software. The system
power will shut-off and restart.

PRE-OVERVIEW 1-5
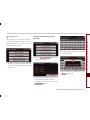
PRE-OVERVIEW
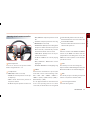
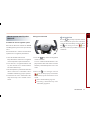
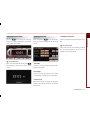
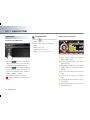
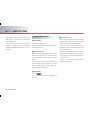
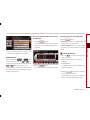
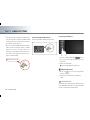
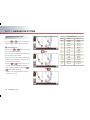
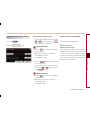
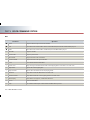
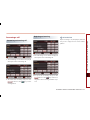
Steering wheel remote controller
1
Volume Up/Down
Increases or decreases the speaker volume
within a range between 0 ~ 35.
2
Seek Up/ Down
●
SHORT KEY(less than 0.8 second)
• FM/AM : Receives the previous or next pre-
set frequency.
• SIRIUS Mode : Receives the previous or
next preset channel.
• CD Mode : Plays the previous or next track.
• MP3, USB Mode : Plays the previous or next
file.
• iPod Mode : Plays the previous or next song.
●
LONG KEY(Over 0.8 second)
• FM/AM Mode : Quickly moves through the
frequencies while the button is pressed.
Once released, it automatically searches
for broadcasts which can be received.
• SIRIUS Mode : Quickly moves to the pre-
vious or next channel.
• CD Mode : REW/FF the current playing
track.
• MP3, USB Mode : REW/FF the current
playing file.
• iPod Mode : REW/FF the current playing song.
3
MODE
Each time the mode button is pressed, the
mode will convert in the following order:
FM1
→
FM2
→
AM
→
SIRIUS1
→
SIRIUS2
→
SIRIUS3
→
(DISC)
→
(USB or iPod)
→
(AUX)
→
(Phone Music)
→
(FM1).
If a not supported DISC has been inserted or
if the corresponding unit has not been
connected, the mode will not be recognized
and automatically switch to the next mode.
●
Press this button for over 0.8 second to turn
the Audio ON and OFF.
●
Press this button when the Power is turned
off to turn the power on.
4
MUTE
Turns the sound on and off. When the MUTE is
turned on, the MUTE icon will become dis-
played. When in the Navigation screen, the
MUTE icon at the top of the screen will disap-
pear after 3seconds.
5
CALL
Press this key to receive an incoming call.
If pressed while in Audio/Navigation mode, the
Bluetooth handsfree screen will be displayed.
6
END
Press this key to reject an incoming call. If pressed
while on a call, then the call will be ended.
7
Voice Recognition button
Starts Voice Recognition.
1
5
6
7
4
2
3

1-6 PRE-OVERVIEW
PART 1 PRE-OVERVIEW
Basic operation and setting
Turning the power ON
1. Turn the ignition key onto ACC or ON. If the
system power had been on when the igni-
tion was turned off, the system will turn
back on automatically.
2. If the system power had been off when the
ignition was turned off, the system will
remain off.
In this case, press the
POWER/VOL
knob to
turn on the system power.
INFORMATION
As system booting starts from the point the
door lock is unlocked, the device may com-
plete booting before the ACC is turned on or
the
POWER/VOL
knob is pressed.
3. Once system booting is complete, the most
recent operated mode will be displayed. For
example, turning on the system will display
FM1 radio mode if the last operated mode
prior to turning off the system had been
FM1 radio mode.
Turning the power OFF
If the
POWER/VOL
knob is pressed for over
0.8 second, a beep will sound and the system
power will be turned off.
Turning the audio ON/OFF
Press the
POWER/VOL
knob for under 0.8
second with the system power on to turn the
Audio on and off.
Voice Command
1. Press the
key on the steering wheel
remote controller.
2. After the beep sound, say a command.
"Audio On"
"Audio Off"

PRE-OVERVIEW 1-7
PRE-OVERVIEW
INFORMATION
Conducting the following operations while
the AUDIO is off will automatically turn on the
Audio system.
●
Pressing the audio related buttons (
FM/AM
,
SAT
,
MEDIA
).
●
Inserting a DISC or connecting an external
device.
Adjusting audio volume
Turn the
POWER/VOL
knob in clockwise direc-
tion to increase the volume and counter-
clockwise to decrease the volume.
INFORMATION
●
The range of volume adjustment is between
0 ~ 35.
●
Adjustments to the volume cannot be made
while the AUDIO is turned off.
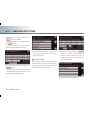
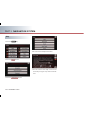
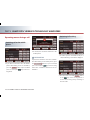
How to operate the screen menu
●
If a menu button on the screen is pressed,
the corresponding function will be opera-
ted.
●
The same menu button may perform diffe-
rent functions depending on the length of
time the button is pressed (under 0.8
seconds or over 0.8 second).
For more information, refer to the specific
function within this user manual.
●
The current operated button will be
highlighted upon display.
●
Buttons which cannot be operated under
the current conditions will be displayed in
disabled state. Pressing a disabled button
will not perform any operation.
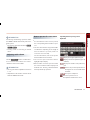
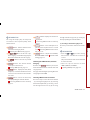
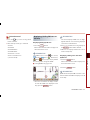
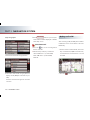
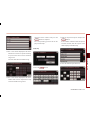
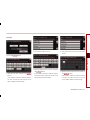
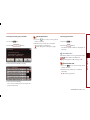
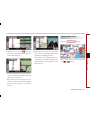
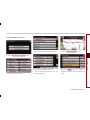
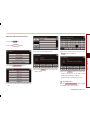
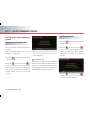
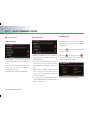
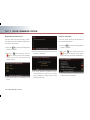
Inputting letters by using screen
keyboard
ABC
: Displays the English alphabet keypad.
: Displays the French alphabet keypad. (if
available)
0 - 9
: Displays the number and symbol key-
pad.
Delete
: Deletes the previous inputted letter.
Pressing for over 0.8 second will delete
all content.
List
: The input is completed.
: Restores to previous screen.
The inputted text will not be saved.

1-8 PRE-OVERVIEW
PART 1 PRE-OVERVIEW
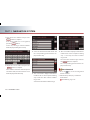
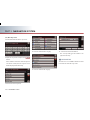
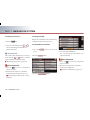
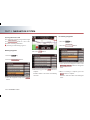
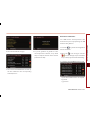
Displaying the list
List
: Even if input is not completed, the
current matching items from the data-
base will be displayed.
INFORMATION
The number at the upper-right side of the
screen displays the number of current
matches.
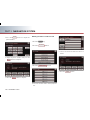
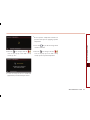
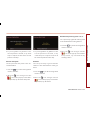
Selecting an item in a list
: Moves to the next page or previous
page.
: The
button will be displayed if
the text is too long to be displayed in
one button.
●
Press the button to move the cursor to
the end of the text.
●
Press the
button to move the cursor to
the front of the text.
Sorting items from the list
Select the desired sorting method to reorga-
nize the list in accordance to the selected
method.

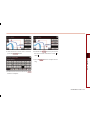
PRE-OVERVIEW 1-9
PRE-OVERVIEW
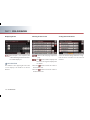
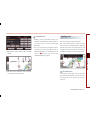
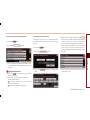
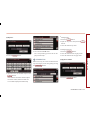
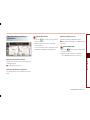
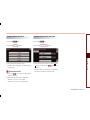
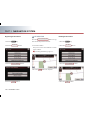
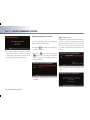
How to operate menu by voice
command
Condition for voice recognition system
Most of the functions within the AUDIO
and Navigation system can be operated by
voice.
Please follow the instructions below for
optimal voice recognition performance.
●
Close all windows and sunroof.
The performance of the voice recognition
can be improved in quiet environment.
●
Press the voice recognition button and
say the desired voice command after
the sound of the beep.
●
The microphone is positioned above the
driver so that voice commands can be
said while maintaining a proper posture.
●
Pronounce the voice commands natu-
rally and clearly as if in normal conver-
sation.
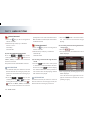
Giving voice command
1. Press the
key on the steering wheel
remote controller.
A voice command window will be dis-
played on the lower side of the screen fol-
lowed by a "Command please" voice com-
ment.
2. Once the
icon changes into the
icon on the pop-up screen with a
beep sound, say the desired voice com-
mand.
[Voice command list], page 4-6.
[ Searching a destination by voice
command], page 4-19.
INFORMATION
Press the
key
shortly to input the desired
voice command. The system voice instruction
comment will immediately terminate. When
the
icon changes into the icon
with a beep sound, it is possible to input voice
commands.

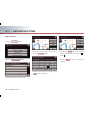
1-10 PRE-OVERVIEW
PART 1 PRE-OVERVIEW
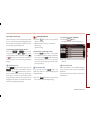
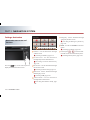
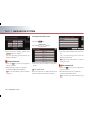
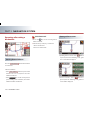
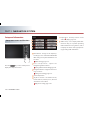
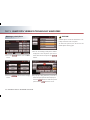
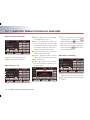
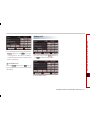
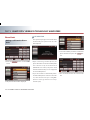
Audio sound setting
Press the
Sound
button on the main screen
of each AV mode (FM/AM, SIRIUS, CD, MP3,
USB, iPod, and AUX) to display the Audio
sound setup screen.
FAD/BAL
The position of the sound can be adjusted by
using the up-down and left-right (
,
,
) buttons on the left side of the screen.
Press the
Default
button to position the
sound in the center of the vehicle.
Treb/Mid/Bass/P.Bass
Treb/Mid/Bass/P.Bass(HIGH, MID, LOW, OFF)
can be adjusted by using the left/right but-
tons (
,
) of each control.
Auto volume control ON/OFF
Each time the
Auto volume control
button is
pressed, the Auto volume control function is
turned on or off.
INFORMATION
The Auto volume control is a function which
automatically adjusts the volume level in
accordance to changes in vehicle speed.
Touch screen Beep ON/OFF
Each time the
Touch screen beep
button is
pressed, the beeping sound that follows each
press on the screen will turn on or off.

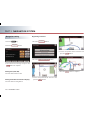
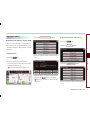
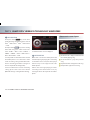
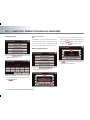
PRE-OVERVIEW 1-11
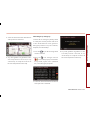
PRE-OVERVIEW
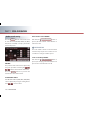
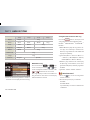
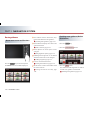
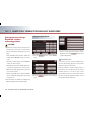
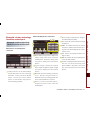
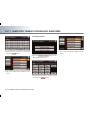
Display setting
Press the
SETUP
key on the control panel to
display the Setup menu screen.
Press
Display
button to display the Display
Setup screen.
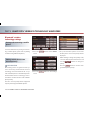
Display mode
Press the button for the desired display mode
from
Automatic
,
Daylight
, and
Night
modes. The current selected mode is highligh-
ted.
●
Automatic
The display is automatically converted
between Daylight and Night modes in accor-
dance to the on/off state of the vehicle
taillights.
●
Daylight
The bright screen is always maintained
regardless of the on/off state of the vehicle
taillights.
●
Night
The dar k scre en is always main tained
regardless of the on/off state of the vehicle
taillights.
Brightness
Use the left/right buttons (
,
) for
control to make adjustments.
Display OFF
Press the
Display off
button.
Display ON
Press anywhere on the black screen.
The screen prior to display setting will be dis-
played.

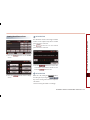
1-12 PRE-OVERVIEW
PART 1 PRE-OVERVIEW
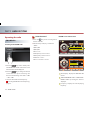
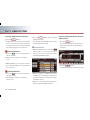
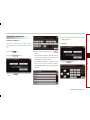
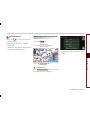
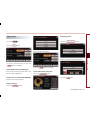
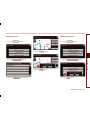
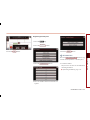
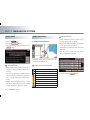
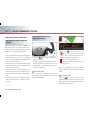
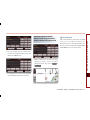
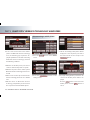
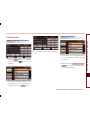
Setting Picture Frame
Display Picture Frame
1. Press the
Picture Frame
bu tto n in the
DISPLAY Setup screen.
2. Press the
My Image
button in the <Setting
Display off> Setup screen.
3. The registered image will be displayed once
power is turned off.
INFORMATION
For Picture Frame setup, the frame must be
set in USB Image mode. (For details on setting
the Picture Frame, refer to the USB IMAGE
page.)
4. To delete an image registered as a frame,
press the
Delete Image
button.

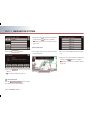
PRE-OVERVIEW 1-13
PRE-OVERVIEW
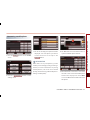
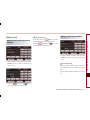
Viewing Current Time
Press the on the front panel shortly
(under 0.8 second) to display the current time
at the center of the screen.
INFORMATION
If the screen is turned off, selecting the
will display the current time on the entire
screen.
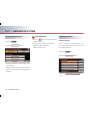
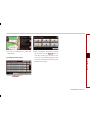
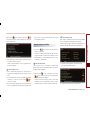
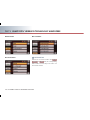
Setting the Clock
Press and hold the on the front panel
(over 0.8 second) to display the Clock setting
screen.
●
GPS Time
The time received from the GPS will be dis-
played automatically.
●
Clock Type
Selects the clock type shown as the entire
screen when the system power is turned off.
●
Time Format
When the clock type is digital, this button is
used to convert the time between 12 hour/ 24
hour systems.
●
Daylight Saving Time
Turns the Daylight Saving Time function on or
off.
INFORMATION
Clock setting mode can be displayed while
the clock is displayed on the screen even
when the system is turned off.

PART 2 AUDIO SYSTEM
PART 2
AUDIO SYSTEM
Operating the radio
2-2
FM/AM Radio
2-2
Listening to the FM/AM radio
2-2
FM/AM screen and functions
2-2
Storing FM/AM presets
2-4
Selecting FM/AM broadcast
frequency
2-4
Scanning FM/AM broadcast
frequency
2-5
SIRIUS Radio
2-6
Listening to the SIRIUS radio
2-6
SIRIUS screen and functions
2-6
Switching the SIRIUS modes
(Channel/Category)
2-7
Selecting SIRIUS broadcast
channel
2-7
Storing SIRIUS presets
2-9
Scanning SIRIUS broadcast channel
2-10
Browsing detailed information
about the SIRIUS channel
2-10
Operating the CDP
2-11
About CDP
2-11
Precautions upon handling discs
2-11
For safe and efficient operation
2-11
Supported disc formats
2-12
Disc/Content format compatibility
2-13
Inserting/Ejecting disc
2-14
2-14
2-14
CD
2-15
Listening to CD music
2-15
CD screen and functions
2-15
Selecting the CD track
2-16
REW/FF CD track
2-16
Setting Random function for
CD music
2-16
Setting Repeat function for
CD music
2-17
Scanning CD track
2-17
MP3
2-18
MP3 disc related information and
precaution
2-18
Listening to MP3 music
2-19
MP3 screen and functions
2-19
Selecting the MP3 file
2-20
REW/FF MP3 file
2-21
Browsing detailed information
about the MP3 file
2-21
Setting Random function for
MP3 file
2-21
Setting Repeat function for MP3
file
2-22
Scanning MP3 file
2-22
Page is loading ...
Page is loading ...
Page is loading ...
Page is loading ...
Page is loading ...
Page is loading ...
Page is loading ...
Page is loading ...
Page is loading ...
Page is loading ...
Page is loading ...
Page is loading ...
Page is loading ...
Page is loading ...
Page is loading ...
Page is loading ...
Page is loading ...
Page is loading ...
Page is loading ...
Page is loading ...
Page is loading ...
Page is loading ...
Page is loading ...
Page is loading ...
Page is loading ...
Page is loading ...
Page is loading ...
Page is loading ...
Page is loading ...
Page is loading ...
Page is loading ...
Page is loading ...
Page is loading ...
Page is loading ...
Page is loading ...
Page is loading ...
Page is loading ...
Page is loading ...
Page is loading ...
Page is loading ...
Page is loading ...
Page is loading ...
Page is loading ...
Page is loading ...
Page is loading ...
Page is loading ...
Page is loading ...
Page is loading ...
Page is loading ...
Page is loading ...
Page is loading ...
Page is loading ...
Page is loading ...
Page is loading ...
Page is loading ...
Page is loading ...
Page is loading ...
Page is loading ...
Page is loading ...
Page is loading ...
Page is loading ...
Page is loading ...
Page is loading ...
Page is loading ...
Page is loading ...
Page is loading ...
Page is loading ...
Page is loading ...
Page is loading ...
Page is loading ...
Page is loading ...
Page is loading ...
Page is loading ...
Page is loading ...
Page is loading ...
Page is loading ...
Page is loading ...
Page is loading ...
Page is loading ...
Page is loading ...
Page is loading ...
Page is loading ...
Page is loading ...
Page is loading ...
Page is loading ...
Page is loading ...
Page is loading ...
Page is loading ...
Page is loading ...
Page is loading ...
Page is loading ...
Page is loading ...
Page is loading ...
Page is loading ...
Page is loading ...
Page is loading ...
Page is loading ...
Page is loading ...
Page is loading ...
Page is loading ...
Page is loading ...
Page is loading ...
Page is loading ...
Page is loading ...
Page is loading ...
Page is loading ...
Page is loading ...
Page is loading ...
Page is loading ...
Page is loading ...
Page is loading ...
Page is loading ...
Page is loading ...
Page is loading ...
Page is loading ...
Page is loading ...
Page is loading ...
Page is loading ...
Page is loading ...
Page is loading ...
Page is loading ...
Page is loading ...
Page is loading ...
Page is loading ...
Page is loading ...
Page is loading ...
Page is loading ...
Page is loading ...
Page is loading ...
Page is loading ...
Page is loading ...
Page is loading ...
Page is loading ...
Page is loading ...
Page is loading ...
Page is loading ...
Page is loading ...
Page is loading ...
Page is loading ...
Page is loading ...
Page is loading ...
Page is loading ...
Page is loading ...
Page is loading ...
Page is loading ...
Page is loading ...
Page is loading ...
Page is loading ...
Page is loading ...
Page is loading ...
Page is loading ...
Page is loading ...
Page is loading ...
Page is loading ...
Page is loading ...
Page is loading ...
Page is loading ...
Page is loading ...
Page is loading ...
Page is loading ...
Page is loading ...
Page is loading ...
Page is loading ...
Page is loading ...
Page is loading ...
Page is loading ...
-
 1
1
-
 2
2
-
 3
3
-
 4
4
-
 5
5
-
 6
6
-
 7
7
-
 8
8
-
 9
9
-
 10
10
-
 11
11
-
 12
12
-
 13
13
-
 14
14
-
 15
15
-
 16
16
-
 17
17
-
 18
18
-
 19
19
-
 20
20
-
 21
21
-
 22
22
-
 23
23
-
 24
24
-
 25
25
-
 26
26
-
 27
27
-
 28
28
-
 29
29
-
 30
30
-
 31
31
-
 32
32
-
 33
33
-
 34
34
-
 35
35
-
 36
36
-
 37
37
-
 38
38
-
 39
39
-
 40
40
-
 41
41
-
 42
42
-
 43
43
-
 44
44
-
 45
45
-
 46
46
-
 47
47
-
 48
48
-
 49
49
-
 50
50
-
 51
51
-
 52
52
-
 53
53
-
 54
54
-
 55
55
-
 56
56
-
 57
57
-
 58
58
-
 59
59
-
 60
60
-
 61
61
-
 62
62
-
 63
63
-
 64
64
-
 65
65
-
 66
66
-
 67
67
-
 68
68
-
 69
69
-
 70
70
-
 71
71
-
 72
72
-
 73
73
-
 74
74
-
 75
75
-
 76
76
-
 77
77
-
 78
78
-
 79
79
-
 80
80
-
 81
81
-
 82
82
-
 83
83
-
 84
84
-
 85
85
-
 86
86
-
 87
87
-
 88
88
-
 89
89
-
 90
90
-
 91
91
-
 92
92
-
 93
93
-
 94
94
-
 95
95
-
 96
96
-
 97
97
-
 98
98
-
 99
99
-
 100
100
-
 101
101
-
 102
102
-
 103
103
-
 104
104
-
 105
105
-
 106
106
-
 107
107
-
 108
108
-
 109
109
-
 110
110
-
 111
111
-
 112
112
-
 113
113
-
 114
114
-
 115
115
-
 116
116
-
 117
117
-
 118
118
-
 119
119
-
 120
120
-
 121
121
-
 122
122
-
 123
123
-
 124
124
-
 125
125
-
 126
126
-
 127
127
-
 128
128
-
 129
129
-
 130
130
-
 131
131
-
 132
132
-
 133
133
-
 134
134
-
 135
135
-
 136
136
-
 137
137
-
 138
138
-
 139
139
-
 140
140
-
 141
141
-
 142
142
-
 143
143
-
 144
144
-
 145
145
-
 146
146
-
 147
147
-
 148
148
-
 149
149
-
 150
150
-
 151
151
-
 152
152
-
 153
153
-
 154
154
-
 155
155
-
 156
156
-
 157
157
-
 158
158
-
 159
159
-
 160
160
-
 161
161
-
 162
162
-
 163
163
-
 164
164
-
 165
165
-
 166
166
-
 167
167
-
 168
168
-
 169
169
-
 170
170
-
 171
171
-
 172
172
-
 173
173
-
 174
174
-
 175
175
-
 176
176
-
 177
177
-
 178
178
-
 179
179
-
 180
180
-
 181
181
-
 182
182
-
 183
183
-
 184
184
-
 185
185
-
 186
186


Ask a question and I''ll find the answer in the document
Finding information in a document is now easier with AI
Related papers

Other documents
-
Hyundai DIGITAL NAVIGATION SYSTEM User manual
-
-
-
Hyundai Elantra Owner's manual
-
-
-
Sony NV-U80 Owner's manual
-
Hyundai Mobis TQ8-AV242INAN User manual
-
-