Xavax LED Built-in Spotlight User manual

Type
User manual

Xavax LED Built-in Spotlight: Illuminate your home with style and functionality! This versatile lighting solution offers 3000K warm white light, creating a cozy atmosphere in any room. With a diameter of 95mm and a fitting dimension of 75mm, it fits seamlessly into your ceiling. Experience energy-efficient lighting with a nominal lamp power of 7W or 5W, depending on the model, and enjoy a long-lasting performance of up to 25,000 hours. The spotlight's 38° + 30° rotatable beam angle allows you to direct light exactly where you need it.

Xavax LED Built-in Spotlight: Illuminate your home with style and functionality! This versatile lighting solution offers 3000K warm white light, creating a cozy atmosphere in any room. With a diameter of 95mm and a fitting dimension of 75mm, it fits seamlessly into your ceiling. Experience energy-efficient lighting with a nominal lamp power of 7W or 5W, depending on the model, and enjoy a long-lasting performance of up to 25,000 hours. The spotlight's 38° + 30° rotatable beam angle allows you to direct light exactly where you need it.

D
GB
Operating Instructions
Bedienungsanleitung
LED Built-in Spotlight
LED-Einbaustrahler
00112694
00112695
2
Step 1: cutthe hole on ceiling
Schritt 1: Loch indie Decke schneiden
Step 3: Vertically put the spring buckle
and then release on the hole of ceiling
Schritt 3: Setzen Sie den Federbügel vertikal
ein und lassen Sieihn dann in das Loch ein.
Step 2: connect power (AC220 -240 V)
Schritt 2: Stromversorgung anschließen
Step 4: Finish installation
Schritt 4: Installation abschließen
Spring buckle
Klemmfeder
Spring buckle
Klemmfeder
Spring buckle
Klemmfeder
Ceiling
Decke
Ø75mm
95 mm
38°
47 mm
30°
swivelable
schwenkbar
3
G Operating instruction
Thank you for choosing aHama product.
Take your time and read the following instructions and
information completely.Please keep these instructions in a
safe place for futurereference. If you sellthe device, please
pass these operating instructions on to the new owner.
1. Explanation of Warning Symbols and Notes
Risk of electric shock
This symbol indicates product parts energized with a
dangerous voltage of sucient magnitude to constitute a
risk of electric shock.
Warning
This symbol is used to indicate safety instructions or to
draw your attention to specichazards and risks.
Note
This symbol is used to indicate additional information or
important notes.
Electrical device of protection class II
Protection against electric shocks by reinforced
or double insulation of voltage-carrying parts
The product is intended for indoor use only.
Use only in dry conditions.
Do not place heat-insulating material on the
light.
Das Produkt ist nur mit Wechselstrom zu
verwenden.
Cannot be dimmed
The lamp is not suitable for use with conventi-
onal dimmers.
The product must only be connected by aqua-
lied electrician who complies with national
and local power supplier regulations and who
possesses knowledge of installation locations,
re protection and electrical installation.
2. Package Contents
3LED Built-in spotlights
Quick start guide
3. Safety Notes
This product is intended for private, non-commercial use
only.
The product is exclusively intended for installation in sus-
pended ceilings or suitable installation pots or concrete
installation housings.
Use the product for its intended purpose only.
Protect the product from dirt, moistureand overheating,
and only use it in adry environment.
Do not drop the product and do not expose it to any
major shocks.
Do not operate the product outside the power limits
given in the specications.
Do not modify the product in any way.Doing so voids
the warranty.
Children arenot permitted to play with the device.
Children may not clean the product or perform user
maintenance without supervision.
Keep this product, as all electrical products, out of the
reach of children!
Dispose of packaging material immediately according to
locally applicable regulations.
The product is intended for indoor use only.Itis not
suitable for installation in bathrooms.
The product may only be operated with the type of power
supply network described on the name plate.
Beforeinstallation, ensurethat the ceiling can hold the
weight of the product and make surethat thereare no
electrical, water,gas or other cables in the ceiling at the
installation location.
Electrical cables must never be pinched or twisted
between the product and the surface.
If the product is attached to ametal surface, it must be
connected to the protective conductor or the potential
equalisation conductor of the installation.
These recessed lights arenot compatible for use with
twilight switches, motion detectors or dimmers.
Use the item only in moderate climatic conditions.
Do not use the product in areas wherethe use of
electronic devices is not permitted.
Do not use the product in moist environments and
avoid splashes.
Do not bend or crush the cable.
Ensurethat no electrical cables arecrushed or damaged
during installation or adjusting.
4
Warning
Please note that lamps (even LEDs) generate heat and
may become hot. Always let the lamp cool off for afew
minutes beforetouching it.
The device may only be operated on a230 V50Hz
AC voltage supply.Work with the 230 Vmains supply
may only be carried out by electricians certied in your
country.The applicable accident prevention regulations
aretobeobserved.
To avoid an electric shock from the device, please
disconnect the mains voltage (switch off circuit
breaker). Failuretoobserve the installation instructions
can cause resorother hazards.
Risk of electric shock
Do not open the product. Do not continue to operate the
product if it is damaged, which may be indicated by smoke,
odours or loud noises. Contact your dealer or our service
department immediately (see ‘Service and support’).
Note
The light source of this light is not replaceable; when the
light source has reached the end of its life, you need to
replace the entirelight.
Example installation in wood/drywallceiling:
1. Beforestarting installation, maintenance or repair
work, disconnect the circuit from the power supply by
switching off the circuit breaker.
2. Securethe circuit from switching on again.
3. Check whether the required minimum installation
depth of at least 80 mm (47 mm light +33mm
distance) is provided. The distance between the upper
edge of the light and the ceiling must not be less than
33 mm to allow for ventilation. The minimum distance
between the lights and ammable materials must not
be less than 50 cm. Do not cover the light with heat-
insulating material.
4. Mark the desired installation location of the light.
5. Drill the installation opening with aØof75mm
using asuitable hole saw.Pay attention to invisible
installation and supply lines.
6. The clamping points (e.g. lustreterminal) between
the building wiring and the connection cable of the
recessed light must be located in suitable junction
boxes. (Not included in the scope of delivery).
7. The construction and insulation of the extension cables
to the next recessed light must correspond to the
operating mode. Yellow/green line –(earth/protective
conductor) is not connected. Additional lights arewired
in the same manner.
230 V
50 Hz
8. Close the junction box and push it into the installation
opening. Ensurethat the cables arefreeofcompressive
and tensile forces. Protect all cables and insulation
from possible damage.
9. Position the recessed light at an angle and then insert a
tensioned clamp into the installation opening. The springs
of the clamp arevery strong and can cause injuries!
10. Insert the second tensioned clamp into the installation
opening. Slowly insert the recessed light completely
into the installation opening. The force of the clamps is
sucient to hold the recessed light in position.
11. No additional xingisnecessary.For exactalignment, you
can easilymoveand rotate theposition of therecessed
light.The inner part of thelight can also be swivelled.
12. Do not switch the circuit breaker back on until all
recessed lights arecompletely installed.
Disassembly:
1. Pull the recessed light out of the installation opening
on one side. Ensurethat the clamp does not
unintentionally slip out of the opening, otherwise there
is arisk of your ngers getting caught.
2. Carefully pull the clamps out of the installation opening
one after the other.
3. Continue disassembly in the reverse order to assembly.
4. Careand Maintenance
•Only clean this product with aslightly damp, lint-free
cloth and do not use aggressive cleaning agents.
•Make surethat water does not get into the product.
Beforestarting installation, maintenance or repair work,
disconnect the circuit from the power supply by switching
off the circuit breaker.
Securethe circuit from switching on again.
5. Warranty Disclaimer
Hama GmbH &CoKGassumes no liability and provides no
warranty for damage resulting from improper installation/
mounting, improper use of the product or from failureto
observe the operating instructions and/or safety notes.
5
6. Service and Support
Please contact Hama Product Consulting if you have any
questions about this product.
Hotline: +49 9091 502-0 (German/English)
Further support information can be found here:
www.hama.com
7. Recycling Information
Note on environmental protection:
After the implementation of the European Directive
2012/19/EU and 2006/66/EU in the national legal
system, the following applies: Electric and electronic
devices as well as batteries must not be disposed of
with household waste. Consumers areobliged by law to return
electrical and electronic devices as well as batteries at the end of
their service lives to the public collecting points set up for this
purpose or point of sale. Details to this aredened by the
national law of the respective country .This symbol on the
product, the instruction manual or the package indicates that a
product is subject to these regulations. By recycling, reusing the
materials or other forms of utilising old devices/batteries, you are
making an important contribution to protecting our environment.
8. Technical data
Item 112695 112694
Voltage 230V~, 50Hz 230V~, 50Hz
Lamp Current 52 mA 40 mA
Nominal lamp power 7W 5W
Luminous ux 450 lm 350 lm
Colour temperature 3000K, warm white, CRI 80 3000K, warm white, CRI 80
Protection class II II
Safety class IP 20; installation in dry areas only IP 20; installation in dry areas only
Diameter
Outside: 95mm;
fitting dimension: 75mm
Outside: 95mm;
fitting dimension: 75mm
Mounting depth 47mm 47mm
Lifetime 25.000h 25.000h
Number of switching cycles 12.500 times 12.500 times
Beam angle 38° +3 rotatable 38° +3 rotatable
Dimmable No No
6
D Bedienungsanleitung
Vielen Dank, dass Sie sich für ein Hama Produkt entschie-
den haben! Nehmen Sie sich Zeit und lesen Sie die fol-
genden Anweisungen und Hinweise zunächst ganz durch.
Bewahren Sie diese Bedienungsanleitung anschließend an
einem sicheren Ort auf,umbei Bedarf darin nachschlagen
zu können. Sollten Sie das Gerät veräußern, geben Sie die-
se Bedienungsanleitung an den neuen Eigentümer weiter.
1. Erklärung von Warnsymbolen und Hinweisen
Gefahr eines elektrischen Schlages
Dieses Symbol weist auf eine Berührungsgefahr mit nicht
isolierten Teilen des Produktes hin, die möglicherweise
eine gefährliche Spannung von solcher Höhe führen,
dass die Gefahr eines elektrischen Schlags besteht.
Warnung
Wirdverwendet, um Sicherheitshinweise zu
kennzeichnen oder um Aufmerksamkeit auf besondere
Gefahren und Risiken zu lenken.
Hinweis
Wirdverwendet, um zusätzlich Informationen oder
wichtige Hinweise zu kennzeichnen.
Elektrisches Gerät der Schutzklasse II.
Schutz vor elektrischem Schlag durch verstärkte
oder doppelte Isolierung von spannungsfüh-
renden Teilen.
Das Produkt ist nur für den Gebrauch innerhalb
von Gebäuden vorgesehen.
Nur in trockener Umgebung einsetzen.
An der Leuchte dürfen keine wärmedämmen-
den Stoffe anliegen.
Das Produkt ist nur mit Wechselstrom zu
verwenden.
Nicht dimmbar.
Die Lampe ist nicht für die Verwendung mit
einem herkömmlichen Dimmer geeignet.
Der Artikel darf nur von einer Elektrofachkraft
angeschlossen werden, welche die landes-
üblichen Vorschriften und die der örtlichen
Energieversorgungsunternehmen einhält, sowie
über Kenntnisse zu Montageorten, Brandschutz
und elektrische Installation verfügt.
2. Packungsinhalt
3Einbaustrahler
1Bedienungsanleitung
3. Sicherheitshinweise
Das Produkt ist für den privaten, nicht-gewerblichen
Gebrauch vorgesehen.
Das Produkt ist ausschließlich für die Montage in abge-
hängten Decken oder entsprechenden Einbautöpfen bzw.
Beton-Einbaugehäusen vorgesehen.
Verwenden Sie das Produkt ausschließlich für den dazu
vorgesehenen Zweck.
Lassen Sie das Produkt nicht fallen und setzen Sie es
keinen heftigen Erschütterungen aus.
Betreiben Sie das Produkt nicht außerhalb seiner in den
technischen Daten angegebenen Leistungsgrenzen.
Nehmen Sie keine Veränderungen am Produkt vor.Da-
durch verlieren sie jegliche Gewährleistungsansprüche.
Kinder dürfen nicht mit dem Gerät spielen. Reinigung
und Benutzerwartung dürfen nicht von Kindern ohne
Beaufsichtigung durchgeführt werden.
Dieses Produkt gehört, wie alle elektrischen Produkte,
nicht in Kinderhände!
Entsorgen Sie das Verpackungsmaterial sofort gemäß
den örtlich gültigen Entsorgungsvorschriften.
Das Produkt sollte ausschließlich in geschlossenen
Räumen installiert werden. Es ist nicht für die Installation
in Badezimmern geeignet.
Das Produkt darf ausschließlich an einem Versorgungsnetz
betrieben werden, wie auf dem Typenschild beschrieben.
Prüfen Sie vor Montage die Eignung der vorgesehenen
Decke für das anzubringende Gewicht und vergewissern
Sie sich, dass sich an der Montagestelle in der Decke kei-
ne elektrischen Leitungen, Wasser-, Gas- oder sonstige
Leitungen benden.
Elektrische Leitungen dürfen zwischen dem Produkt und
der Oberäche niemals eingeklemmt oder verdreht werden.
Wenn das Produkt an einer Metalloberäche angebracht
wird, muss diese mit dem Schutzleiter oder dem Potenzi-
alausgleichsleiter der Installation verbunden sein.
Diese Einbauleuchten sind nicht kompatibel zumBetriebmit
Dämmerungsschaltern,Bewegungsmeldern oder Dimmern.
Schützen Sie das Produkt vor Schmutz, Feuchtigkeit und
Überhitzung und verwenden Sie es nur in trockenen Räumen.
Verwenden Sie den Artikel nur unter moderaten
klimatischen Bedingungen.
Benutzen Sie das Produkt nicht in Bereichen, in denen
elektronische Produkte nicht erlaubt sind.
Verwenden Sie das Produkt nicht in einer feuchten
Umgebung und vermeiden Sie Spritzwasser.
Knicken und quetschen Sie das Kabel nicht.
Versuchen Sie nicht, das Produkt selbst zu warten oder
zu reparieren. Überlassen Sie jegliche Wartungsarbeit
dem zuständigen Fachpersonal.
7
Warnung
Beachten Sie, dass Lampen (auch LED) hohe Tempera-
turen entwickeln und heiß sein können. Geben Sie der
Lampe immer einige Minuten zum Abkühlen, bevor Sie
sie berühren.
Der Betrieb des Gerätes ist ausschließlich am 230V
50Hz Wechselspannungsnetz zulässig. Arbeiten
am 230V-Netz dürfen nur von einer in Ihrem Land
zertizierten Elektrofachkraft erfolgen. Dabei sind die
geltenden Unfallverhütungsvorschriften zu beachten.
Zur Vermeidung eines elektrischen Schlages am Gerät
bitte Netzspannung freischalten (Sicherungsautomat
abschalten). Bei Nichtbeachtung der Installationshin
-
weise können Brände oder andereGefahren entstehen.
Gefahr eines elektrischen Schlages
Öffnen Sie das Produkt nicht und betreiben Sie es bei
Beschädigung, davon ausgehender Rauchentwicklung,
Geruchsbildung oder lauten Geräuschen nicht weiter.
Wenden Sie sich umgehend an Ihren Händler oder unse-
re Serviceabteilung (siehe Pkt. Service und Support).
Hinweis
Die Lichtquelle dieser Leuchte ist nicht ersetzbar; wenn
die Lichtquelle ihr Lebensdauerende erreicht hat, ist die
gesamte Leuchte zu ersetzen.
Beispiel Montage in Holz/Trockenbaudecke:
1. Schalten Sie vor Beginn der Installations-, Wartungs-
oder Reparaturarbeiten den Stromkreis durch
Ausschalten der Sicherung spannungsfrei.
2. Sichern Sie den Stromkreis gegen Wiedereinschalten.
3. Prüfen Sie, ob die erforderliche Mindesteinbautiefe
von min. 80mm (47mm Leuchte +33mm Abstand)
gegeben ist. Der Abstand zwischen oberem Rand
der Leuchte und Decke darf nicht weniger als 33mm
betragen, um eine Belüftung zu ermöglichen. Der Min-
destabstand zwischen den Leuchten und entzündlichen
Werkstoffen darf nicht weniger als 50cm betragen.
Leuchte nicht mit Wärme- Dämmmaterial abdecken.
4. Markieren Sie die gewünschte Einbauposition der Leuchte.
5. Erstellen Sie die Einbauöffnung mit einem Øvon
75 mm mit einer entsprechenden Lochsäge. Achten
Sie dabei auf nicht sichtbareInstallations- und
Versorgungsleitungen.
6. Das Verklemmen der Klemmstellen (z.B. Lüsterklemme)
zwischen Hausinstallation und Einbaustrahler-
Anschlusskabel muss in geeigneten Verteilerdosen
erfolgen. (Nicht im Lieferumfang enthalten).
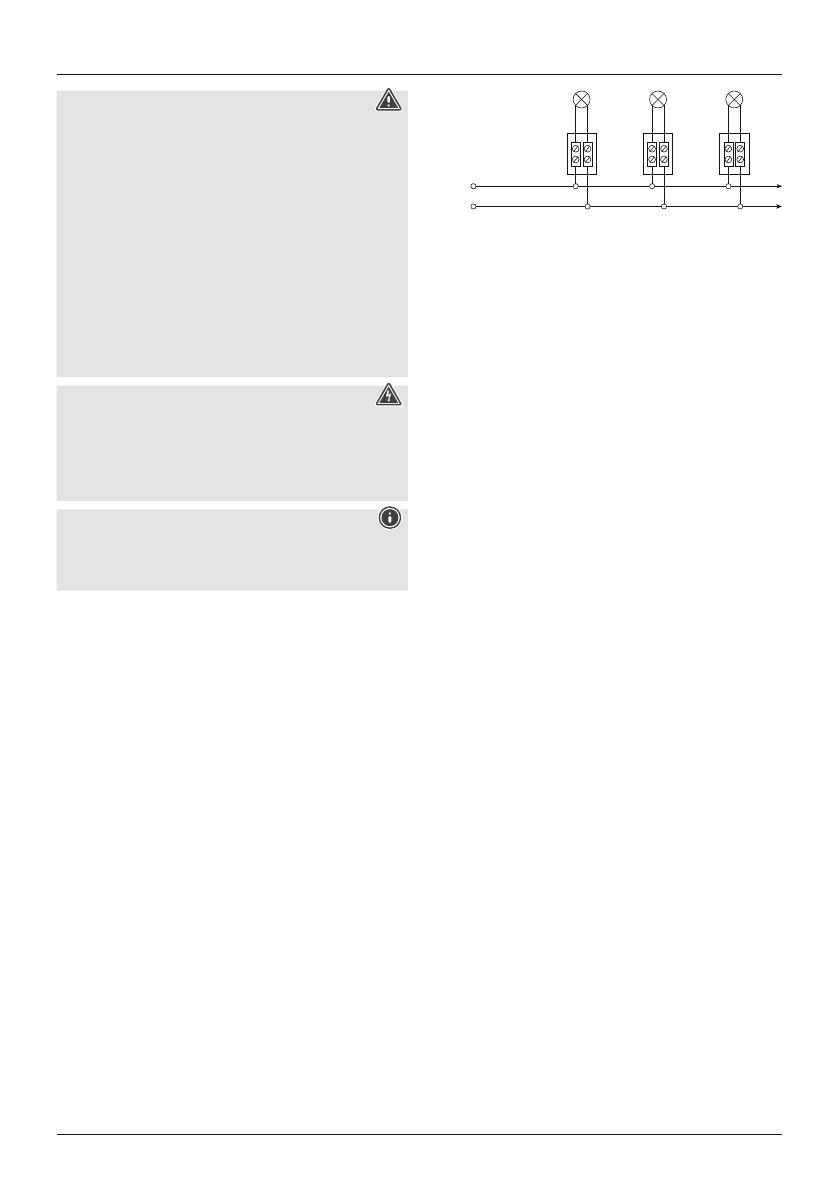
7. Weiterführende Kabel zur nächsten Einbauleuchte
müssen in Aufbau und Isolierung der Betriebsart
entsprechen. Leitung gelb/grün -(Erde/Schutzleiter)
wirdnicht angeschlossen. WeitereLeuchten werden
parallel weiter verkabelt.
230 V
50 Hz
8. Schließen Sie die Verteilerbox und schieben Sie diese in
die Einbauöffnung. Beachten Sie weiter,dass die Kabel
frei von Druck- und Zugkräfte sind. Schützen Sie alle Ka-
bel und Isolierungen vor eventuellen Beschädigungen.
9. Setzen Sie die Einbauleuchte schräg an und führen
zuerst eine gespannte Klammer in die Einbauöffnung
ein. Die Federn der Klammer sind sehr stark und
können bei Unachtsamkeit Verletzungen verursachen!
10. Führen Sie nun die zweite gespannte Klammer in
die Einbauöffnung ein. Die Einbauleuchte wirdnun
langsam vollständig in die Einbauöffnung eingeführt.
Die Kraft der Klammern ist ausreichend, um die
Einbauleuchte in ihrer Position zu halten.
11. Es ist keine weitereFixierung erforderlich. Zur genauen
Ausrichtung kann die Einbauleuchte leicht in ihrer
Position verschoben und gedreht werden. Der innere
Leuchtenteil ist zusätzlich noch schwenkbar.
12. Schalten Sie die Sicherung erst nach vollständig
erfolgter Montage aller Einbauleuchten wieder ein.
Demontage
1. Ziehen Sie die Einbauleuchte einseitig aus der Einbauöff-
nung heraus. Achten Sie hierbei darauf,dass die Klam-
mer nicht ungewollt aus der Öffnung rutscht. Es besteht
sonst die Gefahr,dass Sie sich die Finger klemmen.
2. Ziehen Sie zuerst eine, danach die andereKlammer
vorsichtig aus der Einbauöffnung heraus.
3. Die weitereDemontage erfolgt in umgekehrter
Reihenfolge zur Montage.
4. Wartung und Pflege
Reinigen Sie dieses Produkt nur mit einem fusselfreien,
leicht feuchten Tuch und verwenden Sie keine
aggressiven Reiniger.
Achten Sie darauf ,dass kein Wasser in das Produkt eindringt.
Schalten Sie vor Beginn der Installations-, Wartungs-
oder Reparaturarbeiten den Stromkreis durch Ausschalten
der Sicherung spannungsfrei.
Sichern Sie den Stromkreis gegen Wiedereinschalten.
5. Haftungsausschluss
Die Hama GmbH &CoKbernimmt keinerlei Haftung
oder Gewährleistung für Schäden, die aus unsachgemäßer
Installation, Montage und unsachgemäßem Gebrauch des
Produktes oder einer Nichtbeachtung der Bedienungsanlei-
tung und/oder der Sicherheitshinweise resultieren.
6. Service und Support
Bitte wenden Sie sich bei Fragen zum Produkt gerne an die
Hama-Produktberatung.
Hotline: +49 9091 502-0 (DE/EN)
WeitereSupportinformationen nden sie hier:www.hama.com
8
7. Entsorgungshinweise
Hinweis zum Umweltschutz:
Ab dem Zeitpunkt der Umsetzung der europäi-
schen Richtlinien 2012/19/EU und 2006/66/EG in
nationales Recht gilt folgendes: Elektrische und
elektronische Geräte sowie Batterien dürfen nicht
mit dem Hausmüll entsorgt werden. Der Verbraucher ist
gesetzlich verpichtet, elektrische und elektronische Geräte
sowie Batterien am Ende ihrer Lebensdauer an den dafür
eingerichteten, öffentlichen Sammelstellen oder an die
Verkaufsstelle zurückzugeben. Einzelheiten dazu regelt das
jeweilige Landesrecht. Das Symbol auf dem Produkt, der
Gebrauchsanleitung oder der Verpackung weist auf diese
Bestimmungen hin. Mit der Wiederverwertung, der
stoichen Verwertung oder anderen Formen der
Verwertung von Altgeräten/Batterien leisten Sie einen
wichtigen Beitrag zum Schutz unserer Umwelt.
8. Technische Daten
Artikel 112695 112694
Spannung 230V~, 50Hz 230V~, 50Hz
Lampenstrom 52 mA 40 mA
Nennleistungsaufnahme 7W 5W
Nutzlichtstrom 450 lm 350 lm
Farbtemperatur 3000K, warmweiss, CRI 80 3000K, warmweiss, CRI 80
Schutzklasse II II
Schutzart
IP 20; Einbau nur in trockenen
Bereichen
IP 20; Einbau nur in trockenen
Bereichen
Durchmesser Außen: 95mm; Einbaumaß: 75mm Außen: 95mm; Einbaumaß: 75mm
Einbautiefe 47mm 47mm
Lebensdauer 25.000h 25.000h
Schaltzyklen 12.500 Mal 12.500 Mal
Abstrahlwinkel 38° +3 schwenkbar 38° +3 schwenkbar
Dimmbar Nein Nein
00112694_95/06.20
Alllistedbrands aretrademarksofthe correspondingcompani es.Errorsand omissions excepted,
andsubjecttotechnical changes. Ourgeneral termsofdeliver yand paymentare applied.
Distributed by
Hama GmbH &CoKG
86652 Monheim
/Germany
www.hama.com
  • Page 1 1
  • Page 2 2
  • Page 3 3
  • Page 4 4
  • Page 5 5
  • Page 6 6
  • Page 7 7
  • Page 8 8
  • Page 9 9

Xavax LED Built-in Spotlight User manual

Type
User manual

Xavax LED Built-in Spotlight: Illuminate your home with style and functionality! This versatile lighting solution offers 3000K warm white light, creating a cozy atmosphere in any room. With a diameter of 95mm and a fitting dimension of 75mm, it fits seamlessly into your ceiling. Experience energy-efficient lighting with a nominal lamp power of 7W or 5W, depending on the model, and enjoy a long-lasting performance of up to 25,000 hours. The spotlight's 38° + 30° rotatable beam angle allows you to direct light exactly where you need it.

Ask a question and I''ll find the answer in the document

Finding information in a document is now easier with AI

in other languages