Intermatic KM2ST-1G Operating instructions
- Type
- Operating instructions

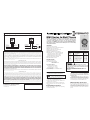
KM2 Series In-Wall Timers
SPECIFICATIONS
Clock Input: 120VAC, 60Hz
Switch Rating: SPST and SPDT
20A @ 120VAC, 60Hz
1HP @ 120VAC
Environmental Ratings:
Operating Temperature Range:
–40°F to 180°F (–40°C to 85°C)
Operating Humidity: 0 - 95% RH,
non-condensing
Wiring Connections: Three #14AWG lead wires
24 Hour
Model Description Switch
KM2ST-1G single gang 20A, SPST
KM2STU-1G three-way single gang 20A, SPDT
KM2ST-2G 2-gang/toggle opening 20A, SPST
KM2ST-2R 2-gang/receptacle opening 20A, SPST
KM2ST-2D 2-gang/decorator opening 20A, SPST
KM2ST-3D 3-gang/decorator opening 20A, SPST
KM2ST-3G 3-gang/toggle openings 20A, SPST
KM2ST-4G 4-gang/toggle openings 20A, SPST
ORDERING DATA
Replaces standard wall switch to provide automatic control of out-
door or indoor lighting, fans, pumps, office machines, and other types
of circuits. Captive trippers are easy to set, can’t be lost. 72 trippers
provide up to 36 ON/OFF events in 24 hour period. OFF/ON/AUTO over-
ride switch provides continuous ON or OFF positions. UL Listed. Easy
wiring and installation.
FEATURES
J
24 hour time switch program
J
Captive trippers with 20 minute switching interval
J
Reliable synchronous timer motor
J
SPST or SPDT 20A, 1HP @ 125V switch
J
OFF/ON/AUTO manual switch
J
Mounts to standard electrical wall boxes
J
Available with 1, 2, 3, or 4-gang wall plates with
toggle switch openings, 2-gang or 3-gang wall
plates with decorator opening or 2-gang
wall plate with duplex receptacle opening.
J
Three way (SPDT) switch available
J
UL and Canadian UL Listed
WARNING
• Toavoidre,shockordeath,turnoffpoweratcircuit
breakerandtestthatpoweris off before wiring or servicing.
• Readinstructionscompletelybeforeinstallationandretain
for future reference.
• Observeallnationalandlocalelectricalcodes.
• Alterationsormodicationstothedevicewillvoidthe
warranty.
Installation Instructions
1. Check the input and output ratings on unit to make
sure this product is suitable for your application.
To avoid fire, shock or death, turn off power at circuit
breaker and test that power is off before wiring.
2. Wire in accordance with all national and local elec-
trical codes (see wiring diagrams below).
3. Verify that all connections are secure. Double check
all twist-on wire connectors.
4. Mount timer into wall box using the supplied screws.
5. Mount wall plate onto timer using the supplied
screws.
Programming Instructions
The timer dial contains 72 trippers, each representing
a 20 minute timer interval.
WARNING
Settingthe clocktime - Rotate the dial gradually
clockwise until the current time is aligned with the tri-
angle marker at the 3 o’clock position. NOTICE! Do
not rotate the dial counter-clockwise. Doing so will
damage the timer.
Programming the timer - Move the slide switch to
the right AUTO position. Move the tripper, correspond-
ing to the start of the desired ON time, inward. Move
each adjacent tripper inward until the desired OFF time
is reached. Repeat for all desired ON/OFF cycles.
Manual Override Instructions
The slide switch provides manual operation of the
load, overriding the timer programming. If set to the
OFF position, the load will be continuously off. If set to
the ON position the load will be continuously on. For
automatic on/off function, set the switch to the AUTO
position.
158--00935
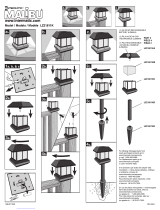
Wiring Diagrams/Diagramas de Cableado/Diagrammes de câblage
Distributed by:/Distribuidos por:/Distribué par :
HOT (BLACK)
CALIENTE (NEGRO)
CHAUD (NOIR)
RED
ROJO
ROUGE
3-Way Switch
Interruptor de 3 vías
Interrupteur à trois voies
BLUE
AZUL
BLEU
LOAD
CARGA
CHARGE
NEUTRAL (WHITE)
NEUTRAL (BLANCO)
NEUTRE (BLANC)
HOT (BLACK)
CALIENTE (NEGRO)
CHAUD (NOIR)
LOAD (RED)
CARGA (ROJO)
CHARGE (ROUGE)
LOAD
CARGA
CHARGE
NEUTRAL (WHITE)
NEUTRAL (BLANCO)
NEUTRE (BLANC)
Standard Installation/Instalación estándar/Installation normale 3-Way Installation/Instalación de 3 vías/Installation à trois voies
INTERMATIC INCORPORATED
Spring Grove, IL 60081-9698
www.intermatic.com
LIMITED ONE YEAR WARRANTY
If within the warranty period specified, this product fails due to a defect in material or workmanship, Intermatic Incorporated will repair or replace it, at its sole
option, free of charge. This warranty is extended to the original purchaser only and is not transferable. This warranty does not apply to: (a) damage to units caused
by accident, dropping or abuse in handling, acts of God or any negligent use; (b) units which have been subject to unauthorized repair, opened, taken apart or
otherwise modified; (c) units not used in accordance with instructions; (d) damages exceeding the cost of the product; (e) sealed lamps and/or lamp bulbs, LED’s
and batteries; (f) the finish on any portion of the product, such as surface and/or weathering, as this is considered normal wear and tear; (g) transit damage, initial
installation costs, removal costs, or reinstallation costs.
INTERMATIC INCORPORATED WILL NOT BE LIABLE FOR INCIDENTAL OR CONSEQUENTIAL DAMAGES. SOME STATES DO NOT ALLOW THE EXCLUSION
OR LIMITATION OF INCIDENTAL OR CONSEQUENTIAL DAMAGES, SO THE ABOVE LIMITATION OR EXCLUSION MAY NOT APPLY TO YOU. THIS WARRANTY
IS IN LIEU OF ALL OTHER EXPRESS OR IMPLIED WARRANTIES. ALL IMPLIED WARRANTIES, INCLUDING THE WARRANTY OF MERCHANTABILITY AND THE
WARRANTY OF FITNESS FOR A PARTICULAR PURPOSE, ARE HEREBY MODIFIED TO EXIST ONLY AS CONTAINED IN THIS LIMITED WARRANTY, AND SHALL
BE OF THE SAME DURATION AS THE WARRANTY PERIOD STATED ABOVE. SOME STATES DO NOT ALLOW LIMITATIONS ON THE DURATION OF AN IMPLIED
WARRANTY, SO THE ABOVE LIMITATION MAY NOT APPLY TO YOU.
This warranty service is available by either (a) returning the product to the dealer from whom the unit was purchased, or (b) completing a warranty claim on line at
www.intermatic.com. This warranty is made by: Intermatic Incorporated, Customer Service 7777 Winn Rd. Spring Grove, Illinois 60081-9698. For warranty service go
to: http://www.intermatic.com or call 815-675-7000.
GARANTÍA LIMITADA DE 1 AÑO
Si en el plazo especificado por la garantía, el producto falla debido a un defecto de material o mano de obra, Intermatic Incorporated lo reparará o reemplazará,
a opción propia, de forma gratuita. Esta garantía se aplica solamente al comprador particular original y no es transferible. Esta garantía no se aplica en los casos
siguientes: (a) daños en unidades causados por accidente, caídas o abuso durante su manipulación, fuerza mayor o cualquier uso negligente; (b) unidades
que hayan sido sometidas a una reparación no autorizada, abiertas, desmontadas o modificadas de otra forma; (c) unidades que no se hayan usado según las
instrucciones; (d) daños que excedan el costo del producto; (e) lámparas selladas y bombillas, LED y pilas; (f) el acabado de cualquier parte del producto, tal
como la superficie y el desgaste debido a la intemperie, ya que esto se considera como un desgaste natural; (g) daños durante el transporte, costos de instalación
iniciales, costos de desmontaje o costos de reinstalación.
INTERMATIC INCORPORATED NO SERÁ RESPONSIBLE DE LOS DAÑOS EMERGENTES O CONSECUENTES. ALGUNOS ESTADOS NO PERMITEN LA
EXCLUSIÓN O LIMITACIÓN DE LOS DAÑOS EMERGENTES O CONSECUENTES, POR LO QUE ES POSIBLE QUE NO SE APLIQUE EN SU CASO LA
LIMITACIÓN O EXCLUSIÓN ANTERIOR. ESTA GARANTÍA SUSTITUYE LAS DEMÁS GARANTÍAS EXPLÍCITAS O IMPLÍCITAS. TODAS LAS GARANTÍAS
IMPLÍCITAS, INCLUIDA LA GARANTÍA DE COMERCIABILIDAD Y LA GARANTÍA DE IDONEIDAD PARA CIERTO FIN, SE MODIFICAN AQUÍ PARA EXISTIR
SÓLO SEGÚN ESTÁN CONTENIDAS EN ESTA GARANTÍA LIMITADA, Y DEBEN TENER LA MISMA DURACIÓN QUE EL PERÍODO DE GARANTÍA INDICADO
ARRIBA. ALGUNOS ESTADOS NO PERMITEN LIMITACIONES DE LA DURACIÓN DE UNA GARANTÍA IMPLÍCITA, POR LO QUE ES POSIBLE QUE LA
LIMITACIÓN ANTERIOR NO SE APLIQUE EN SU CASO.
Este servicio de garantía está disponible mediante (a) la devolución del producto al distribuidor al que se compró la undidad o (b) terminando una demanda de
la garantía en línea en www.intermatic.com. Esta garantía es provista por: Intermatic Incorporated/Customer Service/7777 Winn Rd., Spring Grove, Illinois 60081-
9698/815-675-7000 http://www.intermatic.com
GARANTIE LIMITÉE DE 1 AN
Si, dans la période de la garantie spécifiée, ce produit s’avère défectueux pour vice de matériau ou de fabrication, Intermatic Incorporated le réparera ou le remplac-
era, la décision appartenant Intermatic Incorporated, sans frais. Cette garantie ne concerne que l’acheteur initial et n’est pas transférable. Cette garantie ne couvre
pas : (a) dommages occasionnés par accident, chute ou abus lors de manipulations, cas fortuits ou toute négligence ; (b) unités ayant subi à des réparations non
autorisées, ouvertes, démontées ou modifiées d’une quelconque façon ; (c) unités qui ne sont pas utilisées conformément aux instructions ; (d) dommages supérieurs
au coût du produit ; (e) éclairage scellé et/ou ampoule, DEL et batteries ; (f) la finition d’une partie du produit, telle que les rayures de surface et/ou le vieillisse-
ment climatique qui sont considérés comme une usure normale ; (g) dommages ayant lieu pendant le transport, frais initiaux d’installation, de désinstallation ou de
réinstallation.
INTERMATIC INCORPORATED N’ENDOSSE AUCUNE RESPONSABILITÉ QUANT AUX DOMMAGES ACCESSOIRES OU INDRECTS. CERTAINES PROV-
INCES NE PERMETTENT PAS D’EXCLUSIONS OU DE LIMITATIONS AUX DOMMAGES ACCESSOIRES OU CONSÉCUTIFS, LA LIMITE INDIQUÉE CI-
DESSUS PEUT NE PAS VOUS CONCERNER. CETTE GARANTIE CI-PRÉSENTES REMPLACE TOUTES AUTRES GARANTIES EXPRESSES OU TACITES.
TOUTES LES GARANTIES TACITES Y COMPRIS LA GARANTIE DE COMMERCIALISATION ET CELLE D’ADAPTABILITÉ À DES FINS PARTICULIÈRES
SONT MODIFIÉES CI-PRÉSENTES POUR N’EXISTER QUE TELLES QUELLES DANS CETTE GARANTIE LIMITÉE ET AURONT LA MÊME DURÉE DE VA-
LIDITÉ QUE LA PÉRIODE DE GARANTIE INDIQUÉE CI-DESSUS. CERTAINES PROVINCES NE PERMETTENT PAS DE LIMITATIONS AUX TERMES DE LA
DURÉE DE LA GARANTIE TACITE, LA LIMITE INDIQUÉE CI-DESSUS PEUT NE PAS VOUS CONCERNER.
Ce service sous garantie est disponible soit (a) en retournant le produit au dépositaire où vous avez acheté l’appareil, ou (b) terminant une réclamation de garantie
sur la ligne à www.intermatic.com. Cet garantie fait par: Intermatic Incorporated/Customer Service/7777 Winn Rd., Spring Grove, Illinois 60081-9698/815-675-7000
http://www.intermatic.com

Temporizadores de pared serie KM2
ESPECIFICACIONES
Entrada del reloj: 120VAC, 60Hz
Rangos del interruptor: SPST y SPDT
20A a 120VAC, 60Hz
1HP a 120VAC
Rangos ambientales:
Rango de temperatura operativa:
-40°F a 180°F (-40°C a 85°C)
Humedad operativa: 0 - 95% RH,
sin condensación
Conexiones del cableado: Tres cables de plomo #14AWG
24 Horas
Modelo Descripción Interruptor
KM2ST-1G sencilla 20A, SPST
KM2STU-1G sencilla de tres vías 20A, SPDT
KM2ST-2G abertura para montaje/doble 20A, SPST
KM2ST-2R abertura de receptáculo/doble 20A, SPST
KM2ST-2D abertura de decoración/doble 20A, SPST
KM2ST-3D abertura de decoración/triple 20A, SPST
KM2ST-3G aberturas para montaje/triples 20A, SPST
KM2ST-4G aberturas para montaje/cuádruples 20A, SPST
DATOS PARA PEDIDOS
Reemplaza el interruptor de pared estándar para proveer el control automático
de la iluminación exterior e interior, ventiladores, bombas, máquinas de oficina y
otros tipos de circuitos. Los disparadores cautivos son fáciles de configurar, no
se pueden perder. Los 72 disparadores proveen hasta 36 eventos ACTIVADOS/
DESACTIVADOS en un periodo de 24 horas. El interruptor de apagado con opción
de DESACTIVADO/ACTIVADO/AUTOMÁTICO provee posiciones de ACTIVADO o
DESACTIVADO continuo. Está en la lista de UL. Facilidad de cableado e instalación.
CARACTERÍSTICAS
J
Programa del interruptor de tiempo de 24 horas
J
Disparadores cautivos con intervalo de 20 minutos del interruptor
J
Motor del temporizador sincrónico confiable
J
Interruptor SPST o SPDT 20A, 1HP a 125V
J
Interruptor manual de posición DESACTIVADO/ACTIVADO/AUTOMÁTICO
J
Se monta en las cajas de elementos eléctricos de pared estándar
J
Disponible con placa sencilla, doble, triple o cuádruple para
montaje en pared con aberturas de interruptor de palanca,
placa doble o triple para montaje en pared con abertura de
decoración o placa doble para montaje en pared con abertura
de receptáculo doble.
J
Interruptor de tres vías (SPDT) disponible
J
Se encuentra el la lista de UL y UL canadiense
ADVERTENCIA
• Paraevitarelriesgodeincendio,descargaeléctricaola
muerte,apagueelsuministroeléctricodelcortacircuitoy
compruebe que el suministro estéapagadoantesde
comenzar a instalar el cableado o darle servicio.
• Lealasinstruccionescompletasantesdeinstalary
consérvelasparareferenciasfuturas.
• Respetetodosloscódigosdeelectricidadnacionalesylocales.
• Lasalteracionesomodicacioneseneldispositivoanularán
la garantía.
posición de las 3 en punto. ¡AVISO! No gire el disco
hacia la izquierda. Ya que al hacerlo se dañará el
temporizador.
Programación del temporizador - Mueva el inter-
ruptor deslizable hacia la posición AUTOMÁTICA dere-
cha. Mueva el disparador que corresponde al ini-
cio de la hora ACTIVADA deseada, hacia adentro.
Mueva cada disparador adyacente hacia adentro,
hasta que alcance la hora DESACTIVADA deseada.
Repita el paso para todos los ciclos ACTIVADOS/
DESACTIVADOS deseados.
Instrucciones de Apagado Manual
El interruptor deslizable provee la operación manual de
la carga, lo que apaga la programación del temporiza-
dor. Si se configura en la posición de DESACTIVADO,
la carga estará desactivada en forma continua. Si
se configura en la posición de ACTIVADO, la carga
estará activada en forma continua. Para la función de
activado/desactivado automático, coloque el interrup-
tor en la posición de AUTOMÁTICO.
Instrucciones de instalación
1. Verifique los rangos de entrada y salida de la unidad
para asegurarse de que este producto sea adecua-
do para su aplicación.
Para evitar un incendio, descarga eléctrica o la
muerte, apague el suministro eléctrico del cortacir-
cuito y compruebe que el suministro esté apagado
antes de comenzar a instalar el cableado.
2. Instale el cableado de acuerdo con todos los códi-
gos de electricidad nacionales y locales (vea los
diagramas de cableado que se presentan en seguida).
3. Verifique que todas las conexiones estén seguras.
Verifique dos veces todos los conectores de los
cables enroscables.
4. Monte el temporizador en la caja de la pared con
los tornillos provistos.
5. Monte la placa de la pared en el temporizador con
los tornillos provistos.
Instrucciones de programación
El disco del temporizador contiene 72 disparadores,
donde cada uno representa un intervalo de 2 minutos
del temporizador.
Configuración del tiempo del reloj - Gire el disco
en forma gradual hacia la derecha hasta que la hora
actual se alinee con el marcador de triángulo en la
ADVERTENCIA
Minuterie murale série KM2
SPÉCIFICATIONS
Entrée horloge : 120 V CA, 60 Hz
Valeurs nominales : Unipolaire directionnel et uni-
polaire bidirectionnel
20 A, 120 V CA, 60 Hz
1 HP, 120 volts CA
Évaluation environnementale :
Échelle de température de fonctionnement :
-40 °F à 180 °F (-40 °C à 85 °C)
Niveau d'humidité de fonctionnement : 0 - 95 %
RH, sans condensation
Connexions de câblage : Trois (3) fils 14AWG
24 heures
Modèle Description Interrupteur
KM2ST-1G cage simple 20A, unipolaire unidirectionnel
KM2STU-1G trois voies cage simple 20A, unipolaire bidirectionnel
KM2ST-2G 2 cages/ouverture à glissière 20A, unipolaire unidirectionnel
KM2ST-2R 2 cages/ouverture pour prise de courant 20A, unipolaire unidirectionnel
KM2ST-2D 2 cages/ouverture décorative 20A, unipolaire unidirectionnel
KM2ST-3D 3 cages/ouverture décorative 20A, unipolaire unidirectionnel
KM2ST-3G 3 cages/ouvertures à glissière 20A, unipolaire unidirectionnel
KM2ST-4G 4 cages/ouvertures à glissière 20A, unipolaire unidirectionnel
DONNÉES COMMANDE
Remplace un interrupteur mural standard pour offrir un contrôle automatique de
l'éclairageintérieurouextérieur,desventilateurs,despompes,desappareilsde
bureauou de tout autre type de circuit. Les déclencheurs captifs sontfacilesà
régleretsontimperdables.72déclencheurspermettentleréglagede36périodes
de marche et d'arrêt (ON/OFF) par 24 heures. L'interrupteur de priorité ARRÊT/
MARCHE/AUTO (OFF/ON/AUTO) permet le fonctionnement continu des positions
marcheetarrêt(ON/OFF).ApprouvéUL/ULC.Câblageetinstallationfaciles.
CARACTÉRISTIQUES
J
Programmation 24 heures avec interrupteur
J
Déclencheurs captifs avec intervalles de commutation de 20 minutes
J
Moteur de minuterie synchrone très fiable
J
Interrupteur unipolaire unidirectionnel ou interrupteur
unipolaire bidirectionnel 20A, interrupteur 1HP à 125V
J
Interrupteur de priorité OFF/ON/AUTO
J
Se fixe à des boîtes électriques murales standard
J
Disponible avec des plaques murales à 1, 2, 3 ou 4 cages
avec ouverture pour interrupteur à glissière, des plaques
murales à 2 ou 3 cages avec une ouverture décorative ou
encore un plaque murale à 2 cages avec ouverture pour
prise de courant double.
J
Interrupteur trois voies (unipolaire bidirectionnel) disponible
J
Évaluation UL et ULC
AVERTISSEMENT
• Pourévitertoutrisqued'incendie,dechocélectriqueoude
décès,coupezl'alimentationaudisjoncteuretassurez-vous
que l'alimentation esthorstensionavantdeprocéderau
câblageouàl'entretien.
• Veuillezlirelesdirectivesd'installationattentivementavantde
procéderàl'installationetlesconserverpourréférenceultérieure.
• Respecteztouslescodeslocauxetnationauxenmatière
d'électricité.
• Toutealtérationoumodicationdel'unitéaurapoureffet
d'annuler la garantie.
Directives d'installation
1. Vérifiez le régime nominal d'entrée et de sortie de
l'unité pour vous assurer que le produit convient à
votre application.
Pour éviter tout risque d'incendie, de choc électrique
ou de décès, coupez l'alimentation au disjoncteur et
assurez-vous que l'alimentation est coupée avant
de procéder au câblage.
2. Procédez au câblage conformément à tous les
codes nationaux et locaux en matière d'électricité
(reportez-vous aux diagrammes de câblage ci-des-
sous).
3. Assurez-vous que toutes les connexions sont bien
serrées. Vérifiez à nouveau tous les connecteurs à
torsion.
4. Montez la minuterie sur la boîte murale à l'aide des
vis fournies.
5. Fixez la plaque murale à la minuterie à l'aide des vis
fournies.
Directives de programmation
Le cadran de la minuterie contient 72 déclencheurs,
chacun représentant un intervalle de 20 minutes sur la
minuterie.
Réglagede l'heure - Tournez le cadran graduel-
lement dans le sens horaire jusqu'à ce que l'heure
actuelle soit alignée sur le repère en triangle à la
position 3 heures. AVIS! Ne tournez pas le cadran
dans le sens antihoraire. Cela aurait pour effet
d'endommager la minuterie.
Programmation de la minuterie - Déplacez
l'interrupteur à glissière vers la position AUTO (à
droite). Déplacez le déclencheur, correspondant à
l'heure de début (ON), vers l'intérieur. Déplacez ensuite
chaque déclencheur adjacent vers l'intérieur jusqu'à ce
que l'heure d'arrêt (OFF) soit atteinte. Répétez la pro-
cédure pour tous les cycles de marche et d'arrêt (ON/
OFF) désirés.
Directives de priorité manuelle
L'interrupteur à glissière permet le fonctionnement
manuel de la charge, modifiant la programmation de la
minuterie. Si la minuterie est régléeà la position d'arrêt
( OFF ), la charge sera coupée de façon continue. Si
elle est réglée à la position de marche (ON), la charge
sera sous tension (ON) de façon continue. Pour le
fonctionnement en mode automatique (marche/arrêt),
réglez l'interrupteur à la position AUTO.
AVERTISSEMENT
-
 1
1
-
 2
2


Intermatic KM2ST-1G Operating instructions
- Type
- Operating instructions
Ask a question and I''ll find the answer in the document
Finding information in a document is now easier with AI
in other languages
- français: Intermatic KM2ST-1G Mode d'emploi
- español: Intermatic KM2ST-1G Instrucciones de operación
Related papers
-
Intermatic EI215 Supplementary Manual
-
Intermatic EI200 Supplementary Manual
-
-
-
-
-
-
-
-
Other documents
-
 Malibu Boats LZ16220 Operating instructions
-
 Malibu Boats LZ314R Operating instructions
-
 Malibu Boats LZ21811K Operating instructions
-
Ortech OD-HET-5 User manual
-
 Titan Controls Apollo 10 Operating instructions
-
 Malibu LZ414SM Owner's manual
-
GE 15305 User manual
-
Jasco 15306 User manual
-
-
Robertshaw Tork - 1103 User manual


