Electrolux EOD984W User manual

Category
Ovens
Type
User manual

This manual is also suitable for

MODEL NO. EOD 984
Voltage: 230/240 Volts AC 50Hz
Wattage: 5.3/5.8kW
Height: 885mm
Width: 595mm
Depth: 545mm
(excluding handles and knobs)
Weight: 53kg
This appliance complies with: European Council Directive 73/23/EEC.
EMC Directive 89/336/EEC.
CE Marking Directive 93/68/EEC.
TECHNICAL DETAILS
Please follow these instructions step by step to install and operate your oven safely and easily.
Technical Details
.......................................................................
2
Contents
...............................................................................
3
Safety
...................................................................................
5
Before Installation .................................................................5
During Operation .................................................................5
After Use .........................................................................6
General ..........................................................................6
Installation Instructions ................................................................7
Things You Need to Know
.........................................................
7
Warnings .........................................................................7
Things to Note ....................................................................7
Getting Things Ready
..................................................................
7
Choice of Electrical Connection
....................................................
7
Preparing Cabinet for Fitting Oven .................................................7
Recommended Cabinet Dimensions ...............................................8
How to Finish Unpacking ..........................................................9
Tools Required ...................................................................9
Making the Electrical Connections
.....................................................
9
Preparing Cable
..................................................................
9
To Remove Cover of Mains Terminal ..............................................9
Connecting to the Mains Terminal ................................................10
Connecting to a Hob or Cooker Point .............................................10
Checking Electrical Connections ..................................................10
Fitting Into The Cabinet
...............................................................
11
Introduction
...........................................................................
12
Getting to Know Your Oven ......................................................12
Rating Plate
.....................................................................
13
General Notes on Using The Ovens ..............................................13
When First Switching On .........................................................13
About Condensation and Steam ..................................................13
Cookware .......................................................................13
The Trivet .......................................................................13
The Shelf Positions ..............................................................13
The Cooling Fan for the Controls .................................................14
Control Panel Indicator Neons ....................................................14
Grill and Oven Furniture ..........................................................14
The Grill
...............................................................................
15
Uses of the Dual Grill ............................................................15
Selecting the Dual Grill ...........................................................15
Things to Note ...................................................................15
The Grill Pan and Handle .........................................................16
Hints and Tips ...................................................................16
Grilling Chart ....................................................................17
The Top Oven .........................................................................18
Uses of the Top Oven ............................................................18
Selecting the Top Oven ..........................................................18
Things To Note ..................................................................18
To Fit the Top Oven Shelf ........................................................18
Hints and Tips ...................................................................19
Top Oven Cooking Chart .........................................................19
3
CONTENTS
The Main Fan Oven ....................................................................20
Uses of the Fan Oven ............................................................20
Selecting the Fan Oven ..........................................................20
Things to Note ...................................................................20
To Fit the Main Oven Shelves ....................................................20
Hints and Tips ...................................................................21
Defrost Feature ........................................................................22
Uses of Defrost Feature ..........................................................22
Selecting Defrost ................................................................22
Things to Note ...................................................................22
Hints and Tips ...................................................................22
The Conventional Oven ...............................................................23
Uses of the Conventional Oven ...................................................23
Selecting the Conventional Oven .................................................23
Things to Note ...................................................................23
Hints and Tips ...................................................................24
The Zoned Oven .......................................................................25
Uses of the Zoned Oven .........................................................25
Selecting the Zoned Oven ........................................................25
Things to Note ...................................................................25
Hints and Tips ...................................................................26
Oven Cooking Chart ...................................................................27
Thermal Grilling .......................................................................28
Uses of Thermal Grilling ..........................................................28
Selecting Thermal Grilling ........................................................28
Things to Note ...................................................................28
Hints and Tips ...................................................................29
Thermal Grilling Chart ............................................................30
Oven Clean Feature
...................................................................
31
Uses of Oven Clean Feature .....................................................31
Selecting Oven Clean ............................................................31
Things to Note ...................................................................31
Hints and Tips ...................................................................31
The Electronic Timer ..................................................................32
Helpful Hints when Buying and Preparing Food ......................................34
Care and Cleaning .....................................................................35
Cleaning Materials ...............................................................35
Cleaning the Outside of the Cooker ...............................................35
Cleaning Inside the Ovens .......................................................35
Cleaning the Meat Tin, Grill Pan, Grill Pan Grid, Trivet and Oven Shelves ..........35
Cleaning Between the Outer and Inner Door Glass ................................36
Care of Stayclean Surfaces ......................................................36
Hints and Tips ...................................................................37
Replacing an Oven Light Bulb ....................................................37
Something Not Working? .............................................................38
Service and Spare Parts
...............................................................
39
Electrolux Service Centres
............................................................
40
Guarantee Conditions .................................................................42
4
CONTENTS
THESE WARNINGS ARE PROVIDED IN
THE INTERESTS OF YOUR SAFETY.
ENSURE THAT YOU UNDERSTAND
THEM ALL BEFORE INSTALLING OR
USING THE COOKER.
PLEASE
READ
CAREFULLY
BEFORE INSTALLATION
This cooker is heavy and care must
be taken when moving it.
Ensure that all packaging, both
inside and outside the cooker has
been removed before the cooker is
used.
Do Not try to
lift
or move the cooker
by pulling the door handles. Refer to
installation instructions.
The cooker must be installed
according to the instructions
supplied. Any electrical installation
work must be undertaken by a
qualified
It is dangerous to alter the
specifications or modify the cooker
in any way.
Do not allow young children to play
with any part of the packaging.
After installation, please dispose of
the packaging with due regard to the
environment, your local authority can
arrange this.
DURING OPERATION
Do not use this cooker if it is in
contact with water. Never operate it
with wet hands.
This cooker is designed to be
operated by adults. Young children
must not be allowed to tamper with
the controls or play near or with the
cooker.
Caution accessible parts especially
around the grill area may become hot
when the cooker is in use. Children
should be kept away until it has
cooled.
Take great care when heating fats
and oils as they will ignite if they
become too hot.
This cooker has been designed for
cooking edible foodstuffs only, and
must not be used for any other
purposes.
Never place plastic or any other
material which may melt in or on the
oven.
Ensure cooking utensils are large
enough to contain foods to prevent
spillages and boil overs.
Take care to follow the
recommendations given for tending
the food when grilling. Use the
handle provided in the recommended
way (see page 16).
Always use oven gloves to remove
and replace food in the oven.
5
SAFETY
electrician/competent person.
Ensure that you support the grill pan
when it is in the withdrawn or partially
withdrawn position.
Ensure that all vents are left
unobstructed to ensure ventilation of
the oven cavity.
You must ensure that the grill control
is in the 'OFF' position when the
timer control has been set for
automatic cooking.
Ensure that the anti-tilt shelves are
put in place correctly. Refer to
instructions on pages 18 and 20.
Never line any part of the cooker
with aluminium foil. Do not allow
heatproof cooking material, e.g.
roasting bags to come into contact
with oven elements.
Always stand back from the cooker
when opening the oven door to allow
any build up of steam or heat to
release.
Stand clear when opening the drop
down oven door. Do not allow it to
fall open - support it using the door
handle until it is fully open.
Never leave the cooker
unattended when the oven doors
are open.
Do not place sealed cans or
aerosols inside the oven. They may
explode if they are heated.
AFTER USE
Ensure that all control knobs are in
the OFF position when not in use.
For hygiene and safety reasons
this cooker should be kept clean
at all times. A build-up of fats or
other foodstuffs could result in a
fire, especially in the grill pan.
Do not leave utensils containing
foodstuffs, e.g. fat or oil in or on the
cooker in case it is inadvertently
switched ON.
Cookers and hobs become very hot,
and retain their heat for a long period
of time after use. Children should be
kept well away from the cooker until
it has cooled.
GENERAL
Under no circumstances should
repairs be carried out by
inexperienced persons as this may
cause injury or serious malfunction.
This cooker should be serviced by an
authorised Service Engineer and
only genuine approved spare parts
should be used. Details of servicing
and repair arrangements are
supplied on page 39 of this book.
Do not stand on the cooker or on
the open oven door.
Do not hang towels, dishcloths or
clothes from the cooker or its handle.
They are a safety hazard.
Always allow the cooling fan to cool
the cooker down before switching off
at the wall prior to carrying out any
cleaning or maintenance work.
Only clean this cooker in accordance
with the instructions given on page
35.
6
Your safety is of paramount importance.
Therefore, if you are unsure about any of
the meanings of these WARNINGS
contact the:
Consumer Care Department
Telephone: (01635) 522799
THINGS YOU NEED TO KNOW
WARNINGS:
This cooker must be installed by a qualified
electrician/competent person. Safety may be
impaired if installation is not carried out in
accordance with these instructions.
This cooker must be earthed.
Do not remove the screws from the earth tab
extending from the oven mains terminal block
(Fig. 6).
Before connecting the cooker make sure that the
voltage of your electricity supply is the same as
that indicated on the rating plate. The rating plate
can be seen by opening the oven door and
looking below the oven door seal.
Do not alter the electrical circuitry of this cooker.
THINGS TO NOTE
This cooker is designed to be fitted in cabinets of
the recommended dimensions as shown in Fig.
2. If your cabinet interior dimension is between
565-570mm the oven may still be fitted. However
a minor modification to the cabinet will be
required.
The dimensions given provide adequate air
circulation around the unit within the cabinet,
ensuring compliance with BS EN60-335.
Enquiries regarding the installation of the cooker
point if required should be made to your Regional
Electricity Company to ensure compliance with
their regulations.
The cooker point should be within 2m of the
cooker to make it accessible to switch off the
cooker in case of an emergency.
To protect the hands wear gloves when lifting the
oven into its housing.
NOTE: HOUSE CIRCUIT
Earth leakage and continuity tests must be carried
out before the cooker is connected to the mains
supply and re-checked after fitting.
GETTING THINGS READY
CHOICE OF ELECTRICAL CONNECTION
There are three possible ways to connect your
cooker. In each case the cooker should be
operated using at least 6mm² twin core and earth
PVC insulated multicore cable. Please choose
from the most appropriate after reading the
descriptions:
a) By connecting the cooker to a cooker point
having a double pole isolating switch with at least
3mm contact separation in all poles and neutral,
and protected with a fuse or miniature circuit
breaker at your mains fuse box.
b) By connecting the cooker together with a hob box
directly to a cooker point(s). Having a double
pole isolating switch with at least 3mm contact
separation in all poles and neutral.
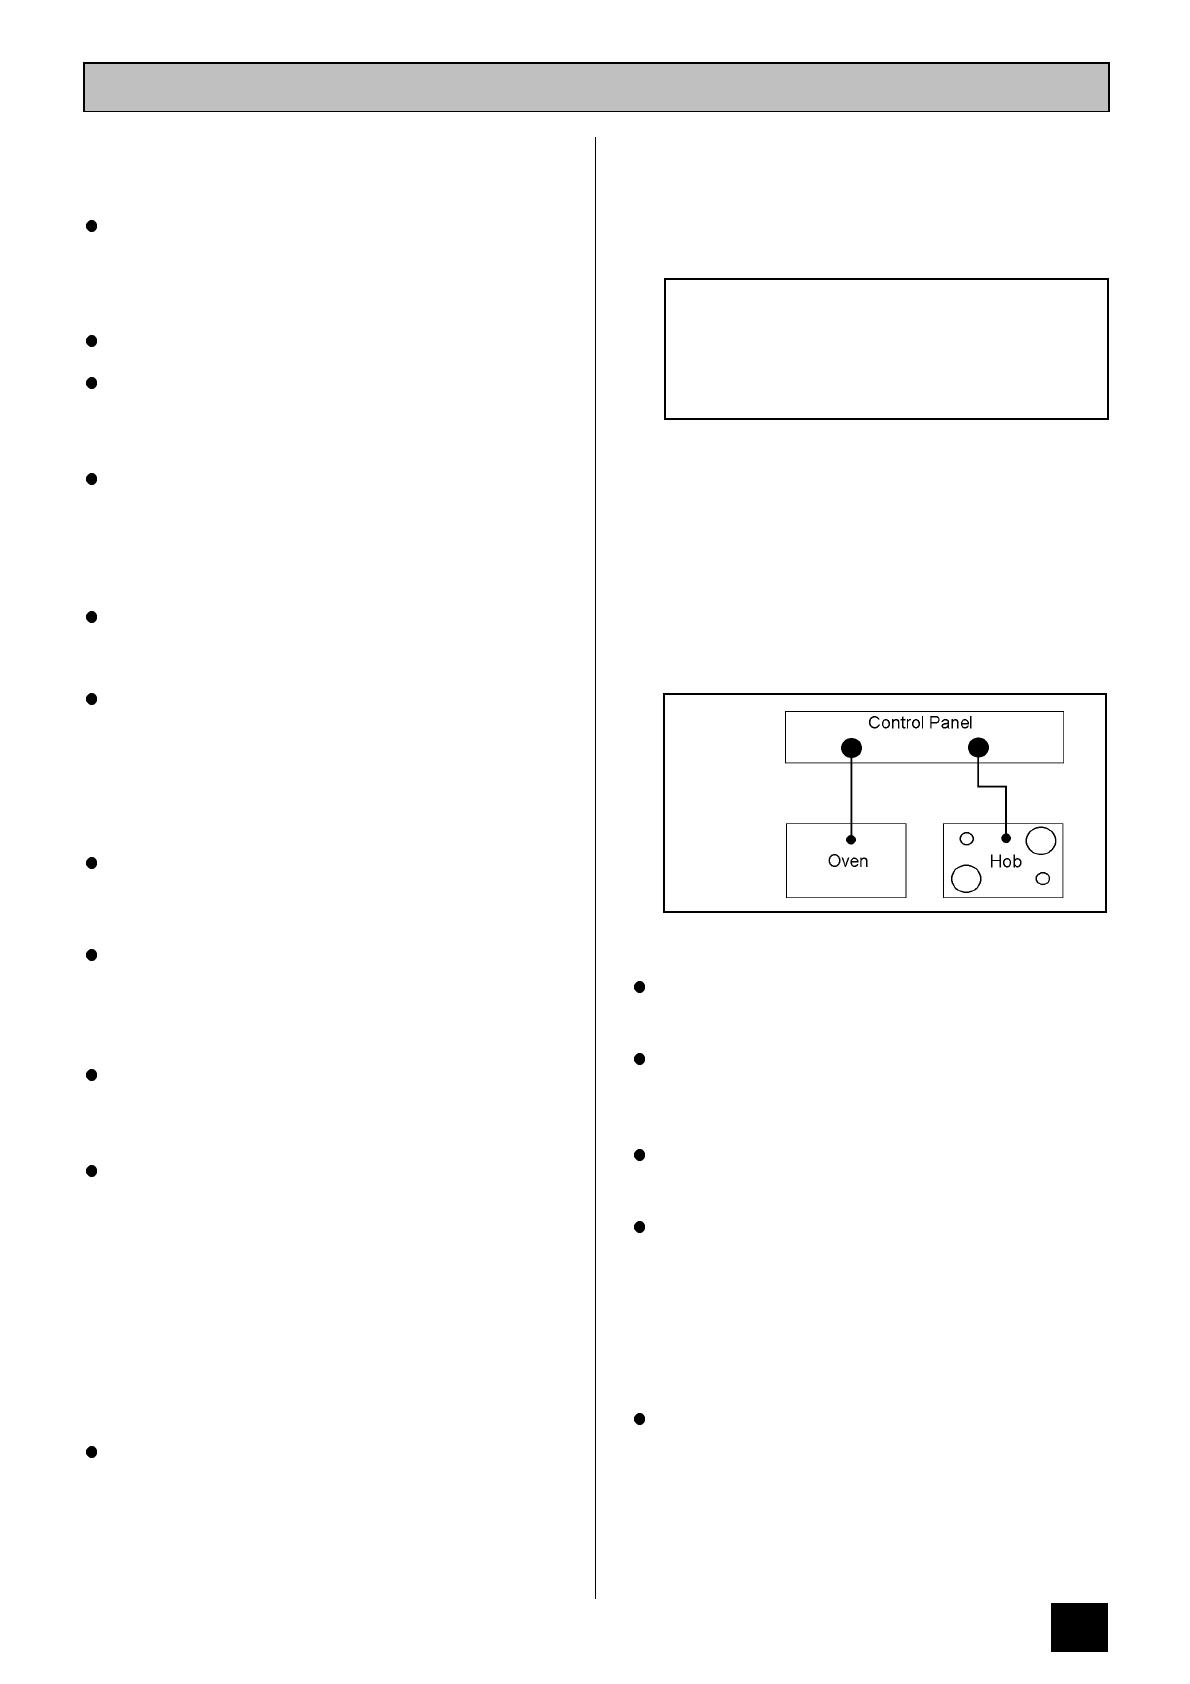
c) If you wish to connect an oven and a hob to a
cooker point you can by connecting the oven and
hob separately to the cooker point. Oven and hob
units should be separately connected to a control
panel. See Fig. 1.
NOTE: It is good practice to:
Fit an Earth Leakage Circuit Breaker to your
house wiring.
Wire your appliance to the latest IEE regulations.
PREPARING CABINET FOR FITTING OVEN
Make sure the cabinet is the correct size for the
appliance to be fitted (Ref. Fig. 2).
If the size is between 565-570*mm, then the
cabinet should be modified so that at the screw
fixing points the recommended dimension of at
least 560-565mm is maintained. The modification
should ideally be localised to ensure that after
screw fitment the oven is securely fixed into
position.
The cabinet must be stable and level by firmly
securing it to the wall or floor. If necessary, make
arrangements to ensure the shelf upon which the
oven will rest is level.
7
Subject to Regional Electricity Company
regulations if you wish to connect the oven
and hob to the power supply you may use
one of the following two methods:-
INSTALLATION INSTRUCTIONS
Fig. 1
8
RECOMMENDED CABINET DIMENSIONS (IN MILLIMETRES)
540
Fig.2 Built In Installation
Cross section
through
cabinet
showing oven
positioned
HOW TO FINISH UNPACKING
Place packed cooker next to the cabinet in which
it will be installed.
Remove the cooker packing except for bottom
tray which should be left in position until the
cooker is ready to be fitted into its cabinet.
NOTE: It is imperative that the appliance is left
in the base to protect both the appliance and the
floor.
Ensure the owner is given these operating
instructions.
TOOLS REQUIRED
The following tools will be needed and its helps to
assemble them before starting to install your oven:
A terminal screwdriver (3mm wide blade)
A pozidrive screwdriver
Pliers
Wirestrippers
Knife
Sidecutters
Adhesive Tape
Tape Measure
PREPARING CABLE
We recommend you use a new length of cable to
ensure your safety.
Ensure you have the correct length of cable
appropriate to the wiring method you are using.
When fitting new cable allow sufficient cable for
removal of the unit at a later date, should it be
necessary.
Score, but do not cut through, around the
sheathing with a knife 100mm (4in) from each
end of the cable and break through to the
encased wires by bending the cable backwards
and forwards to fatigue the sheathing.
Carefully score down from each end of the cable
sheathing along the length of the bare earth wire
(if a cut was made along the length of the live
and neutral wires, it might cut into their
sheathing) to the cuts already made.
Carefully prise open the sheathing at each end of
the cable to expose the encased wiring.
TO REMOVE COVER OF MAINS TERMINAL
From the rear of the cooker, remove mains input
terminal cover to gain access to terminal block.
First remove retaining screw with pozidrive
screwdriver. See Fig. 3.
Prise cover loose using screwdriver in position
(1) then lever off with screwdriver in position (2)
at either side. See Fig. 4.
Lift cover and remove screw from cable clamp.
See Fig. 5.
9
MAKING THE ELECTRICAL CONNECTIONS
Important: Switch off at mains, miniature
circuit breaker and, if appropriate, remove
fuse before commencing any electrical work.
Fig.3
Fig.4
Fig.5
CONNECTING TO THE MAINS TERMINAL
Warning: This cooker must be earthed.
Make connection as shown in Fig. 6 by
proceeding as follows:-
Preform wires to the appropriate shape to suit
fitting into the mains terminal block.
Strip inner insulation on wires using wirestrippers.
Twist the bared wires using pliers.
Cut bared wires 10mm away from the end of the
inner insulation. Where uninsulated Earth wires
are used ensure they are suitably sheathed to
leave 10mm bare wire to fit into the terminal.
Clamp bare wires into the relevant terminal and
check they are held by tugging each one in turn.
Clamp the mains cable securely ensuring 5mm of
the outer insulation is inside the terminal block
and that the wires are not taught but not so slack
as to cause any fouling. See Fig. 6.
Place fuse/ miniature circuit breaker in circuit and
switch on at mains.
CONNECTING TO A HOB OR COOKER POINT
Warning: This cooker must be earthed.
Either follow in general terms the instructions for
connecting to the terminal block or refer to the
hob suppliers installation instructions.
CHECKING ELECTRICAL CONNECTIONS
Confirm the cooker is correctly connected by
switching on and observing the various oven
functions indicators.
The electronic timer will flash on and off.
NOTE: HOUSE CIRCUIT
Earth leakage and continuity tests must be carried
out before the cooker is connected to the mains
supply and re-checked after fitting.
10
Feed the cable through the cabinet and
arrange to route the cable away from the
cooker which may become hot.
Fig.6
FITTING INTO THE CABINET
IMPORTANT: Ensure that the oven is switched
off at the wall before any further work is carried
out.
Using a tape measure establish the internal width
of the cabinet. Refer to page 8 if greater than
565mm.
Position the cooker in front of the cabinet. See
Fig. 7.
Take out all oven furniture before installation to
reduce the weight you need to lift. The oven door
should be taped up to keep it closed whilst lifting.
To place the cooker into the cabinetry follow the
procedure below:
N.B. Two people will be required to carry out
the lifting procedure.
a) Each person should squat either side of the
cooker.
b) Tilt the cooker so that your hands can support
the underside of the cooker.
Warning: Do Not attempt to lift this
appliance by the handles.
c) Keeping your back straight, raise the appliance to
the cabinet by straightening at the knees.
d) Rest the rear underside of the cooker on the
cabinet floor while your hands support the front.
e) The cooker can be pushed fully into the cabinet.
Take care to avoid fouling the mains lead.
f) Ensure the cooker is central in the cabinet and
level.
g) When the cooker is fully housed, screw the
stability screws (supplied with the cooker) into
the side of the cabinet taking care not to distort
the side trims (see Fig. 8). It is advisable to turn
each screw alternately to avoid damaging the
trims.
h) Switch on the cooker then refer to the operating
instructions in the following pages.
11
Fig.8
Fixing Points
for
Stability Screws
Mains
Cable
Pack Base
Fig.7
WARNING: THIS COOKER MUST BE EARTHED
GETTING TO KNOW YOUR OVEN
A - Main Oven Temperature Control
B - Multifunction Selector
Fan Oven
Conventional Oven
Zoned Oven
Defrost
Oven Clean
Thermal Grilling
Oven Light
C - Electronic Timer
D - Top Oven Temperature Control
E - Dual Grill Control
F - Top Oven Indicator Neon
G - Main Oven Indicator Neon
12
INTRODUCTION
A B C D E F G
RATING PLATE
Record the model, product and serial numbers of
your cooker on the back cover of this instruction
book for future reference. These numbers can be
found on the rating plate on the lower front frame of
the cooker upon opening the main oven door.
The cooker must be protected by a suitably rated
fuse or circuit breaker. The rating of the cooker is
given on the rating plate.
Do not remove the rating plate from the cooker
as this may invalidate the guarantee.
We suggest that you run all the elements for a short
period to burn off any residue from their surfaces.
To do this, run the ovens at 220°C for approximately
45 minutes. The procedure should be repeated with
the grill for approximately 5 - 10 minutes.
During this period an unpleasant odour may be
emitted, it is therefore advisable to open a window
for ventilation.
WHEN FIRST SWITCHING ON
The timer must be set to manual before the ovens
can be operated. See page 32. This must be done
whenever the cooker is switched off at the wall or
when there has been a power failure.
If the oven indicator neons do not glow when the
controls are switched on, it is most likely that the
timer is set for automatic cooking.
ABOUT CONDENSATION AND STEAM
When food is heated it produces steam in the same
way as a boiling kettle does. The oven is vented to
allow some of this steam to escape. However,
always stand back from the cooker when opening the
oven door to allow any build up of steam or heat to
release.
If the steam comes into contact with a cool surface
on the outside of the cooker, e.g. a trim, it will
condense and produce water droplets. This is quite
normal and is not caused by a fault on the cooker.
To prevent discolouration, regularly wipe away
condensation and also soilage from surfaces.
COOKWARE
Baking trays, oven dishes etc., should not be placed
directly against the grid covering the fan at the back
of the oven.
Do not use baking trays larger than 30cm x 35cm
(12" x 14") as they will restrict the circulation of heat
and may affect performance. Advice on the effect of
different materials and finishes of bakeware is given
in 'Hints and Tips' in the appropriate oven section.
THE TRIVET
When roasting do use the trivet in the meat tin. Fat
and meat juices will drain into the meat tin below and
can be used to make gravy. The trivet also prevents
splashes of fat from soiling the oven interior.
N.B. The meat tin should not be placed on a heated
hotplate as this may cause the enamel to crack.
THE SHELF POSITIONS
Recommended shelf positions have been shown in
the cooking chart on page 27.
If not fitted correctly the shelf will lie at an angle and
the safety stop will not be effective. To ensure that
the shelf has the correct side uppermost, the wire
stringers which make up the shelf should lie on top of
the surrounding frame.
13
GENERAL NOTES ON USING THE OVENS
INTRODUCTION
THE COOLING FAN FOR THE
CONTROLS
The cooling fan comes on immediately when the grill
is switched on and after a short time when either of
the ovens are in use and switches off when cooking
is completed.
During the initial period the cooling fan may turn ON
and OFF, this is quite normal.
It may run on after the ovens or grill are switched off
to keep the controls cool.
Always allow the cooling fan to cool the cooker down
before switching off at the wall prior to carrying out
any cleaning or maintenance work.
NOTE
The action of the cooling fan will depend on how long
the oven(s) or grill have been used and at what
temperature. It may not switch in at all at lower
temperature settings nor run on where the grill or
oven has only been used for a short time.
CONTROL PANEL INDICATOR NEONS
These lights indicate whether the ovens are switched
ON. The neons also indicate when the set
temperature has been reached. They will turn on and
off during use to show that the temperature is being
maintained.
If the neons do not operate as the instructions
indicate the controls have been incorrectly set.
Return all controls to zero and re-set following the
instructions for the required setting.
When the oven has been set for automatic cooking
the neon should remain unlit during OFF periods.
GRILL AND OVEN FURNITURE
The following items of oven furniture have been
supplied with the cooker.
1 grill pan
1 grill pan handle
1 grill pan grid
1 grill deflector
1 trivet
1 meat tin
2 straight shelves
1 cranked shelf for
grilling and top oven
cooking only
The grill deflector sits above the grill element and
prevents fat splashing onto the oven roof.
The deflector may be easily removed for cleaning.
Scuffing of the Stayclean lining by the oven furniture
pack may occur during transit.
These marks will disappear after the oven elements
have been burnt off for the first time.
14
Turn the grill control clockwise for full grill or
anticlockwise for the centre section only.
Ensure the top oven control is in the OFF
position 'O'.
The dual grill operates independently of the oven.
THINGS TO NOTE
THE GRILL DOOR MUST BE LEFT OPEN DURING
GRILLING
1. The cooling fan for the controls will operate
immediately in conjunction with the grill.
2. Do not attempt to use the grill when the fan oven
has been set to automatic as overheating will
occur.
3. The outer grill element may appear to glow
slightly brighter than the inner element. This is
quite normal.
NOTE
Do not leave food unattended when grilling.
15
USES OF THE DUAL GRILL
CAUTION - ACCESSIBLE PARTS MAY BECOME HOT WHEN THE GRILL IS IN USE. CHILDREN SHOULD
BE KEPT AWAY.
The grill is a dual circuit grill which means that the full area of the grill can be used or for economy purposes the
centre section only can be used when cooking smaller quantities of food.
SELECTING THE DUAL GRILL
THE GRILL
THE GRILL PAN AND HANDLE
The grill pan is supplied with a removable handle.
To attach the handle, place the wirework under the
cut out in the pan so that the metal plate hooks over
the top of the grill pan.
Slide the handle to the left and over the central bump
on the grill pan.
Ensure the handle is correctly located. It is not
necessary to remove the grill pan handle during
grilling.
To remove the handle, slide the handle to the right
and lift the handle away from the cut out on the grill
pan.
Place the grill pan on the shelf so that the pan is
positioned centrally beneath the grill.
HINTS AND TIPS
In order to become acquainted with the
performance of the Dual Grill it is advisable to
check food regularly when grilling.
Food should be thoroughly dried before grilling to
minimise splashing. Brush lean meats and fish
lightly with a little oil or melted butter to keep
them moist during cooking.
Adjust the height of the grilling grid and grill pan
runner position to allow for different foods.
Most food should be placed on the grill pan grid
in the 'high' position in the grill pan to allow
maximum circulation of air around the food. Food
such as fish, liver and kidneys may be placed
directly onto the trivet in the grill pan if preferred.
The use of the trivet beneath the grid when
grilling fatty foods will help minimise splashing.
Accompaniments such as tomatoes and
mushrooms may be placed underneath the grid
when grilling meats.
When toasting bread use the cranked shelf in
position 2 with the grid in the high position.
Preheat the grill on a full setting for a few
minutes before sealing steaks or toasting. Adjust
the heat setting and the shelf as necessary
during cooking.
The food should be turned over during cooking
as required.
When using the centre section of the dual grill,
ensure food is positioned centrally on the grill pan
grid in the grill pan.
NOTE
If you require an additional handle for your grill pan,
this can be ordered from your local Electrolux
Service Force Centre by quoting part number
311479800\6.
16
GRILLING CHART
FOOD SHELF GRILL TIME
(mins)
Bacon Rashers
Beefburgers
Chicken Joints
Chops - Lamb
Pork
Fish - Whole
Trout/Mackerel
Fillets - Plaice/Cod
Kebabs
Kidneys - Lamb/Pig
Liver - Lamb/Pig
Sausages
Steaks - Rare
Medium
Well Done
Toasted Sandwiches
2 crk.
2 crk.
2 crk.
2 crk.
2 crk.
2 crk.
2 crk.
2 crk.
2 crk.
2 crk.
2 crk.
2 crk.
2 crk.
2 crk.
2 crk.
2-3 each side
6-10 each side
15-20 each side
7-10 each side
10-15 each side
8-12 each side
4-6 each side
10-15 each side
4-6 each side
5-10 each side
10-15 each side
3-6 each side
6-8 each side
7-10 each side
1¼-1½ each side
crk. = cranked shelf
Shelf positions are counted from the bottom
upwards.
The times quoted above are given as a guide and
should be adjusted to suit personal taste.
17
USES OF THE TOP OVEN
The top oven is the smaller of the two ovens. It is
heated by elements in the top and bottom of the
oven. It is designed for cooking smaller quantities of
food. It gives especially good results if used to cook
fruit cakes, sweet and savoury flans or quiche.
Ensure the grill control is in the off 'O' position .
Turn the top oven temperature control to the
required setting.
THINGS TO NOTE
1. The top oven light will come on.
2. The top oven neon will glow until the oven has
reached the desired temperature and then go
out. It will turn ON and OFF periodically during
cooking showing that the temperature is being
maintained.
3. The controls cooling fan will operate after a time.
See page 14 for more information on the cooling
fan.
4. The top oven works independently of the main
oven and is not controlled by the selector.
5. Dishes, tins and trays should not be placed
directly on oven floor as it becomes very hot
and damage will occur.
The top oven is also ideal for use as a warming
compartment to warm dishes and keep food hot.
Use a temperature setting of 90° - 100°C on the top
oven temperature control.
TO FIT THE TOP OVEN SHELF
The shelf should be fitted with the straight rods
uppermost on the frame and the forms towards the
back of the oven. If not fitted correctly the anti-tilt and
safety stop mechanism will be affected.
18
SELECTING THE TOP OVEN
THE TOP OVEN
HINTS AND TIPS
There should always be at least 2.5cm (1")
between the top of the food and the element.
This gives best cooking results and allows room
for rise in yeast mixtures, Yorkshire puddings etc.
When cooking cakes, pastry, scones bread etc.,
place the tins or baking trays centrally below the
element.
Ensure that food is placed centrally on the shelf
and there is sufficient room around the baking
tray/dish to allow for maximum circulation.
Stand dishes on a suitably sized baking tray on
the shelf to prevent spillage onto the oven base
and to help reduce cleaning.
The material and finish of the baking tray and
dishes will affect the degree of base browning of
the food. Enamelware, dark, heavy or non-stick
utensils increase base browning. Shiny
aluminium or polishes steel trays reflect the heat
away and give less base browning.
DO NOT place dishes or baking trays directly
onto the oven base as it becomes very hot and
damage may occur.
DO NOT use the grill pan or meat tin as a baking
tray as this will increase base browning of the
food.
Because of the smaller cooking space and lower
temperatures shorter cooking times are
sometimes required. Be guided by the
recommendations below.
For economy leave the door open for the
shortest possible time, particularly when placing
food into a pre-heated oven.
TOP OVEN COOKING CHART
FOOD Shelf
Position
Cooking
Temp°C
Biscuits
Bread
Casseroles
Cakes:
Small/queen
Sponges
Madeira
Rich Fruit
Christmas
Meringues
Fish
Fruit Pies & Crumble
Milk Puddings
Pastry: Choux
- Shortcrust
- Flaky
- Puff
Plate Tarts
Quiches/Flans
Scones
Roasting:
Meat & Poultry
2crk.
1crk.*
1crk.*
2 crk.
2crk.
1crk.
1crk.
1crk.
1crk.
1crk.
1crk.
1crk.
1crk.
Depending
on dish
2crk.
1crk.
2crk.
1crk.*
180-190
210-220
130-140
180-190
160-170
140-150
130-140
130-140
90-100
170-190
190-200
140-150
160-170
190
180
210-220
170-180
crk. = Cranked shelf
* or on a straight shelf from the main oven on the
base.
Shelf positions are counted from the bottom of the
oven upwards.
19
Turn the Function selector to Fan Oven .
Turn the main oven temperature control to the
required setting.
THINGS TO NOTE
1. The oven fan will operate continually during
cooking.
2. The oven indicator neon will glow until the oven
has reached the desired temperature. It will turn
ON and OFF periodically during cooking showing
that the temperature is being maintained.
3. The oven light operates when the selector is set.
4. The cooling fan for the controls will operate after
a time. See page 14 for further details on the
operation of the cooling fan.
5. If an automatic programme is set, the oven fan
and oven light do not come on until the cook time
begins.
TO FIT THE MAIN OVEN SHELVES
The shelves should be fitted with the straight rods
uppermost on the frame and the forms towards the
back of the oven. If not fitted correctly the anti-tilt and
safety stop mechanism will be affected.
20
USES OF THE FAN OVEN
The oven is heated by an element around the fan situated behind the back panel. The fan draws air from the oven
and the element heats the air which is circulated into the oven via the vents in the back panel. The advantages of
fan oven cooking are:
PREHEATING
The fan oven quickly reaches its temperature, so it is not usually necessary to preheat the oven. Without
preheating however, you may find you need to add an extra 5-10 minutes on the recommended cooking times. For
recipes needing high temperatures, e.g. bread, pastries, scones, soufflés, etc., best results are achieved if the oven
is preheated first.
COOKING TEMPERATURES
Fan oven cooking generally requires lower temperatures than conventional cooking. Follow the temperatures
recommended in the chart on page 27. As a guide reduce temperatures by about 20°C-25°C for your own recipes.
BATCH BAKING
The fan oven cooks evenly on all shelf levels, especially useful when batch baking.
SELECTING THE FAN OVEN
THE MAIN FAN OVEN
  • Page 1 1
  • Page 2 2
  • Page 3 3
  • Page 4 4
  • Page 5 5
  • Page 6 6
  • Page 7 7
  • Page 8 8
  • Page 9 9
  • Page 10 10
  • Page 11 11
  • Page 12 12
  • Page 13 13
  • Page 14 14
  • Page 15 15
  • Page 16 16
  • Page 17 17
  • Page 18 18
  • Page 19 19
  • Page 20 20
  • Page 21 21
  • Page 22 22
  • Page 23 23
  • Page 24 24
  • Page 25 25
  • Page 26 26
  • Page 27 27
  • Page 28 28
  • Page 29 29
  • Page 30 30
  • Page 31 31
  • Page 32 32
  • Page 33 33
  • Page 34 34
  • Page 35 35
  • Page 36 36
  • Page 37 37
  • Page 38 38
  • Page 39 39
  • Page 40 40
  • Page 41 41
  • Page 42 42
  • Page 43 43
  • Page 44 44

Electrolux EOD984W User manual

Category
Ovens
Type
User manual
This manual is also suitable for

Ask a question and I''ll find the answer in the document

Finding information in a document is now easier with AI