Page is loading ...


©2015Invacare®Corporation
Allrightsreserved.Republication,duplicationormodificationinwholeorinpartisprohibitedwithoutpriorwritten
permissionfromInvacare.Trademarksareidentifiedby™and®.AlltrademarksareownedbyorlicensedtoInvacare
Corporationoritssubsidiariesunlessotherwisenoted.
Allinformationquotedisbelievedtobecorrectattimeofprint.Invacare®reservestherighttoalterproduct
specificationswithoutpriorconsultation.Rea,ReadesignandDSS(DualStabilitySystem)designareregisteredtrademarks
ofInvacare®International.

Contents
1General........................................5
1.1Introduction..................................5
1.2Symbolsinthismanual...........................5
1.3Warranty....................................5
1.4Limitationofliability.............................5
1.5Customerservice..............................5
1.6Accidents/Nearaccidents........................5
1.7Intendeduse..................................5
1.8Compliance...................................5
1.9Servicelife....................................6
2Safety..........................................7
2.1Specificrisks..................................7
2.2Labels.......................................7
2.3Locationoftheidentificationlabels..................7
2.4Symbolsonthelabels............................8
3Setup..........................................9
3.1Deliverycheck.................................9
3.2Assembly.....................................9
3.2.1Backrest...................................9
3.2.2Placingthewires.............................9
3.2.3Foldingthebackrest—Gaspistonholder..........10
3.2.4Armrests..................................10
3.2.5Rearwheels................................10
3.2.6Angleadjustablelegrests.......................11
3.2.7Fixedlegrests...............................11
3.3Mountingthetabletray..........................11
4Components....................................12
4.1Wheelchairoverview............................12
4.2Adjustingthetensionadjustablebackrest..............12
4.3BackrestforAzaleaMax..........................12
4.4Pushhandles/Pushbars...........................13
4.4.1Heightadjustmentpushhandles/pushbars..........13
4.4.2Adjustingtheangleofthepushbar...............14
4.5Carer-operatedangleadjustment...................14
4.6Manualtiltandbackrestangleadjustment.............14
4.6.1Adjustingthebackrestangle....................14
4.6.2Carer-operatedtiltadjustment..................14
4.6.3Lockingthetiltand/orbackrestangleadjustment.....14
4.7Electrictiltandbackrestangleadjustment.............14
4.7.1Symbolsonthehandcontrol....................15
4.7.2Backrestangleadjustment......................15
4.7.3Tiltadjustmentseat..........................15
4.7.4Lockingofreclineandtiltfunction................15
4.7.5Chargingthebattery..........................16
4.8Tiltscale.....................................16
4.8.1Tiltscalebackrest............................16
4.8.2Tiltscaleseat...............................16
4.9Seatadjustments...............................17
4.9.1Adjustingtheseatdepth.......................17
4.9.2Widthadjustmentseat........................17
4.10Armrestadjustments...........................18
4.10.1Armrestheight.............................18
4.10.2Armrestdepth.............................18
4.10.3Armrestlow...............................18
4.11Legrests....................................18
4.11.1Angleadjustablelegrest.......................18
4.11.2Fixedlegrest...............................19
4.11.3Adjustingtheangleofthecentrallegrest..........19
4.11.4LegrestAzaleaMax..........................19
4.12Amputeelegrest..............................20
4.12.1Amputeelegrest—general....................20
4.12.2Amputeelegrest—AzaleaMax.................20
4.13Footplates—footrest..........................20
4.13.1Adjustingtheangleadjustablefootplates..........20
4.13.2Adjustingtheone-piecefootrest................20
4.13.3Footboardconverter—AzaleaMax.............21
4.14Calfpadsadjustment...........................22
4.15Calfpads—AzaleaMax.........................22
4.16Userbrake—adjustment........................22
4.17Usingthecarer-operatedbrake...................23
5Accessories.....................................24
5.1Headrest/Neckrest............................24
5.1.1Heightadjustment............................24
5.1.2Depth/angleadjustment.......................24
5.2Tabletray....................................24
5.2.1Adjustingthedepthofthetabletray..............24
5.3Addatabletraycushion..........................24
5.4Mountingtheattachmentfortabletray...............25
5.5Hemiplegicarmrest.............................25
5.6Abductioncushion..............................25
5.7Trunksupport.................................25
5.7.1Trunksupportwithfixedarm...................25
5.7.2Trunksupport“swing-away”....................26
5.8Adjustingthedripstand..........................27
5.9Anti-tipdevice.................................27
5.10AzaleaBase—seatattachment....................27
5.11Calfstrappadded..............................28
5.12Heelstrap—AzaleaMax........................28
5.13Brakeextended—AzaleaMax....................28
5.14Coverforfootrest/footplate....................28
5.14.1Attachingacovertothesinglefootplate..........28
5.14.2Attachingacovertotheone-piecefootrest........28
5.15Footbox....................................29
5.16Directionallock...............................29
5.17Pelvicbelt...................................29
5.17.1Pelvicbelt—AzaleaBase.....................30
5.17.2Pelvicbelt—Azaleageneral...................30
5.18Attachmentpositioningbelt......................30
5.19Privacyattachment.............................31
5.20Harness.....................................31
5.20.1Harnessattachmentholder....................31
5.20.2AzaleaMinor—harness......................31
5.20.3Harnessattachment—AzaleaBase..............32
6Usage..........................................33
6.1Operatingthewheelchair........................33
6.1.1Liftingthewheelchair.........................33
6.1.2Moveto/fromthewheelchair...................33
6.1.3Usingtheuseroperatedbrake...................33
6.1.4Stretchingandleaning.........................33
6.1.5Propellingupaslope..........................33
6.1.6Propellingdownaslope.......................34
6.1.7Climbingakerb.............................34
6.1.8Kerbs—alternativemethod....................34
6.1.9Escalatorsandstairs..........................35
7Transport......................................36
7.1Safetyinformation..............................36
7.2Transportingwheelchairswithusersinvehicles.........36
7.3Restraintmethods..............................37
7.3.1Frontalrestraintswithstraps....................37
7.3.2Rearrestraints..............................37
7.3.3Fasteningofpelvicbeltandsafetybelt.............37
7.4Disassemblyfortransport........................38
7.4.1Backrest...................................38
7.4.2BackrestMinor..............................38
7.4.3Pushhandles/pushbar.........................38
7.4.4Removethelegrestangleadjustable...............39
7.4.5Removethefootrestfixed......................39
7.4.6Armrest...................................39
7.4.7Rearwheels................................39
8Maintenance....................................40
8.1Dailyperformancecheck.........................40

Rea®Azalea®
8.2Safetyinformation..............................40
8.3Maintenanceelectricalversion.....................40
8.4Cleaning.....................................40
8.5Washinganddisinfection.........................40
8.5.1Electricalversion............................40
9AfterUse.......................................41
9.1Recycling.....................................41
9.1.1Wastedisposal..............................41
10Troubleshooting................................42
10.1Troubleshootingelectricalversion..................42
11Technicaldata..................................43
11.1Dimensionsandweights.........................43
11.2Material.....................................43
11.3Environmentalconditions........................44
11.4Electricalsystem—Azaleawithelectrictiltand
backrest....................................44
11.5Electromagneticcompliance(EMC).................44
11.6Electromagneticcompliance(EMC)-Manufacturer´s
declaration..................................44
12Service........................................46
12.1Maintenanceschedule...........................46
4
1488727-G

General
1General
1.1Introduction
Rea®Azaleaisawheelchairwithmanyadjustmentpossibilitiesand
accessories.Toensurethatyoubenefitasmuchaspossiblefrom
Rea®Azalea,andinordertodoitsoptionsjustice,thechairmustbe
testedandadjustedbycompetentpersonnel.Youshouldalsoreceive
instructionsonhowtouseyourRea®Azaleaineverydaylife.
Thismanualincludesadescriptionofthepartsofthechair,simple
adjustmentoptions,howtousetheRea®Azaleasafelyandhowto
transportit.Themanualmustbereadthoroughlybytheuserand
assistingperson.
Alsoincludedinthismanualisadescriptionofhowaccessoriesare
fittedandslightlymoreadvancedsettings.
AstheRea®Azaleahasmanydifferentcomponentsandaccessories,
theappearanceoftheaccessoriesyouhaveforyourchairmaydiffer
fromthoseshown.
1.2Symbolsinthismanual
InthisUserManualwarningsareindicatedbysymbols.The
warningsymbolsareaccompaniedbyaheadingthatindicatesthe
severityofthedanger.
WARNING
Indicatesahazardoussituationthatcouldresultin
seriousinjuryordeathifitisnotavoided.
CAUTION
Indicatesahazardoussituationthatcouldresultin
minororslightinjuryifitisnotavoided.
IMPORTANT
Indicatesahazardoussituationthatcouldresultin
damagetopropertyifitisnotavoided.
TipsandRecommendations
Givesusefultips,recommendationsandinformation
forefficient,trouble-freeuse.
ThisproductcomplieswithDirective93/42/EEC
concerningmedicaldevices.Thelaunchdateofthis
productisstatedintheCEdeclarationofconformity.
1.3Warranty
Weprovideatwo-yearwarrantyfromthedeliverydate.Damagedue
towearandtearonupholstery,tires,(rubber)tubes,handrimsand
castorsetc.,isnotcoveredbythewarranty.Damagethathasbeen
causedthroughphysicalviolenceorabnormaluseisnotcovered.
Damagecausedbyuserswhoweighmorethanthemaximum
userweightstatedforeachwheelchairmodelisnotcovered.The
warrantywillonlyapplyifthemaintenanceinstructionsarefollowed.
1.4Limitationofliability
InvacareReaABacceptsnoliabilityfordamagearisingfrom:
•Non-compliancewiththeUserManual
•Incorrectuse
•Naturalwearandtear
•Incorrectassemblyorset-upbythepurchaserorathirdparty
•Technicalmodifications
•Theusageofanunapproved3rdpartybackrestinsteadofa
testedandapprovedInvacarebackrest.
•Unauthorisedmodificationsand/oruseofunsuitablespareparts
ThewrittenauthorisationofInvacareReaABmustbeobtained
beforeinstallingadditionaladaptationsonaInvacareReawheelchair.
Otherwisenoliabilityclaimscanbemade.
1.5Customerservice
Forcontactdetailspleaserefertothelastpageofthispublication
whereyouwillfindaddressestotheEuropeansalescompanies.
1.6Accidents/Nearaccidents
PleaseinformyourInvacareofficeimmediatelyofanyaccidentsor
near-accidentsthathavebeencausedbythiswheelchairandthathave
ledto,orcouldhaveledto,personalinjury.Therelevantauthority
mustalsobecontactedandreportedto.
1.7Intendeduse
Rea®Azaleaisafamilyofmanualwheelchairs,intendedfordependent
andsemi-dependentpassiveusers,whoremainseatedforlong
periodsoftime.Thewheelchairisintendedtobeoperatedbythe
userorassistant.Also,theadjustmentoftheseatingpositioncan
bedonebytheuserorassistant.
•Thewheelchairisintendedforbothoutdoorandindooruse.
•TheRea®Azaleamustbeusedwithaseatandabackrestsystem.
•Rea®AzaleaMinorisintendedforsmalleradultsandteenagers.
•Rea®AzaleaMaxisintendedforlargeradults.
•Rea®AzaleaTallisintendedfortalleradults.
•Rea®AzaleaBaseisawheelchairbaseandcanbecombinedwith
differentseatingsystems,suchasindividuallyadaptedanatomic
seatsmanufacturedbydifferentcompanies.
Therearenoknowncontraindications.
ThemaximumweightforeachversionisstatedintheTechnicalData
section.
1.8Compliance
ThisproductisincompliancewithEN12183Manualwheelchairs
–RequirementsandtestmethodsandtheEuropeanDirective
93/42/EECconcerningmedicaldevicestoapplytheCE-mark.
ThisproducthasbeentestedandconformstothestandardsISO
7176–16orISO1021–2forresistancetoignition.
TheRea®AzaleahasbeencrashtestedtogetherwiththeInvacare
"Flex2"and"Flex3"standardbackrest.Allconfigurations,aretested
togetherwithREAneckrest.
TheRea®AzaleaBasehasbeencrashtestedtogetherwiththe
Invacare"Flo-shape"seatcushionand"MatrXPB"backrest.The
Rea®AzaleaBasehasalsobeencrashtestedtogetherwiththe
“Leckey”seatingsystems“Mygo”and“Kit”.Othertestsperformed
ontheAzaleaBasehavealsobeencarriedoutwiththestandard
backrestandseatfromtheAzalearangemounted.
Invacarecaninnowaypredicttheeffectofanaccidentwithother
configurations.
TheAzaleaproductrangehasbeentestedascompleteproducts
includingInvacarebackrests.However,whentheRea®Azaleais
orderedwithoutbackrest,itisnottobeconsideredasacomplete
product.Onlywhenthebaseandthebackrestsystemhavebeen
combined,anevaluationofthesafetycanbedone.Thecompanythat
mountsthebackrestsystemmustperformafinalriskassessment.
Alwayscheckwhetherthereisacompatibilityagreementbetween
1488727-G5

Rea®Azalea®
themanufacturerofthebackrestandInvacare.Onlythentheproduct
maintainsitsCE-marking.
1.9Servicelife
WeestimatethattheInvacare®wheelchairhasaservicelifespanof
fiveyears.Itisdifficulttostatetheexactlengthoftheservicelifeof
ourproductsandthelengthstatedisanestimatedaveragelifespan
basedonnormaluse.Thelifespanmaybeconsiderablylongerif
thewheelchairisusedtoalimitedextentandifitisusedwithcare,
maintainedandhandledproperly.Thelifespanmaybeshorterifthe
wheelchairissubjectedtoextremeuse.
61488727-G

Safety
2Safety
2.1Specificrisks
Belowyouwillfindanumberofpointsaffectingyourpersonalsafety.
Readthemcarefully!ContactyourlocalInvacareofficeorHealth
Careproviderincaseyouneedassistance.
Invacareisonlyresponsibleforproductchangescarriedoutby
competentpersonnel.Wereservetherighttomakeanychangesto
equipmentandspecificationswithoutpriornotice.
Failuretocomplywithinstructionsgivenmayresultinpersonalinjury
and/orproductdamage.
Thewheelchairmustalwaysbeequippedwithlegrests,
footrests,seatcushionandarmrests!
Forexceptionregardingthelegrestsseesection:Pelvicbelt
WARNING!
Riskofinjury
–Thewheelchairmustalwaysbeprescribedbyan
authorisedpersonneloracompetentpersonwith
knowledgeaboutseating/positioningandothers
relatedtousingawheelchair.
WARNING!
Riskoffalling
–Checkthatallpartsareattachedsecurelytotheframe.
–Checkthatallwheels,knobs,screwsandnutsare
properlytightened.
–Checkthatallbrakesandanti-tipdevicesfunction
correctly.
–Alwaysapplythebrakebeforegettingintooroutof
thechair.
–Neverstandonthefootplateswhengettingintoor
outofthechair,becauseoftheriskoftipping.
–Changingtheseatanglecanmeananincreasedrisk
oftippingover.
–Thewheelchairmustalwaysbeequippedwithanti-tip
devices.
–Rememberthattheeffectivenessofthecarer-operated
brakeisreducedinwetandslipperyconditions,as
wellaswhenonaslope.
–Becarefultoensurethattherearwheelsaresecurely
attached.
WARNING!
Riskoftipping/fallingwhenusingvelcro®backrest
–Thereisariskoftippingandinjuryifthevelcro®
strapsonthebackrestbecometooslack.Always
checkthetension.Alsocheckthattherearwheelsare
adjustedtoensurethatthereisnoriskoftipping.
WARNING!
Riskofinjury
–Neverliftthewheelchairbythedetachablearmrests,
footrests,backbraceorbytheadjustablepushhandles.
Seesection“usage”formoreinformation.
–Thehandrimsmaybecomehotduetofriction,which
maycauseinjurytoyourhands.
–Surfacesofthewheelchairlikeframepartsor
upholsterycan,afterlongexposuretothesun,reach
temperaturesover41°C.
–Whenmountingaccessoriesetc.becarefulnottotrap
yourfingers.
–Thereisalwaysanincreasedriskoftrappingpartsof
yourbodywhentiltingthewheelchair’sbackandseat.
–Thewidthoftheseatmustnotbereducedtoomuch,
asthiswouldincreasethepressurefromthearmrests
tothesideofthepelvis.
WARNING!
Riskofpressuresoresandcontractedposture
–Theusermustnotbeseatedinatiltedpositionfora
longtime.Theseatingpositionsneedstobevaried
toavoidpressuresores.
2.2Labels
A
B
C
D
SN
E
F
G
EAN
A
Manufacturer
B
Manufacturingdate
C
SerialNo.
D
Maxuserweight
E
Model
F
Modelinformationsuchasseatdepthandseatheight
G
EANnumber
2.3Locationoftheidentificationlabels
A
A
Locationoftheseriallabel
1488727-G7

Rea®Azalea®
B
B
Locationoftheelectricalinformationlabel
2.4Symbolsonthelabels
General
Refertotheusermanual.
Wastedisposalandrecyclinginformation.
Seesection“AfterUse”,“Wastedisposal”
ThisproductcomplieswithDirective
93/42/EECconcerningmedicaldevices.The
launchdateofthisproductisstatedinthe
CEdeclarationofconformity.
Electricalversion
CLASSIIequipment
Warning/Caution
Productwithathermalfuse
TypeBAppliedPart
AppliedPartcomplyingwiththespecified
requirementsforprotectionagainst
electricalshockaccordingtoIEC60601-1.
SafetyIsolationtransformer,general
81488727-G

Setup
3Setup
3.1Deliverycheck
Anytransportdamagemustbereportedimmediatelytothetransport
company.Remembertokeepthepackaginguntilthetransport
companyhascheckedthegoodsandasettlementhasbeenreached.
3.2Assembly
Whenyoureceiveyourwheelchair,youeitherfitthebackrestor,on
somemodels,foldupthebackrest.Youalsohavetofitthearmrests
andlegrestsontothechair.Theassemblyissimpleanddoesnot
requireanytools.
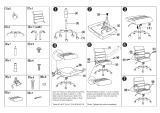
3.2.1Backrest
Onthemodelswherethebackrestfoldsup,thesafetypin
Bneedstobesecuredatthebottomofthebackrest.
A
B
1.LetthegaspistonrestonthelipAforsupportwhenthegas
pistonismounted.
B
C
B
C
2.WhenfasteningthesafetypinB,tiltthebackrestslightlyforward
whilesupportingthegaspistonmanually.
3.Whentheholesarealigned,thesafetypinBcanbeattached.
4.SecurethepistonwiththesafetypinB.
5.Lockthepinusingthelockshackle/loopC.
6.SecurethebackrestcushionusingtheVelcrostrips.
WARNING!
Safetyrisk
Thewheelchairmaycollapse
–Remembertoalwaysreinsertandfastenthesafetypin
whenithasbeenremoved.
–Checkthatthelockshackle/loopissecurelylocked.
B
A
C
OnAzaleaMinorthebackrestisfittedontothewheelchairbysliding
theprofilesAofthebackrestontothetubesofthechairB.Make
surethatyoupushthebackrestdownasfaraspossible.Secureinto
placebytighteningtheknobsC.
WARNING!
Riskofinjury
–Checkthatthebackrestisfirmlysecuredinit’s
position!
3.2.2Placingthewires
Wireswithtensionadjustablebackrest
A
B
C
C
D
E
1.PlacethewiresAandBasshownonthepictureabove.
Riskofdamagetothewires
–Itisimportantthatthecablefortheassistantbrake
Aisplacedontheinsideofthebackresttubes.
2.Placethewireforthebackrest/seatreclineBoutsideofthe
backresttubes.
3.Placebothofthewiresontheinsideofthebackrestattachment
C.
4.AttachthewirestothebackresttubesEwiththestrapsD.
Foldtheslackofthewiresundertheseattogetthem
outoftheway.
1488727-G9

Rea®Azalea®
CAUTION!
Riskofreducedbrakeeffect
–Thewiresmustnotbecrossedonthebackrest!
Wireswithbackrestplate
A
B
1.ThreadthewiresontheoutsideofthebackresttubesB.
2.Placethewiresintheholders/clipsAinordertoholdthemin
place.
Foldtheslackofthewiresundertheseattogetthem
outoftheway.
3.2.3Foldingthebackrest—Gaspistonholder
WARNING!
Safetyrisk
Thewheelchairmaycollapse
–Whenthesafetypinisremoved,theremustnotbe
anyweightonthebackrest.
A
B
WiththehelpofthegaspistonrestinglipA,thetherapist/assistant
canloosenthesafetypinBforthebackrestgaspistonwhenfolding,
inordertoavoidthatthegaspistonandbackrestfallstotheground.
WARNING!
Safetyrisk
Thewheelchairmaycollapse
–Remembertoalwaysreinsertandfastenthesafetypin
Bwhenithasbeenremoved.
–Checkthatthelockshackle/loopissecurelylocked.
See3.2.1Backrest,page9forinstructiononhowtosecurethe
safetypinB.
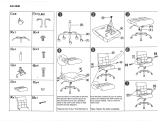
3.2.4Armrests
A
B
1.PlacethearmrestinthearmrestattachmentA.
2.Presstheauto-lockbuttonBandpressthearmrestsdownwards
untilyoucanfeel/seethatthearmrestsaresecurelyinplace.
Thearmrestshaveanauto-locktopreventinvoluntary
movementordetachment.
3.Presstheauto-lockbuttonBtoreleasebeforeremovingor
adjustingthearmrest.
3.2.5Rearwheels
A
B
C
1.Pressandholdinthequick-releasebuttonA.
2.PlacetherearwheelaxleBintherearwheelattachmentC.
3.Pullthewheelsoutwardstocheckthatthewheelissecurely
lockedinposition.
WARNING!
Riskofinjury
–Itisreallyimportanttocheckthattherearwheelis
securelylockedinposition!Itshouldnotbepossible
toremovethewheelswhenthequick-releasebutton
Aisinactivated.
101488727-G

Setup
3.2.6Angleadjustablelegrests
1.
Pushthelegrestsdownintothetubesofthelegrestattachment.
Youmustanglethelegrestoutwardswheninsertingit
intothelegrestattachment.
2.
Turnthelegrestinwardstolockitintoposition.
Thelegrestsareautomaticallylocked,thereisnoriskof
themcomingoffthewheelchair.
3.2.7Fixedlegrests
1.
Pushthefootrestdownintothetubesofthelegrestattachment.
Youmustanglethefootrestoutwardswheninsertingit
intothelegrestattachment.
2.
Turnthefootrestinwardstolockitintoposition.
Thefootrestsareautomaticallylocked,thereisnorisk
ofthemcomingoffthewheelchair.
3.3Mountingthetabletray
A
B
MountthetabletrayAinthetabletrayattachmentsB.
1488727-G
11

Rea®Azalea®
4Components
4.1Wheelchairoverview
A
B
C
D
E
F
G
H
I
J
K
L
M
A
Neckrest
B
Backrest
C
Armrest
D
Seat
E
Legrest
F
Castor
G
Brake
H
Rearwheelplate
I
Anit-tipdeviceandsteptube
J
Rearwheel
K
Allenkeyforadjustments(onthebackofthebackrest
cushion)
L
Handleforbackrestangleandseattiltadjustment
M
Pushhandle
4.2Adjustingthetensionadjustable
backrest
1.Definewhereyouwouldliketohaveafirmersupportofthe
backoftheuser.
2.Havetheuserleaningforwardsandtightenthestrapsinthat
region.
3.Makesurethatallstrapsarefastened.
4.Applythecover(startwiththeverticalmiddle)andmakesure
thattheshapenowcreatedbythetensionadjustablestrapsis
preserved.
4.3BackrestforAzaleaMax
A
B
A
B
A
PositionA—Thelongerangleofthebackrestisturned
upwards.
B
PositionB—Thelongerangleofthebackrestisturned
downwards.
ThebackrestfortheAzaleaMaxisdesignedwithdifferentangles.
Thisallowsfordifferentadjustmentsaccordingtohowthebackrestis
mounted.PositionA(thepartofthebackrestwiththelongerangle
turnedupwards)givestheusermoreroomfortheshoulderarea
whilepositionBgivesmoreroomforthebottom.
12
1488727-G

Components
4.4Pushhandles/Pushbars
Thefollowinginstructionsandwarningsarevalidforallpushhandles
andthepushbar:
4.4.1Heightadjustmentpushhandles/pushbars
Adjustingtheheightoftheconnectedpushhandles
A
B
1.LoosenthehandwheelsB.
2.Theheightofthepushhandlesbraced/pushbarAcanbe
adjustedsimplybypullingthehandlesupwardsorpushingthem
downwards.
3.Adjusttotheheightthatyourequire.
4.Re-tightenthehandwheels.
A
B
MakesurethatthehandwheelforthepushhandleAfits
theholeinthetubes.Ifthethreadedtapofthehandwheel
Bismorethanapp.2,5mmvisible,thepositioniswrong.
Lowerorraisethepushhandletogetthehandwheelin
thecorrectposition.
A
Thepushbar/pushhandlesbracedAmustnotbepulledup
sothatitprotrudesmorethan19cmoverthetopedgeof
theattachment.
CAUTION!
Riskoftrappingfingers
–Donottrapyourfingersbetweenthepushhandles
bracedandtheneckrestattachment.(Ifyouhavea
tensionadjustablebackrest).
PushbarAzaleaMax
A
B
1.Loosenthehandwheels.A.
2.Theheightofthepushhandlesbraced/pushbarBcanbe
adjustedsimplybypullingthehandlesupwardsorpushingthem
downwards.
3.Adjusttotheheightthatyourequire.
4.Re-tightenthehandwheels.
Adjustingtheheightofthepushbar
A
B
1.LoosenthehandwheelsA.
2.Adjustthehandlestotherequiredheightposition.Thereare
twofixedpositionsavailable.
3.Re-tightenthehandwheels.
WARNING!
Riskofinjury
Thepushbarcanloosenfromtheattachments
–MakesurethatthemarkingBonthetubesarefitted
againstthebackresttube.
–Checkthatthehandwheelscanbetightenedproperly,
thescrewofthehandwheelshouldbarelybevisible.If
thepushbarisinthewrongposition,thehandwheel
willnotbepossibletotightenproperly.
1488727-G13

Rea®Azalea®
4.4.2Adjustingtheangleofthepushbar
A
B
1.PressthebuttonsA.
2.AdjustthepushbarBtothepreferredangle.
3.ReleasethebuttonsA.
Movethepushbarslightlyinorderforthebuttonstolock
intoposition.
WARNING!
Riskofimbalance
–Donothanganythingonthepushbar,thiscouldcause
imbalance.
4.5Carer-operatedangleadjustment
Thewheelchairisequippedwithcarer-operatedcontrols.Youcan
adjusttheangleofthebackrestforwardsorbackwardsandtiltthe
wholeseatunitincludingthebackrest.Thesetwofunctionscan
eitherbecontrolledmanuallyorelectrically.
WARNING!
Riskofminorinjury
Riskoftrappingfingers
–Becarefulwhenadjustingtheangleofthebackrestso
thattheassistantoruserdonottrapfingersbetween
thebackrestandthearmrest.
4.6Manualtiltandbackrestangle
adjustment
4.6.1Adjustingthebackrestangle
A
B
1.UsetheyellowleverAmarkedwiththeyellowsymbolBon
thelefthandsidetoanglethebackrest.
2.Pressupwardswhileyouanglethebackresttothedesired
position.
3.Releasethelever.
4.6.2Carer-operatedtiltadjustment
B
A
1.UsethegreenleverAwiththegreensymbolBontheright
handsidetotilttheseatunit(seatandbackrest).
2.Pressupwardswhileyoutilttheseatunittothedesiredposition.
3.Releasethelever.
4.6.3Lockingthetiltand/orbackrestangle
adjustment
A
B
ThelockingdeviceAallowsyoutosetthetiltingoftheseatunit
and/ortheanglingofthebackresttoafixedposition.
1.Tiltand/orangletheseatandbackresttothedesiredposition.
2.InsertthelockingdeviceA.
Thepositionisnowsetandcannotbechanged.
Toremovethelockingdevice,pressontheplasticpegBwithasmall
objectandpulloutwards.
4.7Electrictiltandbackrestangle
adjustment
WARNING!
Riskofinjury
Ifthewheelchairisusedbyconfusedorrestlessusers
oruserswithspasms:
–eitherlockthehandcontrolfunctions
–ormakesurethatthehandcontrolisoutofreachfor
theuser.
CAUTION!
Riskofdamagetotheproduct
–Makesurethatthehandcontrolisnotunintentionally
activated.
–Donotletchildrenplaywiththehandcontrol.
–Ifanythingunusualisobserved,suchasunusualsounds
orunevenrunningduringoperation,shutdownthe
system.
14
1488727-G

Components
Riskofmalfunction
–Workonthehandsetorotherelectricparts(motors
etc.)shouldonlybecarriedoutbyproperlytrained
personnel.
WhenactivatingtheOn/Offbutton,ashort“beep”confirmsthatthe
handcontrolisactivated.Thehandcontrolisactivein30seconds
afterthelastaction,beforeitisautomaticallydeactivated.
Thehandcontrolcanalsobemanuallydeactivatedby
pressingtheOn/Offbutton.
4.7.1Symbolsonthehandcontrol
Batteryandchargingindicator
Lockingfunction
On/Off
Backrestrecline(yellowcoloronarrowand
backrest)
Seattilt(greencoloronarrow,backrestandseat)
Up/Down(yellowcolorforthebackrestrecline,
greencolorfortheseattilt)
4.7.2Backrestangleadjustment
A
B
C
Adjusttheangleofthebackrestbyusingtheyellowbuttonsonthe
leftsideofthehandcontrolA.
1.PressbuttonBtoadjusttheangleofthebackrestbackwards.
2.PressbuttonCtoadjusttheangleforwards.
4.7.3Tiltadjustmentseat
A
B
C
Tilttheseatunit(seatandbackrest)byusingthegreenbuttonson
theleftsideofthehandcontrolA.
1.PressbuttonBtoadjusttheangleoftheseatunitbackwards.
2.PressbuttonCtoadjusttheangleoftheseatunitforwards.
CAUTION!
Riskoftrappingfingers
Couldresultinminorinjuries.
–Theriskoftrappingfingers,etc.,isgreaterinelectric
adjustmentsthaninuser-operatedadjustments.
–Bearinmind,forexample,thatachildmaygetholdof
thecontrolbox,pressthecontrolsandgettrapped,
ortraptheuser.
–Thehandcontrolshouldonlybeusedbyauthorised
personnel.
4.7.4Lockingofreclineandtiltfunction
A
C B
1.PressonthelockingkeyA.
2.Keeppressingonthelockingkey.
3.SimultaneouslypressonthechosenfunctionBfortheseattilt
(green)orCforthebackrestangle(yellow).
4.Repeattheproceduretounlockthefunction.
D D
Whenafunctionislocked,theyellowindicationlampD
shines.
1488727-G15

Rea®Azalea®
4.7.5Chargingthebattery
Damagetothebattery
–Thebatterymustbeloaded24hoursbeforeusingthe
systemthefirsttime.
–Unplugthemainscableafterloadingbeforethe
wheelchairismoved.
Thebatterychargerhasdifferentchargingcablesinorderto
adapttodifferentlocalelectricalstandards.
Whenthebatterylevelislow(20V),thehandcontrolbeeps
whenitisused.
B
A
A
A
1.Connectthechargercablesuppliedwiththechairintoawall
socket.
2.InsertthechargercableAintotheconnectorBwhichisonthe
sideofthewheelchair.
3.Unplugthecablewhenthebatteryisfullycharged.
A
BC
D
A
Greenlight—ON—Handcontrolisactivated
B
•Greenlight—ON—Batterylevelisabove20%
•Greenlightblinking—ON—Batteryischarging(fixed
lightwhenthebatteryisfullyloaded)
C
•Yellowlight—ON—Batterylevelislow,below20%
•Yellowlight—OFF—Batteryisfullyloaded
D
Greenlight—ON—Batterycableisconnected(lightsup
about5secondsafterconnectingthecable)
4.8Tiltscale
Thetiltscalemakesitvisiblehowmanydegreestheseatunitand/or
thebackrestistilted.
4.8.1Tiltscalebackrest
A
C
B
D
E
F
G
H
1.PlacethetiltscaleforthebackrestangleGonthepushbar/push
handleoronthebackresttubesaccordingtopictureAorB
above.
2.AttachtheclampsCtothepushbar/pushhandlesorthe
backresttubesandtightenthescrewsD.
3.PlacetheendplugEintheemptyholeandremovethe
protectioncoverFfromthepre-gluedpadH.
4.AttachthetiltscaleGtothepre-gluedpadHontheattachment
clampsC.
4.8.2Tiltscaleseat
Thetiltscalefortheseatangle,isplacedonthearmrestaccordingto
thepicturesabove.
161488727-G

Components
4.9Seatadjustments
A
B
Theseatdepthofthechaircaneasilybeadjustedtoprovidegood
support.Thewidthbetweenthelegrestsandarmrestsandtheheight
ofthearmrestscanalsobeadjusted.
TheseatcushionAissecuredwithVelcro®stripsBon
theseatplate.
4.9.1Adjustingtheseatdepth
A
1.Removetheseatcushion.
2.LoosenthescrewsAwithanAllenkey.
3.Movethefrontedgeoftheseatforwardsorbackwards.
4.Re-tightenthescrewsA.
5.Puttheseatcushionback.
Thedistancebetweenthebackoftheknee/calfandthe
cushionshouldbeassmallaspossible,butwithoutcontact.
4.9.2Widthadjustmentseat
A
1.LoosenthescrewAwithanAllenkey.
Tools:5mmAllenKey
2.Adjustthearmreststothedesiredwidth.
3.Re-tightenthescrewA.
Riskofpooradjustment
–Theremustnotbeanypressureonthearmrest/
legrestwhileadjustingthescrew.
Widthadjustmentlegrest
1.LoosenthescrewsB.
Tools:5mmAllenKey
2.Adjustthelegreststothedesiredwidth.
3.Re-tightenthescrews.
Siderestpad
Therearetwodifferentsiderestpadsavailable,onesiderestcushion
whichisplacedinthearmrestpocketandonesiderestpadwhichis
placeddirectlyonthesiderest.
A
B
D
C
Theseatwidthcanbedecreasedwith2x20mmeitherby
placingsiderestcushionsAinsidethearmrestpocketBor
byusingthesiderestpadC+D.
1488727-G17

Rea®Azalea®
4.10Armrestadjustments
4.10.1Armrestheight
A
B
1.Adjusttheheightofthearmrestsbyturningthescreworthe
handwheelBdependingonwhichtypeofarmrestyouhave
chosen.
2.Settherequiredheight.
3.Re-tightenthescrew/handwheel.
CAUTION!
Riskoftrappingfingers
–Becarefulnottotrapyourfingersbetweenthearm
padandthesidesupportwhenyouadjustthearmrest
height.
Thearmrestshaveanauto-locktopreventinvoluntary
movementordetachment.PressthebuttonAonthe
armresttoreleasebeforeremovingoradjustingthearmrest.
4.10.2Armrestdepth
A
1.LoosenthescreworthehandwheelA,dependingonwhichtype
ofarmrestyouhavechosen
2.Setthepadintherequiredposition.
3.Re-tightenthescrew/handwheel.
Riskofpooradjustment
–Theremustnotbeanypressureonthearmrestwhile
adjustingthescrew.
4.10.3Armrestlow
ForAzaleaandAzaleaMax,wearealsoofferingalowerarmrest.
Anexperiencedtherapistmustevaluateforwhichusers
thislowarmrestissuitable,especiallyifusedinthelowest
position.
CAUTION!
Riskofpinching
–Becarefulwhenmountingthearmrest.
Foradjustmentsseesection:4.10.1Armrestheight,page18and
4.10.2Armrestdepth,page18
4.11Legrests
Foruserswithlongerlegs,thelegrestattachmentcanbe
mountedinhighposition.ContactyourInvacaredealerfor
furtherinformation.
4.11.1Angleadjustablelegrest
Angleadjustablelegrestssupportthelegsandreducespressure.The
legrestsmustalwaysbefittedwithcalfpads,footplatesandheel
straps.Itisimportanttoadjusttheheightandangleofthelegreststo
obtainagoodseatingposition.
Adjustingthelegrestheight
A
1.LoosenscrewAwithanallenkey.
Tools:5mmallenkey
2.Adjustthelegresttoasuitableheightandthescrewiscaughtby
oneoftherecessesonthelegresttube.
3.Re-tightenthescrew.
Angleadjustment
WARNING!
Riskofdamage
Damageonthemechanism
–Donotplaceanythingheavy,orletchildrensitonthe
legrest.Itmaycausedamagetothemechanism.
–Donotputanypressureonthelegrestwhiletheangle
isbeingadjusted.Thelevermustbefullyopened.
181488727-G

Components
A
B
1.PulltheleverAwithonehandwhilesupportingthelegrestwith
yourotherhand.
2.Whenasuitableangleisobtained,letgooftheleverandthe
legrestwilllockintooneofsevenpresetpositionsB.
FortheAzaleaMaxfourdifferentpositionsareavailable,see
sectionforlegrestsAzaleaMax.
Thedistancebetweenthelowestpartofthefootrestandthe
groundmustbeatleast40mm.
4.11.2Fixedlegrest
Adjustingthelegrestheight
A
B
1.LoosenscrewAwithanallenkey.
Don'ttouchtheupperscrewB.
2.Adjustthelegresttoasuitableheightandthescrewiscaughtby
oneoftherecessesonthelegresttube.
3.Re-tightenthescrew.
Thedistancebetweenthelowestpartofthefootrestandthe
groundmustbeatleast40mm.
4.11.3Adjustingtheangleofthecentrallegrest
A
1.LoosentheadjustmentknobA.
2.Holdthefootplatewiththeotherhand.
3.Adjusttotheappropriatelegangle.
4.Re-tightentheknob.
WARNING!
Riskoftrappingfingers
Whenadjustingthefootplate,thefingersmightget
trapped.
–Loosentheadjustmentknobwithonehandandhold
thefootplatewiththeotherhandtoavoidtrapping
yoursoranyoneelse’sfingers.
CAUTION!
Riskofdamage
Thelegrestmightcausedamagetothefloor.
–Whentheseatistiltedforwardsonachairwithalong
legrestlengthandlowseatheight,thereisariskofthe
legresthittingthefloorandcausingdamage.
4.11.4LegrestAzaleaMax
A
1
2
3
4
B
C
1.PulltheleverAwithonehandwhilesupportingthelegrestwith
yourotherhand.
2.Whenasuitableangleisobtained,letgooftheleverandthe
legrestwilllockintoonethepresetpositionsB.
FortheAzaleaMaxfourdifferentpositionsareavailable.
1488727-G19

Rea®Azalea®
Theadjustmentshouldbedoneinaccordancewiththe
adjustmentofthecalfpads.
Higheradjustments(red-markedarea)Carepossible,but
NOTrecommendedasthelegrestmightnotbeableto
supporttheaddedweight.
WARNING!
Riskofdamage
Damageonthemechanism
–Donotplaceanythingheavy,orletchildrensitonthe
legrest.Itmaycausedamagetothemechanism.
–Donotputanypressureonthelegrestwhiletheangle
isbeingadjusted.Thelevermustbefullyopened.
Thedistancebetweenthelowestpartofthefootrestandthe
groundmustbeatleast40mm.
4.12Amputeelegrest
WARNING!
Riskoftipping
Thereisanincreasedriskoftippingforamputatedusers.
–Useanti-tippersand/orre-balancethewheelchair
whenamputeelegrestsareused.
4.12.1Amputeelegrest—general
A
B
C
D
1.Attachthelegrestsbypushingthetubeattheupperpartofthe
legrestsAdownintothetubesonthewheelchairB.
2.Lockthelegrestsbyturningtheminwards.
3.SlackenleverC,onthecushion’smounting,inordertoadjust
thecushion’sangleandheight.
4.SlackenscrewsDunderthecushion,inordertoadjustthe
cushiondepth.
4.12.2Amputeelegrest—AzaleaMax
WARNING!
Riskoffalling
Increasedtipriskforward
–Theusermustneversitontheamputeepad.
CAUTION!
Riskofpinching
–Theremustnotbeanypressureontheamputee
supportwhenadjustingthesettings.
A
B
C
D
TheamputeelegrestforAzaleaMaxareadjustableinangle,
depth,sidewaysandinheight.
1.LoosenthehandwheelAandadjusttotherequiredangle.
2.Re-tightenthehandwheel.
3.LoosenthehandwheelBandadjustthecalfpadtotherequired
depth.
4.Re-tightenthehandwheel.
5.LoosenthescrewsCandadjustthecalfpadsideways.
Donotforgettotightenthescrewsandthehandles
properly.
6.LoosenthehandleDandadjusttheamputeelegrestinheight.
7.Re-tightenthehandle.
4.13Footplates—footrest
4.13.1Adjustingtheangleadjustablefootplates
Thefootplatescanbeadjustedbothindepthandangle,andcanalso
befolded-up.
A
1.AdjusttheangleandthedepthbylooseningthescrewAatthe
footplateattachment.
Tools:5mmAllenkey
2.Adjustthefootplatetothecorrectposition.
3.Re-tightenthescrew.
Donotplaceanythingonthefootplatewhenthescrewis
loose.
4.13.2Adjustingtheone-piecefootrest
WARNING!
Riskoftrappingfingers
Thefingersmightgettrappedbetweenthefootplateand
thefootplateattachment.
–Becarefulnottotrapyourfingersbetweenthefoot
plateandthefootplateattachmentwhenfoldingit
down.
201488727-G
/