BEGLEC LED NANO BEAM Owner's manual
- Category
- Floodlights
- Type
- Owner's manual
This manual is also suitable for

Version: 1.1
WWW.BEGLEC.COM
Copyright © 2009 by BEGLEC comm.v.a.
‘t Hofveld 2 ~ B1702 Groot-Bijgaarden ~ Belgium
Reproduction or publication of the content in any manner, without express permission of the publisher, is prohibited.
Operation Manual
Mode d'emploi
Gebruiksaanwijzing
Bedienungsanleitung
Manual de instrucciones
Manual do utilizador
EN
FR
NL
DE
ES
PT
LED NANO BEAM
IP68 WATERPROOF LED PROJECTOR
Page is loading ...

ENGLISH OPERATION MANUAL
JB SYSTEMS
®
1/6 LED NANO BEAM
LED NANO BEAM - INSTALLATION MANUAL
SAFETY INSTRUCTIONS:
To protect the environment, please try to recycle the packing material as much as possible.
Install the fixture away from any flammable materials and/or liquids.
Maximum save ambient temperature is 50°C. Don’t use this unit at higher ambient temperatures.
The housing and the lenses must be replaced if they are visibly damaged.
Important: Don’t look directly into the LED light beam at close range and don’t use the projector in the presence of
persons suffering from epilepsy.
ELECTRICAL INSTALLATION
The electrical installation should be carried out by qualified personal only, according to the regulations
for electrical and mechanical safety in your country.
The LED NANO BEAM consumes about 1,7 Watt per unit.
This means that you can put a lot of units on one power supply, however the maximum cable length between the LED
power supply and the last unit in the chain is about 30m.
We strongly suggest using our special LED power supply “LED-PSU 50W/24Vdc” (order code: 4935) for maximum
reliability. However a simple 6Vac to 26Vac
transformer is also possible.
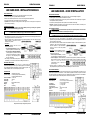
Connections:
For outdoor installations: make sure to use
waterproof junction boxes!
AC-input (ordinary transformer): connect all
projectors in parallel to the transformer output.
DC-input (example: LED-PSU 50W/24Vdc):
connect all projectors in parallel to the PSU output BUT make sure that the positive (red wire) and negative (black
wire) poles of the projectors are connected in
the right way to the corresponding wires of
the PSU see drawing!
After checking that the maximum allowed power is
not exceeded, you can connect the chain to the LED Manager and switch it on.
MECHANICAL INSTALLATION
Many possibilities: you can simply drill a hole (ex. in a wooden surface) and
press/click the LED projector inside or you can install the projector in concrete floors,
using an M40 Cable protection pipe (Diameter = 36mm) to protect the projector. For
outdoor installations, make sure to use waterproof junction boxes.
SPECIFICATIONS
Connections: standard 2x0,75mm² cable
Operation voltage : 9 to 35Vdc (example: LED-PSU 50W/24Vdc)
6 to 26Vac (standard transformer)
Power consumption: 1,7 Watt / unit
Power Cable: curled 1m
Beam Angle: 10°
IP rating: IP68 (complete immersion)
Weight: 0,25 kg
Size: see drawing
Every information is subject to change without prior notice
!!!
CAUTION:
DO
NOT
CONNECT DIRECTLY TO
230Vac !!!
!!! CAUTION: Ensure the LED power supply is switched off before installation !!!
FRANCAIS MODE D’EMPLOI
JB SYSTEMS
®
2/6 LED NANO BEAM
LED NANO BEAM – GUIDE D’INSTALLATION
INSTRUCTIONS DE SECURITE :
Pour protéger l'environnement, veuillez, autant que faire se peut, recycler les emballages de l'appareil.
Installez l'appareil à l'écart de matériaux inflammables et/ou liquides.
La température maximale ambiante est de 50°C pour garantir un fonctionnement correct. N'utilisez pas cet appareil à
des températures ambiantes plus élevées.
Le boîtier et les pièces optiques doivent être remplacés s'ils sont visiblement endommagés.
Important :
Ne regardez pas directement vers le faisceau lumineux des LED à courte distance, et n'utilisez pas le
projecteur en présence de personnes atteintes d'épilepsie.
INSTALLATION ELECTRIQUE
L'installation électrique devrait être effectuée uniquement par du personnel qualifié, suivant les normes
de sécurité relatives à l'électricité et à la mécanique dans votre pays.
Le LED NANO WASH consomme environ 1,7 watt par appareil.
Cela signifie donc que vous pouvez alimenter une série d'appareils au départ d'un seul bloc d'alimentation.
Cependant, la longueur maximale du câble entre le bloc d'alimentation des LED et le dernier appareil de la chaîne doit
se situer aux alentours de 30 mètres.
Nous recommandons vivement l'utilisation de notre bloc d'alimentation spécifique, le 'LED-PSU 50W/24Vdc' (numéro
de référence : 4935) afin de garantir une fiabilité
maximale. Cependant, un simple transformateur
de 6V CA à 26V CA est aussi une possibilité
envisageable.
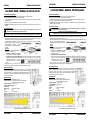
Connexions : Pour des installations en plein air :
assurez-vous que le matériel utilisé pour les
connexions soit bien étanche !
Entrée CA (transfo ordinaire) : connectez
tous les projecteurs en parallèle à la sortie du transfo.
Entrée CC (exemple : LED-PSU 50W/24Vdc) : connectez tous les projecteurs en parallèle à la sortie du PSU,
MAIS assurez-vous bien que les pôles positifs (fil rouge) et négatifs (fil noir) des projecteurs soient connectés
comme il se doit, donc, aux fils
correspondants du PSU prière de se
reporter à la figure !
Après avoir vérifié que la puissance maximale
n'est pas dépassée, vous pouvez raccorder la chaîne au LED Manager et le mettre sous tension.
INSTALLATION MECANIQUE
Il y a beaucoup de possibilités : vous pouvez simplement aménager un trou (par exemple dans une surface en bois) et
presser/cliquer le projecteur à LED à l'intérieur ; ou alors, installer le projecteur dans du béton, en prenant soin d'utiliser
de la gaine de protection (d'un diamètre de 36 mm) pour câble M40 afin de protéger le projecteur. Pour les installations
en plein air, assurez-vous que le matériel utilisé pour les connexions soit bien étanche.
CARACTERISTIQUES
Connexions : Câble standard de 2 x 0,75 mm²
Tension de service : de 9 à 35V CC (exemple : LED-PSU 50W/24Vdc)
de 6 à 26V CA (transfo standard)
Consommation : 1,7 Watt par appareil
CORDON SECTEUR : 1 m, de type spirale
Angle de dispersion : 10°
IP rating (indice de protection) : IP68 (immersion complète)
Poids : 0,25 kg
Dimensions : se reporter à la figure
Every information is subject to change without prior notice
!!! ATTENTION ! NE VOUS CONNECTEZ PAS DIRECTEMENT AU SECTEUR (230V) !!!
!!! ATTENTION ! Assurez-vous que le bloc d'alimentation des LED est éteint avant l'installation !!!
Page is loading ...
Page is loading ...
-
 1
1
-
 2
2
-
 3
3
-
 4
4
-
 5
5


BEGLEC LED NANO BEAM Owner's manual
- Category
- Floodlights
- Type
- Owner's manual
- This manual is also suitable for
Ask a question and I''ll find the answer in the document
Finding information in a document is now easier with AI
in other languages
- français: BEGLEC LED NANO BEAM Le manuel du propriétaire
- español: BEGLEC LED NANO BEAM El manual del propietario
- Deutsch: BEGLEC LED NANO BEAM Bedienungsanleitung
- Nederlands: BEGLEC LED NANO BEAM de handleiding
- português: BEGLEC LED NANO BEAM Manual do proprietário
Related papers
-
JBSYSTEMS LIGHT LED NANO WASH RGB Owner's manual
-
JBSYSTEMS LIGHT LED-PSU-50W-24V Owner's manual
-
JBSYSTEMS LIGHT LED GROUND LIGHT Owner's manual
-
JBSYSTEMS LIGHT Flexiled RGB Owner's manual
-
-
-
-
-
-
JBSYSTEMS LIGHT LED PINSPOT Owner's manual
Other documents
-
Pontec 87585 PondoStar LED Rock Light Set 3 User manual
-
Philips InStyle User manual
-
JB Systems Light LEDCON-02 Operating instructions
-
Briteq LDP-FLOOD10-WW Owner's manual
-
Lincat HAD50 User manual
-
-
 HQ Power Mini red laser 100mW User manual
-
MULTIPLEX Transformer Assemblies Installation guide
-
 HQ Power VDLSTR User manual
-
Ebode IR Link Pro Mini User manual

