Page is loading ...

TROJAN
MY SPACE MY TIME
®
#
1
HOME
FITNESS
SOUTH AFRICA’S
SINCE
1981
CAUTION
READ ALL PRECAUTIONS AND
INSTRUCTIONS IN THIS MANUAL
BEFORE USING THIS EQUIPMENT
KEEP THIS MANUAL FOR
FUTURE REFERENCE
1 YEAR
warranty
CALL
0861 876526
0 861 TROJA N
STATIONARY CYCLE CARE INSTRUCTIONS
AND ASSEMBLY MANUAL
WINNER, SHARON HAARHOFF,
USES TROJAN HOME FITNESS
EQUIPMENT AS PART OF
HER DAIL Y FITNESS
PROGRAM
SHARON HAARHOFF
AS SEEN ON
TV
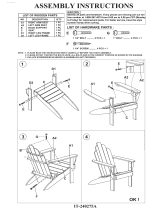
PULSE 500
STATIONARY CYCLE

INDEX PAGE
1. SAFETY INSTRUCTIONS 3
2. PRE ASSEMBLY CHECK LIST 4
3. ASSEMBLY STEPS 5
4. COMPUTER FUNCTIONS 9
5. FITNESS TIPS & TECHNIQUES 13
6. CONDITIONING GUIDELINES 14
7. WARM -UP AND COOL-DOWN 15
8. FREQUENTLY ASKED QUESTIONS 16
9. PARTS LIST 17
10. EXPLODED DRAWING 18
11. TROJAN 1 YEAR LIMITED WARRANTY 20
12. TROJAN REPAIRS PROCEDURE 22

1. SAFETY INSTRUCTIONS
WARNING :
To reduce the risk of serious injury, read the following safety instructions before using the TROJAN PULSE 500 BIKE.
1. Use the TROJAN PULSE 500 BIKE only on a level surface.
2. Keep children and pets away from this equipment at all times.
3. The TROJAN PULSE 500 BIKE should not be used by persons weighing more than 150kgs.
4. The TROJAN PULSE 500 BIKE should be used by only one person at a time.
5. Be careful to maintain your balance while using, mounting, dismounting, folding, unfolding or assembling the
TROJAN PULSE 500 BIKE. Loss of balance may result in a fall and serious bodily injury.
6. Use the TROJAN PULSE 500 BIKE only as described in the manual.
7. Do not attempt to adjust the seat while you are on the TROJAN PULSE 500 BIKE.
8. Before using this equipment to exercise, always do stretching exercises to properly warm up.
9. Always make sure all bolts and nuts are tightened prior to each use.
WARNING
Before starting any exercise or conditioning program you should consult with your personal physician to see if you
require a complete physical exam. This is especially important if you are over the age of 35, have never exercised before,
are pregnant, or suffer from any illness.

2. PRE ASSEMBLY CHECK LIST
Thank you for choosing the TROJAN PULSE 500 BIKE. We take great pride in producing this quality product and hope it
will provide many hours of quality exercise to make you feel better, look better and enjoy life to its fullest.
Yes, it’s a proven fact that a regular exercise program can improve your physical and mental health. Too often, our busy
lifestyles limit our time and opportunity to exercise. The TROJAN PULSE 500 BIKE provides a convenient and simple
method to begin your assault on getting your body in shape and achieving a healthier lifestyle.
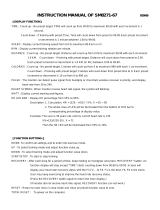
Before reading further, please review the drawing below and familiarise yourself with the parts that are labelled.
• Read this manual carefully before using the TROJAN PULSE 500 BIKE.
Rear Stabiliser
Handlebar
Upright Post
Right Pedal
Front Stabiliser
Computer
Chain Cover
Bottle Holder

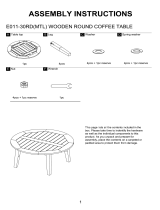
Step 1 Foot Tube Assembly
• Attach the Front Foot (F-1) and Rear Tube (G-1) to the front and back brackets of the mainframe
respectively using 4 Carriage Bolts (I-8), 4 Washers (I-7) and 4 Nuts (I-6).
Step 2 - Pedal Assembly
• Attach the Left Pedal (E-L) onto the Left Crank (D-17 L), and the Right Pedal (E-R) onto the Right Crank
(D-17 R) using a screwdriver.
Note: Screw the left pedal’s spindle anti-clockwise and the right pedal’s spindle clockwise to tighten
(reverse this procedure to loosen). Use a wrench (or screwdriver) to tighten the two spindles properly.
1064M-5
G-1

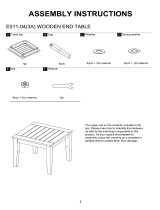
Step 3 - Seat Tube Assembly
• Unscrew the Height-adjusting Spring Knob (D-6) a little bit. Then pull the cap outward, the spindle of the
Spring Knob (D-6) will be withdrawn from the reception tube. Insert the Seat Post (H) into the Reception
Tube of the mainframe, through the Plastic Sleeve, which is pre-inserted into the Reception Tube. Tighten the
Spring Knob (D-6) when the Seat Post (H) is in position.
Note: If you cannot insert the Seat Post (H) into the Reception Tube of the mainframe after you have pulled
out the cap, please unscrew the Spring Knob (D-6) a little more until it allows the Seat Post to slide in.
• Attach the Seat (H-1) to the Seat Post (H)
1064M-6
Step 4 - Handlebar Post Assembly
• Connect the Upper Computer Cable (C5) to the Lower
Computer Cable (D-1). Now insert the
Handlebar Post (C) into the Mainframe, securing it with
4 Screws (C-1) and 4 Curved Washers (C-2).
CAUTION:
Ensure that cables are not damaged during
assembly or when tightening screws

Step 5-Handlebar post Assembly
• Place Handlebar (B) on the Handlebar base, and posi-
tion the Metal Cover (I-5) on the top of Handlebar (B).
• Secure the Handlebar (B) and Metal Cover (I-5) with
a Screw (I-9), Spring Washer (I-2), and Flat Washer (I-1).
Please ensure it is securely tightened.
• Place the Front Cover (C-4) on the Handlebar (B) and
insert T-shape Knob (I-4) into the Metal Cover (C-4) and
secure with Spring Washer (I-2), Flat washer (I-1) and
Bushing (I-3). Please ensure it is securely tightened.
Step 6 - Handlebar Post
Assembly
• Connect the Upper Computer Cable (C3) to the
back of the Computer (A)
• Attach the Computer (A) to the plate on top of
the Handlebar Pole with 4 Screws (A-1).
CAUTION:
Ensure that cables are not damaged during
assembly or when tightening screws
• Plug the Hand-Pulse wire (for measuring your pulse
rate) in the socket on the back of the Computer (A).
• Fasten the Bottle Cage (C-5) to the Handlebar Post
with 2 Cone Cross Screws (C-6), and insert Water
Bottle (C-7)
Recheck
all bolts and nuts are
tightened securely
before using the machine
1064M-7

1064M-8
4. COMPUTER FUNCTIONS
FUNCTIONS
TIME
Count up
No preset target. Time will count up from 00:00 to 99:59 (maximum)
where each increment is 1 second.
Count down
If training with a preset Time. Time will count down from preset time to
00:00.Each preset increment or decrement is 1 minute between 1:00 to
99:00 minutes.
SPEED Display current training speed from 0.0 to maximum 99.9 km or ml.
RPM Display current training rotation per minute.
DISTANCE
Count up
No preset target. Distance will count up from 0.00 to 99.90 (maximum)
with each increment 0.1 KM.
Count down
If training with a preset target. Distance will count down from preset
distance to 0.00. Each preset increment or decrement is 0.1 KM (or ML)
between 0.00 to 99.90.km.
CALORIES
Count up
No preset target. Calories will count up from 0 to 990 (maximum) with
each increment 1 cal.
Count down
If training with preset Calorie target. Calories will count down from preset
calories to 0. Each preset increment or decrement is 10 cal from 0 to 990
cal.
HEART SYMBOL When the monitor receives a heart rate signal, the symbol will start blinking.
PULSE
The monitor can detect pulse signals from the handgrip or chest belt. The monitor will
always display the chest belt reading if your hands are on the handgrips and you have the
chest belt on.
WATT Display current training watt figures.
HR LED BAR Display HR percentage from 55% to 95%.
FUNCTION BUTTONS
MODE Push to confirm all settings and to enter into exercise mode.
UP To select training mode and adjust function value up.
DOWN To select training mode and adjust function value down.
START/STOP To start or stop training.
RECOVERY
RECOVERY : After exercising for a period of time, keep holding on handgrips (if you do not have the
heart rate belt on) and press the “RECOVERY” button. All function displays will stop except “TIME”
starts counting down from 00:60 to 00:00. Screen will display your heart rate recovery status with
F1,F2….to F6. F1 is the best and F6 is the worst. User may keep exercising to improve the heart rate
recovery status. (Press the RECOVERY button again to return the main display.)
(If the monitor does not receive a heart rate signal, the RECOVERY function can not work.)
RESET Return to main menu in stop mode and clean all preset function value to zero.
TOTAL RESET To power on the computer.
NOTE:
1. To rate your pulse recovery correctly you must test it straight after nishing
your workout. The test will last 1 minute and then the results (F1 - F6)
will be dispayed on screen.
E 1 : Message appears on the screen when the palms of your hands are not correctly
placed on both the contact pads.
E 2 : Message appears on the screen because you have not stopped exercising.
Recovery Grade
F1 EXCELLENT
F2 VERY GOOD
F3 GOOD
F4 SATISFACTORY
F5 BELOW AVERAGE
F6 POOR

1064M-9
COMPUTER FUNCTIONS
OPERATING INSTRUCTION
Power on, Connect the adaptor to the computer to power on. The LCD screen will display all segments and sound
a long beep while showing the wheel diameter (78”) for 2 seconds (drawing 1).
drawing 1
PROGRAMMING MODE
1. User personal data setting (U1 – U4):
1. 1 When U1 is blinking, user may press UP and DOWN to select user 1, user 2, user 3 or user 4 (drawing 2)
drawing 2
1. 2 Preset personal data (incl. AGE, WEIGHT, HEIGHT, SEX). And press the MODE for confirmation. (drawing 3-6)
drawing 3 drawing 4 drawing 5
drawing 6
1.3 The computer will enter into MANUAL mode immediately, and selected user may preset his own exercise data
(incl TIME, DISTANCE, CALORIES and PULSE). The computer will memorise and recall this data every time
when the user is selected.
1.4 User may start exercise by pressing the START button.

1064M-10
COMPUTER FUNCTIONS
1.5 Press RESET button to return to training mode selection on the main menu.
Program selections are MANUAL, PROGRAM, H.R.C. (Heart Rate Control), USER, WATT. Press UP and DOWN to
select the program you want and press START for QUICK START in Manual mode. (drawing 7-10)
drawing 7 drawing 8 drawing 9
drawing 10
MANUAL MODE
After selecting MANUAL mode, press the UP and DOWN button to increase and decrease levels (from 1 to 16) and
press MODE button to confirm. Level is adjustable during training. (drawing 11)
drawing 11
PROGRAM MODE
After entering PROGRAM mode, press the UP and DOWN button to select program profile from P1 to P12. Press
MODE button to confirm and enter the selected profile. User may press UP and DOWN to adjust the level. Level is
adjustable during training. (drawing 12)
drawing 12

1064M-11
COMPUTER FUNCTIONS
H.R.C. MODE (HEART RATE CONTROL)
After entering H.R.C. mode, press the UP and DOWN button to select a different target from 55%, 75%, 90% and
TARGET. Press MODE to confirm. (drawing 13)
drawing 13
Note:
55% - Fat Burning Zone. (Exercise at this level for a minimum of 30 minutes at a time)
75% - Cardio Vascular Zone; Improves cardiovascular fitness
90% - Cardio Vascular performance only use for short high intensity bursts if you are a experienced fit user.
USER MODE
After entering USER mode, the first column of the profile is blinking, user may press UP or DOWN and then press
MODE to create his own profile (from column 1 to column 20). Press the MODE button for 2 seconds to quit profile
setting (drawing 14). Each user may have his own user profile.
drawing 14
WATT MODE
The preset watt value of 120 is flashing on the screen in WATT setting mode. User may use the UP or DOWN button
to set target value from 10 to 350. Press MODE button to confirm. The higher the WATT value the greater the effort
required to exercise.
NOTE:
1. Adaptor spec: 9V, 1A

1064M-12
AEROBIC EXERCISE
Aerobic exercise is any sustained activity that sends oxygen to your muscles via your heart and lungs. Aerobic exercise
improves the fitness of your lungs and heart - your body’s most important muscle. Aerobic exercise fitness is promoted
by any activity that uses your large muscle -arms, legs, or buttock, for example. Your heart beats quickly and you breathe
deeply. An aerobic exercise should be part of your entire exercise routine.
WEIGHT TRAINING
Along with aerobic exercising which helps get rid of and keep off the excess fat that our bodies can store, weight train-
ing is an essential part of the exercise routine process. Weight training helps tone, build and strengthen muscle. If you
are working above your target zone, you may want to do a lesser amount of reps. And as always consult your physician
before beginning any exercise program.
MUSCLE CHART
CYCLE
The exercise routine that is performed on the cycle will develop the lower body muscle group as well as condition the
circulatory system and provide a good aerobic workout . These muscle groups are highlighted on the muscle chart below.
5. FITNESS TIPS AND TECHNIQUES

6. CONDITIONING GUIDELINES
How you begin your exercise program depends on your physical condition. If you have been inactive for several years, or
are severely overweight, you must start slowly and increase your time on the equipment; a few minutes per workout.
Initially, you may be able to exercise only for a few minutes in your target zone, however, your aerobic fitness will improve
over the next six to eight weeks. Don’t be discouraged if it takes longer. It’s important to work at your own pace. Ulti-
mately, you’ll be able to exercise continuously for 30 minutes. The better your aerobic fitness, the harder you will have to
work to stay in your target zone. Please remember these essentials :
• Have your doctor review your training and diet programs to advise you of a workout routine you should adopt.
• Begin your training program slowly with realistic goals that have been set by you and your doctor.
• Monitor your pulse frequently. Establish your target heart rate based on your age and condition.
• Set up your equipment on a at, even surface at least 3 feet from walls and furniture.
EXERCISE INTENSITY
To maximize the benefits of exercising, it is important to exercise with the
proper intensity. The proper intensity level can be found by using your heart
rate as a guide. For effective aerobic exercise, your heart rate should be
maintained at a level between 65% and 85% of your maximum heart rate
as you exercise. This is known as your target zone. You can find your target
zone in the table below.
During the first few months of your exercise program, keep your heart rate near the low end of your target zone as you
exercise. After a few months, your heart rate can be increased gradually until it is near the middle of your target zone as
you exercise.
To measure your heart rate, stop exercising but continue moving your legs or walking around and place two fingers on
your wrist. Take a six-second heartbeat count and multiply the results by 10 to find your heart rate. For example, if your
six-second heartbeat count is 14, your heart rate is 140 beats per minute. (A six-seconds count is used because your
heart rate will drop rapidly when you stop exercising.)
Adjust the intensity of your exercise until your
heart rate is at the proper level.
For more information on dieting and
training visit www.trojanhealth.co.za
1064M-13

1
2
3
4
5
1064M-14
7. WARM-UP AND COOL-DOWN
WORKOUT GUIDELINES
Each workout should include the following three parts:
A warm-up, consisting of 5 to 10 minutes of stretching and light exercise. A proper warm-up increases your body tem-
perature, heart rate, and circulation in preparation for exercise.
Training zone exercise, consisting of 20 to 30 minutes of exercising with your heart rate in your training zone. (Note:
During the first few weeks of your exercise program, do not keep your heart rate in your training zone for longer than
20 minutes.)
A cool-down, with 5 to 10 minutes of stretching. This will increase the flexibility of your muscles and will help to prevent
post-exercise problems.
EXERCISE FREQUENCY
To maintain or improve your condition, plan three workouts each week, with at least one day of rest between workouts.
After a few months of regular exercise, you may complete up to five workouts each week, if desired. Remember, the key
to success is make exercise a regular and enjoyable part of your everyday life.
SUGGESTED STRETCHES
The correct form for several basic stretches is shown at the right. Move slowly as you
stretch, never bounce.
1. Toe Touch Stretch
Stand with your knees bent slightly and slowly bend forward from your hips. Allow
your back and shoulders to relax as you reach down toward your toes as far as pos-
sible. Hold for 15 counts, then relax. Repeat 3 times. Stretches: Hamstrings, back of
knees and back.
2. Hamstring Stretch
Sit with one leg extended. Bring the sole of the opposite foot toward you and rest it
against the inner thigh of your extended leg. Reach toward your toes as far as pos-
sible. Hold for 15 counts, then relax. Repeat 3 times for each leg. Stretches: Ham-
strings, lower back and groin.
3. Calf/Achilles Stretch
With one leg in front of the other, reach forward and place your hands against a
wall. Keep your back leg straight and your back foot flat on the floor. Bend your
front leg, lean forward and move your hips toward the wall. Hold for 15 counts, then
relax. Repeat 3 times for each leg. To cause further stretching of the achilles tendons,
bend your back leg as well. Stretches: Calves, achilles tendons and ankles.
4. Quadriceps Stretch
With one hand against a wall for balance, reach back and grasp one foot with your
other hand. Bring your heel as close to your buttocks as possible. Hold for 15 counts,
then relax. Repeat 3 times for each leg. Stretches: Quadriceps and hip muscles.
5. Inner Thigh Stretch
Sit with the soles of your feet together and your knees outward. Pull your feet
toward your groin area as far as possible. Hold for 15 counts, then relax. Repeat 3
times. Stretches: Quadriceps and hip muscles.
For more information on dieting and training visit www.trojanhealth.co.za

1064M-15
8. FREQUENTLY ASKED QUESTIONS
Q1. My computer consol is not working
1. Check that your power cord is in your power outlet and is on.
2. Check that you have a power supply to your home.
3. Ensure that the consol computer cables have been connected properly in the neckpiece when assembling the unit.
Q2. The consol cannot read the hand pulse signal
1. The hand pulse sensors will not operate correctly if your skin is extremely dry. Moisten your hands and try again.
2. Avoid moving your hands while exercising and hold the hand pulse sensors firmly while exercising. If you do move your
hands while exercising, give the computer a few seconds to retest and display your correct heart pulse rate.
3. Clean the hand pulse sensors to ensure good contact between your body and the pulse sensor.
If the error persists, please contact 0861 876 526
Q3. What does BMI stand for
1. Body Mass Index
Q4. My LCD is dim
1. Check if unit is in direct sunlight, move if neccessary.
If display does not improve, please contact 0861 876 526
Q5. My consol is showing an “EI” error
1. The palms of your hands are not correctly placed on both of the hand pulse contact pads. Try again ensuring
proper contact.
Q6. My consol is showing an “E2” error
1. You have not stopped exercising when pushing the recovery button. Stop exercising and try again.

NO. Description Specications Q’TY
A COMPUTER 1PCS
A-1 SCREWS FOR ATTACHING COMPUTER M5 x 10L 4PCS
B HANDLEBAR 1PCS
B-1 FOAM GRIP 360 x 23 x 5.0m 2PCS
B-2 FOAM GRIP 270L x 23 x 5mm 2PCS
B-3 CAP FOR HANDBLEBAR 2PCS
B-4 CABLE FOR HAND PULSE 1PCS
B-5 HAND PULSE SET 1SET
C HANDLEBAR POST 1PCS
C-1 SCREW FOR FIXING HANDLEBAR M8 x P1.25 x 16L 4PCS
C-2 CURVED WASHER 8 x 19 x 2t 4PCS
C-3 COMPUTER CABLE (UPPER) 1PCS
C-4 FRONT COVER FOR HANDLEBAR 1PCS
C-5 BOTTLE CAGE 1PCS
C-6 CONE CROSS SCREW 2PCS
C-7 BOTTLE 1PCS
D MAINFRAME 1PCS
D-1 COMPUTER CABLE (LOWER) 1PCS
D-3 SENSOR BOX 1PCS
D-4 SCREW FOR FIXING SENSOR BOX M4 x 10L 1PCS
D-5 BUSHING FOR SEAT POST 1PCS
D-6 KNOB FOR SEAT POST 1PCS
D-7 SPRING STOPPER FOR AXLE 1PCS
D-8 BEARING 6203 (RS) 2PCS
D-9 CURVED WASHER 17.5 x 25 x 0.3t 1PCS
D-10 FLAT WASHER 17.5 x 25 x 0.3t 1PCS
D-11 C-TYPE RING 17 1PCS
D-12 SCREW M4 x 10L 28PCS
D-13 R+L CHAIN COVER R+L 1SET
D-14 R+L DECORATION COVER 1SET
D-15 SCREWS M4 x 50L 7PCS
D-16 SCREWS 4PCS
D-17 CRANK ARM R+L 1SET
D-18 NYLON NUT M8xP1.0x20L 2PCS
D-19 DRIVING BELT 6 1126mm 1PCS
9. PART LIST
1064M-16

NO. Description Specications Q’TY
E-R/L PEDAL 1SET
F-1 FRONT STABILISER 1PCS
F-2 R+L CAP FOR STABILISER 2PCS
F-3 SCREW 2PCS
G-1 REAR STABILISER 1PCS
G-2 R+L CAP FOR STABILISER 2PCS
G-2 SCREW 2PCS
G-3 HEXAGAONAL NUT 2PCS
G-4 ADJUSTOR FOR CAP 2PCS
H SEAT POST 1PCS
H-1 SEAT 1PCS
H-2 SCREW M5 x P0.8 x 12L 2PCS
H-3 COVER FOR SLIDER 1PCS
H-4 SLIDER 1PCS
H-5 SOCKET FOR SLIDER 1PCS
H-6 CAP 2PCS
H-7 FLAT WASHER 14.3 x 25 x 2t 1PCS
H-8 KNOB FOR SLIDER 1PCS
H-9 SCREW M4 x 20L 1PCS
I-1 FLAT WASHER 7 x 12 x 1t 1PCS
I-2 SPRING WASHER 7 x 2t 1PCS
I-3 BUSHING 7 x 12 x 40mmL 1PCS
I-4 T-KNOB 1PCS
I-5 METAL COVER 1PCS
I-6 NUT M8 30# 4PCS
I-7 WASHER 8*19*2T 4PCS
I-8 CARRIAGE BOLT M8 x P1.25 x 55L 4PCS
I-9 ALLEN BOLT FOR HANDLEBAR M7 x P1.0 x 30L 1PCS
J AXLE 1PCS
PART LIST
1064M-17

NO. Description Specications Q’TY
J-1 BIG PULLEY 1PCS
J-2 NUT M8 x P1.25 x 12L x 5t 3PCS
K MAGNETIC SYSTEM & GEAR BOX SET 1SET
M-1 FLYWHEEL 1PCS
M-2 BEARING 6203 (RS) 1PCS
M-3 BEARING 6003RS 3PCS
M-4 ONE WAY BEARING 1PCS
M-5 CAP FOR FLYWHEEL 2PCS
M-6 PLASTIC WASHER 17 x 23 x 0.5t 2PCS
M-7 FLAT WASHER 17.5 x 25 x 1t 1PCS
M-8 SMALL PULLEY 1PCS
M-9 C-TYPE RING 17 2PCS
M-10 FLAT WASHER 17.5 x 25 x 0.3t 4PCS
M-11 CURVED WASHER 17.5 x 25 x 0.3 1PCS
M-12 SCREW M5 x 10L 6PCS
N IDLER WHEEL SET 1SET
P-1 CHEST BELT 1PCS
P-2 BELT FOR CHEST BELT 1PCS
P-3 ADAPTOR 1PCS
P-4 DC CABLE 1PCS
PART LIST
1064M-18

1064M-19
10. EXPLODED DRAWING 1

1064M-20
EXPLODED DRAWING 2
/