
2018
CHALLENGER
QUICK
REFERENCE
GUIDE
INCLUDES SRT 392/SRT HELLCAT

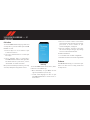
Vehicle User Guide
Access your Owner’s Information – right through
your Uconnect 4C or 4C NAV touchscreen radio —
If Equipped.
To access the Vehicle User Guide on your
Uconnect Touchscreen: Push the Uconnect Apps
button, then push the Vehicle User Guide icon on
your touchscreen. No Uconnect registration is
required.
NOTE:
Vehicle User Guide features are not available
while the vehicle is moving. If you try to access
while the vehicle is in motion, the system displays:
Feature not available while the vehicle is in mo-
tion.
Pre-Installed Features
• Your User Guide —
Updated in real-
time
• Available when and
where you need it
• Touchscreen
convenience
• Customizable
interface
• Maintenance
schedules and
information
• Multilingual
• Comprehensive
icon & symbol glos-
sary
NOTE:
Uconnect screen images are for illustration pur-
poses only and may not reflect exact software for
your vehicle.
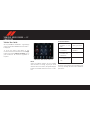
Vehicle User Guide Touchscreen Icon
VEHICLE USER GUIDE — IF
EQUIPPED

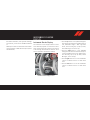
Keyless Enter-N-Go — Passive
Entry
The Keyless Enter-N-Go system is an enhance-
ment to the vehicle’s key fob. This feature allows
you to lock and unlock the vehicle’s door(s) and
trunk without having to press the key fob lock or
unlock buttons.
To Unlock From The Driver Or
Passenger Side
• With a valid Keyless Enter-N-Go key fob located
outside the vehicle and within 5 ft (1.5 m) of
the driver or passenger side door handle, grab
either front door handle to unlock the door
automatically.
To Lock The Vehicle
• Both front door handles have buttons located
on the outside of the handle. With one of the
vehicle's Keyless Enter-N-Go key fobs located
outside the vehicle and within 5 ft (1.5 m) of
the driver's or passenger front door handle,
push the door handle button to lock the two
doors and trunk.
• Do NOT grab the door handle, when pushing
the door handle button. This could unlock the
door(s).
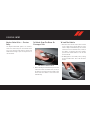
Grab The Door Handle To Unlock
Push The Button To Lock
PASSIVE ENTRY

NOTE:
• If “Unlock All Doors 1st Press” is programmed,
all doors will unlock when you grab hold of the
front driver's door handle. Additionally, all
doors and the trunk will unlock with this option
programmed when you push the trunk button.
• If a key fob is detected in the vehicle when
locking the vehicle using the power door lock
switch, the doors and trunk will unlock, and the
horn will chirp three times. On the third at-
tempt, your key fob can be locked inside the
vehicle.
• After pushing the Keyless Enter-N-Go lock but-
ton, you must wait two seconds before you can
lock or unlock the vehicle using the door
handle. This is done to allow you to check if the
vehicle is locked by pulling the door handle
without the vehicle reacting and unlocking.
• If a Keyless Enter-N-Go door handle has not
been used for 72 hours, the Keyless Enter-
N-Go feature for that handle may time out.
Pulling the deactivated front door handle will
reactivate the door handle's Keyless Enter-
N-Go feature.
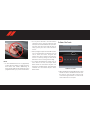
To Enter The Trunk
• With a valid Keyless Enter-N-Go key fob located
outside the vehicle and within 5 ft (1.5 m) of
the deck lid, push the button located on the
center of the light bar which is located on the
deck lid above the license plate.
Do NOT Grab The Handle When Locking
Trunk Release Button

For further information, and applicable warnings
and cautions, please refer to the Owner’s Manual
at
www.mopar.com/en-us/care/owners-manual.html
(U.S. Residents) or www.owners.mopar.ca (Cana-
dian Residents).
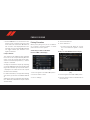
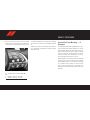
Instrument Cluster Display
The instrument cluster display features an inter-
active driver display that is located in the instru-
ment cluster. Pushing the controls on the left side
of the steering wheel allows the driver to select
vehicle information and Personal Settings.
• Push the up button to scroll upward through the
main menus (Speedometer, mph/km/h, Vehicle
Info, Performance Pages – SRT only, Driver
Assist, Fuel Economy, Trip A, Trip B, Audio,
Stored Messages, Screen Set Up).
• Push the down button to scroll downward
through the main menu and submenus (Speed-
ometer, mph/km/h, Vehicle Info, Driver Assist,
Fuel Economy, Trip A, Trip B, Audio, Stored
Messages, Screen Set Up).
• Push the right button to access the information
screens or submenu screens of a main menu
item.
• Push the left button to access the information
screens or submenu screens of a main menu
item.
Instrument Cluster Display Controls
INSTRUMENT CLUSTER
DISPLAY

• Push the OK button to access/select the infor-
mation screens or submenu screens of a main
menu item. Push and hold the OK button for
two seconds to reset displayed/selected fea-
tures that can be reset. Pushing OK button will
also toggle between mph and km/h on the
digital speedometer.
Compass Calibration
This compass is self-calibrating, which eliminates
the need to set the compass manually. When the
vehicle is new, the compass may appear erratic,
and the cluster will display dashes (- -) until the
compass is calibrated.
You may also calibrate the compass by completing
one or more 360 degree turns (in an area free from
large metal or metallic objects) until the dashes (-
-) displayed in the cluster turn off. The compass
will now function normally.
For further information, and applicable warnings
and cautions, please refer to the Owner’s Manual
at
www.mopar.com/en-us/care/owners-manual.html
(U.S. Residents) or www.owners.mopar.ca (Cana-
dian Residents).
Pairing Procedure
Mobile phone pairing is the process of establish-
ing a wireless connection between a cellular
phone and the Uconnect system.
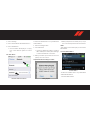
Start Pairing Procedure On The Radio
Uconnect 4 With 7-inch Display
1. Place the ignition in the ACC or ON position.
2. Press the “Phone” button.
3. Select “Settings.”
4. Select “Paired Phones.”
5. Select “Add device.”
• Uconnect Phone will display an “In prog-
ress” screen while the system is connect-
ing.
Uconnect 4C & 4C NAV With 8.4-inch Display
1. Place the ignition in the ACC or ON position.
2. Press the “Phone” button in the Menu Bar on
the touchscreen.
Uconnect 4 With 7-Inch Display
Uconnect 4C & 4C NAV With 8.4-Inch Dis-
play
PHONE PAIRING

3. Select “Pairing.”
4. Select “Paired Phones And Audio Devices.”
5. Select “Add Device.”
• Uconnect Phone will display an “In prog-
ress” screen while the system is connect-
ing.
Pair Your iPhone:
To search for available devices on your Bluetooth
enabled iPhone:
1. Press the Settings button.
2. Select Bluetooth.
• Ensure the Bluetooth feature is enabled.
Once enabled, the mobile phone will begin
to search for Bluetooth connections.
3. When your mobile phone finds the Uconnect
system, select “Uconnect”.
Complete The iPhone Pairing Procedure:
1. When prompted on the mobile phone, accept
the connection request from Uconnect Phone.
NOTE:
Some mobile phones will require you to enter the
PIN number.
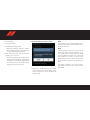
Pair Your Android Device:
To search for available devices on your Bluetooth
enabled Android Device:
1. Push the Menu button.
Bluetooth On/Uconnect Device
Pairing Request
Uconnect Device

2. Select Settings.
3. Select Connections.
4. Turn Bluetooth setting to “On.”
• Ensure the Bluetooth feature is enabled.
Once enabled, the mobile phone will begin
to search for Bluetooth connections.
5. Once your mobile phone finds the Uconnect
system, select “Uconnect”.
• You may be prompted by your mobile phone
to download the phonebook, check “Do Not
Ask Again” to automatically download the
phonebook. This is so you can make calls by
saying the name of your contact.
Complete The Android Pairing Procedure:
1. Confirm the passkey shown on the mobile
phone matches the passkey shown on the
Uconnect system then accept the Bluetooth
pairing request.
NOTE:
Some mobile phones require the PIN to be en-
tered manually, enter the PIN number shown on
the Uconnect screen.
NOTE:
Software updates on your phone or the Uconnect
system may interfere with the Bluetooth connec-
tion. If this happens, simply repeat the pairing
process. However, first, make sure to delete the
device from the list of phones on your Uconnect
system. Next, be sure to remove Uconnect from
the list of devices in your phone’s Bluetooth set-
tings.
For further information on Uconnect Phone,
please refer to “Uconnect Phone” in the vehicle’s
User Guide.
Pairing Request

Automatic High Beam — If
Equipped
This system automatically controls the operation
of the headlamp high beams as oncoming vehicles
approach.
• The Automatic High Beam Headlamp Control
can be turned on or off using the Uconnect
System.
• Push the turn signal lever away from you.
• With the headlight switch in the “AUTO” posi-
tion, the high beams are controlled
automatically.
• Pull the turn signal lever toward you to manu-
ally deactivate the system.
• To improve system recognition of crossing traf-
fic, and to limit use in a residential area, the
vehicle must be moving at a speed greater than
20 mph (32 km/h) before the Automatic High
Beam Module (AHBM) begins requesting high
beam activation.
NOTE:
If the windshield or Automatic High Beam Head-
lamp Control mirror is replaced, the mirror must
be re-aimed to ensure proper performance. See a
local authorized dealer.
Adaptive Cruise Control (ACC) —
If Equipped
If your vehicle is equipped with Adaptive Cruise
Control, the controls operate exactly the same as
the standard cruise control, with one difference.
You can set a specified distance you would like to
maintain between you and the vehicle in front of
you.
• If the ACC sensor detects a vehicle ahead, ACC
will apply limited braking or acceleration auto-
matically to maintain a preset following dis-
tance while matching the speed of the vehicle
ahead.
NOTE:
Your vehicle will not exceed the cruise speed you
have set.
LIGHTS SPEED CONTROL

• If the sensor does not detect a vehicle directly
ahead of you, it functions like a standard cruise
control system, maintaining the speed you set.
For further information, and applicable warnings
and cautions, please refer to the Owner’s Manual
at
www.mopar.com/en-us/care/owners-manual.html
(U.S. Residents) or www.owners.mopar.ca (Cana-
dian Residents).
Forward Collision Warning — If
Equipped
The Forward Collision Warning (FCW) system pro-
vides the driver with audible warnings, as well as
visual warnings within the instrument cluster dis-
play, to warn the driver when a potential frontal
collision is detected. The warnings are intended to
provide the driver with enough time to react, to
avoid or mitigate the potential collision.
FCW monitors the information from the forward
looking sensors, as well as the Electronic Stability
Control (ESC) system, to calculate the probability
of a forward collision. When the system deter-
mines that a forward collision is probable, the
driver will be provided with the audible and visual
warnings.
Adaptive Cruise Switches
1 — Adaptive Cruise Control (ACC) On/
Off
2 — Distance Setting – Decrease
3 — Distance Setting – Increase
SAFETY FEATURES

NOTE:
The FCW feature can be customized and turned
off through the Uconnect System touchscreen.
For further information, and applicable warnings
and cautions, please refer to the Owner’s Manual
at
www.mopar.com/en-us/care/owners-manual.html
(U.S. Residents) or www.owners.mopar.ca (Cana-
dian Residents).
SRT Vehicles
Chassis
• Wheels - due to the high performance nature of
the brake system, the wheels will get coated
with brake dust. It is recommended that
Mopar
®
Wheel Cleaner be used on your wheels
to avoid any possible damage to the finish.
However, do not use wheel cleaner if your
vehicle is equipped with Dark Vapor or Black
Satin Chrome wheels, which must only be
cleaned with mild soap, water, and a soft cloth.
NOTE:
Due to the high performance nature of the brakes
on your SRT, vehicle dust and some noise are
expected and normal.
• Tire Service Kit - your vehicle comes with a tire
inflator kit; there is no spare tire included in
your vehicle.
• Trailer Tow - Trailer towing with your SRT ve-
hicle is not recommended.
• ESC (Electronic Stability Control) - your vehicle
is equipped with selectable ESC modes. The
ESC mode selected will alter the handling char-
acteristics of your vehicle.
• Adjustable Modes - your vehicle is equipped
with selectable driving modes: Default (Street),
Sport, Track, Custom, ECO, and Valet. Please
refer to the Owner’s Manual for further
information.
• Three-Season Tires - This vehicle may be
equipped with three-season tires to enhance
performance. FCA US LLC does not recom-
mend use of these tires when temperatures are
below 40°F (4°C) or in snow/ice conditions.
STARTING AND OPERATING

Powertrain & Drivetrain
• Engine & Transmission (SRT Engine Break-In
Recommendations) - The following tips will be
helpful in obtaining optimum performance and
maximum durability for your new SRT Vehicle.
Despite modern technology and World Class
manufacturing methods, the moving parts of
the vehicle must still wear in with each other.
This wearing in occurs mainly during the first
500 miles (805 km) and continues through the
first oil change interval.
NOTE:
Check engine oil with every refueling and add if
necessary. Oil and fuel consumption may be
higher through the first oil change interval.
• Engine Oil - 0W-40 Full Synthetic Engine Oil
recommended.
• Fuel - for optimum performance, Premium
Fuel with a minimum octane rating of 91 Pump
Octane Number (97 RON) is recommended.
Automatic Transmission:
• Applying the brake and throttle pedals at the
same time [“brake torquing”] for an extended
period of time will illuminate the ETC fault light
requiring the dealership to clear.
• The vehicle may be equipped with steering
wheel mounted “Paddle Shifters” and an M
gate console shifter. When in the M gate, the
vehicle will not shift at red line and must be
manual shifted with either the paddle shifters
or the console shifter. In the M gate, the shift
light can be programed to assist the driver with
optimal shift points.
Launch Control:
• Your car may be equipped with Launch Control
to improve acceleration performance. It is acti-
vated by pressing the LAUNCH or Super Track
Pack (if equipped) button, located in the in-
strument panel switch bank, as well as in the
radio within “Race Options”, and will help
control tire spin for maximum acceleration. The
launch RPM is also selectable through the race
options screens. Launch Control is not avail-
able for the first 500 miles of vehicle life.
Manual Transmission:
• Your vehicle is equipped with a 1-4 skip shift
feature to maximize fuel economy. Under cer-
tain conditions, the vehicle will require you to
shift the transmission from first to fourth gear,
instead of from first gear to second gear. Skip
Shift is only active while in normal or default
driving mode. The detailed conditions of this
feature are described in the Owner’s Manual.
• Do not attempt to shift the transmission if the
rear wheels are spinning due to loss of traction.
Damage to the transmission may occur.
• When shifting, fully depress the clutch pedal
and lift off the accelerator pedal before shifting
gears. Damage to the transmission or clutch
may occur if you do not fully depress the clutch
pedal and lift off the accelerator pedal when
shifting.
• Do not rest your hand on the gear shift knob
while driving. This may cause premature wear
of the transmission synchronizers.
• Do not rest your foot on the clutch pedal while
driving. This may cause premature wear of the
clutch.

Body & Exterior
• Fascias and Ground Effects - This vehicle has a
unique exterior appearance, which includes
SRT unique fascias and ground effects. These
exterior components define the style and ap-
pearance of your new vehicle. They also cause a
lower approach angle in the front of the vehicle
and reduced ground clearance. Due to lower
ground clearance, driving your vehicle up steep
driveways, approach ramps, or near parking
blocks may cause damage to the front fascia
and ground effects.
• If your vehicle is equipped with a SATIN FIN-
ISH Exterior Body Paint: Use products made
specifically for satin paint, such as Swissvax
Opaque Satin Paint Wax and Dr. Beasley’s
Satin Paint and Sealant. Reference Satin Fin-
ish Tips Card.
• Caution should be taken when driving through
water or snow more than 4 inches (100 mm)
deep to avoid any potential for damage to your
vehicle.
Electrical
• Your vehicle may be equipped with a premium
“harman/kardon” sound system. Your audio
mode can be configured using the radio.
• Your vehicle is equipped with SRT performance
pages, Drive Modes, Performance Shift Indica-
tion, Launch Control, and Valet Mode, which
are displayed in the instrument cluster and the
radio.
• Valet Mode is offered on all SRT vehicles. The
driver can activate and deactivate Valet Model
with a four-digit PIN they create. Custom PIN’s
are created with each use. If you forget your
PIN, disconnect the battery for five minutes to
reset.
• Your vehicle may be equipped with a Red key
fob, in addition to the Black key fob. The Red
key is the only key that can unlock the full
horsepower and torque potential of the SRT
Hellcat engine, while the Black key fob limits
the driver to reduced engine output and reduc-
tion of transmission shift schedules. In addi-
tion, the Red key fob will unlock all the options
within Drive Modes. The Black key fob will limit
your options within Drive Modes.
• If equipped with an Automatic Transmission,
your vehicle offers an ECO mode. ECO mode
will change the feel of the throttle response and
shift patterns. Please see the Owner’s Manual
for further information on configuration that are
automatically adjusted.
For additional information, and applicable warn-
ings and cautions, please refer to the Owner’s
Manual at
www.mopar.com/en-us/care/owners-manual.html
(U.S. Residents) or www.owners.mopar.ca (Cana-
dian Residents) for further information.

Activation
To use SiriusXM Guardian emergency, remote and
security services, you must activate your SiriusXM
Guardian account.
1. Press the Apps icon on the bottom of your
in-vehicle touchscreen.
2. Select the “Activate Services” icon from your
list of apps.
3. Select “Customer Care” to speak with a
SiriusXM Guardian Customer Care agent who
will activate services in your vehicle, or select
“Enter Email” to activate on the web.
Once you have activated your services, you’re only
a few steps away from using remote services.
To use SiriusXM Guardian remote services, down-
load the Uconnect Mobile app:
• Once downloaded, use your Owner Account
login and password to open the app.
• Include similar language: You will use your
SiriusXM Guardian PIN to execute these re-
mote services.
• Press the “Location” button on the bottom
menu bar of the app to bring up a map to locate
your vehicle or send a location to your
Uconnect Navigation, if equipped.
• Press the “Settings” side menu in the upper
left corner of the app to bring up app settings
and access the Assist Call Centers.
For further information:
• U.S. residents visit: siriusxm.com/guardian
• Canadian residents visit: siriusxm.ca/guardian/
Features
SiriusXM Guardian keeps you connected to your
vehicle. You have access to safety, remote and
security services.
Mobile App
SIRIUSXM GUARDIAN — IF
EQUIPPED

In-Vehicle Features
SiriusXM Guardian enhances your ownership and
driving experience by connecting your vehicle to
an operable network. When connected to an oper-
able network, you have access to:
• SOS Call: Connect to a live agent who contact
emergency services and stays on the line with
you until help arrives.
• Customer Care Assistance: Speak with a live
agent when you press the ASSIST button on
your rearview mirror to get Roadside Assistance
or support.
Remote Services
SiriusXM Guardian helps you activate features
from a distance. The remote services are:
• Vehicle Finder helps you find where you parked
your car.
• Send & Go allows you to send preset destina-
tions to your navigation system for easy access
on the go.
• Remote Door Lock/Unlock lets you unlock or
lock your doors from any distance.
• Remote Horn & Lights allows you to sounds
your horn and flash your lights to easily find
your car.
• Receive monthly Vehicle Health Reports, and
Alerts whenever a problem is detected under
the hood.
Security Services
The Uconnect Mobile App helps you activate fea-
tures from a distance. The remote services are:
• Receive text or email notifications if your vehi-
cle's security alarm goes off.
• Receive stolen vehicle assistance, using GPS
technology to help authorities locate your ve-
hicle if it is stolen.
SiriusXM Guardian remote services can be used
with the Uconnect app from virtually anywhere.
For further information on SiriusXM Guardian or
the Uconnect Mobile App, refer to your Uconnect
Owner’s Manual Supplement.

Vehicle Finder And Send & Go
Two of the most convenient remote features of the
Uconnect Mobile App are Vehicle Finder and
Send & Go.
Vehicle Finder
Vehicle Finder allows you to find the location of
your vehicle when you have lost it. You can also
sound the alarm and flash the lights to make
finding your vehicle even easier. To find your
vehicle:
1. Press the “Location” tab on the Uconnect
Mobile App bottom bar.
2. Select the “Vehicle” icon to determine the
location of your vehicle.
3. Select the “Find Route” button that appears,
once your vehicle is located.
4. Select your preferred Navigation App to route a
path to your vehicle.
Send & Go
Send & Go allows you to search for a destination
on your mobile device and then send the route to
your vehicle’s built-in navigation system. To send a
navigation route to your vehicle:
1. Press the “Location” tab on the Uconnect
Mobile App bottom bar.
2. Either type in the destination you would like to
navigate to, or search through one of the cat-
egories provided.
3. Select the destination you want to route to
from the list that appears.
4. Press the “Send To Vehicle” button, and then
confirm the destination by pressing “Yes,” to
send the navigation route to the Uconnect
Navigation in your vehicle.
5. Finally, confirm the route inside your vehicle by
pressing the “Go Now” option on the pop-up
that appears on the touchscreen, when the
vehicle is started.
NOTE:
The Owner’s Mobile App content is applicable to
vehicles sold in the U.S. market and are not
available from the Canadian App Store or Google
Play Store.
Key Features
• Owner Information For Your Vehicle
• Accident Assistant
• Online Service Scheduling
• Roadside Assistance
• Maintenance History
• And More
To get this FREE application, go directly to the
App Store or Google Play Store and enter the
search keyword “Dodge”.
DRIVE DODGE MOBILE APP

The DRIVE DODGE Application is the essential
app for owners of Dodge brand vehicles. The app
puts driver and lifestyle information right in the
palm of your hand, anywhere you go. Whether it’s
providing information about specific product fea-
tures, taking a tour through your vehicle’s equip-
ment, staying up to date on your vehicle’s health,
knowing what steps to take following an accident,
or scheduling your next appointment, we know
you’ll find the app an important extension of your
Dodge vehicle. Simply download the FREE app,
select your make and model and enjoy the ride.
Features/Benefits
• Available for free on iOS and Android smart-
phones and tablets.
• Select Dodge brand vehicles from model year
2011 to current model year.
• You can also add other Chrysler, Jeep, Ram,
FIAT or Alfa Romeo vehicles.*
• Easy access to vehicle information anywhere
you go using categories, bookmarks, search
and an A-Z index.
• Vehicle information such as operating instruc-
tions, maintenance, service history, vehicle
controls and emergency procedures.
• Find a dealer or an FCA-certified repair facility.
• Easily document and email an accident report.
• A parking reminder that allows you to drop a pin
on your location and navigate back to your
vehicle.
• Contact customer care with one click.
• Access to vehicle heritage, parts, accessories,
and social media networks.
• Schedule your next service appointment.
• Available in English and Spanish.
*App supports selected vehicles from model year
2011 to present.
To get this FREE application, go directly to the
App Store or Google Play Store and enter the
search keyword “Dodge”.


Whether it’s providing information about specific
product features, taking a tour through your
vehicle’s heritage, knowing what steps to take
following an accident or scheduling your next appointment,
we know you’ll find the app an important extension of your
Dodge brand vehicle. Simply download the app, select your
make and model and enjoy the ride. To get this app, go
directly to the App Store or Google Play and enter the search
keyword “Dodge” (U.S. residents only).
www.dodge.com/en/owners (U.S.) provides special offers
tailored to your needs, customized vehicle galleries,
personalized service records and more. To get this
information, just create an account and check back often.
Get warranty and other information online – you can review
and print or download a copy of the Owner’s Manual,
Navigation/Uconnect manuals and the limited warranties
provided by FCA US LLC for your vehicle by visiting
www.mopar.com (U.S.) or www.owners.mopar.ca (Canada).
Click on the applicable link in the “Popular Topics” area
of the mopar.com (U.S.) or owners.mopar.ca (Canada)
homepage and follow the instructions to select the
applicable year, make and model of your vehicle.
©2017 FCA US LLC. ALL RIGHTS RESERVED.
DODGE IS A REGISTERED TRADEMARK OF FCA US LLC.
18LA-QRG-AA
CHALLENGER
FOURTH EDITION
QUICK REFERENCE GUIDE
DOWNLOAD A FREE ELECTRONIC COPY
OF THE MOST UP-TO-DATE OWNER’S
MANUAL, MEDIA AND WARRANTY
BOOKLET BY VISITING:
WWW.MOPAR.COM/EN-US/CARE/OWNERS-MANUAL.HTML
(U.S. RESIDENTS);
WWW.OWNERS.MOPAR.CA
(CANADIAN RESIDENTS).
DODGE.COM (U.S.)
DODGE.CA (CANADA)
-
 1
1
-
 2
2
-
 3
3
-
 4
4
-
 5
5
-
 6
6
-
 7
7
-
 8
8
-
 9
9
-
 10
10
-
 11
11
-
 12
12
-
 13
13
-
 14
14
-
 15
15
-
 16
16
-
 17
17
-
 18
18
-
 19
19
-
 20
20


