LG 55XS4F-B User manual

Type
User manual
www.lg.com
Please read this manual carefully before operating your set and retain it
for future reference.
webOS 3.0
USER GUIDE
LG Digital
Signage
(MONITOR SIGNAGE)
ENGLISH_index
2
TABLE OF CONTENTS
USER SETTINGS ............................3
- Main Menu Settings ........................................................ 3
Picture Settings
Sound Settings
Network Settings
General Settings
ENTERTAINMENT ...................... 15
- Using Multimedia Features.......................................15
Connecting USB/SD Storage Devices
- Photo & Video ..................................................................18
Supported Photo & Video Files
Viewing Photos and Videos
Scheduled Playing
Export
Delete
- Music ....................................................................................22
Supported Music Files
Playing Music
Delete
- SuperSign Contents .....................................................23
- Information .......................................................................23
- Local Contents Scheduler .........................................24
Setting a Scheduled Playing
- Screen Share ....................................................................25
Configuring WiDi (Wireless Display)
- Group Manager ...............................................................26
- Leveler Tool........................................................................28
- Control Manager ............................................................29
How to Use
Follow the steps below if you encounter issues
with your security certificate while attempting
to access.
- Multi-Screen .....................................................................34
- PICTURE ID Settings ....................................................35
IR CODES .................................... 36
TO CONTROL MULTIPLE
PRODUCTS .................................. 38
- Connecting the Cable ..................................................38
- Communication Parameter ......................................39
- Command Reference List ..........................................40
- Transmission/Reception Protocol .........................44
To obtain the source code under GPL, LGPL, MPL,
and other open source licenses, that is contained
in this product, please visit http://opensource.lge.
com.
In addition to the source code, all referred license
terms, warranty disclaimers and copyright notices
are available for download.
LG Electronics will also provide open source code
to you on CD-ROM for a charge covering the
cost of performing such distribution (such as the
cost of media, shipping, and handling) upon email
request to [email protected]om.
This offer is valid for a period of three years after
our last shipment of this product. This offer is
valid to anyone in receipt of this information.
ENGLISH_index
3
NOTE
The software-related contents may be changed without prior notice due to upgrade of the product functions.
Some features described in the User Guide may not be supported in certain models.
SNMP 2.0 is supported.
USER SETTINGS
Main Menu Settings
Picture Settings
To Select Picture Mode
/ [Picture] [Picture Mode Settings] [Picture Mode]
Select the picture mode that is best suited to the video type.
[Vivid]: Adjusts the video image for a retail environment by enhancing the Contrast, Brightness, and Sharpness.
[Standard]: Adjusts the video image for a normal environment.
[APS]: APS (Auto power saving) mode reduces power consumption by dimming control.
[Cinema]: Optimizes the video image for watching movies.
[Sports]: Optimizes the video image for watching sports. Even fast actions such as kicking or throwing a ball are
rendered clearly on the screen.
[Game]: Optimizes the video image for playing videogames.
[Photo]: Optimizes the screen for viewing photos. (This feature is available only with certain models.)
[Expert]/[Calibration]: Allows an expert, or anyone interested in high quality pictures, to manually tune the picture for
the best picture quality.
NOTE
Depending on the input signal, the available Picture modes may differ.
[Expert] is an option that allows a picture quality expert to fine-tune the picture quality using a specific image. Thus,
it may not be effective for a normal picture.
ENGLISH_index
4
To fine-tune the picture mode
/ [Picture] [Picture Mode Settings] [Customize]
[Backlight]/[OLED Light]: Adjusts the brightness of the screen by controlling the LCD backlight. The closer the value
is to 100, the brighter the screen is.
[Contrast]: Ajusts the difference between the light and dark areas of the picture. The closer the value is to 100, the
greater the difference is.
[Brightness]: Adjusts the overall brightness of the screen. The closer the value is to 100, the brighter the screen is.
[Sharpness]: Adjusts the sharpness of the edges of objects. The closer the value is 50, the clearer and the sharper the
edge becomes.
[H Sharpness]: Adjusts the sharpness of the contrast edges on the screen from a horizontal point of view.
[V Sharpness]: Adjusts the sharpness of the contrast edges on the screen from a vertical point of view.
[Color]: Softens or deepens the tints on the screen. The closer the value is 100, the deeper the colors become.
[Tint]: Adjusts the balance between red and green levels displayed on the screen. The closer the value is to Red 50,
the deeper the color red becomes, and the closer the value is to Green 50, the deeper the color green becomes.
[Color Temperature]: Adjusts the tints of the screen to evoke feelings of warmth or coolness.
[Advanced Controls]/[Expert Control]: Customizes the advanced options.
- [Dynamic Contrast]: Optimizes the difference between the light and dark parts of the screen according to the
brightness of the image.
- [Super Resolution]: Sharpens the blurry or indistinguishable parts of the picture.
- [Color Gamut]: Selects the range of colors to display.
- [Dynamic Color]: Adjusts the tint and saturation of the image for a more vivid and lively display.
- [Edge Enhancer]: Provides much sharper and clearer edges to the picture.
- [Color Filter]: Accurately adjusts color and tint by filtering a specific color area of RGB space.
- [Preferred Color]: Adjusts the skin tint, grass tint, and sky tint to your preference.
- [Gamma]: Adjusts the medium brightness of the image.
- [White Balance]: Adjusts the overall tint of the picture to your preference. In Expert mode, you can fine-tune the
picture using the Method/Pattern options.
- [Color Management System]: Experts use the color management system when they adjust the colors by using the
test pattern. The color management system allows you to make an adjustment by selecting from among 6 different
color spaces (Red/Yellow/Blue/Cyan/Magenta/Green) without affecting other colors. You may not see tints change
in a normal picture even after adjustment.
ENGLISH_index
5
[Picture Options]: Customizes the picture options.
- [Noise Reduction]: Removes irregularly generated tiny dots for a clear picture.
- [MPEG Noise Reduction]: Reduces the noise produced while creating digital video signals.
- [Black Level]: Adjusts the black level of the picture to correct the brightness and contrast of the picture.
(Recommended settings according to input signal: RGB 0–255: High, RGB 16–235: Low, YCbCr: Low)
- [Real Cinema]: Optimizes the video image for a cinematic look.
- [Motion Eye Care]: Reduces eye fatigue by adjusting brightness levels and lessening blurriness based on the
displayed image. (Only applies to certain models.)
- [LED Local Dimming]: Brightens the brighter parts of the image and darkens the darker parts, maximizing contrast.
Turning this feature off may lead to increased power consumption. (Only applies to certain models.)
- [TruMotion]: Reduces image shaking and image sticking that can occur with moving images.
[Reset]: Reset the picture settings. Because the picture settings are reset according to the monitor's picture mode,
please select the picture mode before resetting the picture settings.
NOTE
You can adjust advanced settings only in the [User] mode.
Depending upon the input signal or the selected picture mode, the available options may differ.
To set the aspect ratio
(Some features may not be supported in certain models.)
/ [Picture] [Aspect Ratio]
Changes the aspect ratio to view the image in its optimal size.
[16:9]: Displays the image with a 16:9 aspect ratio.
[Just Scan]: Displays the image in the original size without cutting off the edges. Original is available in HDMI (720p
or higher) mode. (On 58:9 models, this option can be selected regardless of the input signal.)
[Original]: Automatically changes the aspect ratio to 4:3 or 16:9 depending on the input video signal.
[4:3]: Displays the image with a 4:3 aspect ratio.
[58:9]: Displays the screen with a 58:9 aspect ratio.
[Vertical Zoom]: Adjusts the height and vertical position of the displayed image.
[All-Direction Zoom]: Adjusts the horizontal/vertical/diagonal dimensions and horizontal/vertical position of the
displayed image.
CAUTION
If a fixed image is displayed on the screen for a long period of time, it will be imprinted and become a permanent
disfigurement on the screen. This image burn or burn-in is not covered by the warranty.
If the aspect ratio is set to [4:3] for a long period of time, image burn may occur on the letterboxed area of the
screen.
The options may differ depending on the model.
Depending on the input signal, the available aspect ratio may differ.
When you adjust [Vertical Zoom] or [All-Direction Zoom], the screen may flicker for some input signals.
ENGLISH_index
6
To use the Energy Saving function
/ [Picture] [Energy Saving]
Reduces power consumption by adjusting peak screen brightness.
[Auto]: Adjusts the brightness of the monitor according to ambient light. (This feature is available only with certain
models.)
[Off]: Disables the Energy Saving mode.
[Minimum]/[Medium]/[Maximum]: Uses the Energy Saving according to the Energy Saving level specified for your
monitor.
[Screen Off]: Turns off the screen. You will only hear audio. You can turn on the screen again by pressing any button
on the remote control except the power button.
NOTE
To revert to the default settings, either go to [General] [Reset to Initial Settings] or [Installation Menu] [Signage
Setup] [Factory Reset].
To use the Smart Energy Saving function
(Only applies to certain models.)
/ [Picture] [Smart Energy Saving]
According to picture brightness, the brightness of the monitor will be adjusted automatically to save energy.
[Off]: Disables the Smart Energy Saving function.
[On]: Enables the Smart Energy Saving function.
NOTE
To revert to the default settings, either go to [General] [Reset to Initial Settings] or [Installation Menu] [Signage
Setup] [Factory Reset].
Configuring the OLED Display
(For OLED models only)
/ [Picture] [OLED Panel Settings]
[Clear Panel Noise]: Corrects issues that may arise when the screen is turned on for a long period of time.
To use the SCREEN(RGB-PC) function
(Only applies to certain models.)
/ [Picture] [Screen(RGB-PC)]
Customizes the PC display options in RGB mode.
[Set Automatically]: Sets to adjust the screen position, clock, and phase automatically. The displayed image may be
unstable for a few seconds while the configuration is in progress.
[Resolution]: Selects a proper resolution.
[Position]/[Size]/[Phase]: Adjusts the options when the picture is not clear, especially when characters are shaky,
after the auto configuration.
[Reset]: Restores the options to the default setting.
ENGLISH_index
7
Sound Settings
Only applies to certain models.
To select a Sound Mode
/ [Sound] [Sound Mode]
The best sound quality will be selected automatically depending on the video type currently being watched.
[Standard]: This sound mode works well for content of all types.
[Cinema]: Optimizes sound for watching movies.
[Clear Voice III]: Enhances voices so they can be heard more clearly.
[Sports]: Optimizes sound for watching sports.
[Music]: Optimizes sound for listening to music.
[Game]: Optimizes sound for playing videogames.
To use the Sound Effects function
/ [Sound] [Sound Mode Settings]
[Equalizer]: Manually adjust sound by using the equalizer.
[Balance]: Adjust the output volume for the left speaker and the right speaker.
[Reset]: Reset the sound settings.
ENGLISH_index
8
Selecting Sound Output Device
/ [Sound] [Sound Out]
[Signage Speaker]: You can output sound through the signage monitor’s internal speakers. This feature is available
only for models with built-in signage speakers.
[LG Sound Sync / Bluetooth]: You can connect Bluetooth audio devices or Bluetooth headsets wirelessly to enjoy
richer sound from the signage monitor conveniently.
NOTE
Some recently connected devices may automatically attempt to reconnect to the Signage monitor when it is turned
on.
It is recommended that you set LG audio devices that support LG Sound Sync to LG TV mode or LG Sound Sync mode
before connecting.
This feature is only available on certain models.
Press [Device Selection] to view the devices that are or that can be connected and connect other devices.
You can use the signage remote control to adjust the volume of the connected device.
If the audio device fails to connect, check that it is switched on and available for connection.
Depending on the type of Bluetooth device, the device may not connect correctly or a malfunction such as
unsynchronized video and audio may occur.
Sound may stutter or sound quality may be reduced if:
- The Bluetooth device is too far from the signage monitor.
- There are objects obstructing the Bluetooth device and signage monitor.
- The device is used in proximity to other radio devices such as a microwave oven or wireless LAN router.
To select a Volume Increase Rate,
/ [Sound] [Volume Mode] [Volume Increase Amount]
You can set the volume range by selecting any of Low/ Medium/ High.
To sync audio with video
/ [Sound] [AV Sync Adjustment]
[Signage Speaker]: Adjusts the sync between video and audio coming from external speakers, such as those
connected to the digital audio output port, LG audio equipment, or headphones. From the default value, the closer
the value is to -, the faster the sound output becomes, and the closer the value is to +, the slower the sound output
becomes.
[Bypass]: Audio coming from external devices without delay. Audio may be outputted earlier than video due to the
processing time for video that is inputted into the monitor.
ENGLISH_index
9
Network Settings
To Set a Signage Monitor Name
/ [Network] [Signage Name]
You can set a name for Signage Monitor that will be used on the network by using the on-screen keyboard.
To Set Your Wired Network
/ [Network] [Wired Connection (Ethernet)]
Connecting to a wired network: Connect your monitor to a local area network (LAN) via the LAN port, and configure
the network settings. Only wired network connections are supported. After making a physical connection, a small
number of networks may require the display network settings to be adjusted. For most networks, the display will
automatically make a connection without any adjustments. For detailed information, contact your Internet provider or
consult your router manual.
Setting a Wireless Network
(Only applies to certain models.)
/ [Network] [Wi-Fi Connection]
If you have set the monitor up for a wireless network, you can check and connect to the available wireless Internet
networks.
[Add a Hidden Wireless Network]: If you input the name of network directly, you can add a wireless network.
[WPS PBC connection]: Press the button on the wireless router that supports PBC to easily connect to the router.
[WPS PIN Code connection]: Enter the PIN number in the web page of the PIN-supporting wireless router to connect
to the router in a simple manner.
[Wi-Fi advanced settings]: Manually input the network information to connect to a wireless network. When a usable
wireless network does not appear, press Wi-Fi advanced settings. You will be able to add a network.
NOTE
For models that support Wi-Fi Dongle, the Wireless Network Connection menu is enabled only when a Wi-Fi Dongle
is connected to the product.
When connected to a network that supports IPv6, you can select IPv4 / IPv6 in the wired / wireless network
connection. But, IPv6 connection only supports automatic connection.
ENGLISH_index
10
Setting up a SoftAP
(Only applies to certain models.)
/ [Network] [SoftAP]
If you set up a SoftAP, you can connect many devices via a Wi-Fi connection without a wireless router and use wireless
Internet.
To use SIGNAGE, you must have an Internet connection.
You cannot use the SoftAP feature and the Screen Share feature at the same time.
On models that support Wi-Fi dongles, the SoftAP menu is enabled only when a Wi-Fi dongle is connected to the
product.
SoftAP connection information
- SSID: A unique identifier necessary to make a wireless Internet connection
- Security key: The security key you enter to connect to the desired wireless network
- Number of connected devices: Shows the number of devices currently connected to your Signage device via a Wi-Fi
connection. Up to 10 devices are supported.
Tips for Network Setting
Use a standard LAN cable (Cat5 or higher with a RJ45 connector) with this display.
Many network connection problems during set-up can often be fixed by re-setting the router or modem. After
connecting the display to the home network, quickly power off and/or disconnect the power cable of the home
network router or cable modem, then power on and/or connect the power cable again.
Depending on the Internet Service Provider (ISP), the number of devices that can receive Internet service may be
limited by the applicable terms of service. For details, contact your ISP.
LG is not responsible for any malfunction of the display and/or the Internet connection feature due to communication
errors/malfunctions associated with your Internet connection, or other connected equipment.
LG is not responsible for problems with your Internet connection.
You may experience undesired results if the network connection speed does not meet the requirements of the
content being accessed.
Some Internet connection operations may not be possible due to certain restrictions set by the Internet Service
Provider (ISP) supplying your Internet connection.
Any fees charged by an ISP including, without limitation, connection charges are your responsibility.
ENGLISH_index
11
NOTE
If you want to access the Internet directly on your display, the Internet connection should always be on.
If you cannot access the Internet, check the network conditions from a PC on your network.
When you use Network Setting, check the LAN cable or check if DHCP in the router is turned on.
If you do not complete the network settings, the network may not function correctly.
CAUTION
Do not connect a modular telephone cable to the LAN port.
Since there are various connection methods, please follow the specifications of your telecommunication carrier or
Internet Service Provider.
Network Setting menu will not be available until the display is connected to a physical network.
Tips for Wireless Network Setting
Wireless networks can be subject to interference from other devices operating at a frequency of 2.4 GHz (wireless
phones, Bluetooth devices or microwave ovens). There may also be interference from devices with a frequency of 5
GHz, same as other Wi-Fi devices.
The surrounding wireless environment can cause the wireless network service to run slowly.
If you do not turn off the entire local home network, network traffic may occur on some devices.
For an AP connection, an access point device that supports wireless connection is required and the wireless
connection feature must be enabled on the device. Contact your service provider regarding availability of wireless
connection on your access point.
Check the SSID and security settings of the AP for AP connection. Refer to the appropriate documentation for SSID
and security settings of the AP.
Invalid settings on network devices (wired/wireless line sharer, hub) can cause the monitor to run slowly or not
operate properly. Install the devices correctly according to the appropriate manual and set the network.
Connection method may differ according to the AP manufacturer.
ENGLISH_index
12
General Settings
To configure the language
/ [General] [Menu Language]
Select one of the languages on the menu displayed on the screen.
[Menu Language]: Sets a language for Signage.
Setting up the keyboard language
/ [General] [Keyboard Languages]
Select the language you wish to show on the keyboard.
[Keyboard Languages]: Sets the keyboard language.
To set the time/date
/ [General] [Time & Date]
You can check or change the time.
[Set Automatically]: You can set Time and Date.
[Daylight Saving Time]: You can set Start Time and End Time for Daylight Saving Time. The DST start/end settings
work only when you set them more than one day apart from each other.
[NTP Server Setting]: Allows you to set other NTP servers other than the basic NTP server. (Only applies to certain
models.)
[Time zone]: You can change the settings for Continent, Country/Territory, and City.
To turn your monitor on or off automatically
/ [General] [Timers]
You can set the On/Off Timer for your monitor.
[On Timer]: You can set the time when your monitor turns on.
[Off Timer]: You can set the time when your monitor turns off.
[No Signal Power Off (15Min)]:When there is no input source, the monitor will automatically turn off after 15
minutes. If you don’t want it to turn off automatically, set No Signal Power Off to [Off].
[Auto Power Off]:When there is no key input, the monitor will automatically turn off.
NOTE
On Time/Off Time can be saved for up to seven schedules; the monitor is turned on or off at the preset time in the
schedule list. If multiple preset times are stored in the schedule list, this function works at the nearest time from the
current time.
Once the on or off time is set, these functions operate daily at the preset time.
The scheduled power-off function works properly only when the device time is set correctly.
When the scheduled power-on and power-off times are the same, the power-off time has priority over the power-on
time if the set is turned on, and vice versa if the set is turned off.
ENGLISH_index
13
Configuring Set ID
/ [General] [Set ID]
[Set ID](1 to 1000): Assigns a unique Set ID number to each product when several products are connected for
display. Assign numbers ranging from 1 to 1000 and exit the option. You can control each product separately by
using the Set ID you assigned to each product.
[Auto Set ID]: Automatically assigns a unique Set ID number to each set when several products are connected for
display.
[Reset Set ID]: Resets the Set ID of the product to 1.
NOTE
When using automatic ID settings, the IR signal only needs to be transmitted to the first set. Malfunctions could
occur when the IR signal is transmitted to other sets.
Using Tile Mode
(Only applies to certain models.)
/ [General] [Tile Mode]
You can configure the integrated screen in the same way as each screen is configured.
[Row](1 to 15): Sets the number of tile rows.
[Column](1 to 15): Sets the number of tile columns.
[Tile ID](1 to 225): Sets the Tile ID. The ID you selected will be displayed on the screen.
[Natural]: For a more natural display, the image is partly omitted to account for the distance between the screens.
[Natural Size]: Sets the distance between screens for Natural mode.
[Reset]: Resets the tile settings to 2 x 2.
NOTE
If Tile mode is set to On, Smart Energy Saving mode will be disabled to provide the same picture quality as other
displays.
The maximum number of columns and lines that can be set may differ by model.
To use this function, the product:
- Must be displayed with other products.
- Must be operated by connecting to each display via a distributor or DP daisy chain.
- Tile Mode: Horizontal x Vertical (Horizontal = 1 to 15, Vertical = 1 to 15)
- 15 x 15 is available
ENGLISH_index
14
Configuring the Dual-View Screen
(For double-sided flat OLED models only)
/ [General] [Dual-View Screen Setting]
[Front Screen Name]: Sets the name of the front screen.
[Back Screen Name]: Sets the name of the back screen.
[Screen Swap]: Swaps the images on the front and back side of the screens.
[Screen Mirroring]: Copies the image of the current screen to the opposite screen.
[Screen Off]: Turns off the front or back screen.
[Clone All Settings]: Copies all settings for the front screen to those for the back screen. This option is only enabled
for the front screen.
To reset your monitor settings
/ [General] [Reset to Initial Settings]
Resets all monitor settings.
Using UHD Deep Color
(For Ultra HD models only)
/ [General] [UHD Deep Color]
If you connect an HDMI or DP device to one of the Deep Color adjustable ports, you can select between Ultra Deep
Color On (6G) or Off (3G) in the UHD Deep Color settings menu.
If a compatibility issue occurs with the graphics card when the Deep Color option is set to On at 3840 x 2160 @ 60
Hz, set the Deep Color option to Off.
HDMI and DP specifications may vary depending on the input port. Check the specifications of each device before
connecting.
HDMI input ports 1 and 2 are best suited for specifications for high definition 4K @ 60 Hz (4:4:4, 4:2:2) video.
However, video or audio may not be supported depending on the specifications of the external devices. If this is the
case, please connect to a different HDMI port.
ENGLISH_index
15
ENTERTAINMENT
Using Multimedia Features
Connecting USB/SD Storage Devices
Connect a USB storage device such as a USB flash memory, SD storage devices or an external hard drive to the display
and use multimedia features.
CAUTION
Do not turn the monitor off or remove the USB storage device while Photo & Video or Music is playing.
Back up files you have saved on a USB storage device frequently, as loss or damage to the files may be not covered by
the warranty.
ENGLISH_index
16
Tips for using USB/SD storage devices
Only a USB storage device can be recognized.
A USB device does not work effectively when it is connected via a USB hub.
A USB storage device using an automatic recognition program may not be recognized.
A USB storage device using its own driver may not be recognized.
The recognition speed of a USB storage device may depend on each device.
Please do not turn off the display or unplug the USB storage device when the connected device is working. If the USB
storage device is suddenly disconnected, the stored files or the device itself may be damaged.
Please do not connect a USB storage device which was modified to work on a PC. The device may cause the monitor
to malfunction or the content fail to be played. Use only a USB storage device which contains normal music, image or
video files.
A USB storage device formatted as a utility program not supported by Windows may not be recognized.
A USB storage device (over 0.5 A) which requires an external power supply must be connected to a power supply
separately. If it is not, the device may not be recognized.
Please connect the USB storage device using the cable provided by the device manufacturer.
Some USB storage devices may not be supported or operate smoothly.
File alignment method of USB storage devices is similar to that of Window XP and filenames can recognize up to 100
English characters.
Back up important files regularly as data stored on a USB storage device may be damaged. We will not be responsible
for any data loss.
If the USB HDD does not have an external power source, the USB device may not be detected. To ensure the device is
detected, connect the external power source.
- Please use a power adapter for an external power source. We do not provide a USB cable for an external power
source.
ENGLISH_index
17
If your USB storage device has multiple partitions, or if you use a USB multi-card reader, you can use up to four
partitions or USB storage devices.
If a USB storage device is connected to a USB multi-card reader, its volume data may not be detected.
If the USB storage device does not work properly, disconnect and reconnect it.
Detection speed differs from device to device.
If the USB storage device is connected in Standby Mode, the specific hard disk will automatically be loaded when the
display is turned on.
The recommended capacity is 1 TB or less for a USB external hard drive and 32 GB or less for USB memory stick.
Any device with more than the recommended capacity may not work properly.
If a USB external hard drive with an “Energy Saving” function does not work, try turning the hard drive off and on
again.
USB storage devices below USB 2.0 are also supported but may not function correctly in the Videos.
A maximum of 999 sub-folders or files can be recognized under one folder.
The SDHC type for SD cards is supported. To use an SDXC card, format it to the NTFS file system first.
The exFAT file system is not supported for SD cards and USB storage devices.
Certain models do not support SD cards.
ENGLISH_index
18
Photo & Video
The photo feature is not supported in OLED models.
Supported Photo & Video Files
Supported External Subtitle Format
*.smi, *.srt, *.sub (MicroDVD, SubViewer 1.0/2.0), *.ass, *.ssa, *.txt (TMPlayer), *.psb (PowerDivX), *.dcs (DLP Cinema)
NOTE
Subtitles are not supported in certain models.
Embedded subtitles are not supported.
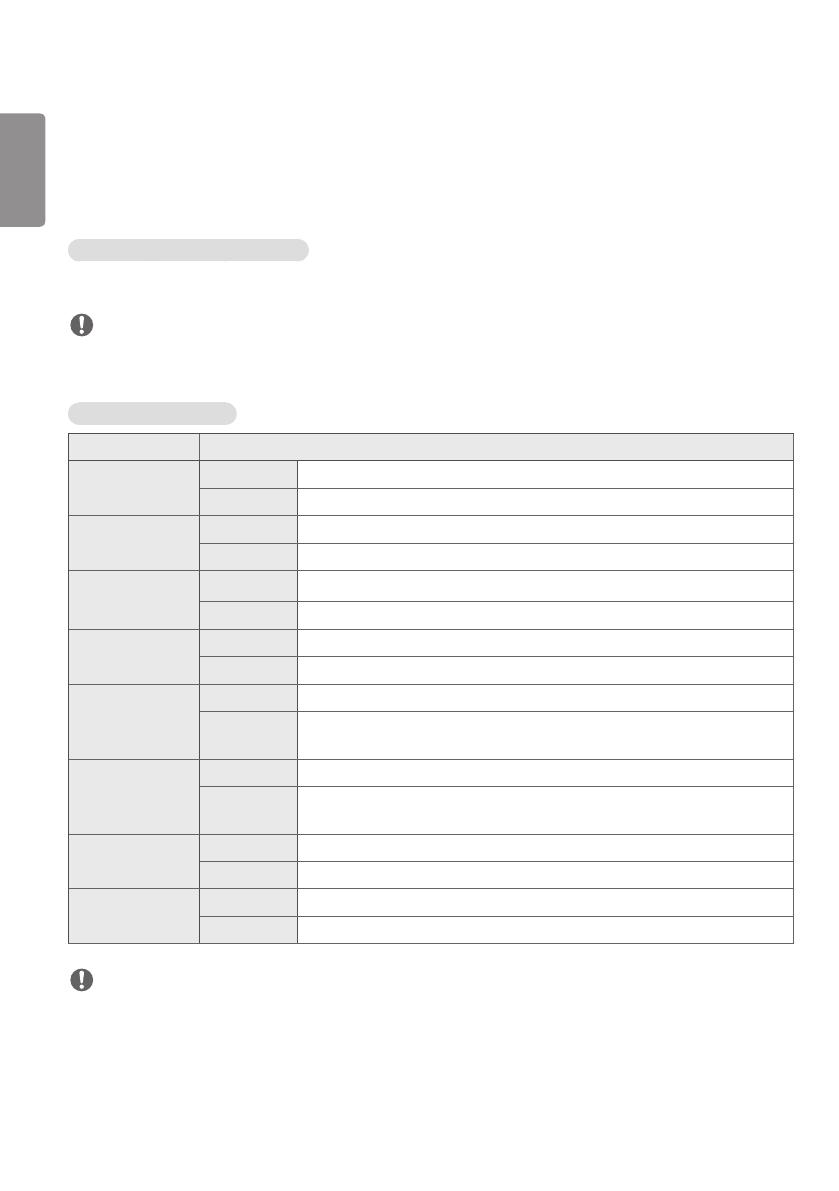
Supported Video Codecs
Extension Codec
.asf, .wmv Video VC-1 Advanced Profile (excluding WMVA), VC-1 Simple and Main Profiles
Audio WMA Standard (excluding WMA v1 / WMA Speech)
.avi Video Xvid (excluding 3 warp-point GMC), H.264/AVC, Motion Jpeg, MPEG-4
Audio MPEG-1 Layer I, II, MPEG-1 Layer III (MP3), Dolby Digital, LPCM, ADPCM, DTS
.mp4, .m4v, .mov Video H.264/AVC, MPEG-4, HEVC
Audio Dolby Digital, Dolby Digital Plus, AAC, MPEG-1 Layer III (MP3)
.3gp, .3g2 Video H.264/AVC, MPEG-4
Audio AAC, AMR-NB, AMR-WB
.mkv Video MPEG-2, MPEG-4, H.264/AVC, VP8, VP9, HEVC
Audio Dolby Digital, Dolby Digital Plus, AAC, PCM, DTS, MPEG-1 Layer I, II, MPEG-1
Layer III (MP3)
.ts, .trp, .tp, .mts Video H.264/AVC, MPEG-2, HEVC
Audio MPEG-1 Layer I, II, MPEG-1 Layer III (MP3), Dolby Digital, Dolby Digital Plus,
AAC, PCM
.mpg, .mpeg, .dat Video MPEG-1, MPEG-2
Audio MPEG-1 Layer I, II, MPEG-1 Layer III (MP3)
.vob Video MPEG-1, MPEG-2
Audio Dolby Digital, MPEG-1 Layer I, II, DVD-LPCM
NOTE
3D videos are not supported.
ENGLISH_index
19
Maximum data transfer rate
Full HD video
H.264 1920 x 1080@60P BP/MP/[email protected] 40 Mbps
HEVC 1920 x 1080@60P [email protected], Main10 Pr[email protected] 40 Mbps
Ultra HD (For Ultra HD models only)
H.264 1920 x 1080@60P 4096 x 2160@30P BP/MP/[email protected] 50 Mbps
HEVC 4096 x 2160@60P [email protected], Main10 Pr[email protected] 50 Mbps
Supported Photo File
File Format Format Item
.jpeg, .jpg, .jpe JPEG Minimum: 64 x 64
Maximum
- Normal Type: 15360 (W) x 8640 (H)
- Progressive Type: 1920 (W) x 1440 (H)
.png PNG Minimum: 64 x 64
Maximum: 5760 (W) x 5760 (H)
.bmp BMP Minimum: 64 x 64
Maximum: 1920 (W) x 1080 (H)
ENGLISH_index
20
Viewing Photos and Videos
/
1 Select your desired storage device.
2 Select and view your desired photo or video.
Tips for Playing Video Files
Some user-created subtitles may not work properly.
Some special characters in subtitles are not rendered.
HTML tags are not supported in subtitles.
Subtitles in languages other than the supported languages are not available.
The screen may suffer temporary interruptions (image stoppage, faster playback, etc.) when the audio language is
changed.
A damaged video file may not play correctly, or some player functions may not be usable.
Video files produced with some encoders may not be played correctly.
If the video and audio structure of a recorded file is not interleaved, either video or audio is outputted.
Video files other than the specified types and formats may not play correctly.
Maximum bit rate of playable video file is 20 Mbps. (Motion JPEG: 10 Mbps only)
We cannot guarantee smooth playback of files encoded level 4.1 or higher in H.264 / AVC.
Video files more than 30 GB in file size are not supported.
A video file and its subtitle file must be located in the same folder. A video file name and its subtitle file name must be
identical in order to display the subtitle properly.
Playing a video via a USB connection that does not support high-speed connection may not function correctly.
Subtitles on a Network Attached Storage (NAS) device may not be supported depending on the manufacturer and
model.
Streaming of files encoded by GMC (Global Motion Compensation) or Qpel (Quarterpel Motion Estimation) is not
supported.
(For Ultra HD models only) Ultra HD image: 3840 X 2160
Some HEVC-encoded Ultra HD videos other than the content officially provided by LG Electronics may not be played.
Some codecs can be used after upgrading software.
Extension Codec
.mkv, .mp4, .ts Video H.264/AVC, HEVC
Audio Dolby Digital, Dolby Digital Plus, AAC, HE-AAC
Playable file sizes may vary depending on the encoding condition.
The AAC Main profile is not supported.
Video files created by some encoders may not play.
  • Page 1 1
  • Page 2 2
  • Page 3 3
  • Page 4 4
  • Page 5 5
  • Page 6 6
  • Page 7 7
  • Page 8 8
  • Page 9 9
  • Page 10 10
  • Page 11 11
  • Page 12 12
  • Page 13 13
  • Page 14 14
  • Page 15 15
  • Page 16 16
  • Page 17 17
  • Page 18 18
  • Page 19 19
  • Page 20 20
  • Page 21 21
  • Page 22 22
  • Page 23 23
  • Page 24 24
  • Page 25 25
  • Page 26 26
  • Page 27 27
  • Page 28 28
  • Page 29 29
  • Page 30 30
  • Page 31 31
  • Page 32 32
  • Page 33 33
  • Page 34 34
  • Page 35 35
  • Page 36 36
  • Page 37 37
  • Page 38 38
  • Page 39 39
  • Page 40 40
  • Page 41 41
  • Page 42 42
  • Page 43 43
  • Page 44 44
  • Page 45 45
  • Page 46 46
  • Page 47 47
  • Page 48 48
  • Page 49 49
  • Page 50 50
  • Page 51 51
  • Page 52 52
  • Page 53 53
  • Page 54 54
  • Page 55 55
  • Page 56 56
  • Page 57 57
  • Page 58 58
  • Page 59 59
  • Page 60 60
  • Page 61 61
  • Page 62 62
  • Page 63 63
  • Page 64 64
  • Page 65 65
  • Page 66 66
  • Page 67 67

LG 55XS4F-B User manual

Type
User manual

Ask a question and I''ll find the answer in the document

Finding information in a document is now easier with AI