Owner's Manual
This Owner's Guide provides specific operating instructions for your model. Use the air
conditioner only as instructed in this guide. These instructions are not meant to cover
every possible condition and situation that may occur. Common sense and caution
must be practiced when installing, operating, and maintaining any appliance.
Record Your Model and Serial Numbers
Record in the space provided below the model and serial numbers. The serial plate is
located on the outside of the cabinet, or behind filter at the bottom of unit. Reading
the numbers may be easier by using a flashlight or by removing the cabinet front as
instructed under "Care and Cleaning."
Model Number:
Serial Number:
Purchase Date:
P/N 309000849(12/02)
/
/
/
0
/
0
0
/
/
Important Safety
Instructions
Avoid fire hazard or
electric shock. Do not use an extension
cord or an adaptor plug. Do not remove
any prong from the power cord.
Grounding type
wall receptacle
under
Power supply
cord with 3-prong
grounding plug
Read all instructions before using this air conditioner.
For Your Safety
Do not store or use gasoline or other flammable vapors and liquids in the vicinity of
this or any other appliance. Readproduct labels for flammability and other warnings.
Prevent Accidents
To reduce the risk of fire, electrical shock, or injury to persons when using your air
conditioner, follow basic precautions, including the following:
Be sure the electrical service is adequate for the model you have chosen.
If the air conditioner is to be installed in a window, you will probably want to
clean both sides of the glass first. If the window is a triple-track type with a
screen panel included, you may want to remove the screen completely before
installation.
Be sure the air conditioner has been securely and correctly installed according to
the separate installation instructions provided with this manual. Save this
manual. Savethis manual and installation instructions for possible future use in
removing or reinstalling this unit.
When handling the air conditioner, be careful to avoid cuts from sharp metal fins
on front and rear coils.
Electrical Information
The complete electrical rating of your new room air conditioner is stated on the
serial plate. Refer to the rating when checking the electrical requirements.
Be sure the air conditioner is properly grounded. To minimize shock and fire
hazards, proper grounding is important. The power cord is equipped with a
three-prong grounding plug for protection against shock hazards.
_d' Your air conditioner must be used in a properly grounded wall receptacle. If
the wall receptacle you intend to use is not adequately grounded or
protected by a time delay fuse or circuit breaker, have a qualified electrician
install the proper receptacle.
Do not run air conditioner with outside protective cover in place. This could
result in mechanical damage within the air conditioner.
o_d Do not use an extension cord or an adapter plug.
Energy Saving Ideas "
I o_o/, Troubleshooting Tips I
The capacity of the room air conditioner must fit the room size for efficient and
satisfactory operation.
Install the room air conditioner on the shady side of your home. A window that
faces north is best because it is shaded most of the day.
Do not block air flow inside with blinds, curtains or furniture; or outside with
shrubs, enclosures, or other buildings.
Close the fireplace damper, floor and wall registers so cool air does not escape
up the chimney and into the duct work.
Keep blinds and drapes in other windows closed during the sunniest part of the
day.
Clean the air filter as recommended in the section "Care and Cleaning."
Proper insulation and water stripping in your home will help keep warm air out
and cool air in.
External house shading with trees, plants or awnings will help reduce the air
conditioner's work load.
Operate heat producing appliances such as ranges, washers, dryers and
dishwashers during the coolest part of the day.
How and Why
Your room air conditioner provides the following functions to make hot weather
living more comfortable:
_d' Cools and circulates room air.
Lowers humidity by removing excess moisture. High moisture levels may
cause the air condkioner to drip excess moisture outside.
Filters out summertime dust, dirt, and some airborne impurities.
m
The air condkioner performs these functions by drawing room air through a filter
which traps dust and dirt particles. The air then passes over a cooling coil which
/
refrigerates the air and removes excess moisture. The same air is then returned to
the room -- cooler, drier and cleaner. Moisture removed from the room air iscarried
_or to the outside and evaporated. This moisture may form ice on the inside coil if the
outside temperature is below 65 degrees. Setting the air conditioner on the fastest
fan setting in FAN ONLYwill defrost the coil.
Your air conditioner is designed to be easy to operate and to provide plenty of
o_d cooling power. Your air conditioner isalso more efficient than (most) older models
and may run longer to cool the room, but will use less energy due to igher energy
efficiency ratings.
Capacity and
Running Time
Proper unit size is important in deciding the desired comfort for the area you want
to cool. The proper size is determined by the number of square feet in the area to
be cooled.
Whenever the heat or humidity load is above normal the air conditioner must run
longer and more often to keep the desired temperature you have selected. Under
heavy heat load conditions the air conditioner may need to run constantly to keep
the temperature you want. Allow some time to coo! the room if the air conditioner
was recently turned on. Using the "AUTO START" feature will allow you to start
cooling the room prior to returning home.
At times using the fastest Fan setting to circulate the room air may make it
comfortable even though you do not have the air conditioner set to cool the air.
This will decrease your cost to use.
Normal Sounds
Sound c_Rushing Air
At the front of the unit,
you may hear the sound
of rushing air being moved
by the fan.
Sound
As cooling systems cycle on
and off, you may hear a
"clicking" sound.
gop Troubleshooting Tips I
High Pilched Charier
Today's high efficient
compressors may have a
high pitched chatter during
the cooling cycle.
Vibration
Unit may vibrate and make
noise because of poor wall
or window construction or
incorrect installation.
Pinging or ,Si*;ishing
Droplets of water hitting
-- condenser during normal
operation may cause
"pinging or swishing"
sounds.
"Gurgling or hissing"
noise may be heard due to refrigerant
passing through evaporation during normal
operation.
3
/
Front Installation
Some models are shipped in a removable sleeve, please follow the supplied
Installation Instruction before installing the Decorative front and accessories.
Installing the Vent Control (on some models)
The vent control handle is included in the decorative front kit. The handle must be
installed before the decorative front is attached.
1. Insert the handle with the "etchings (Vent/Air)" facing to the left,
2. Slip the black door extension into the split at the end of the handle,
3. For ease of assembly, push the handle in while pressing the door extension
against the foam until the two pieces lock together.
4. Move handle in and out to be sure vent is operating properly.
Installing the Front Frame
Some models require installation of the front panel of the air conditioner included
in a decorative kit. To assemble, follow these steps. Before installation, remove the
tilt panel from the frame. Grasping the panel from both sides, gently pull to release,
then lift panel from pivot points at bottom of frame (Fig. 1).
STEP 1: INSTALL DECORATIVE
FRONT TO CABINET:
Decorative Front FIG. 1
Position the top of the decorative front
over the top flange of the case, and align the tabs with the slots in the case
(Fig, 2).
As you install the front frame to
the unit be sure the vent handle is
positioned through the front in the
proper location (Fig. 3),
Carefully pull down on the front to
engage the top tabs, while pushing
the front over the case to ensure
proper alignment.
The side tabs will "click" when
front is seated.
Install front retaining screw(s)
behind the filter and panel (Fig. 3).
Then add filter and front panel.
VENT FIG,2
HANDLE
SCREWS
4
FIG,3
To reduce the risk of fire, electric shock, or injury to persons, read
H_nt_v.$,m,_Air Conditioner the IMPORTANT SAFETYINSTRUCTIONSbefore operating this appliance.
NOTE: If the air conditioner is turned off
or the temperature is changed to a lower
setting then back to a higher setting the
compressor wifl shut off, Wait 3 minutes
before the compressor wifl restart, this
allows for the pressure inside the
compressor to equalize.. Failureto wait 3
minutes may cause inefficient operation.
When adjusting the temperature the fan
wifl continue to run.
To begin operating the air conditioner, follow these steps:
1. Plug in the air conditioner. (Toprevent electrical hazards, do not use an extension
cord or an adapter plug.)
2. Set the exhaust vent to the CLOSED position.
3. Press "On/Off" button to turn unit on.
4. PressFan Speed "FASTER"
5. PressMode "COOL"
6. Press "TEMP/TIME" down v to the lowest setting "60 degrees"
7. Adjust the louvers for comfortable air flow,
8. Once the room has cooled, adjust the "TEMP/TIME" and Fan Speed to desired
temperature.
Review the "Air Conditioner Features" section for other settings.
Air Conditioner Features ELECTRONIC CONTROL OPERATING INSTRUCTIONS
Before you begin, thoroughly familiarize yourself with the control panel and remote
as shown below and aft its functions, then follow the symbol for the functions you
desire. The unit can be controlled by the touch pad alone or with the remote.
LOWERS DISPLAYS
TEMPERATURE . TEMPERATURE/TIME
OR TIME
RAISES
TEMPERATURE
OR TIMES
SETS HOURS
ON OR OFP
REMOTE CONTROL
Slip battery cover off and pull the piece of plastic from between
the battery end and the connector,
PLASTIC
PIECE
5
Air Conditioner Features
(continued)
STEP 1 -- TO TURN UNIT ON: YOU WILL SEE:
DO THIS:
PRESSON/OFF
PAD
STEP 2 -- TO CHANGE
TEMPERATURE SETTING:
YOU WILL SEE:
DO THIS:
TO LOWER
Note: Tap or hold either up(A) or down(v) button until the desired temperature is seen in screen, This temperature will be
automatically maintained anywhere between 60F (16C) and 90F (32C), /f you want the display to read the actual room
temperature, see step 5,
STEP 3 -- TO ADJUST
FAN SPEEDS:
YOU WILL SEE (WHICHEVER
YOU HAVE CHOSEN):
DO THIS:
PRESS
TO SELECT
A 2 Digit Display is used to indicate the Fan Speed setting, from 10 through 99. When the "SLOWER" button is pressed the
motor speed will slow down at various intervals, to a minimum setting of 10. Tospeed the motor up pressthe "FASTER" button,
The speed will increase at various intervals to a maximum setting of 99. The LEDabove the these buttons will momentarily light
indicating which function was chosen. These functions can be controlled by either the Touch Pad or the Remote Control,
6
Air Conditioner Features
(continued)
STEP 4 -- TO USE
AUTO COOL FEATURE:
YOU WILL SEE:
DO THIS:
_RESSAUTO
FAN
Note: Fan speed starts at HI and adjusts to a slower and slower speed as the room temperature dictates. For example, if the
room doesn't get too warm it will stay at the slowest speed./f the room temperature risesquickly, such asa door being opened,
it will automaticafly go to the highest speed. The fan speeds will readjust back to the slowest speed as the room returns to the
original set temperature.
STEP 5 -- TO OPERATE
ON FAN ONLY:
DO THIS:
PRESSON
(if not running)
PRESS
FAN ONLY
YOU WILL SEE:
CHOOSE ONE
Note: Use this function only when cooling is not desired, such as for room air circulation or to exhaust stale ain(remember to
open the vent during this function, but keep it closed during cooling for maximum cooling efficiency.) You can choose any fan
speed you prefer.
During this function, the display will show the actual current temperature, not the set temperature as in the cooling mode.
STEP 6 -- TO USE THE POWER
SAVER FEATURE:
YOU WILL SEE:
DO THIS:
PRESS
POWERSAVER
Note: /n this mode, when the compressor shuts off, the fan will continue to run for another 3 minutes, then shut off until
cooling isneeded, as sensed by the room temperature control. During this time, it may come on for 3 minutes to sense whether
cooling is needed, then it will go off for 10 minutes./t will continue doing this to sample the room air for as long as necessary.
Air Conditioner Features
(con'tinued)
STEP 7 -- TIMER-DELAY
STOP FEATURE
YOU WILL SEE:
Note: The unit must be running to make this setting.
DO THIS:
PRESS
(if unit is not
running)
PRESS
Proceed as in step 9 to change the desired number of hours, before the control will time out and turn off.
STEP 8 -- TIMER-DELAY
START FEATURE:
DO THIS:
PRESSOFF
f unit is running)
}RESSTIMER/OFF
YOU WILL SEE:
Note: To do this, the unit must be in the off position.
When first set, the display will show .5. (one half hour),to increase the time up to 24 hours, go to step 9.
STEP 9 -- TO INCREASE
DELAYED START TIME:
YOU WILL SEE TIME CHOSEN:
DO THIS:
PRESS
I
Note: Tapor hold the UParrow(,',) to increase delayed start time by .5 hours (up to 10 hours), then in 1 hour increments up to
24 hours. The control will count down the time remaining until start (8, 7.5, 7, etc.).
The unit will then come on in Cool and H/fan mode. The temperature maintained will be the same asyou previsouly set./f you
want to change it, Press'Cool" or "Power Saver Mode" pad, whichever you desire, then Up or Down arrows until the desired
temperature is indicated on the display. Pressing timer "On/Off" or after 5 seconds, the control wifl automatically change the
display back to the hours remaining until the unit will start.
Switching unit on at any time will nulfify this setting.
8
Air Conditioner Features
(con'Linued)
STEP 10 -- SLEEP FEATURE: YOU WILL SEE:
DO THIS:
PRESSSLEEP
PAD
1
Note: /n this "MODE" the selected temperature will increase by 2 degrees F 30 minutes after the mode is selected, The
temperature will then increase by another 2 degrees Fafter an additional 30 minutes, This new temperature will be maintained
for 7 hours before it returns to the originally selected temperature, This ends the "Sleep" MODE and the unit will continue to
operate as originally programmed. The "Sleep" MODE program can be cancelled at any time during operation by pressing
"Sleep" MODE, "On/Off", "Fan Only" or the "V / A" buttons, on either the Control or the Remote. "Time Delay Stop"
fimit reached will also end "sleep" MODE.
STEP 11 -- CHECK FILTER
FEATURE:
YOU WILL SEE:
DO THIS:
PRESSTO RESET
0
Note: This feature is a reminder to clean the Air Filter (See Care and Cleaning) for more efficient operation and cooling, The
LED(light) will illuminate after 250 hours of operation, whether in cooling or fan only, To reset after cleaning the filter, press
the "Check Filter" button and the fight will go off. This will restart the 250 hours, this timing cannot be reset unless the LED
(fight) is on. This feature cannot be reset with the remote.
STEP 12 --TO TURN UNIT OFF: YOU WILL SEE:
DO THIS: I
PRESSON/OFF
PAD
9
Air Conditioner Features
(continued)
ADDITIONAL THINGS YOU SHOULD KNOW
Now that you have mastered the operating procedure, here are more features in your control that you should become familiar
with,
Remote control works exactly like the control panel, follow the same instructions.
The "Cool " circuit has an automatic 3 minute time delayed start if the unit is turned off and on quickly. This prevents
overheating of the compressor and possible circuit breaker tripping. The fan wifl continue to run during this time,
The control will maintain the set temperature within 2 degrees Fahrenheit, between 60F and 90F degrees.
Your New Electronic Control air conditioner is a similar to a mini computer and as such MAY experience a lock-up of the
functions. If this occurs, all you need to do is unplug the unit and the control will automatically reset. This does not require
a service carl,
Figure 1 (OFF)
Figure 2 (FRESHAIR)
Figure 3 (VENT)
Fresh Air Vent Control
The Fresh Air Vent allows the air conditioner to recirculate inside air (OFF),draw
air into the room (FRESHAIR) or exhaust stale air to the outside (VENT).See Figures
1, 2 & 3 for this operation.
The "OFF" position is used when MAXIMUM cooling is desired./t may also be
for room air re circulation without cooling when the selector switch is set to the
FAN position, this will also filter the room air,
The FRESHAIR position allows outside air to be drawn into the room to refresh
the inside room air,
The VENT position removes stale air from the room and exhausts it to the
outside,
Any vent position can be used with any fan selection,
10
Air Conditioner Features Air Directional Louvers
Air directional louvers control air flow direction, Your air conditioner has the louver
(continued) type described below.
(4 WAY)
4-Way Louvers
The 4Way air directional louvers allow you to direct air flow up or down, left or
right throughout the room as needed. To adjust the air directional louvers side to
side, use the center handle as you move it side to side.
Care and Cleaning
Clean your air conditioner occasionally to keep it looking new. Be sure to unplug
the unit before cleaning to prevent shock or fire hazards.
Air Filter Cleaning
The air filter should be checked at least once a month to see if cleaning isnecessary,
Trapped particles in the filter can build up and cause an accumulation of frost on
the cooling coils,
Grasp panel from either sidejust below the air directional louvers and gently pull
to release the top edge of panel.
Gently pivot the panel on its hinge,
/
Grasp filter and remove. Snap panel back into place,
Wash filter with warm soapy water. Rinse thoroughly. Gently shake excesswater
from filter, Be sure filter isthoroughly dry before replacing,
Or,
Instead of washing you may vacuum the filter clean.
Open the panel as before and re install the filter.
Cabinet Cleaning
, Besureto unplug the air conditioner to prevent shock or fire hazard.The cabinet and
front may be dusted with an oil-free cloth or washed with a cloth dampened in a
solution of warm water and mild liquid dishwashing detergent, Rinsethoroughly and
wipe dry,
, Never useharsh cleaners,wax or polish on the cabinet front,
, Be sure to wring excesswater from the cloth before wiping around the controls,
Excesswater in or around the controls may cause damage to the air conditioner,
The cabinet front can be removed for more thorough cleaning, Refer to "Front
Installation" in this manual,
Clean the front in a sink using liquid dishwashing detergent and warm water, Rinse
thoroughly and dry,
Replacecabinet front, Replacethe screw_,
Replacefront panel (if applicable) and filter, Plug in air conditioner.
11
Routine Maintenance
Winter Storage
/f you plan to store the air conditioner during the winter, remove it carefully from
the window according to the installation instructions. Cover it with plastic or return
it to the original carton. NOTE: To prevent rust or electrical connections from
being damaged, store air conditioner in an upright position and a dry place.
A winter cover can be purchased from your dealer. The cover will protect the air
conditioner when it is left in place through the winter.
r!_€
Before performing any service, unplug the power cord from
the electrical outlet.
After servicing, reverse the following procedures to reinstall the air conditioner.
Cleaning the Cabinet Front
Remove the front panel. Wash with warm, sudsy water. Rinse and dry with a soft
cloth. Never use solvents, cleaning fluids, abrasive cleaners or strong detergents./f
the packaging leaves a gum residue, remove with a cloth dipped in rubbing alcohol.
Repairing Paint Damage
Inspect weathe_exposed parts (cabinet shell, mounting hardware, if used, etc.)
once or twice a year, especially in areas near oceans or where rust is a problem./f
needed, touch up with a good grade of exterior paint.
Cleaning Inside the Air Conditioner
r!_€
No liquid should get into the motor, electrical control box, or
compressor electrical terminals.
1. Remove front panel.
2. With help and using the proper lifting methods to avoid personal injury, remove
the chassis from cabinet shell.* When removing the air conditioner from cabinet
shell or window, there may be water inside the base that may spill on the floor.
Be careful to avoid cuts from sharp metal fins on the front and rear coils.
3. Liquids should not get into electrical parts. Wrap the fan motor, electrical control
box, and electrical terminals in plastic. This will keep water or other liquid from
getting inside where it could damage the insulation and cause serious trouble.
4. Clean and hose out base, coils, and water pans. Clean at least once a year or
more often if the coils and pans collect dirt, sand, leaves, algae, or insects.
5. After cleaning, remove plastic protection. Wait 24 hours before starting the unit
again. This allows time for a]] areas to dry out.
NOTE: Water from rainfall or from normal use does not harm these components
since the water is not as forcefully driven into parts as a stream of water from a
garden hose.
*HANDLE NOTE: If the air condiLioner has a chassis handle, it is NOT intended for lifting
the unit. It is for sliding the chassis WITFtlN the cabinet shell only (to aid in cleaning,
maintenance, etc)
12
J
@
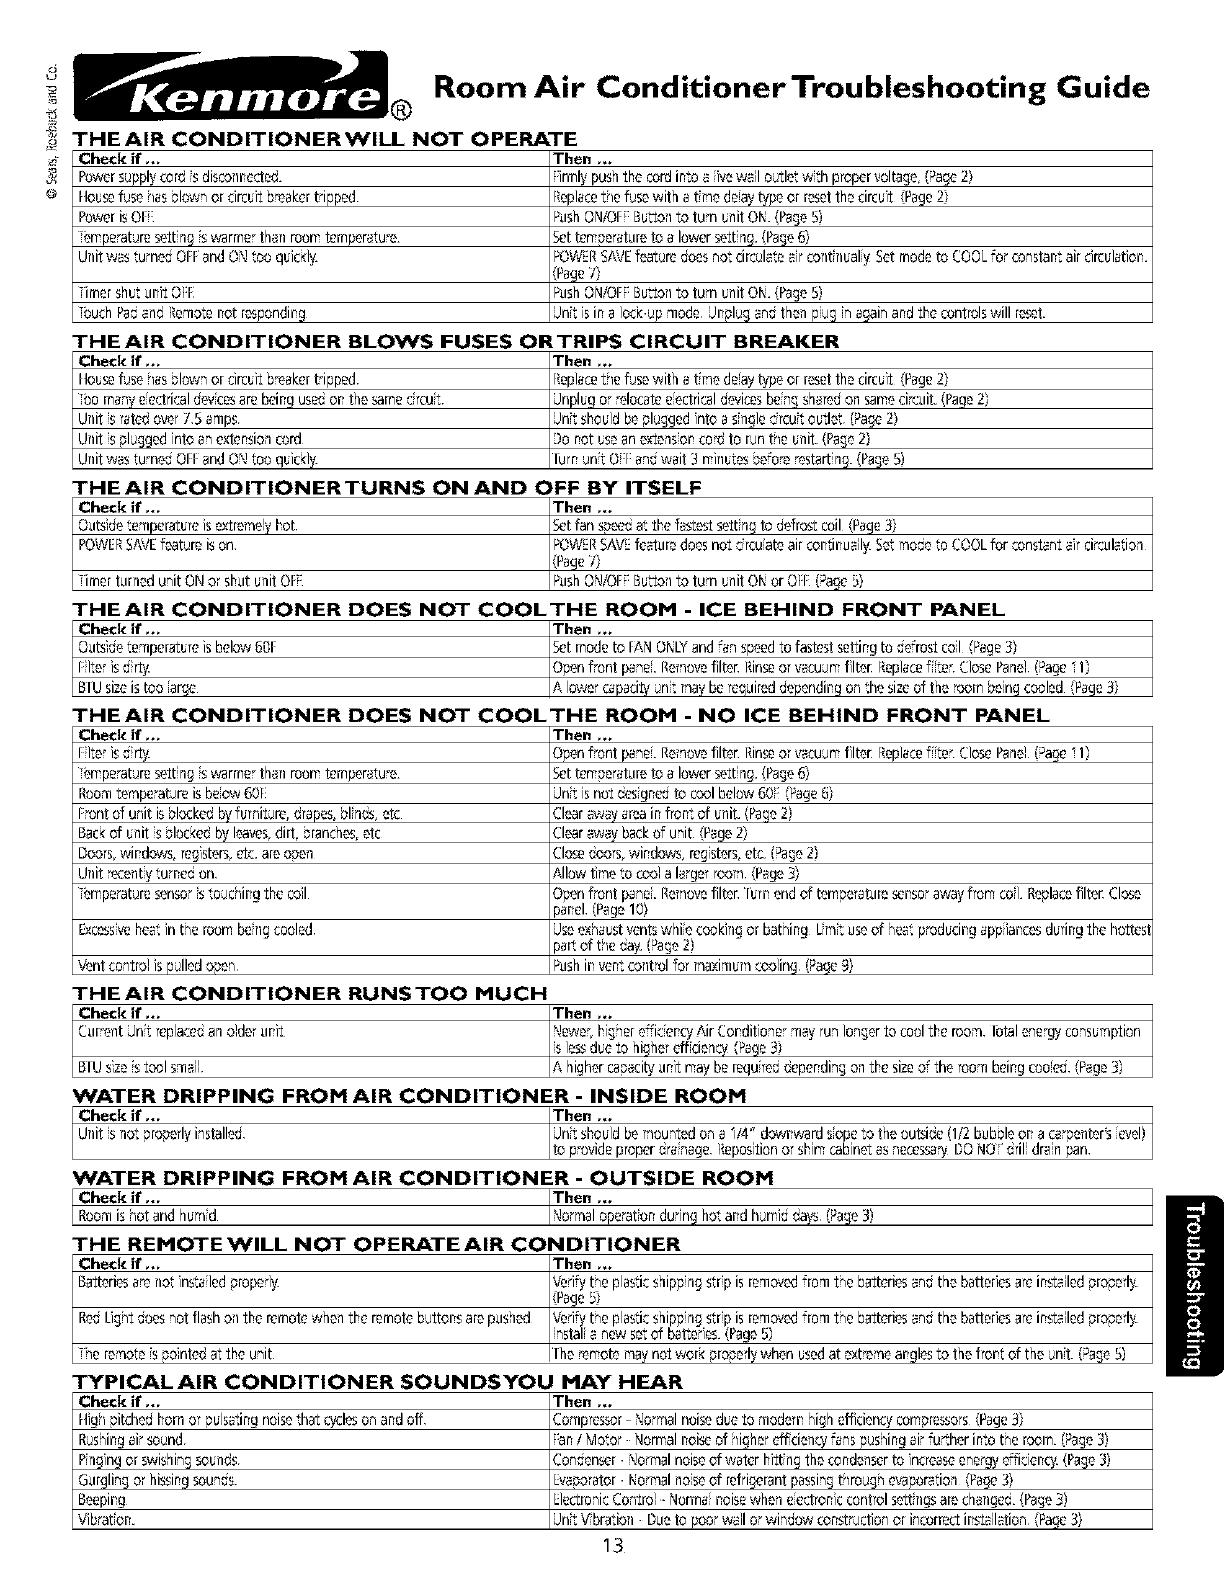
Room Air ConditionerTroubleshooting Guide
®
THE AIR CONDITIONERWlLL NOT OPERATE
Check if ..
Powessupplycore s diseonne_-led.
Ilousefuseirasblown or circuit b.eakertripped
PowesisOF
empe,aturosortng s warmerthen roomtemperetu,e.
Unitwas turned OH:andONtoo quickly.
imershut unit OPL
TbuchPadend Remotanot responding
Then ..
:irmly pushthecordinto eire well o,.Nle:wth propervoltage,Page2)
Replacetile fusewith atree deay type or r_et thecircuit (Page2)
PushON/OF:Burgh to turn unit ON. (Page5)
Settemperatureto a lewes_ettng.(Page6)
POWERSAVEfeaturedoesno_circuletaair centnual[ySetmodeto COOLfor constantaircirculation.
(Page/)
PushON/OF:Burgh to turn unit ON. (Page5)
Unt isina lock ,.Jpmode Unplugendthen p,.Jginagainandthe controlswill reset.
THE AIR CONDITIONER BLOWS FUSES ORTRIPS CIRCUIT BREAKER
Check if ..
Ilousefuseirasblown or circuit b,eakertripped
go manye[e_-lricaldaycesarebeing usedon thesameercut
Unit s ratedover75 amps
Unit s pDggedinto anextensioncord
Unitwas turned OH:andONtoo quickly.
THE AIR CONDITIONERTURNS ON AND (
Check if ...
Outsidetemperatureis_romelyhot
POWERSAVEfeature ison
;linerturned unit ONor shut unit OI
Then ,..
Replacetile fusewith atree delaytype or r_et thecircuit (Page2)
Unplugor ,elocatee[ectrisaldevicesbang sharedon sameci,cait. (Page2)
Unt shouldbe pluggedinto asngle ercut guile: Page 2)
9o not useanextenson ao'oto run tile unit.(Page2)
lurn unt O:Pandwait 3 minutesbe_o,e,estartng. (Page5)
IFF BY ITSELF
Then ...
Setfanspeedatthefes_ sortngto defros_coil (Page3)
POWERSAVEfeaturedoesnoterculateaircontinually.Se:modetoCOOLforconstantegci,caletion
(Page7)
PushON/OF:BUrghtoturnunitONorOff Page_,)
THEAIR CONDITIONER DOES NOT COOLTHE ROOM - ICE BEHIND FRONT PANEL
Check if ... _Then ...
OutsidetamperatuTeisbelow 501 Setmode to FANOND'and fan speedto fastestse_ingto defrostcoil (Page3)
Flier isdi%+ Openflont panel.Removefilter Rinseor vacuumfilte_ Replacefitar ClosePanel(Page11)
BIUsizeistoo large AIow_ capacityunt mayberequireddependingon theSizeof the roombeingcooled (Page3_
THEAIR CONDITIONER DOES NOT COOLTHE ROOM - NO ICE BEHIND FRONT PANEL
Check if ... Then ...
empe,at,.Jro5ettng s warmerthen roomtemperetu,e.
Roomtemperatureisbelow 6Of
Frontof unit isblockedbyfumit,.Jro,drapes,binds, eta
Backof unit s blockedby leaves,dirt, branches,eta
Doors,windo_6, registers,etc.areopen
Unit ,ecent[yturned on
empe,aturosensors touchingthe coil
Excessveheatinti_eroombengcooled
Vent control ispulledopen
Openfleet pane. Removefilter Rinseorveau,.Jmfilter Replacefta" ClosePanelPage 11)
Settemperatureto a lewes_ettng.(Page6)
Unt isnot desgnedto coolbelow6OF(Page5)
Clearawayareain front of unit.(Page2)
Clearawaybackof unit (Page2)
Closedoors,windo_, registers,etc. (_age2)
Allowtime to coo]a largerroom (Page3)
Openfront pane. Removefilter lure end of temperaturesensorawayfrom col Replacefilter Close
panel (Page10)
Useexiraustventswhilecookingor bati_ing Lint useof i_eetp,oducingappiancesduringthe hottes
pa_of tile da)+Page2)
Pushin ventcent,elfor ma×imumcooling Pageg)
THEAIR CONDITIONER RUNSTOO MUCH
Check if ... _Then ...
CurrentUnt replacedanolderunit _gher e=fieencyAir Conditionermayrun longerto coolthe room Iotalenerffyconsumption
_slessdue to higherelf cieoc_(Page3)
BIUsizes tool smell Ahighersa_ecibjunit ma_be requTeddependi% on the sizeof _heroombeing cooled (Page3s
WATER DRIPPING FROM AIR CONDITIONER - INSIDE ROOM
_Then ...
Unit :shot properlyinstalled Un': sfou dbe mountedon a 1/4" downwardsope to the outside(1[2bubbleon acarpenter%eJel)/
to p_ovideproper dranage Repositiooor shimcabinetas neaessa+iDONO drill dren pan |
WATER DRIPPING FROM AIR CONDITIONER - OUTSIDE ROOM
ThenThen...
operaton during hot andh,.Jmiddays(Page3)
Roomishot andhumd
THE REMOTE WILL NOT OPERATE AIR CONDITIONER
Check if ... Then ...
Batteriesarenot instaled properly. Ve,i=_t_e plasJeshippngs_rpis removedfrom t_e batteriesendth_ batteriesare inst+led_ro_erl_.
(Page5)
RedLightdoesnot flashon the remotewhenthe remotebuttonsarepushed Ve,i=_t_e plasJcshippngs_rpis removedfrom t_e batteriesendth_ batteriesare inst+led_ro+erl_.
nstalie new setof baEeries.(Page5)
he remotes pointedatthe unit Ih_ =emote maynot work _ro_erl_++henusedat_×t=emeanglesto th_ fron_of th_ unt. (i%e 5)
TYPICALAIR CONDITIONER SOUNDSYOU
Check if ...
Iligi_ pitchedhorn or pulsatingnoisethat cycleson andoff
Rushingairsound
Pngingor swishingsounds
Gurglingor hissingsounds.
Beeping
Vib,aton.
MAY HEAR
Then ...
Compressor +lormalnoisedueto moderniligh efficiencycompressors(Page3)
an / Me:or Normalnoiseof i_igherelf cieoc_fansp,._shingairfu_her into ti_eroom.Page 3)
Condenser Normalnoiseof water hitt ng thecondenserto increaseenerffye_fidenc_+(Page3)
Eveoorator Normalnoiseof [efrigerant passingtilrough evaporetion (Page3)
ElectronicControl Norma noisewhen e[e_-lroniccontrol_ettngsarechanged.(Page3)
Unt Vbration Dueto poorwell or window constructionor incorrectins_e]letion(Page3)
13
Warranty
WARRANTY
Full One-Year Warranty on Air Conditioner
For one year from date of purchase, when this air conditioner is operated and
maintained for normal room cooling according to instructions in this owner's
manual, Searswill repair it, free of charge, if defective in material or workmanship,
Full Five-Year Warranty on Sealed Refrigeration System
For five years from the date of purchase, when this air conditioner isoperated and
maintained for normal room cooling according to instructions in this owner's
manual, Searswill repair the sealed refrigeration system (consisting of refrigerant,
connecting tubing, and compressor), free of charge, if defective in material or
workmanship.
Warranty Service
Warranty service is available by contacting the nearest service center in the United
States,
Thiswarranty givesyou specificlegalrights, and you may haveother rightswhich varyfrom
stateto state
SEARS, ROEBUCK and CO. Dept. 817WA, Hoffman Estates, IL 60179
Sears Service
Maintenance Agreement
"We Service What We Sell" is our assurance you can depend on Searsfor service.
Your air conditioner hasadded value when you consider that Searshas service units
nationwide, staffed with professional technicians trained on all appliances Sears
sells.They have the knowledge and skills, tools, parts, and equipment to insure our
pledge to you that "We Service What We Sell."
Sears Maintenance Agreement
Maintain the value of your air conditioner with a SearsMaintenance Agreement.
Sears air conditioners are designed, manufactured, and tested for years of
dependable operation. Yet, any modern appliance may require service from time to
time. The SearsMaintenance Agreement offers you an outstanding service program
for your air conditioner.
/
The Sears Maintenance Agreement
= Is your way to buy tomorrow's service at today's price.
Eliminates repair bills resulting from normal use.
Allows for as many service calls as required.
Provides an annual Preventive Maintenance Check at your request to keep your
Air Conditioner in proper running condition.
For more information, call 1-800-827-6655
14
  • Page 1 1
  • Page 2 2
  • Page 3 3
  • Page 4 4
  • Page 5 5
  • Page 6 6
  • Page 7 7
  • Page 8 8
  • Page 9 9
  • Page 10 10
  • Page 11 11
  • Page 12 12
  • Page 13 13
  • Page 14 14

Ask a question and I''ll find the answer in the document

Finding information in a document is now easier with AI